Hi all! The topic of our conversation today will be the answer to the question of how to check the expansion tank cap with your own hands. Although some people do this with their mouth, I still do not recommend experimenting with your own health. There are much simpler and safer ways.
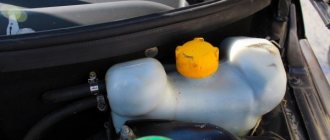
As you know, the expansion tank serves to store coolant. Just not to be confused with the anti-freeze tank, which is used as part of the windshield washer system. Without antifreeze or coolant (coolant), your internal combustion engine will not last long.
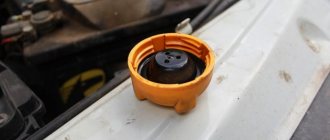
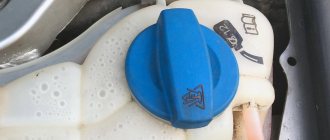
It is on this tank that there is a special lid. It would be more correct to call it a valve cover. The device seems simple, but in fact the lid bears a lot of responsibility.
Cover tasks
The serviceability of the valve cover from the expansion tank directly affects the performance of the entire cooling system of the power unit.
During operation, the engine heats up, which is quite natural and understandable to everyone. When the engine heats up, antifreeze takes away some of this heat so that the internal combustion engine does not overheat. When the coolant itself heats up, it increases in volume, that is, it expands, and at the same time the internal pressure in the system increases. The hotter the engine, the higher the pressure in the cooling system. In order to avoid ruptures of the pipes and the tank itself, the radiator and other components through which antifreeze or antifreeze passes, a valve cover is used.
It is very important not only to tighten the plug correctly, but also to periodically check its functionality. If repairs or replacements are required, they are carried out at the first sign of problems.
The lid serves not only as protection against overpressure. The design provides two valves, or one, but combining both functions. One valve serves to relieve excess pressure, and the other to inject it.
For the motor to work correctly, it must be maintained at operating temperature. Typically it is in the range from 95 to 120 degrees. Depends on the design features of the engine itself. At these temperatures, the expansion of the coolant occurs by approximately 20-30%. This leads to excess pressure. And normal pressure is considered to be 1.1-1.5 atmospheres. The valve cap of the expansion tank, if necessary, removes excess pressure from the system, or pumps it in so that a vacuum does not form inside, the pipes do not compress and the hoses do not stop circulating antifreeze.
If the plug is working correctly, the engine will operate at optimal temperature and normal operating pressure. If not, the consequences of a malfunction can be disastrous for the internal combustion engine. And the culprit is the usual lid.
Expansion tank repair
If small cracks and chips are found, the standard seal dries out, or the lid becomes loose, the tank may need to be repaired.
Repairing cracks
Cracks in the expansion tank usually appear as a result of mechanical damage. When using the machine intensively, this is not surprising, since the plastic tank is not very durable.
A crack in the expansion tank may appear as a result of mechanical damage
Typically, cracks occur due to poor quality plastic. Therefore, when choosing a new tank, you should pay attention to the quality of the material from which the RB is made and avoid cheap Chinese products. The appearance of cracks is caused by insufficient thickness of the tank body, aggravated by boiling coolant. Due to temperature differences, plastic is constantly subjected to mechanical deformation, which, in turn, leads to a decrease in the resource life of the RB.
It is usually impossible to properly seal a crack using generally accepted methods. The inertness of the material from which the tank is made does not allow the adhesive to provide a strong connection. Therefore, to eliminate cracks, use:
- soldering using metal mesh;
- filling with epoxy resin, cold welding or special sealant.
Using epoxy or cold welding to repair cracks will only help in the short term. However, this is enough to get to the garage or car service center.
For soldering you will need a powerful (at least 40 W) soldering iron with a flat tip. The process looks like this.
- Using a regular napkin, the body of the tank is cleaned of residual coolant.
- The work area is degreased with acetone or solvent and dried.
- Depending on the size of the crack, a strip-shaped patch is cut from a brass mesh. In any case, its width should not be less than 10 mm.
To seal the crack, a strip is cut from brass mesh
- The patch is applied to the crack.
- Along each edge of the crack, the patch is soldered evenly in several approaches. The crack must be completely covered with a reinforced layer formed by an alloy of plastic and metal.
The crack must be completely covered with a reinforced layer
- The seam formed during soldering is ground.
- The soldering area is puttied, primed and painted to match the color of the tank.
When sealing cracks, a red polyadhesive is usually used as a sealant, designed specifically for plastic and resistant to oily liquids. Before applying the sealant, the working surface is prepared in the same way - cleaned, washed, dried and degreased.
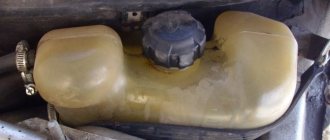
Repair of a plastic radiator tank
The upper part (tank) of the radiator is made of plastic. As a result of mechanical stress, cracks and chips may form on it, from which coolant will leak. This may cause air to enter the cooling system. Such damage can be eliminated, as in the case of RB, by soldering, but cold welding is more often used. In this case, it will provide a stronger connection than on the RB, since the OD pressure in the radiator tank is much lower. You should purchase a composition designed specifically for repairing gas tanks and radiators.
The plastic radiator tank can also leak antifreeze.
Cracks are sealed using the following algorithm.
- The radiator is removed from the car.
- The radiator is cleaned and washed inside and out. You can use a large bath-type container and washing powder.
- Having straightened the antennae, the upper part is removed from the radiator. The rubber gasket, if it is in good condition, can be left.
- The crack along its entire length is cleaned with a flat-blade screwdriver. If the hole is large, but hidden by plastic layers, this will show the entire damaged area.
- The work area is cleaned and degreased.
- The damaged area is filled with cold welding from the outside and sealant from the inside.
When eliminating cracks in the radiator tank, cold welding is used
- The tank dries within 24 hours.
Before installation, it is recommended to check the tank for leaks in a container of water . It is immersed in water and inflated with air. The appearance of bubbles will indicate that the work was done poorly. You will have to redo it or use other repair methods. In extreme cases, the tank can be replaced.
Repair of expansion tank cap
If the tank does not hold increased pressure, the reason for this is not the valve, but the cap spring. Experts recommend carefully disassembling the cover, shortening the spring by one turn, reassembling it and checking it in operating mode.
Some lid models may have two springs - a short and a long one. In this case, the large spring is first cut off by one turn and the cover is checked. If this does not help, the small spring is shortened by two turns and the test is repeated.
The design of some RB covers assumes the presence of two springs
Towbar for Mazda CX 5: which one to choose, installation nuances
- Lada Kalina;
- Ford Focus;
- Gazelle Next;
- Daewoo Lanos;
- Volkswagen Passat;
- Lada Priora;
- VAZ 2110;
- Renault Logan;
- Opel Astra;
- VAZ 2114;
- Chevrolet Lacetti, etc.
You already understand that the cap serves not only to prevent coolant from pouring out of the tank. This is also a pressure regulator in the system.
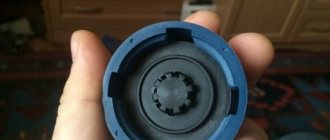
A valve is hidden inside the lid, usually made of plastic. It is he who takes on such responsibility. The valve is immersed inside the expansion tank and, as necessary, pumps or releases excess pressure.
Before buying a new element, if you suspect the old one is broken, you can check it. A similar type of locking mechanism should be selected.
Please note that all modern foreign cars, in the vast majority of cases, have switched to single-valve caps for expansion tanks. That is, only one valve design is physically present. It just can perform two functions at once. While on domestic cars you can still find a pair of valves. Each of them is responsible for performing a corresponding function. Whether this is good or bad is difficult to judge. But the fact remains a fact.
The lid is activated only when an excess or deficit of pressure is detected in the system. Each car has its own temperature and pressure standards for the element to operate.
More serious consequences
- Rupture of low-quality pipes or those that have not been replaced for a long time
- A leak in the main or heating radiator
- Bursts the thermostat housing in some cars
- Broken expansion tank.
The worst consequence will be burnout of the gasket between the cylinder block and the cylinder head. This happens very often and can lead to engine damage.
In most cases, the situation is this: your coolant has boiled. You noticed this on the dashboard and instead of stopping, you decided to go straight to a car service center or garage to fix the problem.
Under no circumstances should you do this! If you see that your temperature has gone beyond the permissible limits, stop immediately and wait until the engine cools down. After this, drive further until the next heating up to operating temperature, after which you also stop and wait.
Expedition trailers: official website, products, owner reviews
- Thick white smoke is pouring out from under the hood;
- the engine overheats, but the stove remains cold;
- breaks the clamps;
- breaks the cooling system pipes;
- the radiator seal is broken;
- ruptures the coolant reservoir;
- the tubes are compressed and do not allow coolant to pass through;
- the circulation of antifreeze through the system is disrupted, etc.
Smoke usually appears when the pressure exceeds the permissible values. But overheating with a cold heater indicates precisely a lack of pressure in the system. Here it will be useful to remind you of the material devoted to eliminating an airlock. I'll leave a link to it. Go ahead and read.
Main malfunctions of the expansion tank
During engine operation, the coolant heats up and expands. The resulting excess coolant is removed from the system through the radiator safety valve. At the same time, antifreeze itself has increased resistance to thermal expansion compared to water. After stopping the engine, the coolant gradually cools down with a decrease in volume, and the pressure in the system drops. If the tightness of the expansion tank (RB) is broken, air begins to flow into the radiator, reducing the quality of engine cooling and increasing the risk of overheating.
Antifreeze has increased resistance to thermal expansion
On the other hand, RB is quite rarely the cause of incorrect operation of the cooling system. The main reasons for its failure:
- tank cap malfunction;
- valve sticking and wear;
- deformation of the rubber seal due to wear;
- mechanical damage and wear of the RB itself.
In any of these situations, air pockets may form in the system, leading to a critical increase in pressure and rupture of the tank itself.
Diagnosis of expansion tank faults
The most obvious symptoms of RB failure are the following situations.
- While driving, thick clouds of steam appear from under the hood due to coolant entering the hot intake manifold. The engine temperature is normal. The reason for this is a malfunction of the intake valve, as a result of which excess antifreeze leaves the system prematurely.
- Cold air enters the cabin from the heater at elevated engine temperatures. This situation occurs when air pockets form due to a faulty pressure valve.
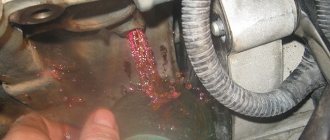
- Traces of coolant appear at the junctions of the hoses and pipes with the tank. The reason for this is the rupture of connecting clamps, tubes, hoses or the radiator itself due to increased pressure or wear.
We recommend: Checking and adjusting the parking brake
Diagnostics of RB comes down to two stages - checking the pressure and searching for mechanical damage.
Pressure check
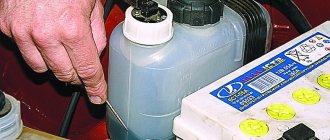
First check the pressure in the cap. The malfunction of the lid only appears at increased pressure, which is quite difficult to create artificially. In car services, they use a special pump for this, with which they check whether the valve operates or not.
Checking the pressure in the reservoir cap is quite difficult
Without such a pump, the cover is diagnosed as follows.
- With the engine warm and running, carefully unscrew the RB cover by hand. If a hissing sound appears, indicating the presence of pressure in the system, the cover is operational.
- Tubes and hoses are inspected. If they are compressed, then either the lid does not hold pressure, or it is too low.
You can also use the old grandfather's method. However, to implement it, there must be sufficient free space under the hood to squeeze the main supply hose with one hand and unscrew the cap with the other. The cap is then screwed into place and the hose is released. If the hose returns to its original shape, the cap valve is operating normally. This is not always feasible due to the fullness of the engine compartment in modern cars.
Many people use a pump with a pressure gauge and an additional tank. In this case, more accurate results are obtained. The procedure is as follows.
- The pump hose is connected to one of the fittings of the additional empty RB and secured with a clamp.
- All other RB pipes are closed with plugs.
- The cap being tested is screwed onto the additional tank.
- The pump forces air into the tank. At the same time, monitor the pressure gauge readings. At a certain moment you will hear a click, and after a while - a whistle of air escaping through the plug. If at this moment the pressure gauge shows 1.1–1.5 kgf/cm2, and further injection of air only increases the sound at a constant pressure, the lid is in good condition.
Such a check is also possible on a working tank, without draining the antifreeze. The steam discharge tube is disconnected from the RB and closed with a plug, and the pump hose is connected in its place.
A pump with a pressure gauge is used to check the antifreeze pressure
Checking mechanical damage
When looking for mechanical damage, first of all, on a cold engine, you need to remove and carefully inspect the RB cover for the appearance of cracks, chips, ruptures of the sealing lips and other mechanical damage. Then you should evaluate the condition of the body of the tank itself, having first cleaned it of dirt, scale and rust.
The valve does not open
The coolant temperature depends on the engine operating mode. The cooling system is completely sealed. High pressure is created inside it, leading to the expansion of all elements to a certain level. A valve is provided to relieve pressure in the system. In addition, the valve sucks air into the system when the engine has cooled down. This is necessary due to the risk of decompensation with a sharp decrease in pressure. There must be enough air to balance the internal atmosphere of the system.
Valves in a modern car play an extremely important role. Therefore, it is necessary to periodically check their condition. The valve can rust, clog, wear out and simply collapse. All this will not allow the system to function normally. The risk of depressurization and air locks will increase. As a result, small components and parts of the system may fail and, as a result, the engine will overheat. The main sign of valve failure is a non-functioning stove.
RB cover valves are important elements of the cooling system
All this is possible even if the valve is working but clogged. An increase in coolant pressure can lead to rupture of the reservoir and hoses. As a result, the engine will boil, hot antifreeze will flood the entire engine compartment, etc. Therefore, it is extremely important to monitor the serviceability of the valve. To check its functionality, press it with your finger and at the same time bring your ear to the lid. When you press the valve, you should hear a hissing sound, and when you release it, you should hear a suction sound.
Oil in expansion tank
Oil may get into the RB. This problem is especially relevant for American cars, but sometimes occurs on domestic ones as well. Oil is usually detected only when checking the coolant level in the form of oil traces on the inner surface of the tank neck. In addition, the color, consistency and smell of antifreeze changes.
Oil in antifreeze is an extremely annoying signal for the car owner
Oil and coolant circulate through different sealed circuits that are closed from each other. Therefore, oil getting into the tank is a rather unpleasant signal, indicating a leak. The reason for this most often is:
- wear of the radiator or oil cooler;
- wear of the heat exchanger cuff;
- Damage to the cylinder head gasket.
A heat exchanger or oil cooler is installed on a number of powerful automobile engines to cool the lubricant.
It is at these three points that there is a risk of coolant and oil coming into contact. Thus, in a heat exchanger, the possibility of their contact is explained by the purpose of the device itself. Another common reason for mixing antifreeze with oil can be the chemical composition of the coolant. If the tank is filled with antifreeze with various additives, the structure of which is incompatible with the structure of the oil, the liquids may react, leading to their mixing.
Oil getting into antifreeze is determined by the following signs.
- Traces of oil appear in the antifreeze that is drained completely. Since oil has a different consistency from antifreeze, their complete mixing is excluded. The remaining coolant that is drained will be darker in color. In addition, the antifreeze will become thicker and will have difficulty flowing out of the tank.
- The coolant will become flammable. To detect this, wet a paper napkin with antifreeze and set it on fire at a sufficient distance from the car.
- The oil filter will become clogged. Solid deposits that have not passed through the filter mesh will appear inside. The filter will quickly become dirty and the oil will circulate more slowly through the system.
It is noteworthy that not only does the oil enter the tank, but, on the contrary, the remaining antifreeze flows into the crankcase. Antifreeze deteriorates the quality of the lubricant, and when it gets into the engine, it accelerates the corrosion process.
A big problem that motorists face is coolant leakage. This is especially true during the cold season. Often the level of antifreeze in the tank decreases, and no visible causes of the leak can be detected. In this case, you should check the oil for coolant penetration. If light traces of foam are found on the lubricant level dipstick, it means there is antifreeze in the oil. If, on the contrary, traces of oil are found in the coolant, it may boil.
We recommend: Replacing valve guides on VAZ 2106 and 2109 cars
If a problem is detected on cars with an oil cooler, first replace the heat exchanger gasket. The order of further actions is as follows.
- The entire cooling system through which antifreeze circulates is washed with a special solution. The solution is sold in specialized stores and is poured into the tank along with the coolant. Then the engine starts and runs for 5–10 minutes. This is enough for the motor to reach operating temperature. Flushing stops when the cooling fan turns on.
- Antifreeze is completely drained from the cooling system. The drain plug is unscrewed and all the coolant flows out of the system into a specially prepared container.
Antifreeze is completely drained from the cooling system into a specially prepared container.
- According to the algorithm specified in the car's operating manual, the oil cooler is dismantled.
- The oil cooler is disassembled, thoroughly washed, cleaned and dried. All worn gaskets are replaced.
When disassembling the oil cooler, all gaskets are replaced
- The RB is removed, washed and cleaned. If cracks or chips are found, the tank is replaced with a new one.
- The oil cooler and reservoir are installed in their places. To flush the cooling system, distilled water is poured into the RB and the engine is started.
The cooling system is flushed with distilled water.
- To reach operating temperature faster, the heater is turned off, but all other energy consumers in the cabin are turned on. When the engine warms up, on the contrary, the interior heater turns on and other devices turn off. The motor must run for at least 10 minutes. After this, after waiting for the cooling system fan to operate, at the moment the latter is turned off, the engine is also turned off. After 20 minutes, the waste water is drained.
The tank is filled with new coolant recommended by the car manufacturer. Then the air that entered the cooling system during flushing is removed. An assistant will be needed for this. The procedure is as follows.
- The driver gets behind the wheel, starts the engine and presses the accelerator pedal 3-4 times.
- At this time, the assistant, with the RB closed, compresses the cooling system pipe.
- The tank lid opens, releasing excess air.
This procedure should be done several times.
Refinement of a new part - what to do if it does not function?
When it turns out that the lid stubbornly refuses to relieve excess pressure and/or is not able to restore air losses in the SOD, it can be modified. For some reason, the most complaints come from owners of VAZ, model 2109, including those who buy new plugs. It is clear that the reason for the incorrect operation of the cover valves lies in the too much rigidity of their springs.
To modify the cover, for example, for a VAZ 2109, it must first be disassembled. This must be done carefully, using pliers and a thin flat-blade screwdriver. We must try to remember where everything stood so that the springs do not fly away to God knows where. After the lid for the VAZ 2109 tank has been disassembled, it’s time for the wire cutters. They need to shorten the springs: the large one, for the safety valve, usually by 1 turn, and the small one by 2.
Shortening the plug spring
For the second, the length of the removed segment is not critical - as long as it generally supports the vacuum valve when it is closed and does not resist the external air pressure of 0.03–0.1 kgf/cm 2 . With a large spring it is more difficult - as if not to overdo it. You need to look at its rigidity and the pressure at which the safety valve opened when checking the tank cap of the VAZ 2109. After shortening the springs, we assemble the cap in the reverse order. Before use, it is advisable to check again how it works.