Replacing valve seals VAZ 2108-09-099.
After being parked for a long time, blue smoke appeared on cold start-up, not critical, but not pleasant either.
Compression measurements showed excellent results, so it was decided to start with the seals. The nearest spare parts store, and we are at a friend's service center. If you have the tools and experience, the task is not difficult, but it is responsible. The tools needed were: - a set of keys - a valve depressurizer - a mandrel for pressing in oil seals - a set of washers for adjusting the thermal clearances of the valves and an auxiliary tool - a set of feeler gauges.
All repairs I recommend carrying out work on the REMOVED “negative” terminal of the battery. It all started with the removal of pipes, cables and everything that got in the way. Then remove the gear from the camshaft. It is necessary to remove the cylinder head cover. Cars of the VAZ 2108 and 2109 models with an automatic injection system do not have a mechanical fuel pump and distributor, and accordingly there are no wires for them. The rear cylinder head cover is installed in its place. In order to remove this rear cover of the cylinder head, it is necessary to unscrew the two nuts securing the ground wires and remove the wire ends from the studs. Then unscrew the two nuts and three bolts securing the rear cylinder head cover. Please note that the O-ring is installed under the bolt head. Remove the back cover from the block head. Evenly unscrew the four front housing nuts and the six rear camshaft bearing housing mounting nuts and remove the washers. Then you need to remove both housings. If the key does not fit tightly in the groove of the camshaft, remove the key so as not to lose it. Remove the camshaft from the cylinder head. Remove the oil seal from the camshaft. Rotate the camshaft so that the piston, which corresponds to the valve seals being replaced, is in the top dead center position. After unscrewing the spark plug from the cylinder head, insert a tin rod between the valve and the piston through the hole for the spark plug (to prevent the valve from falling down). Then it is necessary to install devices for compressing the valves. In this process, it is necessary to use a nut without a serrated shoulder. Compress the valve springs using this tool. Then you need to remove the two valve crackers using tweezers. Then the device must be removed. Remove the upper valve spring retainer and the outer and inner valve springs. It is necessary to press the valve stem seal together with the valve guide. Before you begin installing new valve seals, it is recommended to remove the springs from the oil seals, otherwise the oil seals may be damaged when they pass under the cracks through the grooves on the valves.
It is also necessary to dip the valve stem seal in engine oil and only then insert it into the frame. Carefully press the valve seal into the lower plate until it stops. If you removed the spring, then a spring is required for the oil seal. Replace the remaining valve seals using the same method.
Reinstall the valve plate and springs in the reverse order of removal. Using the tool, install the crackers so that the crackers fit into the groove of the valve stem. Remove the tin rod from the candle hole. After installing the crackers, hit the ends of the valves through a metal rod with a hammer so that the crackers sit in place. Lubricate the adjusting washers and camshaft supports in the cylinder head with engine oil. Install the camshaft into the cylinder head supports so that the cams of the first cylinder are directed away from the valve pushers. Lubricate the camshaft journal cams with engine oil. Apply sealant to the cylinder head in the area of the outer camshaft supports. Reinstall the camshaft bearing housing, put washers on the studs and tighten the fastening nuts in two stages: you need to tighten the nuts until the surface of the block head touches the bearing housings, while making sure that the guide bushings fit into the holes of the bearing housings; then finally tighten the nuts in the specified sequence. The camshaft seal must then be installed. Measure the gaps in the valve drive and, if necessary, adjust them. Next, you should install all the parts in place, connect the wires and hoses in the reverse order of removal. The work is labor-intensive; before you start doing it, I strongly recommend that you think about it, is it worth it?!
Choice of caps
First you need to choose the right material. Until the mid-90s, domestic cars used products from the Kursk plant. The main problem was that the rubber was manufactured at temperatures up to 1500 degrees Celsius, and the temperature in the working area reached 1800 degrees. With the advent of Porsche technology in domestic car production, the production of hubcaps developed. The use of fluorine rubber has had excellent results.
Today, popular companies for the production of valve stem seals are:
- Goetze;
- Erling;
- Reinz;
- Payen;
In some stores you can find domestically produced caps, but this rarely happens. Consult your dealer when selecting parts. After purchasing, you need to prepare your workplace and tools.
VAZ 2108 and VAZ 2109: replacement of valve seals. DIY Repair Guide
Replacing valve seals on a VAZ 2109 and replacing valve seals on a VAZ 2108 is, in fact, the same work process and completely identical, since the engines on these VAZ models are the same. As a rule, blue smoke is not a good sign, the appearance of which means that engine repair is necessary. The job of valve seals, in general, is to remove excess oil that gets onto the valve stem. They remove excess oil, not all of it; the remaining small amount of oil should lubricate the valve with the bushing. You can study the operation of valve seals in more detail using special videos and photos.
Possible faults
There is no need to immediately panic and take your car to a car repair shop to have your engine overhauled:
- This can be caused not only by worn-out oil scraper or compression rings, but also by deteriorated valve seals, which allow oil to pass through the valve stems and oil gets into the combustion chambers.
- And in this case, you just need to replace the valve seals on the VAZ 2109.
- Replacing oil seals can be done with your own hands.
- In this process, you don’t even need to remove the cylinder head - everything is done on site.
- Replacing a VAZ 2108 valve seal is a simple procedure that does not require the skills of a car mechanic or special tools.
- And if you know the engine structure, then replacing the valve stem seals will not be difficult for you.
- And the price of the issue is many times less than a major engine overhaul.
What are the caps made of?
Let's look at what they are made of:
- On early VAZ cars, valve stem seals were made without reinforcement, the material for them was fluoroplastic
- Now the caps are made of rubber; its edge is pressed against the valve stem by a steel bushing. This reduces the risk of misalignment in the assembly during engine operation.
- The use of fluorine rubber and acrylate as materials in modern conditions increases the vehicle mileage to 150 thousand kilometers
How to replace valve seals on a VAZ-2109
Valve seals are needed to remove excess oil, which could otherwise lead to poor performance of the entire engine. The first sign that they need to be replaced is a distinct bluish tint to the exhaust gases.
In this article we will tell you how to replace valve seals on a VAZ-2109 (carburetor and injector).
When do you need to change seals?
The fact that they have fallen into disrepair is evidenced by:
- high oil consumption, with no signs of leakage;
- increased fuel consumption;
- traces of grease on the spark plug contacts.
Moreover, the last point is the most reliable evidence of oil seal failure for the simple reason that there is simply nowhere else for the oil to appear.
Regardless of whether you have an injector or a carburetor in your car, the seals are changed in the same way. The only thing that owners of the latter should know is that before starting work you will need to first dismantle:
- gasoline pump;
- Air filter;
- generator drive housing;
- distributor.
What to prepare for work
The replacement itself is not very difficult and any car owner can do it if he has the desire, time and effort.
To do this you will need to prepare the following tools:
- ratchet wrench with a set of removable heads;
- flat screwdriver;
- a special puller (if you don’t have one, borrow one or buy one - it’s inexpensive and will last for many years);
- desiccant (another specific tool without which the work cannot be completed);
- pliers;
- tin rod 0.8 centimeters thick;
- tweezers;
- new seals.
First of all, the car electrical network is de-energized by disconnecting the negative wire from the battery - this precaution will avoid a short circuit, the probability of which is very high during such repairs.
- remove the gear from the camshaft (to avoid losing it, pull out the key located in the groove);
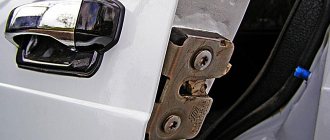
- unscrew the bolts and remove the protective cover from the cylinder head;
- remove ground and other wiring from the cylinder block, dismantle the rear panel;
- remove the camshaft bearings, remove the assembly itself and the gasket from the cylinder head.
Next, you will need to rotate the freed shaft so that the desired piston rises to the maximum. After this, the spark plug is unscrewed and a tin rod is inserted into its socket so that it is exactly between the piston and the valve. If this is not done, then the latter may fail.
After this, the springs are compressed using a special device and the “crackers” (2 pieces) are pulled out with tweezers.
Following this, the springs themselves are removed along with the “plate”.
The valve remover is installed directly onto the cap using a collet. It is removed with a sharp blow to the striker. Pressing the new oil seal is also done with this device, but it will be necessary to hit it not on the bushing, but on the handle.
In the absence of a special remover, you can remove worn-out caps with pliers, but this is a more labor-intensive process. The main thing here is to pull the oil seal strictly vertically and not make rotational movements, otherwise there is a risk of damaging the bushings.
Make sure that the new cap is firmly in place, otherwise the replacement will have no effect.
Useful tips
- There are additives for restoring seals. When you are tempted to use one of them instead of changing the caps, remember that there are no miracles in the operation of the internal combustion engine and natural wear and tear. These additives soften hardened rubber and supposedly restore the quality of the seals. Experience shows that these additives either have no effect on the rubber, or soften it too much, and as a result, the size of the working edge increases, and oil consumption after using the additive increases significantly. So you better think about how to change the valve stem seals. How much it will cost you depends on the type of internal combustion engine. But you will definitely be sure that the caps perform their function. Additives, alas, cannot guarantee you such an effect. You should not try such additives on your car.
- If you haven't found a device with a collet clamp for removing caps, but that hasn't stopped you. Remember that the landing step under the cap has a wall thickness of just over a millimeter and is very fragile, and when you try to remove the cap with pliers, this part of the valve guide is broken very often, and the repairs that are necessary after this (replacing the guide, milling the seat and lapping the valve) are much more expensive more expensive than replacing caps and related devices.
Replacing valve seals VAZ-2108-099
The next step is to rotate the crankshaft to match the marks on the gears and remove the timing belt. The crankshaft can, of course, be turned through the camshaft gear mounting bolt, but I advise turning it by the generator pulley mounting bolt, so as not to grind off the edges on the camshaft bolt. When the marks are set, use a 17 key to loosen the tension roller and remove the belt. To unscrew the camshaft gear, to the left of it you can see a pin on which we put a small tube through the holes in the gear so that it does not turn. And with the same key we unscrew the bolt and carefully remove the gear so that the key is not lost. Although it often fits well in place, it still happens when it falls out, so it is better to remove it and put it separately.
In the place where the tube was put to stop the gear, there is a bolt that needs to be unscrewed and the metal timing protection slightly bent so that the camshaft can be pulled out.
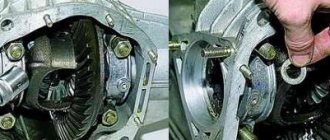
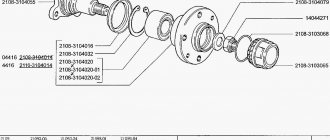
Using a 10mm socket or open-end wrench, unscrew the bolts securing the camshaft bearing caps, and then remove the camshaft itself. When removing the camshaft, try not to damage the oil seal, but the best thing to do is simply replace it with a new one.
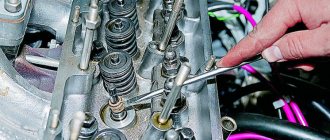
Using a regular syringe, you should pump out the remaining oil and unscrew the spark plugs. Since the crankshaft is aligned according to the marks, the pistons in the first and fourth cylinders are at top dead center, so you need to start replacing the oil seals from the first cylinder, and then from the fourth, so as not to get confused. And then it will be possible to make another revolution of the crankshaft, during which the pistons in the second and third cylinders will simultaneously be at TDC and replace the seals in them. To begin with, the pushers are removed from the intake and exhaust valves and, using a special device for depressuring the valves, the intake and exhaust valves of the first cylinder are decompressed.
To do this, the device is installed on the cylinder head, a special heel rests against the spring, using a handle, the spring is pressed and the crackers are removed with tweezers. The springs with crackers are removed, and most importantly, during assembly, do not confuse the springs, crackers and pushers; for convenience, arrange them on the table in the order of disassembly.
When you get to the oil seal itself, use a puller to press it out, or if there is no puller, you can do this with suitable pliers. Just do this carefully so as not to leave burrs on the valve stem, otherwise even with a new oil seal, oil will leak.
All that remains is to put on the new oil seal and, using a mandrel in the form of a metal tube suitable for the diameter of the oil seal, press it into place with a hammer. By tapping the mandrel with a hammer, the oil seal will shrink and the sound will become duller, as evidenced by the fact that the oil seal is pressed in completely. The main thing is not to overdo it, so as not to spoil it, and during pressing, make sure that the oil seal is not distorted.
Next, rotate the crankshaft so that the pistons in the second and third cylinders are at TDC and replace the seals in the same way. Before assembly, screw the spark plugs into place to prevent debris from getting into the cylinders, and clean the seat of the valve cover and accessory drive housing from any remaining old sealant. I recommend replacing the camshaft oil seal and gaskets under the valve cover and the housing of auxiliary units with new ones, after first applying sealant to their seats. Upon completion of work, assembly is carried out in the reverse order of removal.
vote
Article rating
What will you need?
Replacing valve stem seals can be done in two ways. The first is performed with the removal of the cylinder head, and the second without removal. We will consider the second method, since it is much simpler and does not require disassembling or removing the engine. For this you will need:
- Set of tools. Wrenches, sockets, ratchets, etc.
- A device for loosening valves, a soft metal rod, a cap remover, and if it is not available, two flat-head screwdrivers or pliers. In addition, you will need a set of new caps.
- Tweezers and rags.
- Hammer.
Why do they need to be replaced?
The reason for removing them and installing new parts can only be wear on the valve seal lip, which compresses the valve stem. While the engine is running, they perform a huge amount of work and are exposed to high temperatures and aggressive environments. This cannot but affect their strength and durability. Most of these spare parts are based on rubber, which, under the influence of all these negative factors, begins to harden, the working edges begin to crack and wear out.
This leads to a gap for engine oil to penetrate into the working chamber, a “dirty” exhaust appears and increases the consumption of lubricants. Do not be afraid that replacement will be very frequent; manufacturers have learned to produce good products with a service life of 100,000 km or even more. But, unfortunately, there are many more such cars that are replaced more often than usual.
Symptoms of a problem
If the valves have not been adjusted properly, a characteristic clattering sound appears when the engine starts. This rather loud noise comes from under the block cover. You can hear it especially well when the speed increases.
If the valve clearance is significantly larger than specified, the loud clatter becomes more distinct, and noise appears even at low engine speeds.
Adjustment
To adjust the gap, you must use the appropriate shims. They are installed on top of the valve tappets.
If you choose the right shim using trial and error, you can return the clearance to optimal values, thereby restoring normal engine operation.
There are certain standards regarding clearance sizes depending on the valve.
Valve type
Normal clearance
Tolerance
Adjustment process
Adjusting the gaps yourself is not difficult. Just follow the instructions provided, as well as video tips and visual demonstrations of the process.
- Remove the unit cover and clean the surfaces with a clean rag. You need to remove traces of engine oil.
- Place a device for recessing the valve tappets on the cover fastener studs. This is the most common lever with a handle.
- Set the piston of the first cylinder to the TDC position - top dead center. To do this, remove the camshaft drive belt cover and rotate the crankshaft as it rotates. The marks on the camshaft drive gear and the rear gear cover must match. If you remove a couple of spark plugs, it will be easier to turn the crankshaft.
- After aligning the marks, the crankshaft rotates about another 50 degrees, no more. This will allow you to unscrew the camshaft cam from the valve lifters.
- Using a feeler gauge, check the condition of the gaps on valves 1-3 and 5. If the gap differs from the required one, return the required parameters by replacing the adjusting washers.
- To adjust the clearances, the pushrods are recessed a little so that you can release the shims. The pushers are recessed by pressing the lever. Do not let go and lock it in the desired position. Be sure to place the clamp so that it is between the edge of the pusher and the camshaft.
Fixing the pusher
- Pry the adjusting washer off the pusher by prying it with a flat-head screwdriver. On the back of the washers there is usually a mark with the size. If not, you will have to measure it manually. Write down somewhere how thick the washer you are using is, and using the dimensions as a guide, select a new washer.
- New shims must be installed with the numbers down. By recessing the device for compressing the valve pusher, the retainer can be removed.
- Check the gap. If necessary, perform the operation again, taking a washer larger or smaller than the previous one.
- Having completed the adjustment, the crankshaft rotates 360 degrees, which provides access to valves 4, 6, 7 and 8. They are adjusted in the same way.
Conclusion
The oil seal is an important element of an internal combustion engine. Failure of the cap should never be ignored. At first, this leads to increased oil consumption and to the engine operating in abnormal mode, and over time to its failure. Engine repair will cost tens of times more than buying valve stem seals and installing them. Fortunately, both analogues and originals are quite easy to find. When purchasing these spare parts, carefully check their authenticity. The number of fakes is extremely large, and the fakes are seriously inferior to the originals in quality and can cause carbon deposits in the engine and increased oil consumption.
Why wear cuffs VAZ 2106
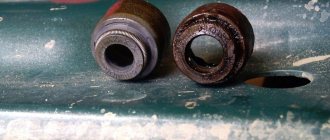
New valve seals. Elastic and soft, elastic, tightly compress the valve, preventing fat from entering the combustion chamber. Depending on how long the engine runs, the covers change their properties.
Exposure to different temperatures. For example, when heated in winter, oil seals can heat up over one hundred degrees in a few minutes.
It is this condition that determines the degree of wear of the caps. They become heavy, begin to leak oil and do not fulfill their direct duties.
The VAS 2106 valve stem seals themselves are easy to replace. You don't need any smart training, just do all the work carefully. From the special tool you will need:
- Dryer valve. To compress a spring.
- Mandrel for installing cuffs.
- Puller or pliers for removing old caps.
- A soft metal rod for attaching valves to engine cylinders.
Briefly about the functions
There are 2 types of valves in the engine: exhaust , intake . Each of the valves is positioned so that its upper part is in contact with the camshaft. There is an oily mist on this side of the valve when the shaft rotates. The type of valve will depend on what is on the other side of it. If this suspension consists of droplets of gasoline, then the valve is inlet. If the bottom side of the valve extends into the exhaust gas area, the valve is called an exhaust valve.
Now let's return to the topic of valve stem seals. Since the camshaft requires a large amount of lubricant to function properly, excess of this oil may well leak into the combustion chambers of the engine. This is highly undesirable. Valve seals, also known as valve seals , serve as a barrier between the environment with a large amount of hot liquefied oil and the combustion chambers. The oil that lubricates the rod during reciprocating movements is removed precisely by the valve stem seals.
Why are high demands placed on valve seals? Everything is very simple. Oil can enter the combustion chamber along the valve stem, where it mixes with the fuel-air mixture and burns. Modern oils have many additives and, in principle, do not burn completely. When they burn, carbon deposits form on valve seats, etc. "plates". As carbon deposits accumulate, the valve simply loses its ability to close. Carbon deposits will also form on the piston rings, cylinder walls and top surfaces of the pistons. All this leads to a serious acceleration of engine wear and a decrease in the quality of its operation - the mixture simply will not burn properly. If the caps do not remove oil and are themselves exposed to an aggressive environment, they cannot be called effective.
Device
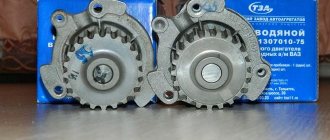
Oil scraper caps are a modern version of valve seals that are equipped with a heavy-duty steel bushing inside and an extension spring. Springs are used to secure the edges of valve caps and valve stems.
Gaskets are made mainly of rubber, which becomes harder over time and wear occurs as the element ceases to perform its functions properly. As a result, oil enters the combustion chamber.
There is only one sign of wear on the valve seals. Thick blue smoke begins to actively pour out of the exhaust pipe, plus oil consumption increases.
There is only one way out of this situation. Replacement.
Brand tour
As already indicated in the previous paragraph, often analogues of valve stem seals can surpass the originals in terms of workmanship and service life. For example, factory engine caps for Mercedes-Benz models M110 and M123 (fluoroplastic) can be replaced with more modern rubber analogues. You should choose between products from the following manufacturers:
- Elring (Germany);
- Ajusa (Spain);
- NOK (Japan);
- Goetze (Germany);
- Victor Reinz (Germany-USA).
In fact, these are the same companies that supply their products to car factories. OEM-quality spare parts can be found under the names of these manufacturers' own brands. Unfortunately, valve stem seals from these companies are often counterfeited. Be especially careful when choosing analogues from Ajusa, Elring and Victor Reinz. Practice shows that the Spanish product is counterfeited especially often, as a result of which the manufacturer itself today does not have the best reputation.
Good analogues can be found in the catalogs ]Musashi[/anchor] (Japan), Corteco (Germany), Stone (Japan-USA). Let us immediately note that some car enthusiasts note the average quality of valve stem seals from these companies. Of the three listed companies, only Corteco’s reputation is spoiled by the large number of fakes exploiting the name of the German brand. As for analogues from little-known packagers, it will almost certainly be a product from one of the manufacturers from the list above. You should only be wary of low-quality fakes.
To identify valve stem seals, you should purchase a branded product. Fortunately, today it will be enough to have on hand photographs found on the Internet. There are several things to pay attention to. Firstly, on the labeling. For example, on the caps of NOK (Japan) there is a marking with a code and the name of the manufacturer. Secondly, counterfeit caps are often made in the wrong color. For example, in a set with branded products, one cap is completely gray, and the second has a black element. With fakes, everything is simple - both caps will turn out to be gray. Thirdly, counterfeit products are almost always larger than branded ones. Often the outer diameter of fakes is 1.5 millimeters larger than that of the originals. And fourthly, pay attention to the price. Fakes are always cheaper. If the average market price of a cap is $3, and you find the same one, but for $1, then it is highly likely to be fake.