Many motorists have encountered the fact that the steering rack on a VAZ-2114, 2113, 2115 began to fail, but not many know how to check. So, let's look at what are the indicators that the rack is faulty. The steering rack is the mechanism that connects the steering wheel to the wheels. Based on this, the correct functioning of this mechanism is the basis of safety, since thanks to this device there is an adequate reaction of the wheels to steering movements.
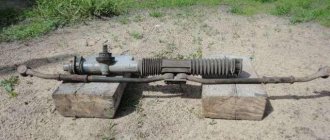
The design of the steering rack on the VAZ-2114
The design of the steering rack is determined by the steering column shaft, which has a gear mechanism at the end connected to a similar mechanism located on the rack itself. Accordingly, the movements of the steering wheel cause the steering rods to move, and they, in turn, change the angle of rotation of the wheels. Before proceeding directly to the verification process, you need to know the design features of the steering rack. Let's look at what elements it consists of:
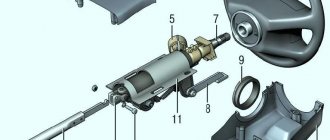
1 – protective cap; 2 – steering gear housing; 3 – rack; 4 – drive gear; 5 – inner tie rod end; 6 – spacer sleeve; 7 – tie rod mounting bolt; 8 – connecting plate; 9 – support sleeve; 10 – steering gear support; 11 – rack support sleeve; 12 – protective cover; 13 – clamp; 14 – rack restrictive ring; 15 – sealing ring of the rack stop; 16 – nut; 17 – rack stop; 18 – roller bearing; 19 – ball bearing; 20 – retaining ring; 21 – nut sealing ring; 22 – gear bearing fastening nut; 23 – boot; 24 – lock washer.
General diagram of the steering system, including the racks.
Checking the rack
. So, to check the steering rack, you need to measure the gaps in it. This can be done either on a removed mechanism (which is even better) or directly on the car. Now let's move on to the process: Set the mechanism to the middle position. It can be determined by its dimensions - (87±0.25) mm from the gear axis to the end of the rack. Using a special device, we load the unit to a force P = 500 ± 20 N (51 ± 2 kgf). The distance from the gear axis should be 84 mm. The maximum permissible movement of the rack “X”, measured through the relative movement of the pressure punch 1, should not exceed 0.12 mm. After assembly, the torque of the gear in the area of the rack stroke should be in the range of 50–200 N·cm (5.1–20.4 kgf·cm) at a rotation speed of 30 min-1.
Causes of steering rack failure
Once the issue of rack adjustment has been sorted out, you can consider the reasons for its failure: • Wear. Each car mechanism has its own running life. • Due to uneven roads, the pressure on the rack is significantly increased. • Inadmissible acceleration when the wheels are in the extreme position. • Mechanical damage caused during operation.
Description of the steering design
The steering is rack-and-pinion type, with a propeller shaft and a tilt-adjustable steering column.
The steering wheel is mounted on the splines of the steering shaft and secured with a self-locking nut.
The steering shaft is composite, consisting of an upper and intermediate shaft connected by a universal joint. The upper shaft rotates in two bearings pressed into the steering column tube. An ignition switch with an anti-theft device is installed on the top of the column pipe.
The steering column bracket is attached to the body with two bolts and two nuts. The bolts are special, with break-off heads. When these bolts are tightened, their heads break off.
Steering:
1 - sealing ring; 2 — protective cover for the tie rod end; 3 - spring ring; 4 — ball pin; 5 — tie rod end; 6 — rod coupling with locknuts; 7 — steering rod; 8, 10 — steering gear mounting brackets; 9 — steering rod; 11 — right steering gear support; 12 — protective cover of the steering mechanism; 13 — steering mechanism; 14 - seal; 15 — protective cap; 16 — coupling bolt of the elastic coupling flange; 17 — coupling bolt of the steering column fixing mechanism; 18 — spacer sleeve; 19 — universal joint; 20 — upper steering shaft; 21 — steering wheel; 22 — steering wheel fastening nut; 23 — steering wheel pad; 24 — decorative insert of the lining; 25, 33 — steering shaft bearings; 26 — bracket for fastening the steering column to the body; 27 — retaining ring; 28 — steering column fixation lever; 29 — adjusting sleeve; 30 — washers; 31 — fixing plate; 32 — bolt with a tear-off head; 34 — intermediate steering shaft; 35 — rubber elastic coupling; 36 — left steering gear support
The bracket is pivotally connected to the steering column tube and is equipped with a steering column fixation mechanism. By moving the locking lever to the lower position, you can change the angle of the steering column. When the lever is raised, the column is fixed in the selected position.
The steering shaft is connected to the steering mechanism through a rubber elastic coupling.
The steering mechanism consists of a crankcase, a drive gear and a rack in gearing. The mechanism is secured to the partition of the engine compartment with two brackets on rubber supports. When the steering wheel is turned, rotation is transmitted through the upper and intermediate shafts of the steering column to the drive gear, which, when turning, moves the rack.
Steering rods are bolted to the steering rack, which consist of the rods themselves, tips and couplings with locknuts. At the inner ends of the steering rods there are eyes with rubber-metal bushings pressed into them. Ball pins are installed in the outer rod ends, with which the steering rods are connected to the swing arms of the front suspension struts. When the rack moves, the rods rotate the front suspension struts. The length of the tie rods can be adjusted by rotating the couplings and thereby changing the toe-in of the front wheels. The couplings are prevented from spontaneous rotation by locknuts on both sides.
Source
Work order
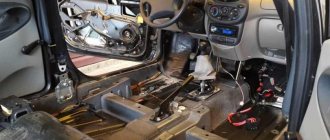
Replacing steering bearings on a vehicle such as a VAZ-2110 consists of a number of stages that must be carried out in the order in which they are listed below.
The whole process can be seen in the video:
First, you need to disconnect the battery on the car to prevent an electrical short circuit. It is enough just to remove one terminal where the “-” sign is indicated.
Then you need to remove the steering wheel. To do this, you will need to turn the car's ignition key, and also turn the steering wheel 90° in either direction. You will see a whole row of nuts, thanks to which the steering wheel is attached to the shaft
Using a special wrench, unscrew the nuts, and then carefully proceed to the recess to remove the steering wheel. This is done due to the fact that in some cars there is a system in the steering wheel that allows the steering wheel to be spring-loaded
If you do not take this into account, you may even get injured.
Using a special wrench, you need to unscrew the nuts where the steering column switch mechanisms are secured. Next, their bases must be moved towards the driver’s seat.
Having found the wire connected to the oil pressure sensor, you need to remove it.
Installation procedure
- We put the coupling flange on the drive gear shaft in a position where the slot of the coupling tip coincides with the central longitudinal line of the flat.
- We tighten the coupling flange bolt without tightening it completely.
- We put the steering column on the studs and tighten the nuts securing the bracket.
- We tighten special bolts with tear-off heads together with the fixing plates. Let's not delay them.
- Tighten the coupling flange coupling bolt, two bolts (until the heads break off) and two nuts securing the steering column bracket.
- Connect the ignition switch wires.
- We install steering column switches.
- Installing the steering wheel
- Reinstall the covers.
- We check the functionality of all mechanisms on the steering column.
How to determine if there is a fault in the steering rack
When you hear a knock coming from the front axle, it is most likely a knock in the steering rack. This symptom is the most obvious characteristic of a malfunction of a mechanism such as the steering rack. By the way, this type of knocking can occur when you turn the steering wheel or drive on an uneven road, but it can completely disappear if you move on a road surface that is characterized by the absence of holes and potholes. Since knocking is not the only sign of a breakdown of the mechanism in question, we will try to identify other existing signs of a steering rack malfunction. 1
.
The steering wheel may become heavier, which appears in certain positions that are repeated regularly. 2
.
There is the already mentioned knock in the steering rack, which may be caused by the transmission of vibration to the steering wheel. In addition, knocking can be detected if you make sudden movements of the steering wheel to the sides with the engine off. A knock in this mechanism can be caused by play in the tips, an increased gap between the rack and gear, as well as loosening of the mechanism itself. 3
.
It is possible that the steering wheel returns incorrectly to its original position when making a turn, that is, the steering wheel does not return at all or it happens quite slowly. 4
. There may be no correspondence between steering wheel turn and wheel turn. The above signs allow us to quite clearly answer the question: how to determine whether the steering rack is faulty? It should be borne in mind that prevention will allow you to significantly increase the operating cycle of this mechanism. Therefore, do not forget to carry it out and check it on time, for example, protective boots. If you notice damage to them, replace them immediately.
If the service life is more than 100 thousand km without repair, it is usually recommended to replace the unit, since, as practice shows, repair kits do not save the situation, and after 5-10 thousand km the rack will knock again or leak.
Steering gear VAZ 2114, VAZ 2115, VAZ 2113, Lada Samara 2
Consists of two VAZ 2115 steering rods and rotary arms of 2 telescopic front suspension struts. Each steering rod consists of an inner tip 6 or 11, a tip 3 and a tubular rod 5. The length of each rod is changed by a tubular rod 5, which is screwed onto the rod ends and secured with nuts 4. The head of the outer tip contains the ball joint parts: liner 9, pin 7 and liner spring. Swivel arms 2 are welded to the front suspension struts.
Steering column Lada Samara 2 assembled: 1 – lower flange of the elastic coupling; 2 – elastic coupling; 3 – intermediate steering shaft; 4 – steering shaft mounting bracket; 5 – upper steering shaft; 6 – tension spring; 7 – facing casing (lower part); 8 – retaining ring; 9 – steering column position adjustment lever; 10 – adjusting sleeve of the lever; 11 – spacer sleeve; 12 – coupling bolt; 13 – pipe of the steering shaft bracket; 14 – contact plate holder; 15 – steering wheel fastening nut; 16 – steering wheel; 17 – facing casing (upper part); 18 – steering shaft bearing; 19 – bushing of the support plate; 20 – spacer sleeve; 21 – universal joint crosspiece; C, E - windows for adjusting the position of the steering column
The VAZ 2114 steering shaft consists of an upper shaft 5 and an intermediate shaft 3. The upper and intermediate shafts are connected to each other by a cardan joint with a cross 21. The intermediate shaft 3 is attached to the steering gear drive gear through an elastic coupling 2 with a lower flange 1. It is attached to the upper shaft 5 steering wheel 16 with nut 15. The upper shaft is located on bearings 18 in pipe 13. Bracket 4 for fastening the steering shaft is fixed in four places to the body bracket, and the front part of the bracket is secured with two bolts with break-away heads, and the rear part of the bracket with nuts. Bracket 4 and pipe 13 are hingedly connected to each other by two plates using four bolts located in plastic bushings 19 and spacer bushings 20. With this connection, pipe 13 and shaft 5 relative to bracket 4 have angular and axial movements, which are limited by windows “C” and "E". To fix the pipe 13 relative to the bracket 4, there is a lever 9. In the hub of the lever 9 there are splines with which it is connected to the adjusting sleeve 10. The sleeve 10 is located on the coupling bolt 12, which passes through the slots of the guide plates of the pipe 13 and bracket 4 (through the windows "C" and "E"). When lever 9 is turned down, the fixation of pipe 13 in bracket 4 is loosened, which allows you to manually change the angle of the steering column of the VAZ 2113.
Source
Preliminary assessment of the situation
It is advisable to first independently check the car for the presence of a faulty steering column or rack, rather than immediately rushing to a service station. After all, even for diagnosing the rack, the car owner will be asked to pay a significant monetary fee. You can certainly diagnose play in the rack and bearing wear by lifting the front wheels of the car, for example, using a jack. If you detect play when turning the wheels by hand or when turning the steering wheel, this is already a signal for repair. Also, if you hear the characteristic sounds of a worn bearing when turning the steering wheel, then the bearing probably needs to be replaced.
How to properly change steering shaft bearings? To do this, you can carry out all the necessary work yourself, if the car owner understands the structure of the rack and column. Or you can turn to car service specialists for assistance, who can quickly fix the steering shaft fault. But it must be taken into account that such repair work to replace rack bearings will cost significant finances. Moreover, in the repair of columns and racks there is nothing very difficult to contact specialists. Therefore, it will be much better and faster to do everything yourself, you just need to be patient and stock up on the necessary tools.
Why tighten the rack on a VAZ-2114
Diagnostics of the steering rack and steering mechanism
Before tightening the steering rack on a VAZ-2114, it is worth considering the prerequisites that will tell you that it’s time to repair or tighten it.
First of all, this is a backlash.
In principle, AvtoVAZ guarantees a fairly long service life of the steering mechanism, namely ten years . However, we must understand that we are talking about ideal operating conditions. This assumes smooth asphalt roads, constant availability of high-quality lubrication in the rack housing and a gentle driving style.
Under normal operating conditions, this period is practically unattainable. Unimportant roads, poor quality of spare parts and often harsh operating conditions of the car lead to the fact that the mechanism makes itself felt much earlier.
The first symptoms of a faulty steering mechanism on a VAZ-2114
The first symptoms of a rack malfunction or the need for tightening are clear:
- Knocking noise under the hood in the area of the engine shield, especially when driving over uneven surfaces.
On a VAZ-2114, a knocking sound when driving through uneven sections of the road may occur due to a loose nut on the bolt that compresses the cardan clamp
The latter can be considered a glaring signal of malfunction and can lead to serious troubles while driving.
In this case, most likely, tightening the situation will not correct the situation, however, it is too early to draw conclusions, you can try to adjust it. This can be done in two ways - both on the car and with the rack removed.
Complete disassembly of the steering rack and replacement of the repair kit
In the second case, the adjustment is made after replacing the repair kit and completely repairing the mechanism. We will try to make do with little expense and simply adjust the gap in the gear-rack engagement , thereby eliminating backlash and knocking.
What kind of steering wheel can I install?
If you decide to replace your old steering wheel, it means that its appearance did not suit you in some way. Of course, the issue may be a breakdown or external damage, however, even in this case, you should consider installing third-party models. What if you like one of them much more than the previous steering wheel?
Sports models
When tuning their iron horses, car enthusiasts often look at sports steering wheels. Their appearance helps create the image of a fashionable racing car. The sports steering wheel has a smaller diameter than a regular steering wheel, which significantly improves maneuverability. In addition, it saves space inside the car. And various design options give room for creativity when styling the rest of the interior.
The design of a sports steering wheel can refresh the interior of the car
Unfortunately, sports steering wheel models have as many disadvantages as advantages. It is not as safe in a collision as the stock steering wheel. Its construction uses metal, so upon impact, the risk of serious injury increases. In addition, sports steering wheels are not equipped with airbags.
To install such a steering wheel you will need special adapters. They can be divided into two categories:
- cast;
- corrugated.
Moreover, the latter are much safer, since in the event of an accident they can fold up and absorb part of the energy.
The corrugated adapter for the sports steering wheel can fold upon impact, therefore it is considered injury-proof
Buy a sports steering wheel from trusted stores and from well-known manufacturers. Make sure you have the appropriate certificate. A poor-quality steering wheel, even with a corrugated adapter, can play a cruel joke on you if you get into an accident.
Steering wheels from other VAZ car models
Steering wheels from more modern models of VAZ cars, such as Lada Priora, Kalina or Granta, look prettier and are much more comfortable in the hands. Installing them will not be difficult, provided that you replace not only the steering wheel itself, but also the steering column column. Otherwise, the hub size will not match.
The Lada Kalina steering wheel looks more stylish and presentable than the standard part from a VAZ 2114 or 2115
Read on to learn how to choose the right steering wheel for the VAZ 2114 and VAZ 2115.
What you need to know when installing
Please note that not every steering wheel is suitable for installation on VAZ 2114 and VAZ 2115 cars. You need to choose a steering wheel with the same contact group as the original part.
choose a steering wheel with the same contact group as that of the VAZ 2114 and 2115
This is quite easy to do if you plan to install a steering wheel from other VAZ models. For example, a steering wheel with a Europanel from a VAZ 2110 is ideal for these purposes.
If you have chosen a Lada Kalina car, then its steering wheel should be marked 1118–3402010. With it you will also have to install the upper casing marked 2110–3403070–30, as well as the lower casing 2110–3403072–30.
To install a non-standard steering wheel on a VAZ 2114, use the steering shaft housing 2110–12
If you like sports models, then you will have to purchase a special adapter designed for VAZ 2113–2115 cars. This adapter is installed on the steering shaft, and the steering wheel is mounted on top. An adapter model suitable for this purpose is PROSPORT RS-04282.
for installing a sports steering wheel on VAZ 2114 and 2115 cars, the PROSPORT RS-04282 adapter is suitable
How to remove the steering wheel?
Dismantling the steering wheel on VAZ 2114 and 2115 is carried out using the same method. However, remember that according to the Code of Administrative Offenses, replacing a steering wheel with a steering wheel different from the original is considered illegal modification of the steering structure and vehicle control system. Such tuning falls under Part 2 of Article 12.5 of the Code of Administrative Offenses on driving a vehicle in the presence of malfunctions or conditions under which its operation is prohibited.
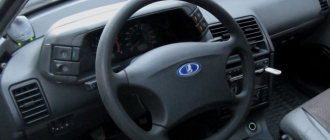
Recently, traffic police officers have been quite zealous in catching violators of this article, so think carefully before embarking on the replacement process. The standard VAZ 2114 steering wheel looks unattractive, so someone may want to replace it
Required Tools
To remove and then install a new steering wheel, you will need the following tools:
- new steering wheel (make sure the part you choose fits your car);
- set of screwdrivers with straight and Phillips slots;
- 24 mm socket head;
- pencil or marker;
- hammer (in some cases);
- a soft metal drift (included with the hammer);
- wire cores (in some cases).
Please note that after completing all the work, you will have to remove traces of a pencil or marker from the steering wheel cover and front panel. To avoid problems with subsequent cleaning, consider the coating material of these interior elements. You should not use permanent, or as they are also called, indelible markers, especially if the parts are covered with high-quality natural leather of a light shade. The easiest way to remove marker is water-based. But it is better to use a regular pencil: it can be erased with a regular eraser.
Steering wheel removal process
There is a signal inside the steering wheel that receives power from the battery, so the first thing you need to do is turn off the power to the car. To do this, you just need to disconnect the negative terminal. After this, you can safely begin the dismantling process.
- Remove the ignition key from the lock.
- Turn the steering wheel so that the system locking the steering shaft is activated. Your steering wheel is now locked in a straight position.
- In order to subsequently correctly install the new part while maintaining control accuracy, apply a mark to the steering wheel with a pencil. Place a similar mark on the dashboard right next to it.
- Using a straight screwdriver, pry the cover with the Lada inscription on the steering wheel and remove it. This element is attached using ordinary plastic clips, so removing it is not difficult. However, due to the thin plastic, the part breaks easily. If you plan to continue using your old steering wheel, be careful.
- Under the trim you will see two screws. They hold the steering wheel cover. Unscrew them using a Phillips screwdriver and then remove the cover.
- In the central part of the structure you will see a large nut. It should be unscrewed using a 24 mm socket.
- The steering wheel no longer holds anything. To remove it, grab the steering wheel with both hands and pull each side in turn. There's no point in trying. If the part has not been dismantled before, it will be quite difficult to move. Do not try to remove the part with one jerk: you may accidentally injure yourself.
- If attempts to remove the steering wheel using the method described in point 7 are unsuccessful, use a small hammer and drift. In addition to additional tools, you will need an assistant. One person from the pair should pull the steering wheel, and the second should hit the drift attached to the end of the steering shaft with a hammer.
Removing the steering wheel for VAZ 2114 and VAZ 2115
First of all, you need to remove the cover
VAZ 2114, is it possible to install an amplifier yourself?
The work will take no more than two hours if you do everything without haste and with breaks. There is no need to remove the VAZ steering rack; there is no need to even disconnect the rods. You will need a small set of keys: for 10, 13 and 17. The last two are needed. It is advisable to have a good set of tools, since pliers, for example, may be needed at any time.
First you need to remove the left clamp and install the amplifier clamp located on the left on the studs. Moreover, its eye should be facing upward. After this, tighten all the nuts. The clamp on the right side of the steering rack is replaced in the same way. Then you need to put the corner of the rack on a pin located on the cross beam of the car body.
If there is an adsorber tube, remove it first and then install it on top of the corner. The entire structure must be tightened by placing a large washer on the stud. Next, the cross member is installed; its two bolts must be tightened simultaneously.
If there is a gap of about 1 cm in the structure, you will need to rearrange the clamps. Most likely, you mixed them up and installed them incorrectly. This completes the installation, now you can check the VAZ power steering rack in action.
The difference will be immediately felt, the car's handling will become much better, and it will be easier for you to stay on course. If necessary, adjust the rack to minimize the backlash.
Replacing the VAZ 2114 steering rack - step-by-step instructions
When the location and structure of the steering rack is clear, you can move directly to the issue of replacement. To complete the operation you will need certain tools. Which one: a set of keys and hexagons, a wheel wrench, a jack, VD-40, Litol-24, rags, a steering rod puller, or a pry bar with a hammer. And also a new steering rack itself. If you tightened the rack and it did not help, then it needs to be replaced! When everything is assembled and ready, you can proceed to consider the step-by-step replacement process: 1
.
Place the car on a flat surface. 2
.
Now you need to raise the front of the car. To do this, you can turn to the ancient method of installing the machine on logs. It is recommended to put 3-4 sandbags in the trunk to ensure that it does not tip forward. 3
. Unscrew the front wheels.
4
.
Remove the negative terminal from the battery. 5
. Now, unscrew the locking bolts of the steering shaft propeller shaft.
6
. We remove the absorber.
7
. We take out the steering tips from the seats.
8
. Unscrew the nuts securing the steering rack clamps. If they don’t give in right away, you should use WD-40.
9
.
We remove the steering rack. This can be done by pulling it out through the wheel arch on the right. It won't work the other way because it will get stuck. 10
. We remove the tie rod ends from the rack, which will be installed on a new part.
eleven
.
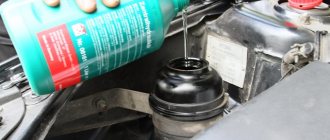
The new rail must be filled with Litol. This can be done by lowering the anthers. 12
.
Now you can install the new rail on the seats. The operation should be performed by two people. 13
.
The remaining components are assembled in the reverse order. 2108-3400012 is the original catalog number of the steering rack produced by AvtoVAZ. It fits perfectly into the seats and does not require modification of the fasteners. The average cost is 6,000 rubles. Analogues
.
In addition to the original part, there are a number of analogues that can be used for installation on a car. Let's look at which ones: Weber SG 2108-0012
- the average cost is 4,500 rubles.
Pilenga SR-P 1141
- average cost is 6,000 rubles.
Trialli CR 108
— steering mechanism (rack) for VAZ 2108 (2113-2114) without tie rods (cr 108).
The cost of the product is 6,000 rubles. Trialli CR S 708
— Steering mechanism (rack) for VAZ 2108 (2113-2114) with tie rods and ends (cr s 708). The average cost is 12,000 rubles.
Tuning steering racks for VAZ 2114
Recently, it has become popular to tune domestic cars, especially those produced by the AvtoVAZ plant. So, in addition to external tuning and interior modifications, motorists are trying to improve driving performance and handling. Some auto parts manufacturers follow fashion and try to help car enthusiasts make their dreams come true. So, on the car tuning market you can find reinforced steering racks with an increased reach. Only two companies produce these parts in the “tuning” version for the VAZ-2114 - Brembo (Italy) and ATF (Poland). Of course, the price is a little steep and not everyone can afford it, but a true connoisseur of tuning will not regret the money. Replacing the steering rack on a VAZ-2114 with your own hands is not as difficult as it might seem at first glance, if you strictly follow all the instructions described in the article. So, the process itself will take from 3 hours, depending on various factors. Particular attention should be paid to the moment of choosing the slats, since even new ones are not always of adequate quality and there are fakes. But, if the process seems complicated, you can always contact a car service center, where they will do everything and help you choose a quality part.