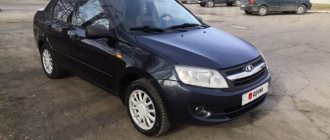
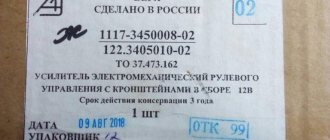
Latest model of Kalina
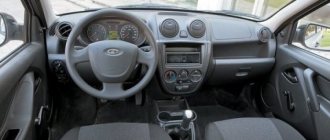
Lada Kalina cars are equipped with electric power steering. Its design is very simple, it consists of one block, so even on a standard vehicle, the EUR can be installed without any problems. It contains no liquid, which means it is easy to maintain. But it is worth paying attention to the experience of foreign manufacturers who try not to install ESD in their cars. This mechanism has a special feature: it can operate at both low and high speeds. The second option is undesirable, since the slightest movement of the steering wheel can cause the car to drift into a ditch or to the side of the road.
The Lada electric power steering circuit provides for the mechanism to operate at different speeds, and when driving it either functions or turns off. The malfunction is that the EUR stops in one state. It is prohibited to use the vehicle until the breakdown is repaired. A yellow light on the dashboard will indicate the problem. It shows an exclamation mark and a steering wheel. If the malfunction lies in the power steering unit, and it is not possible to eliminate it, you should remove the fuse that is responsible for the operation of the electric amplifier. It should be taken into account that EMUR can fail not only on old, but also on new Kalinas that have not had time to be run-in.
Location of contacts on the blocks
Block X1: 1. “Plus” from the battery (12V); 2. “Minus” from the battery. Block X2: 1. Ignition switch (“plus” from the terminal); 2. Signal input (tachometer); 3. Signal input (speed sensor); 4. Output (EMURU status indicator); 5. K-line output (diagnostic block); 6. L-line output (free); 7. General (mass); 8. Technological output (free). Block X3: motor phases: A. (1 and 2) – phase A; B. (1 and 2) – B; C. (1 and 2) – C. Block X4: torque sensor ESD “Kalina”: 1. Common wire 1; 2. General 2; 3. Power contact; 4. Output 1; 5. Output 2; 6. Frequency signal input terminal. Block X5: rotor position sensor: 1. General; 2. Phase A output; 3. Phase B output; 4. Phase C output; 5. Power (+ 5V). The electromechanical power steering installed on the Kalina can operate in the following modes: • Self-test • Compensation • Failure • Ready
Diagnostics
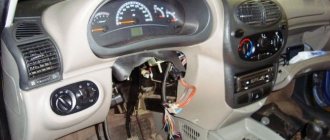
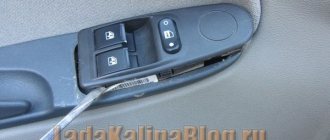
To check the amplifier in a car, you need to remove the plastic trim on the steering column; to do this, unscrew the bolts securing it from the bottom.
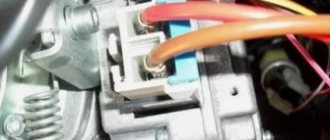
Then you will need to get to the 8-pin plug, its pinout is as follows:
- The blue contact is connected to the ignition switch, this is 12 volt power;
- the red-brown contact is the connection cable to the tachometer;
- the gray contact goes to the car speed controller;
- white and pink wire - amplifier control indicator;
- black-yellow contact is a diagnostic line;
- the next contact is empty, the wire is not connected to it;
- brown contact is ground;
- empty.
More accurate results will be obtained by checking the amplifier using a scanner. But since such equipment can usually only be found at service stations, you can try to check the operation of the system with a paper clip.
To check you need to do the following:
- First the ignition is turned off.
- Then, using a paper clip, you need to close contacts numbered 6 and 7 of this plug, while the plug itself does not need to be removed.
- Next, the ignition must be turned on.
- After completing these steps, the EUR failure indicator located in the dashboard will begin to blink; by the number of blinks, you can determine whether the system is broken (the author of the video is Gosha Vakhromeev).
Electric power steering on Kalina
Latest model of Kalina
Lada Kalina cars are equipped with electric power steering. Its design is very simple, it consists of one block, so even on a standard vehicle, the EUR can be installed without any problems. It contains no liquid, which means it is easy to maintain
But it is worth paying attention to the experience of foreign manufacturers who try not to install ESD in their cars. This mechanism has a special feature: it can operate at both low and high speeds.
The second option is undesirable, since the slightest movement of the steering wheel can cause the car to drift into a ditch or to the side of the road.
The Lada electric power steering circuit provides for the mechanism to operate at different speeds, and when driving it either functions or turns off. The malfunction is that the EUR stops in one state. It is prohibited to use the vehicle until the breakdown is repaired. A yellow light on the dashboard will indicate the problem. It shows an exclamation mark and a steering wheel. If the malfunction lies in the power steering unit, and it is not possible to eliminate it, you should remove the fuse that is responsible for the operation of the electric amplifier. It should be taken into account that EMUR can fail not only on old, but also on new Kalinas that have not had time to be run-in.
Fuse box
The weak link of the electric power steering on Kalina is the fuse box; if something doesn’t work, it’s worth checking them. To get to them, you need to open the dashboard, to the left of the steering wheel. To do this, pull the top part towards you and the latch will open.
Check if the fuse is working, if it fails, replace it. It is very easy to check, check the integrity of the thread inside the fuse. Changing a 50 amp relay to a 30 amp one will also help.
Newer versions of Kalina are equipped with electric amplifiers from Hyundai, which has a positive effect on its reliability. However, there are still thousands of cars with the domestic version, which malfunctions and breaks down from time to time. Now it will be easier for you to repair the electric power steering on Kalina yourself. The main thing to remember is that not every amplifier shutdown is a breakdown. And you can find the problem yourself and fix it, but somewhere you will have to go to a service center.
What malfunctions threaten the EUR on Kalina and what are the ways to eliminate them?
» Power steering » What malfunctions threaten the power steering on Kalina and what are the ways to eliminate them?
Electric power steering is a component used to provide more comfortable driving. Not so long ago, domestically produced cars began to be equipped with EUR, in particular, in this article we will talk about Lada Kalinas. What malfunctions can occur with the Kalina EUR and what troubleshooting methods are there? Find answers to these and other questions below.
Why does the electric power steering on the Lada Kalina not work, turns off and refuses to work, what are the signs of a steering wheel with power steering knocking, jamming, biting or squeaking? To repair the system yourself, you need to know how diagnostics are carried out and what causes precede the breakdown. Most often, the failure of the amplifier is caused by a breakdown of the unit itself and the amplifier fails. Problems of this type are resolved by thoroughly checking the system to identify the exact problem.
As practice shows, often the inoperability of the electric amplifier (failure) is associated with a breakdown of the speed controller.
Consequences:
- the steering wheel is jammed,
- jams
- becomes tight
- and others
Because the speed controller sensor ensures activation and deactivation of the electric power steering under different driving modes. The amplifier on Kalina works if the car is moving at low speed. When the speed begins to increase, the booster automatically turns off, allowing for safer machine control when driving at high speeds.
So, briefly about the reasons for the inoperability of the EUR:
- The speed controller has failed or the control unit does not receive or disappears a signal from it. In this case, the reason may lie in either a breakdown of the sensor, damaged wiring, or poor contact of the controller with the on-board network.
- The voltage in the vehicle's electrical network has decreased. The reasons can be different, ranging from a dead battery and an inoperative generator to the use of inappropriate electrical equipment in the car.
- The permissible crankshaft speed has been exceeded.
- Incorrect operation or failure of the control module. Depending on the cause, the control unit may need to be repaired; more detailed diagnostics need to be done.
Error codes
c1044 - incorrect sequence of the rotor position sensor (RPS)
c1621 - incorrect voltage 5V
c1622 - speed signal circuit failure
c1011 - car engine speed signal circuit, no signal - the signal from the idle sensor (or the standard tachometer through a voltage limiter) is divided by 4 and applied to the tachometer input,
c1022 - error, voltage of the main output of the torque sensor - it is possible that the shaft cover has rubbed the insulation and the middle, green wire shorts to ground
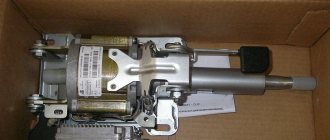
Dismantling and disassembling the electric amplifier
Before removing the amplifier, you need to remove all the steering column switches. Remove the steering rack cover and dismantle the devices, remembering to disconnect the connectors from the power supply.
How to remove the EUR with your own hands:
- After removing the switches, you will need to dismantle the lower cross member of the dashboard. To do this, you need to press the fasteners that secure the connector with wires, and then disconnect the wiring from the control module. Once these steps are completed, you can disconnect the connector from the switches.
- The system bracket is secured with nuts; you will need to unscrew them with a wrench.
- After this, the steering rack will need to be carefully lowered down. To do this, you will need to find the bolt that secures the driveshaft to the booster shaft. This bolt must be unscrewed, but when unscrewing, you will need to fix the nut, this will prevent it from turning. When the bolt is removed, the fastening will need to be loosened, after which the intermediate shaft will be carefully removed. At this stage, we recommend marking the position of the shaft and gears; you can use a marker for this. This step is very important because doing it will prevent possible installation problems in the future. If the marks on the shafts do not match, this may cause problems with the amplifier. When dismantling, be careful not to damage the wiring, as this will also lead to the inoperability of the ESD.
- When the unit is dismantled, it will need to be disassembled and the failed elements replaced. Further editing is done in reverse order (the author of the video is Murzik Bely).
Removing the electric amplifier
The first step is to get rid of the steering column switches. After this, disconnect all connectors with wires from the dashboard. If it is necessary to dismantle the ignition switch, you need to unscrew 3 screws using a Phillips screwdriver. Next, remove the lower cross member of the dashboard. After this, press the clamps on the wiring harness blocks and disconnect them from the EMUR control unit. And only now can you disconnect the block directly from the steering column switches.
How is the unit located in the car?
The bracket is secured with 4 nuts that need to be unscrewed. After this, the entire steering column is carefully lowered to the floor. Locate the bolt securing the cardan to the steering shaft. Unscrew it with a 13mm wrench, while holding the nut from turning in the same way. The bolt is removed and the terminal connection is loosened using a strong flathead screwdriver. Carefully remove the intermediate shaft. It is recommended to mark with a marker the location of the shafts and gears relative to each other. Next, the necessary repairs to the electric power steering are carried out and assembly of the unit begins.
Be careful not to damage the wiring during dismantling. Mark the location of the shafts and gears as accurately as possible so that later there will be no inconvenience when turning the steering wheel. Installation of the EUR is carried out using the same tools, only in the reverse order. The most important thing is to align all the marks on the shafts. The help of a partner will not be superfluous.
Place the lower joint on the gear shaft in advance. First, connect the intermediate cardan directly to the steering gear shaft, then, using a 13-mm wrench, unscrew the nut designed to tighten the intermediate shaft. Remove the bolt and carefully disconnect the upper hinge from the lower one. The first step is to install the lower hinge, after which the shaft is rotated until the hole in the upper hinge is located for the bolt in the lower part of the shaft. Now all that remains is to connect the hinges and tighten them with a bolt. After this, connect the wire blocks and install the facing panels.
Types of generators
Based on current strength, generating devices for Kalina are available in the following types:
- 85 A.
- 90 A.
- 100 A.
- 115 A.
- 120 A.
- 135 A.
By power there are units:
- 12 V.
- 24 V.
The higher the performance characteristics of the device, the higher the price is set for it.
There are new units:
- New.
- Used.
New devices naturally cost more.
Generators for Kalina are produced by different manufacturers. So, you can buy a device from the company:
- ISKRA (Slovenia).
- LKD (China).
- BATE (Belarus).
- Eldix (Bulgaria).
- StartVOLT.
- KZATE.
- Pramo.
- Bosch.
Products from Eldix, Bosch, and BATE are more valued. Products from the Chinese company LKD are cheaper.
You can purchase a generator at the place of purchase:
The most expensive units are sold in specialized stores, the cheapest - in the car market and through advertisements.
About the principle of operation of a car generator
The operation of the Lada Kalina generator unit is based on the following principle: an alternating current is induced in the stator winding, which is subsequently transformed into direct current through a rectifier module located on the body of the unit. The generator cover is also equipped with an electronic voltage regulator and a brush holder. The rotor of the device receives torque from the crankshaft pulley. The transmission link is a poly V-belt.
The basic characteristics of the generator set include the following parameters:
- maximum generated current – 85-90 Amperes;
- operating range of on-board voltage – 14.4-15.1 Volts;
- rotation ratio of the motor and rotor – 1:2.4;
- right-hand direction of rotation.
The housing of the unit is held together by pins that tighten the stator with the covers. The mounting sockets of the indicated covers contain bearings, which ensure the ability of the rotor to rotate. The rear bearing is installed inside the cover with a minimum gap. The front element is equipped with the ability to slide along the surface of the rotor shaft. It is fixed inside the front cover with a slight interference fit, and a pressure plate covers it from the outside. The back of the device is protected by a plastic casing.
Let's move on to the switching diagram of the generator with the on-board network. The connection diagram is very simple. After turning on the ignition, power begins to flow to the voltage regulator through the battery discharge lamp circuit. When the motor starts, the excitation winding is supplied with supply voltage from three diodes mounted in the rectifier unit.
Using the indicated signal lamp, the generator unit can be checked. If the device is working properly, the lamp lights up when the ignition is on. It goes out when the engine starts. When this phenomenon is not observed and the lamp continues to shine, the generator set should be diagnosed for the presence of malfunctions. In some cases, replacement is required, and many are interested in how to remove the generator?
Reviews
| 2. | Motel Varshavskiy – Spare parts store: Hyundai, LADA | Moscow (metro Annino), metro Annino, 32 km. MKAD (on the territory of Kashirsky Dvor 3). Telephone, |
| 3. | "Expert-Auto" - Spare parts store: Renault, LADA | Moscow (metro station Tulskaya), Zagorodnoye shosse, 7A, phone: (916) 838-00-62, |
| 4. | “Spare parts on wheels” – Spare parts store: Renault, LADA | Mytishchi, Volkovskoe highway, 13, phone, (968) 409-30-19 |
| 5. | Service station "Car service on Sedova" | m. Elizarovskaya, Sedova street, 11AB, box C |
| № | Positive |
| 1. | Ignat: six months ago I installed the servo drive myself. I bought a domestic one, it works properly, no complaints. |
| 2. | Vasily: my garage mates recommended buying a servo drive. We installed it ourselves last weekend. Control with minimal effort. My advice to motorists. |
| 3. | Kirill: I heard a lot of positive reviews about the servo drive, so I decided to install it. I've been actively using the car for over a year now and have no complaints. |
| 4. | Victor: I ordered the installation of the EUR at a service station, the guys handled it quickly and provided a one-year warranty. |
| Negative | |
| 1. | Gennady: I’m dissatisfied with the quality of manufacturing of the domestic servo drive. Three months after installation it had to be removed and repaired. |
| 2. | Slavik: the EUR I installed lasted six months, after which the bearing flew. |
| 3. | Sergey: I used the servo drive for six months, after which I returned the power steering. Broke too often. |
Conclusion
How to determine the malfunction?
Despite the fact that repairing the EUR requires contacting a car service, you can detect the first symptoms of a malfunction yourself
Viburnums on the front panel have a special yellow indicator, which, in the event of a breakdown of the electric amplifier, lights up and reports an error in the system. If it lights up, it means you have another reason to visit the nearest auto repair shop. But it’s immediately worth noting that the yellow indicator does not indicate a critical malfunction, but only signals the occurrence of a problem that allows you to drive the car, but without the participation of the ESD.
If the electric power steering has completely failed, it is better to stop immediately and pull out its fuses.
. In Kalina they are located on the left side of the steering wheel. Theoretically, in case of malfunctions, the EUR should turn off on its own. However, it doesn’t happen once at a time. Therefore, to be sure, it is still worth taking care of the fuses.
How to lubricate the electric power steering on a Kalina
While driving, I began to notice a slight biting of the steering wheel. I googled and found very useful information on this topic. I did everything as described in the article and was very pleased with the result. It takes 15 minutes, and the result...
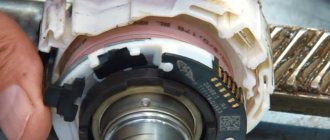
Some owners of Kalina cars note poor handling after 50 thousand kilometers. The car begins to “scour” along the road, the steering wheel becomes uninformative and “wobbly”. If the tire pressure is normal and the wheel alignment angles have been checked, you can lubricate the EUR Kalina to eliminate these symptoms. Gears of the EUR gearbox (electric power steering) Kalina, lacking lubrication, bite each other, they become wedged, as a result of which the forces on the steering wheel increase In the EUR by another At the factory, lubricant is supplied, but during operation its lubricating properties are lost. By filling the amplifier with new lubricant, you will not only renew it, but also simply increase its quantity, because it is no secret that the factory knows how to save money). To avoid expensive repairs of the Kalina EUR, you will have to work with your hands. To perform this work, you will need to unscrew 5 bolts of the plastic steering wheel cover. Then, using a 13mm socket, unscrew the two front nuts securing the steering column to the body. The steering wheel together with the mount will go slightly down and access will open to the bolt, which is located horizontally (shown in the photo with a red arrow). For the convenience of unscrewing it, you can use a cardan and a thirteen-socket head. When the bolt is unscrewed, you can apply lubricant into the resulting hole. We will apply lubricant with an ordinary medical syringe. It is advisable to put a thin tube on the toe of the syringe, insert the tip of the tube into the hole and, pressing on the syringe piston, apply lubricant to the gearbox. When applying lubricant, it is advisable to swing the steering wheel to the left or right for better distribution of lubricant on the gears of the power steering gear. To completely fill the electric booster with lubricant, you will need approximately two syringes. It is better to take imported, low-temperature lubricant containing molybdenum. Reassemble the unit in reverse order
What kind of lubricant should I use to lubricate the insides of the EUR, there is a plastic gear there?
- Power steering switches off in Kalina - 1 answer
- Kalina electric power steering does not always work - 1 answer
- EUR does not work on Kalina - 1 answer
Most car owners lubricate with lithol (but it affects the plastic), read the comments here and under the first video. But it is better to choose technical Vaseline or special lubricants for plastic gears, such as silicone grease. The second video has an overview of lubricants.
The problem of jamming EMUR (aka EPS - electric power steering) is familiar to many Kalinovods; this malfunction can be considered a disease of all Kalinas, unfortunately. However, our man would not be ours if he had not found a solution to this problem.
In this article I want to talk about how to fix the problem of the Lada Kalina steering wheel biting quickly and inexpensively, at home, without the need to replace the EUR.
As you understand, the problem is more than serious. There are a lot of threads on thematic forums online in which owners share sad reviews about how at one fine moment while driving the steering wheel simply jammed and stopped rotating. Everyone has their own outcome, some managed to avoid an accident, some did not, in general there is a problem and it needs to be solved immediately.
In order to eliminate the steering wheel of the EUR Lada Kalina from biting, you need to have: several keys, a Phillips screwdriver, as well as a syringe and lubricant (Litol or alternative).
How to tighten the electric power steering rack?
The appearance of a knocking sound in the operation of the electric power steering is associated with the need to tighten the steering rack.
How to do it right:
- First you need to disconnect the battery; to do this, disconnect the terminals from it. Unscrew the battery mount; to do this, you need to unscrew two more nuts located at the edges. After this, the battery is removed and put aside.
- Then you need to lift the plastic stand, there are four more screws under it, they can also be unscrewed.
- Having done this, it is necessary to move this stand forward until the platform is disconnected from the air filter housing retainer pad. After this, the trim can be moved back, this will provide freer access to the rail itself.
- At the next stage, you will need to crawl your hand under the rail. Directly below it, as shown in the photo, there is a rubberized cap; it will need to be removed, this will allow the key to access the adjusting nut.
- To perform adjustment work, you will need a special wrench to tighten the rack; without it, the adjustment procedure will not be possible. Using this wrench, you need to crawl under the car rail to install the tool in the required hole.
- When adjusting, be careful not to overtighten the rack. If its tightening is very strong, then when cornering the rack will bite, and this, in turn, may affect the safety of movement. The angle of adjustment is always different, it depends on how much the nut is loose, but usually when performing such work the nut is tightened by approximately 30 degrees. This should be enough to get everything right. After the adjustment is completed, it will be necessary to check that this task was performed correctly. That is, you will need to make sure that the steering wheel turns normally to any position all the way and there is no knocking. If the knock remains, then the adjustment continues.
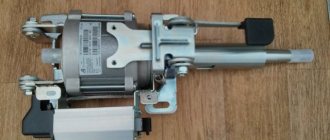
What does Kalina's power steering consist of?
This unit is an independent device included in the steering mechanism of the Lada Kalina. It allows the driver to turn the steering wheel without much effort, and also ensures softness and smooth operation of the moving parts of the steering system.
Structurally, this mechanism cannot be classified as complex units. The electric power steering has the following parts:
- electric motor;
- gear unit;
- control module;
- sensors that monitor the torque, speed and number of revolutions made by the crankshaft.
The Lada Kalina on-board controller continuously monitors the functioning of this amplifier and controls its operation, but malfunctions do occur and many car owners are very interested in how to eliminate them. The mechanism is activated at engine speeds of 400 rpm. When the speed exceeds 60 km per hour, the electric booster stops functioning. This is done for the sake of safety, because at high speeds the driver must have confident feedback on the steering wheel, which a “light” steering wheel is not able to provide. With increasing speed, a gradual decrease in the magnitude of the force in the mechanism is observed.
➤ Electric booster Grant Liftback - step-by-step installation
Cars of the Lada Grant family are equipped with power steering as standard. Electromechanical power steering (hereinafter referred to as EPS) is installed individually by the owners.
Electromechanical power steering
ESD is a relatively new development of modular control, which, like power steering, has advantages and disadvantages.
Is it worth installing electric power steering on a Lada Granta car?
The cost of the EUR for Granta Liftback is 15-20% more expensive than its hydraulic counterpart. Not every owner can afford installation.
Removing and disassembling the generator
Disconnect the wire terminal from the negative terminal of the battery. Remove the generator belt (see “Checking the condition and replacing the generator drive belt”).
By pressing the lock of the generator pre-excitation wire block. . disconnect the block from the voltage regulator connector.
Using the “13” socket, unscrew the nut securing the wire lugs to terminal “B+”. . and remove them from output.
Using a 17mm socket, unscrew the bolt of the lower mounting of the generator and remove it. Remove the nut from the generator bracket.
Using a 13mm socket, unscrew the nut of the bolt for the upper mounting of the generator.
. and remove the generator. We disassemble generator 5132. 3771 to replace the voltage regulator, rectifier unit, rotor, stator and bearings.
Using the “8” socket, unscrew the three nuts securing the casing.
. and remove the casing.
Remove three metal washers from the casing mounting studs.
Using a slotted screwdriver, unscrew the two screws securing the voltage regulator terminals.
Using the “8” socket, unscrew the two nuts securing the voltage regulator.
. and remove the regulator.
We use a marker to mark the relative positions of the generator covers.
Using a 7-point socket, unscrew the four bolts holding the covers together.
Remove the back cover with the stator assembly. If the stator does not come out of the front cover, pry it off with a screwdriver from different sides relative to the front cover.
We put a high “24” head on the pulley fastening nut and through its hole insert a “8” hexagon into the hole of the rotor shaft. We unscrew the pulley fastening nut, holding the tool head with a pipe wrench or in a vice. Remove the spring washer
. and a spacer washer.
Push the rotor shaft out of the front cover.
. and remove the cover to replace the front bearing.
. Using a slotted screwdriver, unscrew the four screws securing the bearing pressure plate.
Remove the pressure plate.
Use your hands to push the bearing out of its seat.
. and remove it. If it is not possible to push out the bearing, we knock it out using a mandrel or tool head of a suitable diameter. To replace the rear bearing...
. Using a two-jaw puller, press the bearing from the rotor shaft. When performing this operation, the puller screw should be pressed exactly into the center of the shaft so as not to damage the plastic insulator of the rotor slip rings. To install the puller grips, two flats are made on the plastic rotor bushing. If it is necessary to remove the rectifier unit or stator.
. We unsolder the six terminals of the stator winding from the terminals of the rectifier block. . and, having unscrewed the three fastening nuts with a “8” wrench, remove the rectifier unit and the stator. Using a tester, we check the stator and rotor windings for open circuits and short circuits to the housing (see “Checking the generator”). We assemble the generator in the reverse order. To install the rear bearing, rest the front end of the rotor shaft on a wooden block.
. and press the bearing onto the rear end of the shaft using a mandrel or a piece of pipe of a suitable diameter, applying force only to the inner ring of the bearing. If the front bearing cannot be inserted into the generator cover...
. We press it in with a suitable tool head, applying force to the outer ring of the bearing.
Tell me how to remove and replace the Lada Kalina generator? Otherwise there is not enough voltage, last time I changed the regulator. But it didn’t help for long, I want to install a new one that’s more powerful.
- The reason for the whistling of the generator on the VAZ Kalina - 7 answers
- VAZ Kalina generator fire – 3 answers
- Generator failure on Kalina, station wagon – 3 answers
- Why doesn't the new generator charge? – 3 answers
- Kalina has trouble starting - 2 answers
There seems to be nothing complicated about removing and replacing the generator on a Lada Kalina...
To replace the generator with a 16-cl. Kalina you will need a warm garage with a pit and a set of keys: 13, 19; heads: 8, 10 and 13.
Remove: the plastic engine protection and the washer reservoir (after all, it would be better to unscrew a few extra nuts than to suffer later). So remove the connectors from the washer motor and use keys “8” and “10” to unscrew the nuts securing the barrel. The barrel is screwed in two places.
Then remove the alternator belt and remove the “gene” chip.
If there is engine protection at the bottom, then remove it too. Then disconnect the generator wires.
The wires are fastened with two bolts (it’s not difficult to reach the top one, and the second one from the bottom from the hole with a head and a key set to “13”, just for this it was necessary to remove the tank).
Remove the generator from the Kalina from the bottom, and if it is an 8-valve, then pull it out from the top.
Of course, you can remove the generator on Kalina without a hole, using the keys to climb up from above, but this will be much more difficult to do.
Operating principle
The basic principle of operation of the generator is as follows: a three-phase alternating current is induced in the stator winding, which is converted into direct current using a rectifier unit attached to the cover of the device. On the cover there is a unit consisting of an electronic voltage regulator and a brush holder. The rotor rotates from the crankshaft of the car engine via a serpentine belt.
The Lada Kalina generator has the following characteristics:
- maximum output current - 85-90 A;
- voltage - 14.4-15.1 V;
- engine-generator gear ratio - 1:2.4;
- direction of rotation is right.
4 bolts secure the stator and covers of the device. The covers contain bearings in which the rotor shaft rotates. The rear bearing is located on the rotor shaft; it is mounted in the rear cover with a small gap. The front bearing, which slides along the rotor shaft, is installed in the front cover with a slight interference fit and covered with a pressure plate. The device is covered at the back by a plastic casing.
The generator connection diagram is quite simple. When the car's ignition is turned on, voltage is supplied to the voltage regulator through the low battery warning light. When the engine is started, the field winding receives power from 3 diodes that are installed on the rectifier block.
Typically, checking the alternator is easily done using the battery charging warning light. If the device is working properly, this lamp should light up when the ignition is turned on, and when the engine starts, it should go out. If the lamp burns brightly or at full intensity, then the generator needs to be replaced or repaired because it is faulty.
Possible malfunctions and their causes
The main problem that causes damage to the electric power steering is a malfunction of the speed sensor.
The EUR installed on Kalina does not work with a constant force applied to the steering rack. The amplifier begins to operate at full strength only when the car is moving at low speed or is at rest. When accelerating, the power steering forces on the steering rack decrease. That is, the lower the speed, the more the power steering starts to work.
The naturally described malfunction can only be detected when the car is standing still or moving at low speed
.
This failure can only be corrected by completely replacing the speed sensor. Moreover, here it is not necessary to go to the service. You can replace everything yourself.
The second malfunction may be hidden in the EUR itself. Basically, it consists of self-disabling the electric power steering due to the fact that it has not passed self-test. That is, the device turns off automatically so as not to interfere with the driver when driving the car.
This kind of malfunction guarantees a trip to the service station and will require you to spend a lot of money.
Causes of EUR failure
This is a useful car unit
The main cause of the malfunction lies directly in the electric amplifier. When the ignition is turned on, a self-diagnosis of the system occurs, which the mechanism does not pass. As a result, the EUR is simply turned off, and this affects the ease of driving. Repairing the device can cost a pretty penny, so if the car is still under warranty, it is better to have it serviced by a dealer. If the amplifier fails completely, turn off the power. In this case, the torque will be received by the steering rack, bypassing the electromechanical amplifier.
Another frequently occurring malfunction is a breakdown of the speed sensor. This sensor is responsible for the operation of the electric booster at different speeds. The power steering operates at full power only when driving at very low speeds. When accelerating, the force created by the amplifier on the rack decreases. The speed sensor is responsible for this operating algorithm. It is not difficult to replace it yourself, so repairs will cost a small amount.
If the speed is higher, then the EMUR works less, since it is not needed. For this reason, on Kalina with electric power steering, control at high speed is the same as in the “standard” model without this device. If the speed sensor connected to the speedometer fails, the electric power steering control unit receives incorrect data. As a result, the power steering switches off, and the driver sees a yellow indicator on the dashboard, notifying about an error in the electric booster.
Electrical equipment Lada Kalina
If the voltage regulator unit, capacitor and not a tight fit of the brushes are faulty, or if they are worn out, the vehicle's supply voltage deviates from the norm. In this case, it is necessary to check the above listed elements and, if necessary, replace them. In this article we will talk in more detail about diagnosing and replacing generator elements in a Lada Kalina car.
To remove the Lada Kalina voltage regulator you will need the following tool:
flat-blade screwdriver, 8mm and 10mm open-end wrenches and 7mm, 8mm and 24mm socket wrenches, hammer, soldering iron, universal meter (with DC voltmeter and megger)
Checking the functionality of the voltage regulator on the Lada Kalina generator
1. Move aside the rubber insulating boot of the positive terminal from the generator. 2. Start the engine and allow the engine to warm up so that the vehicle operates normally at idle speed. 3. Measure the voltage between the positive terminal and the body (negative terminal). The voltage should be 14.5-15.1 volts.
If there is a deviation from the specified range, the voltage regulator must be replaced. See also checking the Lada Kalina generator regulator in the section “Replacing the voltage regulator”
Checking the functionality of the Lada Kalina generator capacitor
The capacitor is usually checked with a specialized meggometer, since not all universal devices have a measurement of up to 10 MoM. The device is set precisely in the range of 1-10 MΩ. Before connecting to the capacitor, the device shows infinity. If connected to a working capacitor, it begins to charge and an electric charge accumulates on its plates - current flows and, accordingly, the resistance on the device drops. After charging it (saturating the capacitor plates), the resistance again becomes infinite.
Replacing the voltage regulator Lada Kalina
carried out as follows
1. Disconnect the negative cable from the battery. 2. Disconnect the excitation block from the generator.
3. Disconnect the positive terminal from the battery by unscrewing the nut.
4. Remove the factory seal from one of the screws holding the plastic casing and remove the screws. Remove the protective plastic cover. 5. Remove the two screws securing the regulator and remove the voltage regulator.
6. Check the ease of movement of the brushes. They must protrude at least 5 mm from the voltage regulator housing. 7. You can check the voltage regulator by connecting a 12 V lamp to its outputs and applying a voltage in the range of up to 12 volts to its inputs, while the lamp should light and the voltage is more than 12 V to 16 V.
If the voltage is too high, the lamp should go out. If this algorithm does not work, then the regulator must be replaced. Installation of the regulator is done in the reverse order.
Replacing the rectifier unit with a capacitor Lada Kalina
1. Using a soldering iron, unsolder the six leads and remove the 3 bolts.
2. Remove the rectifier unit from the generator. Installation of the rectifier unit is carried out in the reverse order
Checking diodes on the rectifier block Lada Kalina
1. Dodas are checked with a universal device. (6 diodes in total) Attach the black “negative” probe to the negative plate, and the positive “red” probe alternately to the three contact terminals of the diodes. The resistance should be 580-620 Ohms.
Attach the red “positive” probe to the negative plate, and the negative “black” probe alternately to the three contact terminals of the diodes. The resistance should be 580-620 Ohms.
Checking the windings of the Lada Kalina generator
1. Check the generator windings with a device. All windings should have approximately equal resistance, without significant deviations. Deviations indicate a break or short circuit.
EUR malfunctions and their diagnosis
Despite the simplicity of the design of the unit we are considering, if the need for repair arises, it is difficult to carry out; there are different malfunctions and the methods of elimination are often complex. An important “aggravating” circumstance is the poor location of the mechanism. The manufacturer placed this module directly under the radiator of the LADA Kalina interior heating circuit.
Operation in cold weather has a temperature effect on the electric power steering. Over time, this factor causes malfunctions in the amplifier. This phenomenon is very common for Lada Kalina. If a unit fails, the driver immediately feels it becomes more difficult to control the car at low speeds. The most common factors leading to electrical amplifier malfunctions can be grouped into the following areas:
- the speed sensor “does not respond” and does not send signals to the ECU;
- the on-board network “suffers” from low voltage;
- the maximum speed has exceeded the permissible limit;
- The control module has become unusable.
The identified malfunctions and solutions will be discussed below. When the ignition is turned on, the ECU independently diagnoses the amplifier system for possible failures and malfunctions. If there is no signal from any of the sensors, the on-board controller automatically identifies this sensor as faulty, and the corresponding lamp on the display on the front panel of the cabin immediately lights up. This indicator looks like a steering wheel with an exclamation mark and is highlighted in orange.
The instructions supplied by the factory to the LADA Kalina car require immediate repairs if a malfunction is detected in the electric power steering mechanism, especially when the power is turned off. In such a situation, the driver should drive to the service center at low speed. Practice shows that this development of events does not always take place. An orange symbol on the dashboard may not indicate the need for repair procedures. It indicates the presence of a problem in one of the structural components of the system. Sometimes failures can occur in the supply circuit or one of the sensors has failed. These situations do not in any way affect the functionality of the node, and control control remains active.
If the steering wheel, after the indicated symbol is illuminated, has lost sensitivity, then a malfunction of this kind is considered quite dangerous, since it interferes with the normal functioning of the mechanism as a whole; it is also bad when the amplifier is turned off. Such problems arise quite often and really require urgent intervention. Ignoring this state of affairs may be associated with dire consequences for the LADA Kalina car. In order to quickly respond to a problem that has arisen, we quickly remove the fuse located in the panel block on the left side of the steering wheel. This measure prevents further damage to the electrical amplification system, since it completely deactivates it. You can go to the repair site, but you will need to apply more force to the steering wheel, because the amplifier is no longer functioning.
About qualified electric amplifier replacement
If there is a need to replace the mechanism when the ESD does not work, we recommend contacting experienced technicians. When the car is under warranty, the most rational measure would be to contact the dealer network to resolve the problem.
There are situations that do not allow you to resort to these two methods of eliminating an amplifier malfunction. Then the only solution will be to manually replace the mechanism that has become unusable.
Let us immediately make a reservation that the replacement process if the EUR does not work is characterized by sufficient complexity. To carry it out successfully, you will need experience and the possession of special tools. Unqualified replacement actions can aggravate the scale of the breakdown, which will entail a significant waste of money on more expensive repairs in service conditions.
Before the actual replacement procedure, we recommend that you carefully study the entire list of features and actions if the ESD does not work. Here you will need to delve into the connection diagram of the unit, which will avoid damage to the electrical components of the mechanism.
To remove the amplifier, partial disassembly of the front panel of the Lada Kalina is necessary. After this, the device itself must be disconnected from the entire list of supply wires. Sometimes owners repair the electric power steering, avoiding the need to replace it with a new unit. As a rule, after a complex of restoration work, standard devices work no worse than their new counterparts.
A common malfunction is the occurrence of a knock that clearly comes to the driver from under the panel or the amplifier turns off. This phenomenon may be accompanied by a characteristic squeak that occurs during rotational actions with the LADA Kalina steering wheel. This situation is usually solved by using a special lubricant. If such an action does not bring the expected result, then a more detailed diagnosis of the amplification mechanism will be required.
To install the electric power steering in the seat of the Lada Kalina, you will need to be attentive and patient. All cable connectors must be tightly seated, and the device itself must be firmly secured. Only after this can you proceed to the reassembly of the previously dismantled front panel components.
Let's sum it up
In a modern car, which can also be considered the Lada Kalina, most systems are equipped with sensors with the help of which the on-board module carries out control. If the check light is on, this indicates that a certain type of malfunction has occurred. The cause is found using a diagnostic device. Sometimes the problem when the check light is on requires the connection of more complex scanning equipment to identify the breakdown. In any case, to prevent malfunctions, it is necessary to perform regular diagnostic inspections, which will avoid premature failure of expensive components. Answering the question of how to reset a check, the answer is obvious: it is necessary to diagnose the malfunction and eliminate it.