- Design
- How to remove
- Repair tool
- Repair
- Painting
- Video instruction
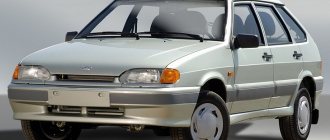
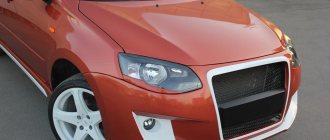
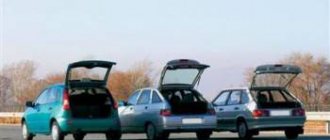
Plastic bumpers on VAZ cars serve as decoration and are damaged even with minimal contact. Do-it-yourself VAZ 2114 bumper repair allows you to avoid costs for service stations.
Removing a small dent on the bumper under the headlight on a VAZ 2114
Repair of the plastic bumper of the Lada 2114 is possible only with minor damage. If the bumper is severely damaged, it is more profitable to purchase a new bumper. Car owners often choose non-original bumpers as a replacement for a broken one. There is a large selection of non-original Lada 2114 body parts on the automobile markets.
Buying a new original bumper for a VAZ 2114 will cost more.
But you can find a used bumper - there is a chance to save on painting if the bumper matches the body color.
Repairs are canceled
Breakage of plastic car body kits is a fairly common occurrence. Apart from cases of obvious collision, the bumper can be easily damaged by snow. In cold weather, plastic parts lose their plasticity. A slight push is enough for the bumper to crack.
Prices for plastic parts for cars of the Samara family nullify the economic feasibility of bumper repairs.
The cost of repairing plastic body kits with further painting will cost much more than a new body element. Moreover, the bumper can be purchased in the same color as the car.
Of course, doubts arise: will the new element exactly match the body color? There is no need to worry, because even new cars that come off the assembly line have only slight differences in the color of plastic elements and the body.
How to glue a bumper at home: glue for plastic parts
The quality of repair of a plastic buffer depends on the glue purchased. When dry, such a product forms a full layer of polymers. They must have the same characteristics as the material of this car part.
The buffer is restored using a polyurethane-based product or glued with epoxy resin. Use this information to understand how to repair the bumper yourself.
The adhesive composition must be selected according to the following criteria:
- High temperature resistance. If the car part is heated at the time of painting, the adhesive should not liquefy.
- The adhesive base should adhere well to the plastic.
- When choosing a thermosetting or thermoplastic composition, keep in mind that after this the part will have to be painted.
Popular types of adhesives
There are different types of adhesive for car bumpers. However, it is important to know how to seal a crack on it and which adhesive to choose in a particular situation. The following brands have won the greatest trust:
- AKFIX. Bonding and high strength. No additional primer required. Can be used for spot gluing.
- Weicon Construction. Durable and elastic. Not afraid of temperature changes, high humidity and other weather factors.
- Adhesive for plastic PowerPlast. Provides good adhesion.
- Two-component 3M composition for gluing plastic. Used for DIY repair of fiberglass bumpers and for gluing other plastic car parts. Can be sanded and painted.
- Moment. Universal superglue for gluing plastic car bumpers. The advantages are a relatively low price, resistance to moisture, and a strong connection between the parts. Disadvantage: relative toxicity.
The properties of the adhesive and additional materials determine the quality of the fastening. Therefore, during repairs, it is rational to seal the holes with patches made of the same material as the part being repaired.
To carry out repairs at home, you need to stock up on epoxy resin. A mesh will be placed on it to increase the strength of the connection.
Selecting a new part
When replacing, it is necessary that the new part exactly matches the dimensions of the original product. It often happens that the sides of the VAZ-2114 bumper, when replaced, do not reach their seat, and the joint with the front fender turns out to be ugly. This happens because manufacturers of non-original parts make the bumper slightly smaller than the factory one - the price to pay for a cheaper part. Another problem with aftermarket bumpers is that over time the paint and varnish will flake off the surface. This happens due to non-compliance with the dyeing technology.
The best option is to purchase an original part. Even in this case, the purchase will cost less than repairs.
How to properly repair a cracked plastic bumper with your own hands
Restoration will only be considered high-quality when the structure is monolithic not only outside, but also inside. Think about this idea, and you will understand that mesh, staples and other reinforcing tricks cannot provide this. That is why soldering using filler plates (rods) and gluing using special kits have confidently replaced techniques that we do not recommend for use.
Crack preparation and method selection
The successful result of any technology for repairing a plastic bumper is determined by the preparatory stage. If you leave the damage as they say “as is” and immediately start soldering or gluing, then, alas, all efforts will be in vain. That is why you should not trust the restoration to the first service station you come across, but it is even better to take the initiative into your own hands.
There is nothing complicated in preparing a crack:
- Drill out the end of the damage. This must be done without fail, since the hole will help prevent further cracking of the bumper under the influence of vibrations.
- Sharpen the edges along the outline. This increases the contact area with the glue or molten filler rod. This means that the strength of the repaired area as a whole increases. You can sharpen it with an angle grinder or a piece of medium-grit sandpaper.
There are no specific recommendations regarding the choice of one of the effective recovery technologies. You can start from the existing equipment: if you have an industrial hair dryer, then it will be cheaper to solder. The situation can be considered a matter of taste in the absence of any devices, since gluing and soldering guarantee an equally long-term result.
How to solder correctly
What do we mean by the word “competently”? This is a sign of quality in the form of a homogeneous surface obtained. You can draw a parallel with the question of how to remove scratches from car glass with your own hands. In recognition of the high-quality work done when polishing glass, we recorded the absence of a lens effect upon completion of the work. Here, at the finish, the plastic should be exactly one whole without any putty or other finishing.
To achieve this result, follow simple rules:
- Connect the cracked parts into a single whole and grab with a regular soldering iron from the side opposite the front.
- Cut the rod into small pieces 15-20 cm long.
- Place the filler strip against the crack, heat it with a hairdryer and press it with the palm of your hand hidden in the glove.
- Make several fixing stitches. Cut the rod into several pieces 5-7 cm long and solder them across the crack in small increments (no more than 5 cm).
- Repeat the steps described for the front side, excluding the section with soldering the transverse strips.
- Sand the front surface until the seam is aligned with the bumper profile.
As equipment, experts recommend using a special hair dryer with a thin nozzle. However, you can also narrow the heating zone in the case of a household hair dryer. To do this, just select a suitable head from a set of keys.
In everyday life, we came across situations where savvy craftsmen found a replacement not only for a special hair dryer, but also for filler materials. So, instead of a rod, they used plastic shavings from the bumper being repaired, cut in an inconspicuous place. Then the resulting material was melted and the crack was filled on both sides. Practice shows that this economical option is not inferior to proprietary technology.
How to seal correctly
For gluing it is necessary to use a special repair kit. The kit for restoring plastic from ZM has earned special respect online, so we take its instructions as a basis.
To begin with, what does a repair case for repairing cracks in plastic bumpers from ZM include:
- Two-component adhesive.
- Glass tape with a sticky backing.
- Adhesion activator.
- Reinforcing tape.
Having prepared and degreased the damage to be repaired (for example, with acetone, waiting for it to dry completely), we proceed to restoration:
- Glue the crack with reinforcing tape from the front side. You will get a rigid structure with which you can work.
- Turn the bumper over - further work will be done on the opposite side to the front.
- Degrease the area around the crack and wait until the solution dries completely.
- Apply the adhesion activator in two layers with intermediate drying for a few minutes.
- Mix the glue components in a 1:1 ratio and apply the mixture to the defective area.
- Immediately apply glass tape.
- Repeat the previous two steps twice. The result should be 3 layers of glue and 3 layers of glass tape.
- Take a break for two hours.
- Remove the reinforcing tape from the front side, degrease and apply glue in one layer without glass tape.
- After a day, grind the resulting seam until it is level with the surface of the bumper.
Do-it-yourself dismantling and installation
To replace the front bumper of a VAZ-2114 with your own hands, you can use a flat platform. Although the best option is to work on a lift or in a viewing hole.
Before starting work, you need to prepare a place for the new bumper. This is either a special table or a flat, clean floor surface. Before installation, the new part should not be removed from its packaging: the painted surface can be easily damaged. The car itself must be washed before starting work, including the wheel arches.
The dismantling procedure is as follows:
- On the side of the front wheels, you need to unscrew one screw at the top of the bumper.
- Remove the 6 screws securing the bottom of the bumper to the fender liners on each side. For further work, the locker can be removed completely. This will give freer access to the side brackets. You can also simply bend the fender liner to the side, but then further work will have to be done blindly.
- Using a “10” key, you need to unscrew the 4 nuts of the side brackets. Dirt getting into these places causes the nuts to stick tightly, and attempts to unscrew them lead to the stud breaking. To avoid these troubles, you need to thoroughly clean the fasteners of dirt and treat them with aerosol lubricant. Leave to sit for 10 minutes, then start turning away.
- Remove the license plate and plastic plate. Under them you will find 2 large screws for a Phillips screwdriver. They attach the bumper to the amplifier. You also need to unscrew 3 screws in the deflector area.
How to remove
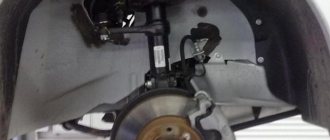
Repairing the bumper yourself requires removing the element from the car. The process of removing the bumper is divided into 2 stages: partial removal of the fender liner and removal of the bumper. Before the procedure, you need to prepare a tool: a Phillips screwdriver and a set of keys.
- Unscrew the 3 bolts securing the wheel protection.
- Unscrew the 2 bolts securing the fender liner. The bolts are located above the wheel.
- Bend the fender liner and unscrew the 2 nuts securing the bumper. Perform the same procedure on the other side of the car.
- Remove the license plate frame and unscrew the 2 mounting bolts.
- Unscrew the 2 mounting bolts at the edges of the lower windows.
- Remove the bumper from the car.
When replacing a bumper with a new one, you must remove the side brackets from the old one. To do this, you need to unscrew 3 bolts with a screwdriver.
When dismantling the bumper amplifier, it is necessary to unscrew the 2 mounting bolts at the edges.
Amplifier
The fastenings of the front bumper of the VAZ-2114 are all unscrewed, but nevertheless it is impossible to remove the outer part. The reason lies in the plastic latches, which are located on the inside of the bumper in its upper part. Several clips are located under the headlight eyelashes. To separate them, you need to press the plastic from the inside with a pry bar or a long screwdriver. In the middle part there are also clamps under the radiator trim.
The amplifier may be damaged in a collision. It is the connecting link between the body and the front bumper of the VAZ-2114. It is also necessary to replace it if there is damage.
To remove the amplifier, unscrew 4 nuts to “13”. Be sure to use a long wrench. Using a short one will not allow you to reach the mount.
Under the amplifier there are 4 studs screwed into the side member of the car. They often have one or more wide shims. They are selected in such a way that the upper part of the bumper fits tightly to the eyelashes of the headlights. Therefore, when dismantling, you need to pay attention to how many washers were on each stud.
Sealing process - preparation
Before sealing the bumper with fiberglass, we recommend conducting a trial compatibility test on a small area of the damage. To determine how to glue the body bumper, carefully study the manufacturer's instructions. The adhesive material must match the surface type of the part.
If there are body kits at the site of damage, they must first be secured and only then removed. At the same stage, accurately determine the material of the spare part to select the desired adhesive base.
This information is on a stamp on the inside of the product. When the mixture is selected, all that remains is to use it correctly in order to correctly restore the spare part after damage.
In order for the repair to last as long as possible, the bumper will have to be pre-treated. The part is disconnected in advance.
Carry out mandatory training:
- thoroughly clean the car buffer from dirt accumulations;
- remove residual oil and dust;
- let the parts dry;
- wipe it with a chemical to degrease it;
- grind the broken surface with an abrasive or a grinding machine;
- if the cracks are too deep, we recommend drilling them out, protecting the spare part from increasing damage.
With the listed procedures, you will achieve stronger adhesion of the glue to the surface, which will guarantee the quality and long service life of the part.
How to glue a bumper: let's get started
Once the surface has been pre-treated, it is time to begin the bulk of the restoration process. Cover the damaged area of the spare part with a primer and wait until the substance dries completely.
The second option: seal the crack on the bumper from the outside so that glue does not leak out of it. To do this, use foil. Once the adhesive has dried, the material must be removed.
Primary gluing from the inner surface of the buffer is carried out with a composition having reinforcing properties. To do this, we recommend using a composition based on epoxy resin with a high degree of adhesion. If you have previously decided to abandon priming work, then carefully move the damaged areas towards each other.
Sometimes the cracked parts are held together with metal staples. However, fixing the two parts from the outside is done with standard paper tape. He will carefully secure the edges of the surface at the same level before painting. After gluing the hole from the inside, the tape will be easier to remove than the staples.
When both parts of the car are securely fixed, apply the adhesive mixture to both parts of the damaged part. Before it dries, glue a metal or synthetic mesh to strengthen the seam.
This can be a painting mesh, which also needs to be treated with adhesive on top. It is impossible to predict the drying time, since each chemical composition takes its own time to dry.
Final stage
When the crack is glued and the adhesive solution is completely dry, the car buffer remains visually unattractive. There is no need to sound the alarm - this is natural, because there is still finishing work ahead.
Let's get started:
- Remove any excess compound on the plastic, carefully cut it off or sand it.
- Prepare the surface of the spare part for further painting. To do this, use a primer, putty or other materials for this purpose.
- The car buffer must be painted according to technology. Such paints are available in car dealerships.
Detailed work on painting a bumper with your own hands in the video:
Results
Repairing a buffer at home is not a difficult task. Therefore, if you have minimal experience in this matter and follow all the instructions, you can quickly restore the part. And you won’t have to spend money on paying a car mechanic.
Glue for car parts has significant advantages. It is cheap, its purchase will not affect the family budget. The method of sealing a cracked buffer with an adhesive mixture is in no way inferior to sealing.
We recommend watching the video instructions on how to glue a bumper with glue yourself:
Bumper adjustment
When reinstalling the front bumper of a VAZ-2114, the first thing you need to pay attention to is the correct position of the amplifier. You may have to try the bumper on several times to figure out how to adjust it to the optimal position.
In addition to the adjusting washers, the amplifier can be adjusted in height by adjusting it in the mounting holes. This way you can press the bumper more tightly to the headlights and front fenders. This will eliminate the gap between them and give the car a cleaner look.
Adjustment using washers is more difficult. In order to raise the front part of the bumper, you need to place washers between the body and the amplifier on the lower studs. But there is a nuance here: if the thickness of the washer is excessive, then the side parts of the bumper will not fit well with the front fenders. There will be excessive clearance and the front end will be pushing too far into the headlights.
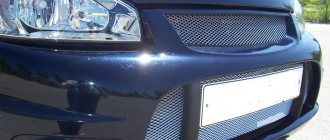
If the owner wants to tune the front bumper of a VAZ-2114 by adding a decorative mesh to the design, this will not affect the adjustment and subsequent installation. And if the tuning is due to a non-standard bumper, then, most likely, serious problems will arise both with fit and installation.
Installation of the front bumper of the VAZ-2114 occurs in the reverse order. The only difficulty is in the adjustment. To avoid displacement of the body kit relative to the body axis, immediately when installing the amplifier you need to pay attention to its alignment. Otherwise, the bumper may be shifted to the right or left, which will be noticeable against the background of the car's headlights.
Requirements for tools for soldering plastic
Each tool used during work ensures the implementation of one of the basic components of the repair. It can be fundamentally different in design and principle of operation, but at the same time serve the same purpose:
- heating, the main thing that is required when working with thermoplastic plastics, with its help you can both give the desired shape to a part and be embedded in its structure using a filler or reinforcing material;
- cleaning and preparation for painting, the repaired surface must be carefully leveled and create the desired roughness;
- reinforcement, such as gluing, welding or soldering, will not be able to provide the specified strength.
Various tools can be used for heating:
- an ordinary soldering iron of sufficient power, it is very desirable to be able to adjust the temperature;
- an industrial hair dryer differs from a household hair dryer in the very high temperature of the blown air, which can reach up to 600 degrees and above, the energy is also regulated;
- a gas burner has high thermal power, but works with an open fire, which is not always desirable;
- a specialized device for reinforced soldering of plastic - a heated stapler, it uses wire staples of various shapes, heated by the low-voltage winding of a transformer to the melting temperature of the plastic, very similar to the “Moment” type pulse soldering irons known to many.
Further processing can be carried out using drill attachments with adjustable rotation speed.
Features of sealing polyurethane parts
Polyurethane materials have a lower melting point than polypropylene materials, and when heated above +220°C they begin to collapse. Therefore, it is important not to overheat the part, otherwise the polymer will become brittle and lose its properties. Also, when performing preliminary preparation, the ends of the cracks in the polyurethane bumper are not drilled.
- The splits are reinforced with a special mesh or staples from a furniture stapler.
- For a heat gun or hair dryer, select a nozzle with a 10 mm nozzle.
- Then 8 mm wide polyurethane electrodes are laid on top and melted with a construction hairdryer. In this case, the polymer should melt quickly, but without evaporation. Just as in the case of a propylene product, the strips are fused starting from the middle of the crack, then the middle of the half, and so on.
Reasons for withdrawal
In fact, there can be many reasons for removing the front end of your car. Everyone has their own views on this issue.
But let’s still name the main reasons why car owners most often turn to car services or decide to dismantle and even replace the front bumper on their own.
- The replacement was caused by damage to the element as a result of a collision or accident. The integrity of the structure is compromised, and driving with a broken front end is not particularly pleasant.
- Dismantling work with the subsequent return of elements to their place can be carried out due to engine repairs, when replacing the radiator and other components of the engine compartment.
- External modification in the form of tuning the front of the car.
- Replacement of headlights, installation of new optics.
- Installation of decorative overlays, mesh.
Dismantling works
If the bumper is broken, then you have two ways to solve this issue - replace it with a new one or try to restore the old one. This largely depends on the desire and degree of breakdown of the previous element.
How to choose
When choosing a new bumper for the front of your car, you should adhere to several of the most important, but fairly simple rules and recommendations.
We will be happy to share them with you.
| Selection criterion | Peculiarity |
| Plastic thickness | Try to choose elements made from the thickest layer of plastic. This has a positive effect on quality and protection |
| Color | If you buy a bumper that is already painted, carefully match it to the body color of your car. If it's unpainted, then you'll have to guess with paint |
| Compatibility | Many people purchase body parts from other VAZ models or from foreign cars. For the 2114, many people call the Sniper bumper, designed for the VAZ 2115 model, ideal. Moreover, choose a design with holes for fog lights |
| Manufacturer | There are many companies producing bumpers today. But experts agree that native elements are best suited for VAZ |
| Price | The cost of domestic native bumpers is significantly lower compared to imported analogues. Moreover, the quality may be even higher than that of foreign models. The average price for a VAZ front end is 2000-2500 rubles |
An unpainted bumper is usually 500 rubles cheaper, but there may be problems finding suitable paint. Therefore, we advise you to pay a little more. AvtoVAZ produces elements painted exactly to match the colors of the cars they produce. Problems may arise here with foreign analogues.
How to solder a bumper using a soldering iron
Polypropylene, polyethylene and polyurethane bumpers can be soldered with a conventional electric soldering iron with a power of about 100 Watts. The tip must be clean and free of metal solder residues.
The material from the edges of the crack is moved by the tip of the heated tip into the middle, forming short stitches. After which the crack is filled and leveled. To strengthen the seam, metal brackets or reinforcing mesh are fused into it, which is preheated with a hairdryer or torch.
It is pressed into the bumper material with a heated soldering iron, recessed completely, and the plastic is smoothed out.
After cooling, the finished seam is sanded and puttied using a special polyester or epoxy putty, which should be designed specifically for working on plastic, since it will require elasticity and good adhesion.
The filler material can be taken from the same bumper, which has areas that do not perform any functions and are not externally noticeable. This will ensure full compatibility of the plastic.
How to prepare a plastic bumper for restoration
First of all, you need to collect all the fragments and fold the bumper along the cracks. This will make sure that the repair will be reduced only to fixing debris and cracked parts, and there will be no need to prepare patches.
All parts are thoroughly washed, dried and degreased. Any contamination will reduce the strength of the seams.
On topic: How to repair a crack in a plastic bumper yourself
Depending on the chosen technology, cleaning, chamfering, and selection of additives may be required. It is important to know the material from which the bumper is made; the melting point and the possibility of using heating in principle depend on this.
For example, fiberglass parts do not melt and will require adhesive compounds and repair kits.
The edges of the parts are securely fixed with clamping devices such as clamps or welding pliers.
Bumper VAZ 2114 sport
It started with the fact that I saw this bumper in one of the BZs and caught fire with it. Then, almost every week, I began to see new and new posts about the installation of such a bumper, and each time I wanted it more and more for myself. But I decided to wait until spring, because... Winter is such a thing - snow, ice and so on. But fate decided differently. My bumper was no longer original and it was slightly hit by a car while rolling back and the varnish burst. Often I had to touch up this place with paint (using a match). But last week I went to the car wash and they knocked off the paint, revealing this terrible black color. As a result, a decision was made to replace it. I found a bumper in a regional city for 3900 in color. It can be cheaper, but this is delivery, etc. and I like to look and feel what I buy and I don’t know how it will all get to the shopping center.
Installation is no different from installing a factory bumper; all fasteners fit together without problems. The only thing I recommend is to immediately buy new side brackets, because... Everything there was dirty. Everyone liked the bumper, except for the PTF masks, they are installed terribly hard and you are afraid to break them, but in general I like the bumper. For me, it freshens up the car a little and I like this lip, and the spoiler looks good under my non-stock one...
Thanks for reading and good luck on the road.
Prices
| Service | Price | Promotion price* |
| Car diagnostics on a lift | for free | for free |
| Installing a standard muffler | from 800 rub. | from 500 rub. |
| Resonator installation | from 900 rub. | from 600 rub. |
| Installing a flame arrester | from 1,500 rub. | from 1,200 rub. |
| Replacing corrugations | from 1,800 rub. | from 1,500 rub. |
Final work
After restoring the bumper, you will need to paint the element. To do this you need:
- Carefully remove excess plastic with a blade.
- Apply putty with a spatula.
- Thoroughly sand and sand the surface of the bumper.
- Apply several coats of primer. It will take time for each layer to dry (to speed up the process, you can use a hair dryer).
- Apply paint using a spray bottle. If only the restored area is being painted, it is recommended to use an aerosol can of paint.
When painting locally, you should carefully select the paint color. Otherwise, the repair area will differ in tone from the rest of the surface of the part.
In some cases, the body element, after being treated with a primer, is coated with bright paint. After it has dried, the surface is sanded again to a primer layer. Traces of paint may remain on the surface; putty must be applied in those places, then primed again in several layers and painted.