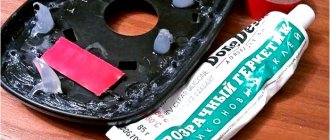
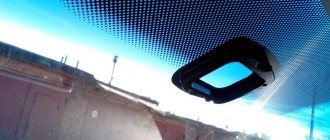
Hello, I finally decided to tinker with the mirrors, there’s simply no review in the stock ones, and they don’t look very good, I went to the market, took the first ones that were NOT stock, in the body color, and rushed to the garage to install them. In general, their fastening is native, standard, but with us there are no difficulties)) This is what the cut on the door at the stock mirrors looks like:
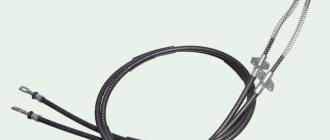
And this is the adjustment lever on the cables on the new ones:
The problem is already known, usually everyone suggests sawing a small hole in the door for the required connector, but I didn’t like this option and decided to do something more sophisticated. We disconnect the mirror adjustment cables from the plastic fasteners, push them through the door connector and hook them back to the plastic, in the end everything falls into place. This is what the stock looks like:
And this is the view with the new ones:
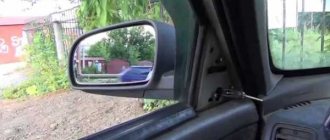
Actually, it was because of the appearance that I changed it, and the visibility was strained in these; you can see everything much better.
Pros: Better visibility, presentable appearance, adjustment from inside(?)
Cons: Both the stock ones and these ones tremble and rattle on bumps. Plus, either because of my shamanism, or because of the not quite correct fastening, but there is almost no adjustment from the interior, and the mirror barely holds on, I had to put the corners of the mirrors on electrical tape to at least somehow fix it in the position I needed. So perhaps the option of sawing the connector on the door is more justified, see for yourself.
Added later: the problem with rattling mirrors and poor adjustment was solved once and for all in such a simple way, nothing else rattled, and they were set up as I needed, a little collective farm, but reliable and sure, I drove like this in the fall, winter and half of the spring, that’s all normal Everything is simple, I fixed the position I needed using 2-sided tape, layer on layer, as they say, 4 layers are enough.
To control the situation on the road, each car is necessarily equipped with rear-view mirrors. Two are located outside on the sides or one more is located inside the cabin. As a result, the driver receives a 360-degree view.
But it happens that the integrity of these mirrors is violated. This can happen as a result of an accident, banal looting, or some kind of accidental blow to them caused by the driver himself.
In any case, it is advisable for you to know how they are removed, disassembled, installed in place, adjusted and even insulated. Today our article will be devoted to these issues.
Price issue
First of all, we will orient you a little on the price tags that are presented on the market today.
The cost may vary depending on the manufacturer, technical features of the product and the region of its sales. Therefore, prices are average.
Mirror type
approximate cost
Outdoor heated
Obviously, the characteristics of the panoramic interior mirror provide a better view, and the presence of heated exterior mirrors provides comfort and does not require constant wiping. It is better to pay more, but buy new functional products.
Internal
Let's start with the rearview mirror installed inside your car.
Interior rear view element
There are several reasons why the driver will want or have to dismantle this element:
- The desire to replace with a more advanced, new model;
- Installation of electronics, parking sensors;
- The glass or plastic case is damaged, broken and does not allow further use of the component;
- There is a need to install sensors that are not included in the standard equipment of your car.
Replacement
Do not rush to remove the old mirror if you have not yet purchased a new product. Sometimes you have to wait for weeks because of the speed of delivery, and sometimes it’s enough to go to the market or store, where you will immediately find the desired product.
VAZ 2114 were produced until 2009, which requires the use of a standard type of fastening consisting of two bolts. This method of fixation has been used since 1976.
The downside of bolt-on mounting is the impossibility of installing an interior mirror from a foreign car. It’s good that there are many domestic products on the market that perfectly match the VAZ 2114.
You can start working.
- Remove the plug from the bolts. Although it is not always present.
- Holding the mirror body with one hand, begin to unscrew the mounting bolts with the other.
- Remove the old mirror.
- Check the condition of the seat and clean it.
- If the old bolts are covered with rust, it is better to replace them with similar new ones.
- Screw in the new mirror using the bolts.
- Insert decorative plugs so that the bolt heads do not spoil the appearance of the interior.
Installation of a new structure
The installation of new elements begins with the removal of old ones. There are several reasons for replacing factory mirrors:
- Mechanical failure of the fastening or adjustment mechanism;
- Desire to improve the appearance of the car body;
- The ability to equip the machine with electrical adjustment and heating options;
- Improved visibility around the car.
In addition to the above varieties, there are other options (convex, double, with a repeater function directly on the glass, etc.). The abundance of options for equipping the “four” allows owners to create a unique appearance for the car. The replacement of standard parts is due to the low level of assembly quality of domestic cars. Selecting from the list of non-standard review items simplifies the driver's orientation and decorates the appearance of the VAZ 2114 body. The ability to purchase goods online and an abundance of videos with detailed reviews and reviews from owners makes the selection process simple.
Lateral
There can also be many reasons for removing side mirrors. But mainly this is replacement, painting or installing a heating system.
Regardless of the situation specifically with your VAZ 2114, the first thing you will have to do is remove the elements. How to do it?
Side mirrors
Dismantling
Removing side mirrors is not a difficult task. Here you only need a screwdriver to work. Perhaps not alone.
- Pry off the plug located on the side mirror control knob.
- Behind the plug there is a screw that needs to be unscrewed with a Phillips screwdriver.
- Remove the triangular plug. In the case of the VAZ 2114, it is held in place by special clamps. So to remove it you need to carefully unscrew the latches. Use a flathead screwdriver to pry the plug and remove it without too much trouble.
- Next, three mounting screws appear in front of you.
- By unscrewing them, you will thereby remove the side mirror.
- Do the same procedure with the second rear view element.
As you can see, removing the components is quite simple; simple fastening is provided. This is largely why they love domestic cars, since even a person without much experience can disassemble and assemble most components.
Dismantling process
Disassembly
It is not a fact that you will need to completely change the rear view element assembly. Therefore, it is necessary to figure out how to properly and accurately disassemble the side mirror.
There are several ways to do this, each of which has its own characteristics.
- Press the inside of the plastic case and snap off the holders with a flat-head screwdriver. This method cannot be called reliable, since the probability of breaking the mirror itself is quite high.
- The second method is even more risky because it involves quickly striking the glass onto the surface. Choose a soft surface, such as rubber. This will allow you to quickly and easily remove and disassemble the element. Strike lightly but quickly.
- To replace the plastic housing or main fastener, you need to remove the adjusting rod and pin. Assembly is carried out in exactly the reverse order.
Heating
If you have driven foreign cars, especially in winter, you could appreciate all the delights of having heated exterior mirrors.
The VAZ 2114 does not have such an option, but this did not stop third-party manufacturers from producing a whole range of products equipped with heating.
Frankly speaking, it is much easier to spend about 800-900 rubles on buying a ready-made heated side mirror than to try to make the heating yourself. This is better in terms of reliability and safety.
The only peculiarity of the installation is that, unlike a conventional rear view element, you will need to not only install the housing on the seat, but also additionally connect the wiring to the power system of your car. That's all.
Heated mirror
For reference, we add that today there are kits for self-insulation on the market. It consists of three components:
- Wiring;
- A light bulb (it is this that creates the effect of heating the mirror);
- Insulating material (prevents the heat from the lamp from being wasted and leaving the housing).
Adjustment
To provide yourself with the necessary level of visibility of everything that is happening behind you, you need to properly adjust the side mirrors. This is not difficult to do, since there are appropriate adjustment knobs inside the cabin. Another question is what is the correct setting?
- When set correctly, when looking in the mirror you should be able to see the entire side of the road surface.
- When driving, you should have a good view of the adjacent lane and the car that is moving next to you.
- If the mirror is positioned correctly, you will see the edge of the body of your own car in it. Due to this, the distance between you and the neighboring car is correctly determined.
- The side element should reflect no more than 5 percent of your car.
- The road surface takes up about 50 percent of the bottom of the glass when properly configured.
- If you manually lower the mirrors down for easier parking, be sure to return them to their original position.
Example of correct adjustment
Checking the adjustment should be carried out exclusively on a level road. This way you will get the most accurate tuning result.
Obviously, changing mirrors is a very simple task. In this regard, the VAZ 2114 is designed simply but reliably. A couple of bolts, several clamps, decorative plugs - these are all the elements that need to be removed to get the result. The reassembly procedure does not cause any problems. So go for it!
How to replace side mirrors on a VAZ-2114?
To maximize control over the situation on the road, any car is equipped with mirrors. There are two side mirrors and an interior (rear view). As a result, the driver can view the traffic situation in 360 degrees.
How to secure and how to glue a new one
If you have successfully dismantled the mirror yourself, then returning it back will not be difficult. As a rule, all actions are performed in reverse order.
But you should pay special attention to the selection of glue, since not everyone is suitable for this process
it is necessary to choose the right adhesive for attaching the mirror to the windshield
Glue selection
There are three types of compositions for gluing mirrors:
- chemically cured;
- light-curing;
- compositions based on epoxy resin.
A composition with resins will work well only if it is allowed to dry properly. This usually takes from 10 hours to a day. In this case, the part must be pressed tightly at all times. This approach is not very convenient, so such products are not used in everyday life.
Light-curing mixtures operate when exposed to special ultraviolet lamps. This is one of the most common methods in production. However, if you are not the happy owner of a lamp, you should not purchase such a composition. Sunlight, especially diffused light, is not able to have a sufficient effect.
For these reasons, chemically cured compounds are the most popular. A special hardener starts the polymerization process. As a rule, they consist of the glue itself and an aerosol activator, although one-component compositions are also found.
Please note that some materials cannot be used to glue the mirror
- household superglue;
- double-sided adhesive tape.
The adhesive component of both materials has such a composition that when used on glass or metal, it will not be able to harden completely. High air temperature inside the cabin or heating of the glass from sunlight will soften it and the mirror will fall off. You can use household adhesives only if the mirror fell completely unexpectedly, and now you need to urgently get to a car service center.
Max
https://homo-habilis.ru/v-garazhe/223-chem-prikleit-zerkalo-zadnego-vida-v-avtomobile
How to stick to windshield
Having selected the appropriate glue, you can begin returning the rear view mirror to its rightful place. Choose a warm day for this or install a heater in the garage: the air temperature should be between 20 and 25 ° C.
process of applying glue to the holder platform
- Clean the holder platform of any old adhesive residue.
- Lightly sand the surface of the holder to improve the adhesion effect.
- In the same way, sand the area of the windshield where it is glued.
- Degrease the holder and glass area.
- Apply a thin layer of glue to the holder.
- Spray a special activator onto the place where the part is attached.
- Place the adhesive side of the part onto the glass. Try to follow the trail left from the previous time.
- Press the mirror firmly against the glass and hold for the time indicated on the package.
- After making sure that the part is firmly in place, clean the mirror from any remaining activator and glue around the holder.
- Reinstall the windshield (if you removed it) according to the owner's manual.
Ready! If you followed all the instructions carefully, the mirror looks like it was installed at the factory or at least in a car repair shop.
How to install on bracket
If during dismantling you did not separate the bracket platform from the glass, it will be even easier to assemble it. To do this, find a fixing element: it may be a screw or a latch. After this, connect the bracket leg to the platform.
There are also special brackets that are not glued to the glass, but are installed on the ceiling or other elements of the car, for example, on sun visors.
Characteristics
Manufacturers are constantly trying to produce car mirrors with modern reflective elements, equip them with a heating system and electric drives. All this can significantly improve the life of the owner of a Lada car. A good mirror increases security many times over.
Modern products can be characterized by an increased level of visibility, the presence of special anti-reflective coatings, transparent and high-quality images, and a convenient and reliable adjustment system.
Sufficient visibility for a car mirror is achieved by a combination of the shape, size and level of curvature of the optical reflective element. The position of the mirror relative to the eyes is also adjustable. A lot depends on the review. the higher, the more information about the situation that the driver will receive.
Young car enthusiasts like to equip their cars with xenon optics. At night, xenon dazzles other drivers through the side mirrors of the VAZ-2114. To prevent even minimal glare, a special liquid crystal layer is inserted into it, which, in bright light, reduces the intensity of reflected light and helps protect the driver, thereby helping to avoid an accident.
See:
A clearer image, which is viewed in electric mirrors, is provided by a special reflective layer. Previously, it was applied only to the inner surface of the reflective element. even with heavy contamination, the driver saw a distorted image. Modern manufacturers produce side mirrors VAZ-2114 with a reflective layer on the outside.
Installation of mirrors with additional functions
Modern devices not only reflect, but also have a number of additional functions. You can equip them with heating, or even install a camera with a monitor.
Heated
The heating function is very convenient for external side mirrors, since thanks to it they will not fog up in high humidity and will not become covered with a crust of ice in frosty weather.
The heating element in the mirrors will help prevent fogging and icing
The heating device consists of the following parts:
- a heating element;
- wiring for a 12V system;
There are both separate heaters and mirrors themselves with a built-in element on sale. Both are quite easy to install. To do this, you must perform the following steps.
- Remove the door trim.
- Remove the side mirrors according to the instructions.
- Thread the wires through the side of the door and out to the outside mirrors.
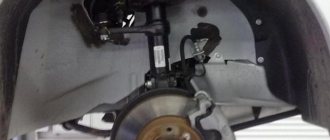
- Remove the reflective element after preheating the junction with the body.
- Remove the screw and remove the frame (if equipped).
- Pull the wires through the frame body, strip the ends and install the connectors.
- Put the frame back in place and route the wires through it.
- Connect the wires to the contacts of the heating element and install it.
- Put the mirror back in place and put the entire structure back together.
- Connect the part of the wire that is located inside the passenger compartment to the heated rear window relay.
- Check the functionality of the mechanism.
Now, in bad weather, you don’t have to get out of the car and clean the mirror yourself. This is a very convenient feature, especially considering the low price of the equipment.
Video: installation process of a mirror with a heater
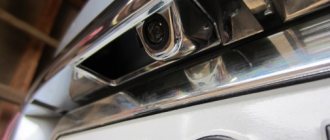
With monitor
Monitors are a common feature in modern high-end cars. As a rule, they are installed on the control panel and display information about the car, an image from a DVR or camera.
a rear view mirror equipped with a monitor will show the entire space behind the car
If you cannot afford a car with such equipment, but you like the idea of a monitor in the cabin, pay attention to special rear-view mirrors with a monitor.
The most difficult thing in installing the structure is correctly laying the wiring and connecting the power. As a rule, wires are attached to the mirror: negative black (-12V), positive red (+12V), blue for connecting the signal source, as well as RCA connectors, which in everyday life are called tulips.
The mirror is equipped with a set of necessary wires
As a rule, monitors have three connectors, one of which is responsible for power, and the other two for receiving signals. In this case, you can connect both the front and rear cameras. By default, video from the front camera will be displayed on the screen. But when receiving a signal from the rear, the monitor will automatically switch.
The colors of wires and plugs may vary depending on the mirror model.
Route the wires along the floor or ceiling. Choose the best option taking into account the characteristics of your car model.
The mirror itself, as a rule, has special mounts that allow it to be installed directly on top of the factory one. If desired, the monitor function can be turned off, and then you will be left with a regular mirror, but, unfortunately, with a slightly worse reflectivity.
Video: DIY monitor and rear view camera installation
With a camera
Installing a monitor usually makes sense when you plan to display camera images on it. Conventional mirrors have blind spots, so the camera allows you to significantly expand your view of the area behind the car. In addition, using such equipment is very convenient when parking.
It is best to purchase a camera and a mirror with a monitor as a set: this will simplify your task when connecting.
According to the mounting method, all cameras can be divided into several types:
Mounted cameras are the most popular because they are smaller in size and do not require serious manipulations with the body or other elements of the car. They are usually installed above the number plate. There it is quite invisible, so you don’t have to worry about it being stolen.
All cameras have special parking lines that are displayed on the monitor. Using them you can calculate the angle, estimate the parameters of the machine and understand the distance to the displayed object. At first it may seem unusual, but with experience you will acquire all the necessary skills.
Front and rear cameras have different optical systems and are therefore not interchangeable.
The camera comes with all the necessary wiring to connect to the monitor. These include the excitation wire, which activates the operation of the monitors with a current with a positive charge, as well as the power wire.
The principle of the signal is as follows: when you switch to reverse gear, current is supplied to the camera, which, in turn, sends a signal to turn on the screen in the mirror. As soon as reversing is stopped, the image automatically disappears.
In order for the camera to work, stretch the wires from the back to the front of the car and connect them according to the instructions. If you purchased a monitor and camera as a set, this will not be particularly difficult: just connect the necessary plugs and wires according to their charge (plus to plus, and minus to minus).
Standard models for the VAZ-2114 and their disadvantages
The car is equipped with products with a strong and fairly reliable fastening, but at the same time all these elements have a lot of very serious shortcomings. The main disadvantage that distinguishes the standard rear view mirror of the VAZ-2114 is poor visibility. Downsides include few customization options, and it still shakes when moving.
Particularly strong shaking can be observed when driving on bad roads or off-road vehicles. And everything would be fine, but constant vibrations lead to the fact that the plastic cover becomes useless. And due to the fact that the side mirrors of the VAZ-2114
The design is also not very good; most of the road is simply not visible in them. When performing maneuvers, the driver must be distracted in order to see through the windows without interference. Adjust the position of the mirror, which the manufacturer suggests using a mechanical lever. This is convenient enough, but this method is primitive and does not allow you to get the correct angle when all the blind spots, or at least most of them, are accessible.
Also, standard models have a simple wedge-shaped anti-glare system, which is not very effective. In the dark, this primitive anti-glare system does not allow the driver to accurately assess the distance to the nearest vehicle and its overall dimensions.
In addition, in winter the mirror and all its components are covered with ice. You need to put in a lot of effort to clean them. Replacing the side mirrors of the VAZ-2114 with more modern ones will help solve all these problems. The market offers a wide range of alternative models that are ideal for these vehicles.
Search
Choosing a mirror in Kalina
Kalina mirror often requires replacement. This is justified by the difficulties of the first years of driving and the desire to install a more beautiful part.
Replacing a side mirror is not a complicated process; it is important to be careful and follow a certain method
How to make a worthy choice?
Exterior mirrors are one of the most important and important parts of a car. Without them, it is impossible to look at the situation and move along a busy highway. Side view mirrors often require replacement, which is explained by their greatest “trauma” while driving. Before starting work, you need to choose a balanced version of the mirror part. This could be a similar or more sophisticated mirror in Kalina. If you're having trouble choosing, you'll need to familiarize yourself with the basic setup mechanisms.
There are the following types of mirrors:
Ease of use depends on the choice of mechanism. The articulated mirror element is the most common type. Almost all modern cars do not do this.
The lever control is based on a joystick or lever located inside the cab and is pulled to the side by a narrow cable.
Electronic mirror element. this is a modern mechanism. It is found in new cars equipped with many additional features. Its implementation. comfort and safety.
Main advantages of the electronic mechanism:
- increased appearance;
- anti-glare coating;
- heating;
- Built-in double turn signal.
How to remove
and disassemble the side mirror
by car Lada
Kalina
.
replacing the mirror element with an exterior rear view mirror from Kalina, Grants and Priors
Video review of the self-service mirror element on the external rear view mirror of such cars
Heated mirrors. These are modern developments that simplify the life of every motorist. Increased visibility allows you to better navigate city roads. This option reduces the likelihood of accidents and increases the chances of noticing a dangerous moment. Lastly, the clarity and appearance of this item is much better than the standard part.
The anti-reflective coating on the viburnum mirror allows you to reflect both the sun and bright light. The anti-glare effect ensures good visibility while driving.
Heated mirrors. this is a convenient option. Thanks to this, you don't have to remove snow and ice from the glass. This is a very nice and convenient addition. Finally, there is a built-in signal repeater. This Lada Kalina Mirror element allows everyone to know the traffic about future maneuvers. Which simplifies the trip and makes it safe.
When choosing the best mirror element for Lada Kalina, personal preferences should be taken into account. Of course, do not forget about convenience and safety.
Reasons for replacement and the process itself
Replacing a mirror on a Lada Kalina may be required in the following cases:
- in case of damage to the mirror element, due to a stroke or a decrease in temperature;
- if you want to improve your car;
- in the absence of “parts” (as a result of theft).
How to change a mirror yourself, and what is needed for this? If you have a little skill, you can get the job done easily. The main thing is that you need to consider, disassemble and install it yourself
this is caution. This will prevent damage to the new element and damage to the car body. When removing an object, you need to unscrew it as much as possible.
A gap between the part and its body will indicate this process. In this matter, the main thing is not to damage the motors of the elements. The design itself can be carefully unscrewed with a Phillips screwdriver. It must be unscrewed from the car body and disconnected. The question of how to disassemble a mirror is closed. The next step is to install a new element
When removing an item, you need to unscrew it as much as possible. A gap between the part and its body will indicate this process. In this matter, the main thing is not to damage the motors of the elements. The design itself can be carefully unscrewed with a Phillips screwdriver. It must be unscrewed from the car body and disconnected. The question of how to disassemble a mirror is closed. The next step is to install the new element.
The mirror element itself is located in the center, where it is securely secured with latches. The main thing is that he corrects himself correctly. Apply force and press on the part itself. The side member is then bolted to the car body.
The process is not complicated, the main thing is not to damage the gaskets on the viburnum samples and not to spoil the mirror element yourself.
Post Views: 2
Replacing a VAZ mirror element
In this video I want to show you why on VAZ cars
They are small on the rearview mirrors.
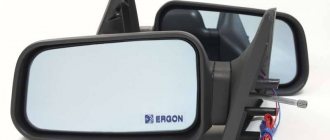
Automotive stores often have products with cable adjustment or power mirrors. They have folding functions. In addition, the VAZ-2114 has heated side mirrors. There are modifications that are protected from glare and turn signals.
The most famous and popular manufacturers are NPK Polytech and Ergon. Quite often there are quality models from Japanese brands. This replacement of the side mirrors of the VAZ-2114 is not difficult. this can be done without modification. The product, regardless of manufacturer, has a massive base where it is attached to the vehicle, which significantly reduces or even prevents vibration and shaking.
Model "Rostov"
For those who want to “round out” the angular shapes of the “four” body, there is a variety of “Rostov” mirrors with mechanical adjustment. The main difference from stock is the rounded shape of the body and glossy plastic. Otherwise, “Rostov” is not equipped with options, so the price of these mirrors is small - about 2500 rubles .
The overview of the Rostov side mirrors is better than the factory indicators, so this option can be safely considered for purchase. The fastening of the structure does not differ from the factory ones, so it can be built in without any problems.
Cost and equipment
The approximate price of one such mirror starts at 700 rubles. Costs can vary significantly depending on the equipment. New left-hand electric mirrors with an aspherical reflective element have appeared on the market, while the right one has a conventional spherical shape.
Electric mirrors of this type are in a special protective case. this allows you to reliably protect the mirror glass from any damage. These models also have anti-reflective reflectors of different shades. Includes lining. They are made of black plastic and can be painted directly to match the body color. Sell options specifically for tuning enthusiasts. with turn signal repeaters. Such details will add attractiveness and uniqueness to the appearance of the car.
Removing the mirror on a VAZ-2114
The first thing to do is remove the old mirror. This is not an easy task and you only need a regular screwdriver to do it. To begin with, you need to remove the plug that is located on the mirror handle. Behind it is a screw for a Phillips screwdriver.
The plug is then removed. on the VAZ-2114 it remains locked. The minus screwdriver for unlocking the latches is very simple. There are three screws under the decorative cap. if you unscrew them, the product can be removed .
This task, how to replace a side mirror on a VAZ-2114, is solved simply and simply. For this, many people, such as Russian-made cars, can be repaired with minimal tools and without much experience. To install a new mirror, you need to do the opposite. It's not difficult either.
Salon mirror
There are several reasons why motorists remove their rearview mirrors:
- Replacement with a more modern and new model;
- Electronics installation. For example, a rear parking sensor camera;
- Broken glass;
- Installation of non-standard sensors that are not initially included in the VAZ 2114.
Before starting work, you need to make sure that replacement parts are available. You need to choose an element according to your capabilities. For example, for a large sum you can purchase a panoramic mirror, which significantly surpasses the standard element in visibility. Replacement can be made with any mirror, it does not have to be from a VAZ 2114. The average price for a regular brightening mirror is 650 rubles. For a panoramic one in a car shop they will ask about 800 rubles.
Replacement instructions
VAZ 2114 refers to cars manufactured before 2009, which means that the interior rear view mirror has a standard mount. The element is held in place by two bolts. This mounting option has been used since 1976. The only disadvantage of the bolts is the inability to install a rear view mirror from a foreign car. But there are enough original and non-standard models for domestic cars on the market. Replacement is carried out as follows:
- You will need to remove the cap from the bolts if present.
- Next, holding the body with your hand, you need to unscrew the fastening bolts.
When you install the rear view mirror in its place, you need to make sure that the patch is in the same place. The fixing bolts must be tightened tightly to prevent the glass from being damaged by vibration and shaking.
Adjustment
The modern rear view mirror can be adjusted in tilt. The ideal setting is that you can see everything going on behind the car. But if your VAZ 2114 has high seats, then you can see the headrest and even part of your right ear in the glass. This is normal, nothing needs to be adjusted.
It is recommended to choose a modern panoramic model with lighting, as it has flat glass and does not distort the reflection. Therefore, the presence of a panoramic model increases safety. By looking in the mirror, you can immediately determine the distance to the car or lamppost that is behind you. The larger the rear view mirror, the better.
How to disassemble a side mirror
Sometimes a complete replacement of the VAZ-2114 side mirror is required. It is possible that everything will cost by installing a separate element on the left or right.
See:
Let's see how we can parse the structure as accurately as possible. First you need to press the plastic case from the inside. The holders are carefully snapped into place with a flat screwdriver. This method is not very reliable. There is a high chance that the mirror element or other parts will break.
The second option carries even greater risks. here you need to quickly hit the glass on the surface (but it's better if it's soft). This is a quick way to dismantle and replace an element. The impact should be simple and quick. To replace the plastic housing or main mount, remove the adjustment rods and pin. Assembly is exactly the opposite.
Disassembling the rear view mirror
Salon
In order to disassemble the internal, you will need special picks and push-ups. The case is divided according to the same principle as a mobile phone or control panel to replace the battery.
- Find the junction of the body and the mirror part.
- Insert the wringer into this area and press firmly. A gap should form on the housing.
- Carefully walk the pick along the entire gap and divide the body into two parts.
- Remove the mirror. All the elements you need will be located under it.
Disassembly process on video
Lateral
Once you have separated the side mirror housing from the car body, it should be disassembled. First of all, you need to remove the mirror element. This process may not be the same for different brands, however, the following procedure is most often used.
- Use a regular household hairdryer to thoroughly heat the junction of the reflective element with the body. The temperature of the air flow should not be too high, so a technical hair dryer will not work here.
- Using a flat-blade screwdriver or a small spatula, pry the mirror away from the housing. On some models, at this stage you need to bend the terminals. To avoid damaging the glass, you can wrap a screwdriver or spatula with electrical tape or a soft cloth.
- In some designs, to separate it, you need to lightly press it in the center and, as it were, push it to the side. After this, the reflective element can be removed with careful movements.
- Then remove the center screw from the plastic frame (if equipped).
- All side mirror mechanisms are located under the frame. Using a screwdriver, you can unscrew any of them and put them in place. You can independently divide the structure into all its component parts, including adjustment and folding motors.
Video: process of disassembling the side mirror
The mirror is assembled in the same way, but in reverse order.
Heating connection
Often two wires will leave the heating element. You can connect them as you wish. Since the heating must be turned on along with the heated rear window, the mirror cords can be attached directly to this element. If you need to heat the mirrors independently of the rear window, you will need a relay and power button, as well as a 10 amp fuse. If the button is rated for 10 A, you can do without a relay.
The heating system is made of improvised materials with a light bulb. This is the most universal solution. The body needs to be slightly modified. There is a heat shield made of foil. Then place the lamp socket into the housing and secure it there so that the lamp does not touch your body or mirror.
Heating from an incandescent lamp
So, one 21-watt light bulb can defrost even a very frozen mirror in just a few minutes.
If one lamp is not enough, then you can use two 10 W lamps or one, but with two contacts. One is intended for defrosting, the second will be used for anti-fog. This function will save you more than once in rain or snow.
Summary
This way you can replace or refine the mirror if necessary. Some people buy electric drive solutions. it is very comfortable. You can equip it with heating and with your own hands. In both cases, they will not have any problems in winter.
By the way, ultrasonic cleaning of glasses was used on Toyota Crown cars of the 90s. Thus, the ice accumulated on the surface was separated from it in a matter of seconds. However, most manufacturers chose to install electric heating, including AvtoVAZ (of course, as an option). However, you can add this feature to yours with a regular light bulb.
So, we found out how you can easily change the side mirror on a VAZ-2114 with your own hands.