Domestic cars cannot boast of such reliability as foreign cars and therefore, in order to save on their maintenance, the car owner has to do many of the works himself. Replacing the Kalina 8 valve cylinder head gasket can be done with your own hands and you do not need to be a high-class auto mechanic.
The cylinder head gasket on an 8-cl engine cannot be called a weak point in the car’s design. But still, even with careful operation of the vehicle, there may be a need for replacement. You can do it yourself, but if you are hesitant and want to take on this work for the first time, then invite a friend who has experience in similar work (replacing the cylinder head gasket). Be sure to carefully read the material we offer and you will definitely succeed. Let’s say right away that replacing the cylinder head gasket on Kalina units with 8 cl and 16 cl is very similar, but there are some nuances regarding the tightening of the cylinder head bolts. Therefore, be careful.
[ To uncover]
[Hide]
Detailed procedure for replacing the valve cover gasket of Lada Kalina 1.6 8-cl:
The first step is to remove the plastic casing, first unscrew the oil filler plug. It can be removed without any problems, you just need to pull it and that’s it. After this, you need to unscrew the fastening of the throttle cable, which is held on by three nuts.
So that it does not interfere with us, we take it somewhere to the side.
Then, unscrew the bolts of the clamps of all the hoses that are connected to the valve cover. You will need a Phillips screwdriver to loosen the three bolts. The photos below are shown with arrows.
When all three hoses have been removed, you can begin to unscrew the fastening nuts, there are only two of them, and they are located at the edges, and now you can safely pry a screwdriver under the very bottom of the cover and remove it.
The gasket is placed in a groove along the entire perimeter and can be removed quite simply without any extra effort.
Then we insert a new one, press it well into the groove and make sure that it sits evenly around the entire circle. The photo shows that the factory one is white, but the stores sell it black. I can’t say what the difference is between them.
After this, you can put the valve cover back in place, reconnect all the hoses and tighten all the bolts, and do not forget about the throttle cable - the mount must be installed strictly in the same place as it was before, otherwise problems with engine idle speed may arise due to incorrect tension.
And now an addition to this article! After replacing the gasket, a little more than 3000 km passed and the oil began to flow even more harshly than before. The quality of the components certainly leaves much to be desired. Next time I'll have to buy something of better quality, or at least more expensive - maybe it will be better. Many Lada Kalina owners say that this is an eternal problem and can only be eliminated with the help of a sealant, but again, it is not always enough for long. Has anyone had this problem and how did you solve it, please post in the comments. Thank you in advance!
Source
How to replace it yourself?
Replacing a burnt gasket requires a large amount of work. Self-repair and replacement of the Kalina cylinder head gasket can only be carried out by an experienced car owner who has the skills to disassemble and reassemble engines. For novice drivers and people who are not confident in their capabilities, contacting a specialized service would be an advisable step.
Tools and materials
Before starting work, you need to find a room for the replacement and check the availability of the necessary tools and equipment.
The minimum set of tools and spare parts is as follows:
- new cylinder head gasket;
- 10 bolts for cylinder head with size M12 (article 026707, for motor 11183) and M10 (article 256632, for engine 11186);
- gasket for the junction of the catalytic converter and resonator housings;
- torque wrench up to 100 Nm;
- a set of hex keys and sockets (at least sizes 10, 13, 17 and 19);
- pliers;
- screwdrivers with different types of blades;
- rags for wiping;
- container for draining coolant.
It is not recommended to use old cylinder head bolts.
Step by step instructions (8 valves)
After preparing the tools, you can begin replacing. The gasket replacement procedure is quite lengthy and takes about 8-9 hours even for experienced craftsmen.
Below is an approximate sequence of actions when replacing the cylinder head gasket of a Kalina with a 1.6-liter 8-valve engine:
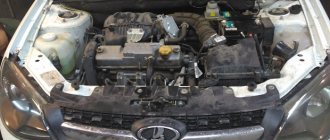
- Place the car over the inspection hole.
- Remove the fuse box cover located on the center console and remove the fuel pump fuse.
- Start the engine and drain fuel from the ramp. Turn off the engine.
- Disconnect the battery and remove it from the vehicle.
- Replace the fuse and cover.
- Unfasten the decorative plastic casing from the motor. To do this, you need to pull it up and pull off the rubber caps from the studs. Inspect these caps; damaged parts should be replaced.
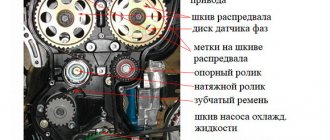
- Remove the three bolts securing the upper part of the camshaft drive belt housing.
- Separate the cover and manually turn the engine crankshaft to TDC (top dead center) in the first cylinder. The guideline will be the coincidence of the notch on the camshaft gear with the notch on the rear of the housing.
- Remove the plug located on the clutch housing and check the location of the mark on the flywheel and housing. The marks must match.
- Secure the engine flywheel with a screwdriver through the hole in the crankcase and unscrew the camshaft gear.
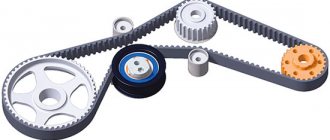
- Remove the timing belt drive.
- Remove the ignition coil attached to the bracket with four screws.
- Remove the engine sump protective shield. Drain the coolant from the cylinder block. To do this, you need to open the expansion tank cap and unscrew the screw plug on the side of the crankcase. Pour the liquid into a prepared container.
- Disconnect the lines from the thermostat and throttle valve assembly.
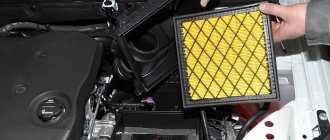
- Separate the air duct from the throttle body and remove the air filter housing.
- Step by step disconnect the electrical wiring connectors for the idle speed (IAC), throttle position (TPS), fluid temperature and oil pressure sensors.
- Disconnect the ground wire from the engine.
- Disconnect the injector connectors.
- Remove the fitting and separate the fuel supply pipe from the ramp.
- Remove the two bolts securing the ramp to the intake manifold housing.
- Carefully move the ramp along the axis of the injectors and remove them from their seats on the manifold.
- Remove the brake booster hose attached to the throttle body fitting.
- Unfasten the intake pipe spacer mounted on the nuts.
- Remove the lambda probe connectors on the catalytic converter.
- Unscrew the receiving pipe going to the muffler from the flange of the gas neutralizer.
- Remove the neutralizer support bracket.
- Loosen the head bolts according to the diagram and unscrew them completely. When removing bolts, they must be removed along with washers.
- Remove the head from the engine.
- Remove the old gasket.
- It is advisable to send the removed head for surface milling, since it may have microcracks that arose when the engine was running with a broken gasket.
- After checking, you can put the head back, having first checked the presence and completeness of installation of the guide bushings.
- Thoroughly wipe the mating surfaces of the block and head from oil and coolant. Clean the bolt wells from liquids.
- Carefully wash the cylinders with gasoline to remove deposits.
- Place a new gasket on the block, centering it along the guide bushings. The channel for the passage of oil through the gasket is located between the third and fourth cylinders - it is important not to miss this moment.
- When reinstalling the head, it is necessary to set the position of the shafts corresponding to TDC in the first cylinder (according to the marks).
- Tighten the bolts according to the scheme in several passes - initial tightening with a force of 20 Nm, tightening with a torque of 70–85 Nm, the first turn by 90 degrees and the second turn by another 90 degrees. When installing the head, use only new bolts and lubricate them with a thin layer of engine oil, which will facilitate tightening.
- Reinstall all removed parts.
- During assembly, it is recommended to check and adjust the valve clearances, as well as check the tension of the drive belt and the correct timing of the gas distribution mechanism.
- Turn the assembled engine over by hand several times and re-check the timing timing.
- Start the engine, make sure there are no leaks or extraneous sounds. Warm it up, visually monitoring its condition.
- Remove the coolant pipes from the throttle body assembly. Release the air from them, gradually increasing engine speed. Put the tubes back on and add fluid to the tank to the normal level.
Sequence of loosening bolts
Bolt tightening order
Video from the channel Sdelaj Sam! Pljus interesting! Demonstrates basic methods for identifying faults and replacing worn parts.
Step by step instructions (16 valves)
Removing the head for replacement on such motors has its own characteristics that must be taken into account during disassembly and reassembly. The engine design is much more complex than the 8-valve version and requires careful assembly and subsequent adjustment of the valve timing.
How to remove the head from a 1.4-liter 16-valve engine with an injector, model VAZ 11194:
- By analogy with an 8-valve engine, it is necessary to drain the fuel from the line, remove the battery, decorative casing, and air filter. And also drain the coolant and disconnect all sensor connectors.
- Remove the breather pipe and vacuum booster hose.
- Disconnect the hoses from the throttle body and the throttle position sensor.
- Remove the ignition coils.
- Disconnect the wiring harnesses and fluid supply pipes from the windshield washer reservoir. Remove the tank itself.
- Loosen the tension on the accessory drive belt and remove it.
- Remove the camshaft drive belt guard and fuel rail. The injectors are removed using a scheme similar to the 8-valve engine.
- Move the generator towards the radiator and remove the oil level dipstick guide.
- Remove the receiver mount to the block head.
- Unscrew the lower timing belt cover.
- Unscrew the fastenings of the timing belt tension rollers and the crankshaft pulley and remove them together with the belt.
- Remove the camshaft gears.
- Unscrew the 15 bolts and remove the camshaft cover.
- Unscrew the 20 bolts that secure the camshaft supports.
- Remove the shafts.
- Remove the hydraulic compensators.
- Unscrew the attachment points of the neutralizer to the head.
- Disconnect all hoses from the thermostat.
- Unscrew the 10 head mounting bolts (according to the diagram).
- Remove the head and replace the gasket.
- Reassemble, taking into account the recommendations for the 8-valve engine.
Head removal procedure
Bolt tightening order
Replacing the valve cover gasket on 8 and 16 valve VAZ engines yourself.
Many car enthusiasts are faced with such a problem as oil leakage from under the engine valve cover . The reason for this is the wear of the valve cover gasket. Replacement is quite simple and does not require special knowledge and skills. An oil leak greatly spoils the appearance of the engine and, of course, a decrease in the level of engine oil in the engine, which can lead to engine failure. The cause of oil leakage can be various factors: wear of the gasket on an 8-valve engine, loose valve cover bolts, a small amount of sealant on a 16-valve engine, but one of the main reasons is too high a level of engine oil.
What are valve stem seals
The working title used by all repairmen is valve seals. These are special rings, belts, made of rubber and metal, worn around the neck of the valve. Their task is to prevent the engine oil that lubricates the Priora engine from getting into the working cylinders and into the air supply system into the receiver. That’s why they are “oil scraper”.
Engines 21126
Kalina cars with internal combustion engine model 21126, it is necessary to remove not only the suspension equipment and valve cover, but also the camshaft gears and the bed. Eliminating the possibility of oil getting into the spark plug wells is to apply a high quality anaerobic sealant. Injecting silicone gasket sealant will not be as effective.
The sealant must be applied in a thin layer to the mating surfaces of the camshaft bed. A very thick layer when clamping parts will lead to the squeezing of the sealant inside the cylinder head, which can become a prerequisite for clogging the lines of the lubrication system. After installing the valve cover, we also recommend lubricating the internal connections in the spark plug well with gasket sealant.
Replacing the valve cover gasket on an 8-valve VAZ engine:
- remove the negative terminal of the battery
- disconnect the throttle control cable
- disconnect all pipes by loosening the fastening clamps
- unscrew the two nuts securing the cover
- carefully remove the cover so that no debris or gasket particles get into the engine block
- remove the old gasket, clean all areas well and degrease
— install a new gasket (you can use a little special sealant at the joints for better sealing)
- assemble everything in reverse order
Removing the valve covers on the 21120 16v 1.5 engine
Briefly, the sequence looks like this: remove the filter box and the plastic trim, disconnect the wires and unscrew the ignition module. The key must be turned to position “0”.
To remove the filter, loosen clamps 1 and 2, and then disconnect connector 3. Pipes 1 and 2 are removed from the box. Use a 10mm wrench to unscrew the screw on the body, then remove the box from its mountings.
To disconnect high-voltage cables, you need to pull the caps out of the wells. The cables are also disconnected from the ignition module. It is pressed to the valve cover with 3 10mm nuts.
Don't forget to disconnect the low-voltage connector and dismantle the module. If you do not unscrew the module, you will not be able to remove the valve cover on a VAZ-2112.
Replacing valve cover sealant on a 16-valve VAZ engine:
- remove the negative terminal of the battery
— disconnect the ignition coil and injector wire blocks
- unscrew the front and rear brackets
— disconnect the crankcase ventilation hose from the cylinder block
— remove the oil level indicator (dipstick) bracket
- unscrew the two fastening nuts on top and three nuts on the intake manifold block and remove it
— carefully unscrew the 15 bolts securing the cylinder head cover (unscrew it very carefully - if the bolt breaks, you will have to remove the engine block)
- remove the cover, remove the old layer of sealant, clean everything well and degrease
- apply a thin layer of sealant (without gaps)
- install the cover and reassemble everything in reverse order
Source
Replacement process
The replacement process itself on the Kalina 8 cl unit is simple and can be carried out under normal conditions, in the most ordinary garage with good lighting. When dismantling, place all removed parts in some previously prepared container so as not to lose anything. If the car has high mileage, you may need to purchase new bolts for tightening. But it will be possible to say more definitely after dismantling the head.
Required Tools
- torque wrench;
One type of torque wrench - a set of keys;
- set of heads;
- hexagon;
- durable screwdriver.
Stages
- Place the vehicle on a level surface.
- Allow the engine to cool.
Power point - The first step is to remove the casing of the 8 cl power unit.
- The number one cylinder piston should be set to the top dead center position.
- De-energize the system by disconnecting the negative battery cable.
- Drain the coolant.
- Disconnect and set aside the air filter element.
- Disconnect the heating hoses, other pipes and connectors.
- Don't forget to disconnect all the wires from the spark plugs.
- Next, remove the cylinder head cover.
- Remove the camshaft drive cover located in front.
- Insert a screwdriver into the hole in the pulley hub to prevent the camshaft from turning, and loosen the bolt securing the timing pulley.
- Next you need to remove the timing belt.
- Completely unscrew the bolt that secures the camshaft pulley.
- Remove the pulley.
- Next, you need to remove the camshaft drive cover, which is located at the rear.
- Remove the remaining pipes and wires.
- After disconnecting all the wires and pipes, you need to loosen the bolts that secure the cylinder head of the viburnum 8 class. This is done strictly according to the scheme.
Be sure to strictly adhere to this diagram when loosening the bolts
- Next, you need to completely unscrew the cylinder head mounting bolts.
- They are removed along with the washers.
- We remove the cylinder head.
- It is worth knowing that during long-term operation, the bolts with which the cylinder head is secured increase in length. Therefore, it is better not to save money, but to install new ones.
- Before installing new bolts, they must be lubricated with oil.
- We remove the Kalina cylinder head gasket.
- The place where it was installed must be cleaned.
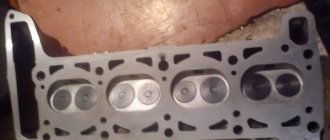
This is done not mechanically, but using a special liquid. If you use a file or a wire brush, there is a high risk of scratching the surfaces. As a consequence, loss of tightness with all the ensuing consequences. The surface was polished with an abrasive tool. Scratches are noticeable. - Install a new gasket.
New part installed - We install the cylinder head. Make sure the crankshaft and camshaft are at top dead center. This is a very important condition.
- We insert bolts into all holes and tighten them in a certain sequence:
The diagram for tightening the bolts.
- First, we walk around the first circle and pull, applying a force of 20 N•m (2 kgf•m);
- Then we go around the second circle and pull, applying a force of 69.4-85.7 N•m (7.1-8.7 kgf•m);
- Next, use a wrench to turn the bolts 90 degrees;
- We go through it again and turn it 90 degrees again.
- Next, you need to connect all the removed wires and pipes. Many car enthusiasts, performing this work for the first time, mark the parts or take photos.
At this point, the replacement of the cylinder head gasket on Kalina with an 8-cl unit is completed. The process cannot be called simple, but requires special care and accuracy. If, after reading the material and viewing the photo gallery, you still have questions, watch the video material.
Replacing the valve cover gasket for Lada Kalina sedan (VAZ Kalina)
During operation of the car, various malfunctions occur in the engine - knocking appears, the engine runs unevenly (troits), engine oil begins to leak, and the engine may also smoke.
Preparing for work
The valve cover gasket can be replaced in any convenient place - in an open area or in a garage. There is no need to drain engine lubricant or antifreeze. What tools will be needed for disassembly:
- a head with an extension and a knob, suitable in size to the cover mounting bolts;
- flathead and Phillips head screwdrivers;
- pliers;
- rags.
We recommend: Advantages of ordering a car battery from a local company rather than from network companies
Work is carried out with the power unit cooled down to a comfortable temperature. If you don’t have time to wait for the engine to cool down, perform disassembly wearing cloth gloves that protect your hands from burns.
Before replacing, prepare the following consumables:
- a new gasket element selected according to the car model;
- O-rings for bolts (installed on certain brands of cars);
- high temperature sealant and degreaser such as white spirit.
The use of sealants to treat the seal before installation is not necessary. For example, on engines of classic VAZ 2101–07 models, the gasket does not require additional sealing. On 16-valve engines with a wider flange, the use of sealant is desirable, but not required.
Advice. Take your time to buy and change a gasket that leaks a little oil at one point. First, check and tighten the threaded connections - perhaps the seal has sagged and the bolts have become loose. If the operation does not help and drips still appear, the gasket element will have to be replaced with a new one.
Reasons for oil leakage from under the valve cover
It should be noted right away that motor oil cannot just appear outside the engine, and it can leak from under the valve covers for the following reasons:
- the gasket is torn or its material has become too hard (stiffened);
- the valve cover itself has defects - chips and cracks if it is made of aluminum, as well as a deformed surface adjacent to the cylinder head if the cover is made of steel;
- crankcase ventilation ducts are clogged;
- the cover is not tightly bolted to the cylinder head - the threads on the bolts are broken, in the very head of the block;
- the piston group is faulty - excess pressure is created inside the engine, and oil is squeezed out through all connections.
If the oil leaks a little, there is no particular problem, but it is unpleasant - the engine becomes oily, and dirt instantly forms on it. A significant leak becomes dangerous - if you do not add oil in time, the engine may knock, and then serious repairs will be necessary.
see also
Comments 4
You haven't cleaned the oil separator mesh properly. It will accumulate carbon deposits.
Clean it like this: 1. Remove one plate at a time and clean it in solvent with a toothbrush until it shines. 2. Place the peeled ones in a stack sequentially. 3. When the last one is cleaned, it is placed on a bolt and collected one at a time - from a stack. 4. Clean the oil separator compartment (and cover) with a shaving brush - also a solvent.
Why is everything like this?
A clean surface without roughness is important!
Then the oil separator works correctly. After all, its clean parts have much less surface area! And the oil drains under the influence of gravity. Naturally, it will flow faster through cleaned meshes (and this is very important).
About the new separator from the store. What are they selling now sold in auto parts? Cheap Chinese counterfeits or defective parts from quality control departments of assembly plants. This is modern business. Bought cheaper, sold more expensive. Nowadays it is understood as follows: “I bought it very cheap, I sold it very expensive.” So it’s not a fact that you will buy a real oil separator mesh, but buy a product made from cheap Chinese fish canning tin.
Hello, dear Drive colleagues!
For a long time I was worried about the problem associated with the passage of engine oil into the spark plug wells... This unpleasant phenomenon occurred due to an insufficient amount of sealant, which is used when assembling the engine instead of the usual valve cover gasket. The first time I discovered the problem was when I was changing the spark plugs. If in the first three cylinders everything was normal and the spark plugs were dry, then in the fourth cylinder things were bad - the entire working part of the spark plug was in oil... I drove like this for a long time. Either there was a lack of free time, or there was not enough money... But this time I set a goal to eliminate this problem. Moreover, oil has now begun to seep into the second cylinder... The Multitronics on-board computer constantly reminded me with an audible signal and a notification on the display that there were errors in the Electronic Control Unit - misfires. Which, in turn, can lead to premature failure of the ignition coils...
Eliminating oil leaks from under the valve covers
If leakage occurs due to a poor gasket, the defect can be eliminated quite simply - it is necessary to change the sealing material between the valve body and the cylinder head. The valve covers are also easy to change, but here the car owner may encounter another difficulty - on some foreign cars the part can be expensive. There is an alternative option - buy a used spare part at a dismantling station or through an advertisement.
When oil leaks due to poor crankcase ventilation, clogged passages should be cleaned. The ventilation system has a different design depending on the engine model; before you start cleaning, you should find out where these channels are located.
If oil is squeezed out from under the valve body due to a faulty piston group, this is the worst option. Here, cleaning the channels and replacing the gasket will not help; at a minimum, you will have to change the piston rings or carry out a major overhaul of the engine.
The nuances of using valve cover sealant
Each of the listed sealants has its own characteristics. Accordingly, you will find accurate information on their use only in the annotation attached to the tool. But almost always there are a number of general rules and simply necessary tips that should be followed. Namely:
Review of favorite auto high-temperature sealants
- The sealant is completely vulcanized only after a few hours. You will find the exact information in the annotation or on the packaging. Accordingly, after applying it, the car cannot be used, and even just run the engine at idle until the composition has completely dried. Otherwise, the sealant will not do the tasks assigned to it.
- Before applying the product, working surfaces must not only be degreased, but also cleaned of dirt and other small parts. For degreasing, you can use different solvents (not white spirit). It is better to clean it with an iron brush or sandpaper (depending on the degree of contamination and the parts being cleaned). The main thing is not to overdo it.
- During reverse installation, it is better to tighten the bolts with a torque wrench, following the specific sequence provided by the manufacturer. At the same time, this procedure is carried out in two steps - a preparatory tightening, and then a complete tightening.
- The amount of sealant should be average. If there is a lot of it, then when tightening it can get into the engine, if not a lot, then the effectiveness of its use is reduced to zero. Also, do not cover the entire surface of the gasket with sealant!
- The sealant must be placed in the groove of the cover and wait about 10 minutes, and only then can the gasket be installed. This procedure provides greater comfort and effectiveness of protection.
- If you are using a non-unusual gasket, then it is much better to use a sealant (although not necessarily), since its geometric dimensions and shape may differ. And even a slight deviation will lead to depressurization of the system.
Crankcase ventilation system
Excessive crankcase gas pressure is one of the main reasons for accelerated oil breakthrough through the spark plug hole seals. The closed-type crankcase ventilation mechanism involves supplying a mixture of oil vapor, gasoline and exhaust gases back to the intake manifold.
valve is responsible for dosing a portion of gases . If for any reason the valve is not controlled with its task, excess pressure appears inside the cylinder head. The cause of the malfunction can be either in the valve itself or in a worn-out cylinder-piston group. With worn compression rings and increased clearance between the pistons and cylinders, it is more difficult for the crankcase ventilation system to cope with its task.
If there is excessive fogging around the valve cover gasket, oil pan, oil in the air filter, spark plug wells, we strongly advise you to check the crankcase ventilation. If the exhaust gas pressure is too high, replacing the gaskets with the application of an anaerobic sealant will only give a short-term effect.
Replacing the valve cover gasket VAZ 2108-15
Fixing oil leaks from the CC on an 8-valve VAZ injection engine is not a difficult task, but before you begin, you must:
- stock up on a new gasket and oil-resistant sealant;
- prepare the necessary tools.
- turn off the ignition, open the hood;
- Using a 10mm wrench, unscrew the two bolts securing the throttle cable bracket;
Quite often, on front-wheel drive 8-valve VAZ engines, oil leaks from under the oil filler cap. The problem is not eliminated even by replacing the part - VAZ spare parts are not of high quality.
There are other ways to solve the issue:
- bend the antennae so that the oil filler cap is pressed more tightly to the valve body;
- cut and install an additional gasket made of oil-resistant rubber or paronite.
On some VAZ engines, oil still continues to leak - this defect is typical for these engines.
Price issue
Changing the head gasket yourself will be quite inexpensive, since its cost ranges from 220 (for 8-valve engines) to 550 rubles (for 16-valve engines). In addition to it, you will need a gasket between the exhaust pipe and the catalyst, which costs no more than 100 rubles, and 10 new head bolts, costing 40–50 rubles each. Often the manifold gasket is damaged, which in this case must be replaced. A new part costs about 750 rubles. The total cost of spare parts will not exceed 1,500 rubles. It must be remembered that when disassembling and troubleshooting the engine, other parts may appear that need to be replaced.
Performing such work at a service station depends on the territorial location and ranges from 4 thousand rubles in small cities (Tula, Bryansk) and up to 10 thousand rubles in large cities (Moscow, St. Petersburg).
Eliminating oil leaks from under the valve covers of Daewoo Nexia
On 8-valve Daewoo Nexia engines, oil leakage is also a characteristic disease; this defect also appears on Opel Vectra A and Chevrolet Lanos with 1.5 or 1.6 l (8-cl.) engines. Mostly oil leaks from under aluminum caps, and replacing the gasket does not help in many cases.
The owners of Daewoo Nexia have found a way out of the situation - they need to purchase a plastic valve cover; these covers fit tightly to the camshaft housing and very rarely leak oil.
Compression measurement
Compression in the pot is 11.6 - a very good result for a used one. engine
To do this, unscrew the spark plugs and insert a compression gauge in their place one by one. Two people must work in this case. One will turn the engine with the starter, and the second will hold the device.
In the case where the engine in the car has 8 valves, you will need to turn off the ignition module so that it does not break. When the engine has 16 valves, nothing additional needs to be done.
The compression in each cylinder should be the same compared to the others. It also should not fall below 10 units. If it drops below 10, then the engine will need to be completely repaired. If in one cylinder the compression is lower than in the others, then most likely the valve in it has burned out and will require replacement. In this case, it is impossible to accurately answer the question. You just need to disassemble the motor.
Eliminating oil leaks from under the valve covers of a Chevrolet Niva
The Chevrolet Niva has the same engine design as the VAZ classic, so it has the same characteristic “diseases”. If oil begins to ooze through the valve, tightening the bolts in many cases does not help; other methods must be used to eliminate the defect.
The valve cover of the Chevy Niva (VAZ-classic) is made of tin, and washers-plates are installed under the nuts of its fastening; they are necessary so that the metal does not deform when the nuts are tightened. But over time, the iron still bends, and therefore oil begins to leak between the valve body and the cylinder head.
You can level the surface of the lid quite easily; you just need to place the CC on a flat metal surface and carefully tap out all the irregularities with a hammer.
If the crankcase ventilation on a VAZ Chevrolet Niva engine is clogged, leveling the surface of the cover will not help; it is necessary to clean the ventilation ducts and pipes. There is no need to remove the air cooler for this operation; the breather, which needs to be cleaned, is located on the left side of the engine in the direction of travel of the car, below the cylinder head level.
To clean the breather, remove the ventilation pipe, unscrew the 13 nut with an open-end wrench, and remove the device. We wash the breather in kerosene and wipe it with a clean rag. The seat in the block should also be cleaned, but this must be done carefully; it is highly undesirable for dirt to get into the ventilation system channel.
Guide to replacing the cylinder head gasket on a DAEWOO Nexia 16 cl. with your own hands
We install a new gasket. We clean the mating surface of the camshaft and cylinder head bearing housing. Disconnect the pipes from the fuel rail.
Using pliers, loosen the clamp and disconnect the heating system radiator pipe from the tee. Now the bracket can be removed.
Then disconnect the catalytic converter and remove the cylinder head cover. Using pliers, loosen the clamp and disconnect the cooling system pipes from the thermostat. Use pliers to cut off the clamp and disconnect the crankcase ventilation system pipe.
Original (item)
Unique valve cover gasket
2108-1003270 – unique catalog number of the valve cover gasket manufactured by AvtoVAZ. It fits perfectly in terms of landing mounts and does not require any modifications. Average
Reinstallation of parts on foreign cars
Next, we’ll look at how to create the same type of repair on a Chevrolet. Changing the valve cover gasket on a Chevrolet Lacetti can be done according to the instructions below. During the work we will need:
- wrenches, sockets;
- screwdrivers;
- auto sealant;
- rags.
- Disconnect the battery terminals.
- We dismantle the decorative panel of the piston unit.
- Loosen the clamps and disconnect the ventilation hoses.
- We unfasten and put aside the high-voltage spark plug wires.
- After unscrewing the fasteners, remove the cylinder head casing.
- We reinstall the lining, having previously coated the new part with sealant and cleaned the contact areas with a rag.
- Putting everything back together.
It seems that in a Chevrolet Lacetti the operation of replacing the gasket is no more difficult than performing the previously described function regarding the VAZ. By the way, in the same way as we just outlined, the gasket is changed on the Hyundai Accent. The only difference is the number of threaded connections.
As for another popular Chevrolet model, replaced using the technology just described. However, the ventilation hoses do not need to be disconnected; it is enough to disconnect only one interfering plug.
But replacing the gasket in a Ford Focus 2 proceeds as follows. We take accessories and tools, namely:
- wrenches, sockets;
- flat screwdriver;
- sealant for cars.
- First of all, as usual, remove the decorative panel of the motor.
- Unscrew and remove the coils from the spark plugs.
- We separate the crankcase gas exhaust pipe.
- Disconnect the crankshaft position sensor.
- Now, finally, we unscrew the fasteners, after which we remove the part covering the mechanism.
- We take out our leaky part, clean the surfaces, attach a new layer, lubricated with a special sealing substance.
- We do the assembly in reverse order.
This process is similar to the technology for changing the valve cover gasket on the 16-valve Nexia. Only when repairing DAEWOO is it necessary to unscrew the spark plugs, and there are two interfering gas tubes, plus you need to remove the phase sensor wiring block.
Well, now let’s see how a part is replaced in a Citroen C4. A special feature of this car is the presence of two valve covers. Let’s take the following attributes for repair:
- wrenches, sockets;
- slotted screwdriver;
- automotive sealant;
- Remove the decorative panel of the piston unit.
- We detach the hoses from the opened units.
- We dismantle the ignition coils.
- Disconnect the interfering plugs.
- Having unscrewed the fasteners, we take out both casings, first prying them off with a screwdriver.
- We replace the gasket of each cover, both of the cylinder heads. At the same time, we first wipe the surfaces and lubricate the seals with a sealing compound.
- We collect everything on the way back.
This is the technology. And now, to summarize, let’s try to figure out what the cost of this operation is to replace the valve cover gasket.
Typical mistakes of car enthusiasts who undertake to change the valve gasket themselves
Often, when performing this manipulation using artisanal methods, it is not only impossible to stop the flow of oil, on the contrary, it even intensifies. The following errors are to blame:
- Using a gasket of insufficient quality.
- Using a sealant that has lost its quality characteristics.
- Uneven application of force when tightening the bolts that hold the cover , which led to its distortion.
Entrust your car to the specialists from and they will do everything at the highest quality level.
Sources:
https://krutimotor.ru/zamena-prokladki-kryshki-klapanov/ https://xn80aaajvii0auesmd7d.xnp1ai/raznoe/poryadok-zatyazhki-kryshki-klapanov-deu-neksiya-16-klapanov-zamena-prokladki-klapannoj-kryshki- na-neksii.html https://adaptsport.ru/remont/zamena-prokladki-klapannoj-kryshki-deu-neksiya-16-klapanov.html
Cleaning the crankcase ventilation on a Daewoo Nexia car
Often oil leaks from the top of the engine due to clogged crankcase ventilation. On many car models, a mesh is installed in the valve cover, which catches dirt coming from the engine oil sump. A clogged mesh does not allow crankcase gases to escape from the engine, excess pressure is created in the engine, and oil begins to ooze from all the gaskets.
For 8th grade On the Daewoo Nexia engine, we begin cleaning the ventilation system by removing the CC:
- disconnect the ventilation pipes;
- unscrew the eight bolts securing the cover itself and remove it.
Now you need to dismantle the filter element; its body is screwed to the CC from the inside with 8 bolts.
Having removed all the insides, we clean the mesh, and also do not forget to rinse the gas ventilation outlet in the back of the lid.
There are several meshes in the filter; to remove them, you need to pry them off with a screwdriver.
After cleaning, we collect all the parts and install the valve cover in place.
Valve cover viburnum 8 valves price
This product was chosen by 1 customer
- Description
- Shipping and payment
- Reviews (0)
Valve cover repair kit (gasket + bushings) blue silicone for 8 cells VAZ 2108-21099, 2110-2112, 2113-2115, Kalina, Granta
Gasket code: 2108-1003270 Bushing code: 2108-1003277
Material: Silicone
Production: Special technical kit, Balakovo
Applicability: VAZ 2108, 2109, 21099, VAZ 2110, 2111, 2112, VAZ 2113, 2114, 2115, Lada Kalina-2 VAZ 2192, 2194 Lada Granta VAZ 2190, 2191
Delivery:
Delivery by Russian Post
Calculation of delivery costs (city of departure Tolyatti) Tracking the parcel by track number Delivery time from 3 to 12 days, depending on the distance of your locality from Tolyatti Delivery cost from 200 rubles.
The cost depends on the weight, dimensions and declared value of the parcel. By Russian Post courier service EMS Calculation of delivery costs (city of departure Tolyatti) Tracking the parcel by track number
Delivery time from 2 to 7 days, depending on the distance of your locality from Tolyatti Delivery cost from 550 rubles. The cost depends on the weight, dimensions and declared value of the parcel.
First class Russian Post. Delivery time is from 2 to 9 days, depending on the distance of your locality from Togliatti. Delivery cost from 250 rubles. The cost depends on the weight, dimensions and declared value of the parcel. Attention! The maximum weight of 1st class items is 2.5 kg.
Delivery by Transport Company:
Delivery time is up to 10 days, throughout Russia, only to large cities. Oversized parcels are 50% more profitable than by mail.
1. SDEK
Courier delivery service with a very large number of branches throughout Russia. Delivery cost from 180 rubles. Delivery time is from 2 to 5 days. Recommended for sending oversized cargo. Calculate delivery costs and select a branch: https://www.cdek.ru
2. GTD (Former Whale)
Low rates, fast delivery. Recommended for sending medium and large-sized items. Calculate delivery costs and select a branch: https://gtdel.com/
3. Energy
Low tariffs, fast delivery. Recommended for sending medium and large-sized items. Calculate delivery costs and select a branch: https://nrg-tk.ru/
4. Business lines
Average rates, fast delivery. Recommended for sending medium and large-sized items. Calculate delivery costs and select a branch: https://www.dellin.ru/
Replacing gaskets: when and how often
- Google+
- LJ
- Blogger
- carrying out scheduled or emergency engine repair work;
- detection of oil leaks in joints connecting equipment elements;
- timing belt maintenance or repair.
To eliminate problems with the gasket, some drivers change it along with the oil.
During the operation, the condition of the gas distribution device components is also diagnosed.