Even a novice motorist who just bought a VAZ-2114 is trying to master the art of self-repairing a car. Replacing the valve cover gasket is the first step in learning how to repair an engine. This process is not complicated and will require 20-30 minutes of time.
Below is a detailed video about replacing the valve cover on a VAZ-2114
The video will tell you how to replace the valve cover gasket on a car, and also tell you about the nuances and subtleties of the process.
How to change the valve cover gasket on a VAZ 2114: when is it necessary and how to do it
Any car enthusiast makes sure that his car is in perfect condition. If there are any problems with transport, they must be resolved promptly. So, if you see that there is a leak between the valve cover and the engine block, then you should suspect that the cover gasket is leaky.
Such an element does not have a global function in the operation of the system. But if problems arise with the gasket, then you should not turn a blind eye to them, despite the fact that the motor will work properly.
The faulty part must be replaced, otherwise oil will leak from under it. This point can cause a number of problems. So the valve cover gasket of a VAZ 2114 can be replaced independently without the involvement of specialists. Some craftsmen are of the opinion that the gasket needs to be changed every time the cover is removed. This point must be taken into account when carrying out various works.
What do you need to know about the motor?
Before the valve cover of the VAZ 2114 is removed and the gasket is replaced, it is worth talking about the features of the engine. If you don’t know anything about design features, then the best solution would be to turn to specialists. Remember that to carry out such work you will need a certain tool.
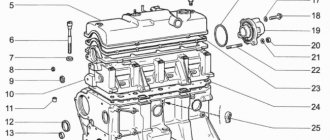
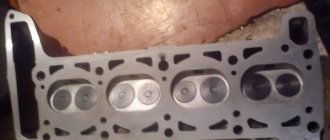
Diagram of internal combustion engine components
| № | Detail number | Part name |
| 1 | 2108-1003298 | screw |
| 2 | 2108-1003278-01 | Washer |
| 3 | 2108-1003277-01 | Sleeve |
| 3 | 2108-1003277-02 | Sleeve |
| 4 | 2108-1003274 | Cover pin |
| 5 | 2111-1003260 | Cylinder head cover |
| 6 | 2108-1003271 | Bolt M12x1.25x135 |
| 7 | 2108-1003265 | Washer |
| 8 | 14328201 | Plug 10 cup |
| 9 | 14329101 | Plug 30 cup |
| 10 | 1118-1003011 | Cylinder head |
| 11 | 2101-1002042 | Sleeve |
| 12 | 14329201 | Plug 36 cup |
| 13 | 10158601 | Plug 16 spherical |
| 14 | 11183-1002011-10 | Cylinder block |
| 15 | 14234330 | Bolt M10x1.25x65 |
| 16 | 2108-1003284-10 | Ring sealing |
| 17 | 2111-1003284 | Ring sealing |
| 18 | 2111-1003286 | Bolt |
| 19 | 2111-1003288-10 | Stub |
| 20 | 10725911 | Nut M6 low |
| 21 | 11197773 | Conical spring washer 6 |
| 22 | 13541221 | Hairpin M6x22 |
| 23 | 2108-1003270-10 | Cover gasket |
| 23 | 2108-1003270-11 | Cylinder head cover gasket |
| 24 | 21083-1003020-10 | Head gasket |
| 24 | 21083-1003020-11 | Head gasket |
| 25 | 2112-3855020 | Knock sensor |
| 25 | 2112-3855020-01 | Knock sensor |
| 25 | 2112-3855020-02 | Knock sensor |
| 25 | 2112-3855020-03 | Knock sensor |
| 26 | 2101-1002040 | Sleeve |
In particular, a car enthusiast needs to have on hand the following details:
- ratchet with extension;
- head at 10;
- screwdriver with Phillips head.
Installation
- We remove any remaining oil from the mating surface of the cylinder head, to which the cover gasket is pressed.
- Place a new gasket in the cover. When installing, please note that the radii on the right and left sides of the cover are different. Make sure the gasket is installed correctly.
Apply a thin layer of Loctite-574 sealant or similar to the corners of the gasket.- Install the cylinder head cover in the reverse order of removal.
Why do you need a gasket?
It is clear that without such a gasket the car will work as before. But you need to understand that it plays a certain role, even if it does not affect the technical features of the car. It is important that when a leak occurs, a number of serious problems can arise.
The gasket has a certain service life. It must be promptly replaced as it wears out.
If we consider the main task of this part, then it is worth saying that it is to ensure the tightness of the connection. In order for the connection between the valve cover and the engine part to be tight, a gasket is needed. You don’t need any special skills to find the cap, because it has a neck for filling engine oil.
When to replace?
It is worth figuring out exactly when it is necessary to replace the valve cover gasket on a VAZ 2114. The plant tries to use only high-quality gaskets, which is why the initial part lasts for a long time. After a certain period of time, parts lose their elasticity and may harden. This is why cracks and leaks can form.
Even a small leak can cause dirt and dust to enter the motor. Many car enthusiasts change the part when changing the oil. This is an excellent solution to the problem, as leaks can be completely eliminated.
Cases when it is worth replacing include:
- We noticed a clear oil leak at the junction.
- The motor is undergoing routine repairs, in which case a replacement can be performed.
- Carrying out technical inspection.
- Removing the cover.
How to replace?
Domestic cars are not perfect; over time, you may notice that oil is leaking from under the gasket. In this case, it is simply necessary to make a replacement. Of course, you can try to tighten the bolts more tightly, but this is unlikely to help solve the problem. If you are wondering how to change the valve cover gasket on a VAZ 2114, then you should proceed sequentially. Anyone can cope with such a task as replacing the valve cover gasket 2114.
The sequence of your actions should be as follows:
- First you need to loosen the clamps and disconnect the hoses.
- The next step is to remove the locking plate and remove the end of the cable.
- You will need to unscrew the bolts that allow you to tighten the cable bracket.
- You will see two nuts that will also need to be unscrewed and removed, as well as the rubber bands that are used for the seal.
- The valve cover can be removed.
- The old part is removed and the new one is installed.
When the cover is removed, it is worth cleaning the oil separator screens. This manipulation can be done by unscrewing the bolt and removing the cover.
How repairs are made
To replace the seals yourself, you must have:
- a device for dismantling the oil seal;
- device for removing crackers;
- tweezers;
- two flat screwdrivers;
- hammer;
- spanners;
- socket heads;
- ratchet;
- rags;
- soft metal rod (no more than 8 mm);
- pliers;
- new seals;
- press-fit mandrel for new seals.
Replacement instructions:
- First, the hood is opened and the terminal with a minus sign is disconnected from the battery.
- Then the high-voltage wires are removed and the spark plugs are unscrewed.
- The timing belt is removed, the GB head cover and the camshaft toothed pulley are removed. At the same time, it is necessary to monitor the key so as not to lose it.
- Next, unscrew the back cover fasteners so as not to damage the block gasket and other connections.
- Now you need to remove the camshaft, leaving only the bushing.
- Then the crankshaft must be turned until the piston stops at the TDC position, where the seal must be replaced. Note: to prevent the valve from falling into the cylinder, it is necessary to unscrew the spark plug and insert a rod made of material that will not damage the thread (for example, tin) into the connector.
- By squeezing the valve spring, the crackers can be easily removed with tweezers. The upper and lower plates are also disconnected. Then the cap is removed from the guide sleeve, a collet is installed on it, and the oil scraper cap is pressed out with a quick and precise blow of a hammer. Next, everything must be repeated with the second valve.
- New oil seals (the inside of which must be lubricated with engine oil in advance) are inserted into the frame and then pressed into place. And then you can mount springs and plates. The crackers must be inserted into the lower groove of the valve using a special device. The crankshaft is then rotated until there are two cylinders at TDC. The rod is removed from the spark plug hole and inserted into the next socket. All work is repeated exclusively in the order in which the parts were removed.
- The camshaft supports, as well as washers, adjusting tappets, journals and cams must be lubricated with oil. Note: before installing the support seal, it is recommended to check its technical condition.
- If necessary, the gap between the valves is adjusted.
- Finally, the terminals are connected to the battery and the engine is started. If the work and installation are done correctly, the motor will run smoothly and without unnecessary noise.
The bottom line can be summed up as follows: take care of your car, check it in a timely manner in order to track all faults in time and eliminate them, and it will serve you for a long time.
Self-replacement - what needs to be taken into account?
The replacement process is considered quite simple, but you need to understand that it is not always possible to carry out the work smoothly.
That is why when carrying out work you should follow simple tips that will help you avoid mistakes:
- When removing the lid, you should wash it in turpentine.
- The optimal solution would be to use high-quality gaskets.
- All parts used must be clean; when carrying out work, experts advise wiping the edges of parts to remove any existing oil.
- During installation, you can use a sealant; it is applied to the joints.
- After the replacement is completed, you need to check the oil level.
- To check the system, you need to start the car; carry out a second inspection after making the first trip.
- The groove under the gasket should be cleaned as thoroughly as possible.
Video on replacing the gasket:
After a certain mileage of the car, it happens that oil begins to ooze from under the valve cover gasket. To correct this situation, it is necessary to carry out the gasket replacement procedure. It is not very difficult, but still requires some skills and knowledge. So, to complete the work you will need some tools: A set of spanner or socket wrenches. Torque wrench.
Turpentine. Screwdriver. Automotive sealant.
New gasket. It is best to carry out the operation on a cold engine. It is more comfortable. How to replace a valve cover gasket. Procedure: You will need to unscrew the valve cover mounting bolts.
Usually a 10mm wrench is suitable for this. All unscrewed bolts must be completely removed. Next, you need to carefully pick out the corner of the valve cover with a screwdriver.
The cover will lift up and can be easily removed. The edges of the part must be thoroughly cleaned of oil. Turpentine, sold in pharmacies, is excellent for this.
Valve cover replacement process
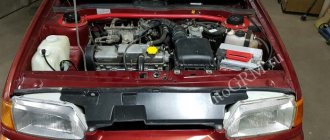
Valve cover removed from a VAZ-2114 engine
So, in order to replace the valve cover gasket on a car, you will need certain tools. What exactly is needed? Let's consider this question: a ratchet with an extension, a 10-mm socket, a screwdriver with a Phillips head.
Now that everything is ready, we buy a new gasket from the list recommended below and we can get to work.
Don't forget about the new sealant.
Let's consider the sequential stage of performing replacement operations:
- Loosen the clamps and remove the hoses shown below.
Shows which hoses need to be removed
- After removing the locking plate, disconnect the accelerator cable.
Remove the locking plate and dismantle the throttle cable
- Unscrew the mounting bolts securing the accelerator cable bracket to the receiver.
The process of dismantling the accelerator cable bracket
- Unscrew the nuts securing the valve cover.
Unscrew the valve cover mounting bolts
- We remove the rubber seals.
When the nuts are unscrewed, it is necessary to remove the seals
- Remove the valve cover upwards.
Pull the lid up
- Now you need to clean the oil separator screens. To complete the process, you need to unscrew the valve cover.
Unscrew the oil separator fasteners
Removing the oil separator cover
Oil separator screens that need to be cleaned If the screens are dirty, they need to be washed.
- If the nets are dirty, they need to be washed.
During the cleaning process
- We install a new gasket. When performing the process, we use a sealant.
Applying sealant
- If everything is tightened correctly, the gasket will fit perfectly and prevent oil leakage.
Place the gasket on the sealant
- We carry out the assembly in the reverse order.
How to properly remove valves
Before you begin, you need to prepare the appropriate tool. In particular, to replace you will need:
- Set of socket and open-end wrenches.
- Torque wrench.
- Spare parts for replacement (new set of valves, gaskets if oil seals need to be replaced, etc.)
- Container for draining antifreeze.
Initially, the machine must be de-energized. This is done by removing the negative terminal from the battery; the next step is to free the cooling system from antifreeze. Drain the coolant into a specially prepared container; releasing pressure in the fuel system. To do this, you need to unscrew the fuel hose fittings. To do this you will need a 17 key; disconnecting the exhaust pipe from the exhaust manifold and dismantling the thermostat; retraction to the side of the bracket. It is held on by several nuts that will need to be unscrewed; removing the cylinder head along with bearings and fuel rail; desiccation. When dismantling the crackers, you must be extremely careful, since they are under high tension on the springs. Therefore, they can simply “shoot” at you; dismantling the valve plate along with the springs
Please note that removing the lower plates may require removing the seal and this also requires a special tool
That's all, actually. The procedure is completed, and then you can begin repair and maintenance work. If you intend to change valves, do not rush to install new ones. Inspect them carefully, because it is quite possible that you will be able to restore them, and they will still serve. At the same time, as a rule, restoration is more often practiced on old cars; on a VAZ-2112 this is not always possible. The reason for this is the quality of old parts, which is considered higher than the current one.
If you do intend to restore a damaged part, it is best to mark the cylinder on which it sat. You should also evaluate the condition of the device guide bushings. After an initial assessment of the condition has been made, repair or maintenance can begin.
Hello) A little about my VAZ 2105 with 16 cells. two-wheel engine. I bought it from a friend with the engine already installed, freshly painted, on 15 chrome wheels. After two years of daily rape of the car, and the final drive into a ditch (I gave it to a friend for a ride(()) with the tearing out of the beam, the car was up for repairs.
Full size before major overhaul I always didn’t like the constant leaking oil from under the oil filler cap and the burning zero filter located above the exhaust manifold. I was surfing the Internet and came across a flat valve cover from Clubturbo.
There on the website they immediately recommended buying an external oil separator as a kit, because... on a standard engine it is located in the cover itself.
Full size External oil separator
Full sizePurchased almost everything you need
Full size We assembled it and started to figure out what the cover, receiver and oil separator would look like
Full size The cover bolts had to be filed
Initially we decided to leave the oil separator here. But. For front-wheel drive cars this might be suitable, but in 16 cl.
the classics would not have come close to it.
Skipping many details of the installation description, here is a photo of what happened. The oil separator is installed on the body, an additional oil sump is installed. The flat valve cover of the clubturbo is poorly made, leaks along the weld seams ((at first I was guilty of a bad gasket between the oil filler nut, but nothing. An oil pressure sensor from the classics was installed. The ignition module was moved to the receiver (they used clamps, I don’t know where to place it) after the previous one failed due to overheating
Full size This is how I ride now. This is my first post, so I apologize in advance if anything is wrong)
Source
Analogues (manufacturers)
Valve cover gasket made by Goetze
Of course, the manufacturer and many automotive experts recommend installing the original valve cover gasket, but, as practice shows, substitutes are often of higher quality and have a much longer service life.
So, let's look at which analogues of the original part are recommended for installation on a car:
| Manufacturer's name | Catalog number | Cost in rubles |
| Glaser | X08964-00 | 300 |
| Goetze | 50-025881-00 | 750 |
| Ajusa | 56021200 | 1000 |
| Trialli | GZ 101 7022 | 1500 |
As you can see, the cost of alternative gaskets is quite high, but as practice has shown, the service life of the parts is twice as long as the original.
Valve cover gasket made by Elring
Reasons for gasket failure
When all the processes have been sorted out and the choice of valve cover gasket has been decided, it is necessary to consider the reasons for the failure of this element:
- Wear. Perhaps the most common reason is that during use this element tends to crack because it is constantly exposed to hot oil.
- Stretching. Constantly high temperature negatively affects the rubber product, which loses its physical properties and stretches, which entails a loose connection and the passage of lubricant.
- Oil streams. Occurs due to gasket breakdown. This usually happens after the engine overheats severely.
Oil Creek
- Pressure. Excessively high pressure can squeeze the gasket out of its seat, which will cause oil to flow like a river.
Consequences of untimely replacement
Dirty valve cover and filter elements
There are not many consequences, but they are quite compelling to change the gasket in time.
- Firstly, this is directly related to oil leakage, which reduces the volume in the engine. Even if the loss is insignificant, it may just be enough for the internal parts of the power unit to wear out faster.
- Secondly, air constantly gets under the valve cover, which can affect the quality of the air-fuel mixture and the engine will begin to “eat” a sufficient amount of fuel.
- Thirdly, dirt and foreign objects, as well as water during winter and rainy periods, can enter through the resulting cracks. This can negatively affect the operation of the power unit, cylinder head and other elements, as well as affect the performance of the entire system as a whole.
- Fourthly, leaked oil contaminates the outer part of the block, onto which dirt clings. It can also affect the operation of the power unit and other elements.
see also
Comments 58
prntscr.com/liqrkv. My personal opinion. In the current version, it is made for non-fans of the car, so that there is a bypass from the crankcase gas reception area (bypassing the oil separator) directly into the intake manifold
Read more: Installing mudguards on Mazda CX 5 2018
The idea is completely correct, the execution is not very good. The grids need to be replaced with something of better quality to prevent them from being destroyed and getting into the engine. Someone wrote here that they will rust... What the heck. rust, this is the oil separator, everything is covered in oil. The last thing that will happen to the meshes is that they will rust. There are normal meshes made of thin wire. It is better to leave the standard grids, and use these as an addition.
Well, how are the washcloths?)
what is the effect after cleaning? I have never cleaned the crankcase ventilation of my VAZ 2115... what problems could there be?
absolutely true)))) because the place adjacent to the shaft is dry, so the seals quickly fail! Try it and you’ll understand! I just change the timing belt to a 16-valve every 20 thousand km because I like to play with the tachometer needle, already 2 replacements and the oil seals are not leaking))) and I also put 2 oil seals on the crankshaft at once))) you recess the first one deeper and the second one on top, and don’t worry that it doesn’t sit deep)))
In order for the cover, as well as the entire engine, to be clean inside, you need to fill in high-quality oil! and I’ll tell you this, there are three commandments for internal engine cleanliness: 1-fill only with high-quality oil (in my case, I drive 0W-30 Nissan original - only plastic containers!) 2-even though the factory recommends 10w-40, use 5W-40.30 (but you just need to take into account the wear of the rubber and metal seals, namely the seals! It is advisable to change everything, put it on sealant and lubricate the internal groove before installation with castrol LMX grease) 3-SHORTEN THE OIL CHANGE INTERVAL from 10,000 to 8,000, and in winter to 6,000 (as it often warms up) here are, in principle, 3 simple rules)))) and there is so much pleasure when you open the engine and everything is in light colors)))) and if someone says that there will be scuffs from synthetics, I will say so Lada 2112 1.5 16valve mileage 250,000 km, of which 40 000 km and sow the day on 0W-30 and nothing knocks or clatters anywhere, and you also need to take into account that the wife drives about 100 km on it every day, good luck to everyone)))
I absolutely agree about synthetics! I plan to replace the seals and wash the engine and the pan next year. If I understand correctly, then Castrol LMX grease should be applied to the oil seals?
In order for the cover, as well as the entire engine, to be clean inside, you need to fill in high-quality oil! and I’ll tell you this, there are three commandments for internal engine cleanliness: 1-fill only with high-quality oil (in my case, I drive 0W-30 Nissan original - only plastic containers!) 2-even though the factory recommends 10w-40, use 5W-40.30 (but you just need to take into account the wear of the rubber and metal seals, namely the seals! It is advisable to change everything, put it on sealant and lubricate the internal groove before installation with castrol LMX grease) 3-SHORTEN THE OIL CHANGE INTERVAL from 10,000 to 8,000, and in winter to 6,000 (as it often warms up) here are, in principle, 3 simple rules)))) and there is so much pleasure when you open the engine and everything is in light colors)))) and if someone says that there will be scuffs from synthetics, I will say so Lada 2112 1.5 16valve mileage 250,000 km, of which 40 000 km and sow the day on 0W-30 and nothing knocks or clatters anywhere, and you also need to take into account that the wife drives about 100 km on it every day, good luck to everyone)))
Read more: Valve on the LPG reducer
Gold words! Is it possible to use 5W-40 all year round?
Why this mesh at all?
It separates the oil from the gases that enter the ventilation hose and returns it to the engine, preventing it from getting into the start!
I also worry about washcloths, especially Made in China - in my kitchen these rust very quickly.
good job. I cleaned everything myself more thoroughly) but I agree with everyone about the washcloths, it’s crap!
I was just thinking about this today, and then this topic came up and inspired me too)
What is the mileage, what kind of oil is it, and how long do you drive it from MOT to MOT? There's just a lot of varnish, and it's not good at all.
When I bought the car and went to the mechanic, he told me the mileage was 120-150 thousand. After that I drove about 38,000 km. www.drive2.ru/cars/lada/2…lnik/journal/289612/#post
I wouldn't do that, it's too risky.
Totally terrible! In which Murzilkas do you get all this) ) ) ? What kind of drugs are you taking?
Over time, the sponges will turn into chips and fall under the friction surfaces of the camshaft, and down, and there is another shaft. Remove them as soon as possible, but if athletes do this, then they overhaul the engine after each race. Do you need it? Oil with good cleaning properties will cope with this dirt in one or two minutes, so change it. From personal experience, I poured regular Lukoil into such an engine for three years, removed the valve cover to adjust it, and everything was sparkling clean. The oil turned black after about 4000 miles. Draw your conclusions!
What oil are you running? I've never seen such a black motor. Your whole engine inside is just as dirty. And the fact that you only cleaned the valve cover from the inside won’t make it any better.
Read more: On-board computer staff 110x4 m instructions
Do you even read carefully? I wrote why I did it!
As for washcloths, I’m also not sure what’s good. Over time, it will crumble, this is China, and chips will get into the engine. And also according to the instructions for the car where the cutout for the camshaft needs to be coated with sealant on the corners. I did just that on my 15, and everything is great, I’ve already covered 15,000 km! And not a single leak!
+1 about washcloths, especially Chinese ones. At home, one of these was left in the sink a couple of times in a damp place and got rusty - so there’s no place for them in the engine.
Repair from the series "pinnal wheel, wiped glass")
Don’t judge too harshly, everyone starts with this at some point, but here’s the know-how right away) Respect for the purity)
Repair from the series "pinnal wheel, wiped glass")
totally agree with you))))
I don’t understand why you would put some kind of washcloths in there... the mesh looks much more impressive and clearly performs its functions better than washcloths, I think. for a clean lid +)
UralSvyazInform stands))))) in boots))) I’m talking about pants... Test topic
sponges are used in external oil separators, but not under the valve cover! Better get it before it's too late
The article is for those who plan to independently carry out work on replacing the cylinder head gasket on a VAZ 2114, 13.15 car.
How to replace the cylinder head cover gasket on a VAZ 2114
Removal procedure:
Remove the decorative trim from engine 11183 (1.6i)
We disconnect the drive cable from the throttle valve and, together with the mounting bracket, move it towards the radiator
Using a Phillips screwdriver, loosen the clamps securing the three hoses of the crankcase ventilation system. Remove the hoses from the cylinder head cover pipes.
Using a 10 mm socket wrench, unscrew the two nuts securing the cylinder head cover
Remove the washer and rubber bushing from both studs.
Remove the cover.
Remove the gasket from the cover.
Flushing
Unscrew the oil filler plug.
Using a 10 mm socket wrench, unscrew the two bolts securing the oil separator housing.
We remove the body.
Remove the oil separator screens.
We wash the removed parts in kerosene, wipe with a rag and blow with compressed air (from a tire pump).
We assemble the oil separator in reverse order.
Removing and disassembling cylinder covers.
First remove the high pressure pipes (to the injector), the valve box, the drive rods and the exhaust and intake manifold pipes. After this, the cylinder covers are evenly loosened and then the stud nuts are unscrewed. In order to protect them and the crankshaft from damage, safety shields are placed on the cylinder liners. When disassembling the covers and lever mechanism, the parts are not disassembled unless they require replacement. If wear exceeds the permissible value, the valve guides, lever heads and sockets (11D45) are pressed out of the cylinder cover.