About the sensor
The Priora uses phased fuel injection. The operating principle of this injection is based on the readings of the phase sensor. The phase sensor receives pulses from the camshaft pulley and supplies them to the computer. In turn, the ECU, receiving these signals, adjusts the fuel injection and distributes it among the phases.
If the phase sensor malfunctions, the engine goes into emergency operation mode, switching fuel injection to pairwise mode, that is, the injectors begin to supply fuel in pairs to cylinders 1 and 3, 2 and 4.
Failure of the DF produces small but very noticeable symptoms that will undoubtedly force you to replace it.
Video on the topic
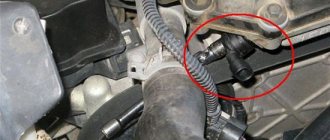
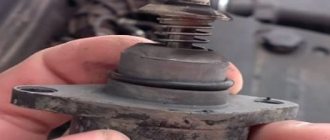
In Lada Priora cars, the camshaft position sensor (hereinafter referred to as CPS) is installed in a secret place - under the camshaft pulley. Access to the controller for preventive maintenance without prior dismantling is extremely difficult.
To facilitate repairs, it is necessary to loosen the generator belt drive. Time for prophylaxis is 15 minutes.
The process of self-replacement is not at all difficult, but it requires attentiveness on the part of the master. Don't make mistakes, don't break the rules.
DPRV is used to determine the position of the gas distribution mechanism in relation to the crankshaft. In real time, data is sent to the electronic engine control unit. The ECU adjusts the fuel injection frequency and ignition timing.
Where is the sensor located
The location of the phase sensor depends on the type of engine.
In 16-valve engines, the phase sensor is installed near the intake camshaft gear. It is attached with two bolts to the cylinder head. This location complicates the process of replacing it.
In 8-valve internal combustion engines, the sensor is located on the gearbox side in the upper part of the cylinder head, near the oil filler neck, where previously in older carburetor internal combustion engines, a distributor was installed.
Signs of a malfunctioning absolute pressure sensor. What should you pay attention to? »
Symptoms of a malfunctioning absolute pressure sensor
What to pay attention to? In old carburetor systems, its volume was regulated by air jets, an air damper and other devices
In modern engines, this function is performed by a sensor.
In old carburetor systems, its volume was regulated by air jets, an air damper and other devices. In modern engines, this function is performed by a sensor.
Signs of a faulty absolute pressure sensor will help the driver roughly determine the troubleshooting area in the engine power system
This is important for any driver, since injection engines have several such devices, the problems of many of them are similar to each other, so it is important to be able to correctly diagnose a broken engine
The system of control and measuring instruments is designed to determine the mass composition of the fuel at a specific point in time, it sets the required ignition timing, and solves other issues of the optimal operating mode of the power unit. This product finds its use mainly on foreign cars, where it replaces, but there are also cars where these devices are installed together.
Very often in the conversations of “experienced” drivers it is called a vacuum sensor, since it measures air pressure relative to vacuum. A place for its installation is provided in the intake tract. While the throttle valve is closed while the engine is running, a small, or to be more precise, very low pressure of the air mixture is formed in the intake manifold.
To increase engine speed, the gas pedal is pressed, after which the throttle valve opens. The flow area of the collector increases, the flow of the air mixture becomes greater, which means its pressure increases. Based on the data received from the absolute pressure sensor, the electronic control unit calculates the required amount of air mixture for the engine.
The industry produces two types of these devices: products made on the basis of thick-film technologies, and more modern and reliable designs of micromechanical technology. The first type of device is a variable resistor, in which the slider moves along the conductive layer, changing its resistance. With prolonged use, this layer wears out.
The second type of device is more reliable and progressive. It consists of four strain gauges, a silicon chip, and a diaphragm. The separation of air flow and vacuum occurs precisely with a diaphragm. A change in pressure leads to changes in the resistance of the strain gauges, as a result of which the voltage supplied to the control unit changes.
Recently, several modified designs of such devices have appeared. They provide for the installation of a special protective gel layer, which is exposed to the pressure of the air mixture. Information is sent from it to the electronic unit, and the advantage of such a device is that its service life increases several times.
You can guess about impending or existing problems with the absolute pressure sensor by some signs that appear during operation of the power unit. The most common “symptoms” of the disease are:
- Noticeable increase in fuel consumption. The sensor signals to the control unit that the system is in complete order, but in fact it is very small. Because of this, the control unit directs almost only gasoline into the cylinders;
The dynamic performance of the car deteriorates, which does not disappear when the engine warms up;
When the engine is running, a very strong smell of fuel is felt in the exhaust pipe area;
On the engine in operating mode, even in the warm season, the exhaust of white smoke is visible;
When idling while the power unit is warming up, the engine speed does not drop for a long time;
When trying to change gears, the car jerks;
Instability of the engine in any mode, the appearance of extraneous noise, often turning into a hum.
Source
Symptoms of malfunction
If these symptoms appear, you should pay attention to the integrity of the phase sensor and, if necessary, replace it:
- The appearance of the “Check Engine” indicator on the dashboard;
- Increased fuel consumption;
- Unstable engine operation in all modes;
- Loss of power and dynamics;
Also read our article on how to diagnose a car using the Chinese ELM 327 scanner.
Errors that indicate a breakdown of the phase sensor:
- Error 0343 – High signal level of the phase sensor circuit;
- Error 0340 – Malfunction of the camshaft position sensor circuit;
How to check and replace
Once the phase sensor is detected, you can begin diagnosing this element. Having only the ability to use a conventional multimeter, you can accurately determine the performance of the part. The work is performed in the following sequence:
- Turn on the car ignition.
- Set the multimeter to DC current measurement mode.
- Measure the voltage at the battery terminals.
- Find the camshaft position sensor.
- Connect one probe to ground and the other to the central terminal of the device. In this case, the voltage must match the value that was previously recorded at the battery terminals.
- In the same way, you should diagnose the black-and-white connector of the DPRV. There should be a voltage of about 5 Volts at this pin.
To avoid purchasing a fake in a store, it is recommended to check the sensor using the ignition key. A good quality product is equipped with a fairly powerful magnet, with the help of which a key or other small metal product will be attracted to the device.
If during operation the malfunction symptoms described above are observed, then the fastest way to determine the presence of a breakdown is to replace the Lada Priora camshaft sensor with a known good product.
To install a new part, you must:
- Find the location where the sensor is located.
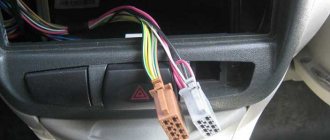
- Disconnect the wire block from this part.
- Using a 10mm wrench, unscrew the bolt securing the sensor to the engine.
- Install a new part.
By installing a new sensor, the serviceability of which is beyond doubt, you can quickly restore engine performance if this part was the cause of the malfunction. In many cases, the cause of unstable operation of the DPRV may be poor electrical contact at the connection point of the electrical block. If the presence of oxides on the contacts is visually determined, they must be cleaned with a hard non-metallic object and then treated with ethyl alcohol.
Checking the Sensor
To check the phase sensor, you must use a multimeter. Using this device you can check almost all sensors in the car.
Step by step verification process:
- Turn on the ignition on the car, check the voltage on the battery and make sure that it corresponds to the operating voltage of 11.8-12.6V. To check the voltage, you need to set the switch on the multimeter to constant voltage mode, on the 20V division scale.
- Now you need to check the power supply to the sensor necessary for its operation. To do this, remove the connector from the sensor and connect a multimeter to it. We connect one multimeter probe to ground, the second to the central connector of the block - the voltage should be 12 V. The outermost connectors of the block should show up to 5V.
- After the sensor's power supply circuit has been checked and no damage has been detected, it is necessary to begin checking the DF itself. To check it, it must be removed from the cylinder head. After dismantling, we connect the sensor to the connector and check the voltage on the back side of the block with multimeter probes. At contact “B” the voltage value should be at least 0.9V. Then you need a small metal plate, which needs to be inserted into the slot of the sensor and when the plate is in the sensor, the voltage on the multimeter should drop to 0.4V. If all parameters match, then the Priora phase sensor is working. If the parameters differ, then the sensor must be replaced, since it is not repairable.
Care and maintenance of the phase sensor in a Lada Priora car
One of the new features in the electronic control unit of the vehicle's power plant is the phase sensor, or, as it is also called, the camshaft position sensor of the engine unit.
Purpose and principle of operation of the phase sensor
The standard Priora phase sensor is used to accurately identify the cyclicity of engine operation and, taking into account the information received, transmit it in the form of electronic pulses to the input connector of the on-board computer, which controls the functionality of the power plant.
Briefly, we can say that the purpose of the phase sensor is to determine the angular position of the camshaft of a car’s gasoline unit. The operating principle of this device is based on the use of the Hall effect. On the camshaft pulley of the car there is a welded and specially machined disk of the setting value.
When the disk passes through a special hole in the phase sensor, a voltage signal with a value close to the initial value (slightly more than zero value) is transmitted from the device to the on-board computer. When the disk moves through the control segment for measurements, a translation signal appears, the so-called. reference pulse, with a potential difference of about 5 Volts, which is comparable to the position of cylinder III at the compression point.
In other words, the highly sensitive element of the product responds to the configuration created by the circular rotation of the motor camshaft of the magnetic field. Such a phase sensor for Priora, the price of which is acceptable for Russian car enthusiasts, is a complex of components, where the secondary type device consists of an output cascade, designed similar to an open collector, as well as a semiconductor bridge and a pulse amplifier.
Russian car enthusiasts often ask about the phase sensor, where it is located, how difficult it is to dismantle it, etc. Please be informed that this device is located on the aft drive housing of the DOHC camshafts. Removing and replacing the phase sensor on a Lada Priora will cause some discomfort due to the “blind” search for a hole for mounting the device, but with some skill this will not be difficult to do.
In the Lada Priora car, a phase sensor is attached to both models with an eight-valve engine and those with a sixteen-valve engine. If in the first case its location is in the end plane of the cylinder head near the air purification filter, then in the other on the cylinder head near the first cylinder of the vehicle.
On Lada Priora (eight-valve) cars produced before 2005, a phase sensor was not installed. If the vehicle was not previously equipped with such a device, then this meant a change in the principle of opening injection systems, i.e. the injectors operated in pairs in parallel mode. If the device is installed on a car, then fuel injection occurs in a phased manner, i.e. a specific injector into the corresponding cylinder.
A defect in such a device and rendering it inoperative for one reason or another means that one should expect an increase in fuel consumption, an increase in the toxicity of exhaust gases and problems with diagnosing errors in this device. The main malfunctions of an electronic gadget include the following cases:
- When starting the power plant, the starter spins the flywheel for 3-5 seconds. Next, the engine starts and the “Check Engine” banner lights up on the instrument panel, which means the on-board computer is waiting to receive signals from the device.
- Excessive consumption of fuel.
- Errors in the vehicle self-diagnosis mode when operating the engine unit.
- Reducing the dynamic properties of the vehicle's power plant.
- The motor does not start.
Replacing the phase sensor
Only replacing the phase sensor can correct the operating state of a faulty device, because Repairing this device is useless and will practically not bring the desired result. Correcting the readings of a faulty phase sensor, the price of which is low and amounts to 300-450 rubles, consists of completely replacing it with an updated product.
You can purchase such a product in specialized VAZ automobile stores selling spare parts and accessories or at branded vehicle service stations.
To replace the phase sensor, you must have a set of locksmith wrenches, tools and accessories used by drivers. The operating procedure is as follows:
- Remove the negative cable from the vehicle battery terminal.
- Using a locking device, press out the car wiring distribution block and disconnect it from the device being removed.
- Using wrenches, unscrew the device fasteners.
- We dismantle the electronic phased injection complex.
- We install the updated device in the appropriate order using the reverse algorithm.
For car enthusiasts who use Priora. Remember that if you have problems turning on the power plant, the cause may also be hidden in this inconspicuous device, which, it would seem, does not have a significant effect on the functionality of the car. At the same time, its malfunction leads to unnecessary financial expenses and loss of time.
Sensor cost
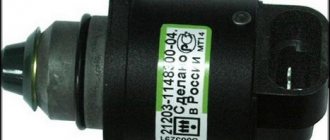
There are several types of phase sensors, differing not only in design, but also in the manufacturer.
Phase sensor for 16 valve engine
| Manufacturer | vendor code | Price, (rubles) |
| LADA | 21120-3706040-00 | 490 |
| Pegasus | 2112-3706040-04 | 265 |
| VOLTON | VLT2112-3706040-04 | 260 |
| Kaluga | 21-3847AT | 240 |
Phase sensor for 8 valve engine
| Manufacturer | vendor code | Price, (rubles) |
| LADA | 21110-3706040-00 | 415 |
| RHOMBUS | 361-3847 | 260 |
| VOLTON | VLT2111-3706040 | 285 |
| Kaluga | 48-3855000 | 280 |
Basic scheme for supply and exhaust ventilation with air recirculation
Engine valve knock
Most often, to organize supply and exhaust ventilation with recirculation, a scheme based on the use of a combination of a fan coil and a chiller is used. The fan coil replaces the indoor unit of the air conditioner, working as an active battery. This is a prefabricated unit in which there is a drainage system for organizing the outflow of condensate formed in the summer, a fan, a heat exchanger and an air filter. A chiller is a water heater that, depending on the time of year, heats or cools water, which then transfers its temperature to the incoming air.
The temperature of the coolant in the chiller is controlled from the control panel. This system allows for full or partial air heating in winter and air conditioning in summer. The volume of the room does not matter, since there are systems designed specifically for supermarkets and other large buildings. The advantage of this system is the ability to ventilate a large number of rooms in one building under a single climate regime. The air intake and exhaust points from the fan coil unit are routed using standard ventilation ducts.
As for recirculation control, it is carried out using remotely adjustable dampers or grilles, which are controlled from a remote control. The temperature of the incoming air varies depending on the time of year, while the temperature of the supply air supplied to the room should be comfortable. Its required value is set on the control panel. The chiller heats or cools the outside air to a predetermined value; it enters the heat exchanger, mixing with the air returned from the room, as a result of which it leaves the supply diffuser at the optimal temperature.
The amount of air that needs to be taken from the room and mixed with outside air depends on the set temperature parameters in the room. It is by this criterion that the installed position of the dampers is determined. The dampers themselves are mounted at the points of air intake from the room, as well as on the street air intake line. The dampers are controlled synchronized and carried out from the remote control. Its parameters are adjusted by specialists individually in each case.
Replacement
The process of replacing the sensor is a fairly simple job, but very inconvenient for 16-valve engines. Below are replacement instructions for two types of motors.
To carry out the work you will need a ratchet with a 10mm head and a 10mm open-end wrench.
Replacing DF 16 valves
- Remove the negative mark from the battery and remove the decorative engine cover with the inscription (16 VALVE)
- Disconnect the connector from DF
- We unscrew the two bolts securing the sensor, the bottom bolt is screwed into a hard-to-reach place, so you will have to work hard to unscrew it, but it is still possible. It is recommended to use an open-end wrench to unscrew the bottom bolt.
- Then remove the sensor and install a new one in reverse order.
Replacing DF 8 valves
- Disconnect the negative terminal from the battery and remove the connector from the sensor.
- Unscrew the sensor mount. In the 8-valve model, it is secured with one M6 bolt; use a ratchet to unscrew the bolt and remove the sensor.
- Install the new sensor in reverse order
Replacement completed
Remember, the Priora phase sensor differs from the 16 and 8 valve models.
We hope our article was useful to you.
Repair
Before checking the DPRV or before starting any independent actions, you need to familiarize yourself with the connection diagram for the VAZ 2110 camshaft sensor, as well as the features of its installation in the engine body.
The type of action performed depends on what signs of malfunction have been identified:
- if there is visible mechanical damage to the wiring or exposure of live parts, it must be replaced, but repairs in the form of re-insulation of the wires are also possible;
- If the sensor is mechanically damaged, it must be replaced. It is not recommended to repair or disassemble it;
- if the connector is dirty, it is necessary to reconnect with a visual inspection and cleaning of the electrical contacts;
- Wear of the connection connector requires its maintenance or replacement of the sensor. Maintenance consists of ensuring a tight fit of the connected parts;
- When checking the electrical wiring or sensor with a voltmeter and identifying deviations, it is necessary to replace the faulty element. When connecting the voltmeter probes to the electrical power contacts, the sensor resistance should not be lower than 550 Ohms or higher than 750 Ohms;
- If an internal malfunction of the sensor is detected during computer diagnostics, it must be replaced.
Replacing the DPRV is carried out by disconnecting it, dismantling the faulty one, installing a new one and reconnecting the power connector.
It is important to note that after performing any actions aimed at eliminating identified faults, it is necessary to recheck the engine operation. The operating manual does not recommend disabling the sensor yourself and further operating the vehicle.
The operating manual does not recommend disabling the sensor yourself and further operating the vehicle.
Maintenance
Don't forget to regularly maintain your car by changing the cabin air filter. You should definitely change this cabin air filter at least once a year. We also advise you to treat the ventilation system with antibacterial sprays every year. To do this, having purchased antibacterial agents (preferably spray, etc.), turn on the engine and start the interior ventilation system, turning off air recirculation. Next, open the hood and spray with an antibacterial agent in the place where air is taken into the cabin. This substance, together with the air, will pass through the entire ventilation system and enter the cabin. This way you will protect yourself from the formation of harmful bacteria and microbes in the ventilation system.
Also, sooner or later you will have to replace the refrigerant in the system. Be sure to have this work performed only by an authorized dealership to avoid damaging the air conditioning system or refilling coolant that is not certified by the vehicle company.
Subsequence
When you arrive at your destination, do not rush to turn off the engine while the air conditioning is running. This will place a greater load on the electrical power conversion system. First you need to turn off the air conditioner while the engine is running. You can do this by approaching your final route in advance. Since the air in your cabin is already cooled, turning off the cooling will not heat up the cabin in a short time. Also, turning off the air conditioner in advance will save you from the formation of a puddle under the car, which is formed as a result of condensation. At first glance there is nothing wrong with this. But it's not quite that simple. Condensation forms on the cooler in the cabin. The coolant passing through it lowers the temperature of the evaporator to very low values. The external hot air meets the cold fixative, resulting in the formation of water droplets. By turning off the air conditioning in advance while the car is moving, you will prevent the formation of harmful microorganisms due to moisture in the air conditioning system.
Hood with recirculation is an exhaust and ventilation device
While when using a flow hood, dirty air leaves the room through an air duct, a recirculation hood has a completely different principle of operation.
Here, there is no element such as an air duct, and the device itself is equipped with effective catch filters. When passing through them, the air is freed from all harmful microimpurities and unwanted odors, and then again supplied to the room.
How does a recirculating hood work?
The recirculation type hood operates in a closed cycle. In fact, it can only be called an exhaust device conditionally, since it does not remove air from the room, but only cleans it and returns it back. Contaminated air enters the device body under the influence of draft created by the fan blades rotating in a plane horizontal to the surface of the kitchen stove.
Moving along a given path, the air mass collides with the coarse filter. Having passed through it, it leaves fatty inclusions, particles of soot and dust on its fine mesh surface.
A hood of this type will help out when the ventilation system of the house is not working at full capacity or the ventilation ducts are so clogged that there is no draft in them at all.
Next, the air flow, under the influence of pressure, passes through a fine filter, where it gets rid of odors and traces of the smallest particles, then returns to the room. This filter is an ordinary cartridge filled with granular carbon. The carbon filter is a disposable product, so when it becomes dirty, it must be replaced.
Since this type of hood does not interact with the ventilation system, designers have developed telescopic hoods. During operation, they create a powerful lateral draft, due to which all dirty air masses are sucked in. As soon as the need for this disappears, the device hides in the countertop. This solution is not only original, but also very convenient.