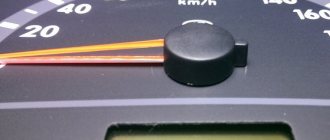
When the speed sensor on a Lada Kalina is faulty, the speedometer needle begins to twitch or does not move at all, the reading error is high, the power steering does not work. The article discusses the signs and causes of the malfunction and provides instructions for replacing the device. In addition, photographs and a demonstration video are included.
The speed sensor (DS) is an element of the fuel system of engines with an injector. Its purpose is to determine the rotation speed of the front wheels of the car and transmit the received data to the electronic control unit. The controller analyzes the received information and sends it to the instrument panel. In addition, these data are used to calculate the required proportions of fuel and air to form a high-quality fuel-air mixture, which is supplied to the cylinders of the power unit.
Signs of a malfunctioning speed sensor
If the DS is faulty, then the following signs appear:
- incorrect speedometer readings, the needle moves chaotically, complete speedometer failure;
- increased fuel consumption;
- The power steering refuses to work;
- the power unit check sign is on;
- The car odometer does not show mileage;
- the arrow indicating the fuel level fluctuates, making it impossible to correctly determine the level;
- the engine does not pull or has lost throttle response;
- The engine stalls at idle.
The listed symptoms can be caused by a breakdown of other devices (the author of the video is Autoelectrics HF).
Replacement procedure
- Park the car on a level surface and secure it with the parking brake.
- After opening the hood, turn off the power to the on-board circuit by removing the ground wire from the battery terminal.
- For ease of operation, remove the air duct corrugation by loosening the clamp securing it to the mass air flow sensor. Move it aside.
- Disconnect the wires on the sensor by removing them from the connector.
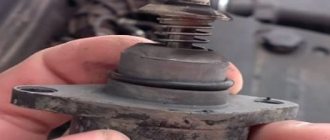
- Using a socket wrench or a 10 mm socket, unscrew the bolt securing the sensor housing.
- Using a slotted screwdriver, pry up the housing and remove the sensor from the gearbox.
- Install a new sensor in its place.
- Connect the connector.
- Install the duct corrugation.
- Connect power.
After completing the repair work, start the engine and check its idle speed. Look at the tachometer readings. Next, check the functionality of the sensor in motion.
Pay attention to the odometer and speedometer readings, compare them with the real ones. If the engine operation returns to normal, you can consider your work successful.
Source
Causes of breakdowns
The cause of the DS malfunction may be:
- poor contact in the DS connector or its complete absence;
- violation of the integrity of the wiring, the wires oxidize and rust over time;
- contamination on sensitive elements;
- sensor element malfunction.
The first three reasons can be corrected without replacing the DS; in the latter case, the device must be changed.
Checking the cleanliness of the connector
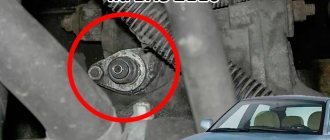
Where is the Lada Kalina speed sensor located?
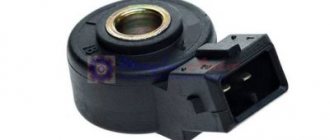
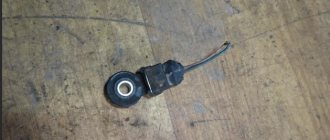
The Lada Kalina speed sensor consists of a plastic housing shaped like a cylinder and an electronic sensitive element.
The place where it is located in the engine compartment is not difficult to find. To do this, you need to lift the hood to gain access to the engine compartment. The air pipe connects the throttle to the filter. After unscrewing the clamps, you need to dismantle the air pipe. On top of the gearbox is the DS.
Speed sensor for Lada Kalina
Replacing DS
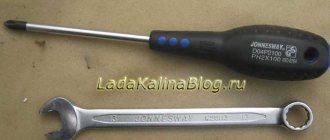
To work you will need the bare minimum of tools:
- curly screwdriver;
- socket wrench 10.
For greater convenience, it is advisable to remove the battery. Replacing the Kalina speed sensor (8 valves) is carried out in the following sequence:
- Use a screwdriver to loosen the clamps of the corrugated air duct between the mass air flow sensor and the throttle assembly and remove it;
- The DS is located at the gearbox, next to the partition of the engine compartment;
- remove the terminal block; to do this, press the latch with your thumb and simultaneously pull it up;
- Use a 10mm wrench to unscrew the only nut securing the controller;
- remove the old sensor;
- before installation, the new DS must be lubricated with lithol from the rubber ring to the mount;
- assembly is carried out in reverse order.
Removal and installation instructions
Before changing the DS, you should first carry out a number of preventive actions that can eliminate the malfunction:
- clean the contacts: they may have oxidized;
- Clean the pad, which may have gotten dirty.
The sensor should also be removed, cleaned and checked for functionality.
The check can be performed in three ways:
- Using a multimeter. The positive wire of the removed DC must be connected to the central contact, and the negative wire must be leaned against the body of the car. If the DC is exposed to slight vibration, the readings on the tester should fluctuate from 0.5 to 10 V.
- To check the second method, the device does not need to be removed from the gearbox. You should hang the front wheel, then start rotating it and attach a multimeter in the same way as the first method. If after connection the tester changes readings, then the device is working properly.
- If you don't have a multimeter, you can use a 12 V test light in the socket. The minus must be connected to the signal contact of the DC, and the plus must be connected to the battery. When the light comes on, it indicates that the device is working properly.
If the DS is faulty, it must be replaced.
To replace the DS, you need to prepare the following tools and materials:
Diagnostics
Checking the controller can be done in several ways; we recommend that you familiarize yourself with each of them in more detail. For the first two methods you will need a voltmeter.
- First, the sensor must be removed. Find its installation location, disconnect the connected connector, unscrew the fixing nut and remove the device from the mounting location.
- Then take a voltmeter and figure out the pinout of the connector. The connector has three contacts, the first of which is usually a positive contact, the second is an output signal, and the third is a negative contact. One of the tester probes should be connected to contact number 2, and the second probe should be grounded - connected to the engine body or car body.
- Afterwards, you need to rotate the controller to determine whether there are pulses in the operating cycle and measure the output voltage. To do this, you need to install a piece of pipe on the sensor axis and rotate the device at a speed of approximately 3-5 km/h. The voltage and frequency in the tester depend on the rotation speed of the controller (the author of the video is Artem Kulzhanov).
The second diagnostic option is performed without dismantling the sensor:
- You need to put the car on a jack. You need to jack up the front of the car so that one of the wheels is hanging out and not in contact with the ground.
- After this, the tester probes must again be connected to the contacts on the device connector.
- The hanging wheel must be rotated and at the same time monitor the readings on the tester display. If, as a result of rotation, voltage and frequency appear, measured in hertz, then this indicates the operability of the device.
There is another checking option; to perform it you will need a light bulb or control.
Diagnostics is performed as follows:
- First of all, you should disconnect the plug and wiring from the sensor.
- Using the control, you will need to find the plus and minus, before that you need to turn on the ignition.
- Next, as in the previous method, you need to put the front of the car body on a jack and hang one wheel.
- Now you should connect the control pin to the pulse contact of the sensor (usually it is the middle one) and rotate the wheel by hand. If at the same time the minus lights up on the control panel, this indicates that the device is working. Alternatively, instead of a control, you can use a light bulb with a connected wire, one of which is connected to the battery, and the second to the signal connector. If the light begins to blink when the wheel rotates, then the controller is working (video shot by Alex Kov).
Video “Replacing the speed sensor”
This video demonstrates how to replace a speed sensor with your own hands (the author of the video is Alexandr V).
In order for the driver to constantly monitor the speed of his car using the speedometer, a speed sensor must be present. This measuring element is located on the transmission unit. The main purpose of this component is to ensure the transmission of pulses to the electronic engine control unit (ECU). Sometimes situations occur when the reader experiences a malfunction. Owners of practical small cars Lada Kalina are also not immune from this. Here it is necessary to take urgent replacement measures, since orientation in high-speed mode is one of the primary safety tasks for any driver. Many car owners are interested in the question of where this sensor is located.
Accessories
Over the years, on cars of 2 series, speed sensors of various modifications were installed on Kalina. They differ only in appearance. The factory EMF marking for the original gearbox begins with the digital designation 1118. If a Lada Priora gearbox is installed on Kalina, the EMF marking will begin with the numbers 2170. This is not so important. Original speed sensors are marked with article numbers: 1118-3843010-04, 1118-3843010-02, 1118-3843010. One of the most common faults is replacing a faulty EMF with a non-original analogue. The analogue operating from the gearbox does not transmit accurate data or its drive breaks down.
List of main faults
Signs of failure of the sensor we are considering are quite easy to determine. Even a novice owner of Kalina can cope with such a “task”.
Symptoms include the following:
If these signs are present, the owner of the Lada Kalina should take preventive measures or replace the reader. The element itself is fixed to the gearbox housing with one screw. Three cables fit into its connector. You can get to the element after preliminary dismantling the adjacent elements of the engine compartment. If we have a 16-valve version of the engine in front of us, then to provide access we should move the reservoir with the washer fluid. When the owner has a Lada Kalina with an 8-valve engine, the speed sensor will be accessible if you remove the corrugated pipe of the air intake system, which fits into the housing of the filter component.
To purchase a similar sensor, you will need to read the number printed on the surface of the product. Here you need to show restraint and not run to the store for a new element just yet. We recommend checking your contacts. Sometimes they can oxidize or there is a break in the supply wiring. A fairly common cause of sensor failures is the ingress of metal shavings, which are present in any well-worn transmission unit.
Main causes of damage
The place where the Kalina speed sensor is located is not very well chosen. Located at the gearbox, under the cooling system pipes, the DS is exposed to dust and aggressive liquids. Despite the boot on the terminal block, antifreeze and oil get onto the sensor contacts, causing contamination and corrosion. Most often this is the cause of damage to the DS. Contacts become heavily oxidized and sometimes even break off. As a result, the DS does not work correctly.
Much more often than the sensor contacts, the terminal block oxidizes. It is frankly rusting from the inside, and it is almost impossible to eliminate it. Moreover, there are often cases when a car owner changes the DS, but the speedometer still does not work. I have to change the block. This is not difficult to do. The block is sold with wires of different colors. It is enough to cut off the old one and connect it to the corresponding wires of the new one. There is one more nuance here. If you remove the block during diagnostics and then put it back and the speedometer's performance is temporarily restored, then the problem is almost certainly in the terminal. True, there are often cases when the contacts oxidize both on it and on the sensor itself.
Another reason that the controller stops working is the wires. They are quite long and not secured in any way. As a result, the insulation is frayed and one of the conductors is shorted to ground, which naturally disrupts the operation of the DC.
If we analyze the main causes of damage, it becomes clear that replacing the Kalina speed sensor is not always necessary. Sometimes a visual inspection is enough to check all the conductors and also clean the contacts. As a last resort, change the pad first, which is three times cheaper. True, if it is definitely established that the sensor is to blame, then, of course, you cannot do without removing it.
How to replace the sensor?
Before installing a new sensor, you will need to dismantle the damaged part. To perform this manipulation, the owner will need to acquire a “6” key or a Phillips screwdriver.
Sensors have several design varieties, and each type of product is assigned its own code. This is important when selecting a similar component.
Replacing a speed sensor is not a complicated procedure, so any LADA Kalina owner can do it.
- Unscrew the clamp screw.
- We remove the corrugated pipe and press out the fixing element.
- Remove the block with the supply wiring and move it to the side.
- Unscrew the fasteners and remove the old sensor.
We carry out installation following the reverse algorithm of manipulations.
How to determine if the sensor is faulty
There are a number of signs by which you can determine that the speed sensor is faulty and requires replacement.
- Odometer doesn't count mileage
- The speedometer needle moves chaotically regardless of the vehicle speed
- Check Engine Light comes on while driving
These are the main signs that indicate that you cannot avoid replacing the speed sensor on Kalina.
After removing the sensor, you can inspect it and clean it, sometimes this “reanimates” it. Moisture or dirt may get into it, which leads to its unstable operation. The sensor terminal contact may also oxidize.
How to fix the problem?
If the diagnostic test shows that the sensor is working properly, but it still refuses to function, then we approach the search for problems from the other side.
Among the most common causes of failure is the fact that the working thread of fuse “F1” has burned out. This protective component is also responsible for the functioning of the immobilizer. Its malfunction can cause the dial indicator to fail to respond to changes in speed.
If the result is still missing, then we suspect the LADA Kalina instrument panel. For testing purposes, we recommend connecting a known-good shield. You can also compare the speedometer readings with the information from the on-board controller.
Supporters of tuning are faced with a breakdown of the speedometer needle, which is due to careless work on upgrading the panel. We re-check the correct installation and integrity of the components.
Other damage
If, after installing a new sensor, the speedometer on the Lada Kalina still does not work, the reason must be sought in the electrical circuit of this device.
Bad "0"
To determine whether the speedometer is in poor contact with the vehicle's ground, it is necessary to dismantle the device itself. After dismantling, you will notice that a black wire enters the speedometer housing and is connected to the frame. This wire is secured to the frame using an “8” bolt.
- Unscrew the bolt.
- Clean the contact itself and its connection with sandpaper.
- Screw the wire contact into place.
- Check the speedometer operation.
A break in the negative wire can only occur after a poor-quality replacement of the speedometer. You cannot connect a broken wire with simple twisting. If the problem persists, you should pay attention to the vehicle's safety unit.
Fuse
A 10-amp fuse is responsible for protecting the speedometer from electrical surges. In the safety block it is designated “F1” and is located first in the row. Its malfunction will be indicated by the complete absence of speedometer lighting. Next you need:
- Remove the fuse from its socket.
- Set the multimeter to beep mode.
- Connect both multimeter probes to the fuse terminals.
If there is no sound signal, this indicates a faulty speedometer fuse. It is worth remembering that the replacement must be made with a similar sample, marked “10A”. Fuses of a lower rating will often blow out or lead to the passage of excess voltage into the electronic circuit of the device. It is also prohibited to screw jumper wires onto the fuse.
The check can be carried out visually. The transparent fuse housing allows you to see the condition of the jumper wire.
If, after checking the electrical circuit, replacing the sensor and fuse, the speedometer on Kalina does not work, then it is completely out of order. This device cannot be repaired and there are no spare parts for it. Will have to replace it with a similar model.
Let's sum it up
So, we have found out the main symptoms of a sensor malfunction, when they appear, the owner of a Lada Kalina should worry about eliminating the unpleasant breakdown that has arisen. We found out where the sensor is located and how to check it correctly. We also became acquainted with situations in which, instead of such a procedure as replacing a speed sensor, the owner can get by with simple repair and preventative actions. As you can see, both directions of troubleshooting work are quite simple. Following our recommendations, feel free to fix any damage that has appeared.
The Lada Kalina speed sensor is a device that is intended not only to measure the vehicle's speed, but is also an important link in interacting with other systems in the car. The principle of its operation is based on electromagnetic pulses, with the help of which the vehicle’s speed is analyzed and calculated.
The device readings are taken into account when calculating the quantitative parameters of the fuel supply by the engine control unit. Therefore, if the speed measurement device breaks down or malfunctions, the control unit does not receive information important for the engine. The question of where the Lada Kalina speed sensor is located is of interest to many car owners who are faced with the incorrect operation of this device. The location is the gearbox assembly in the speedometer drive area. The most convenient way to access the mechanism is by opening the hood and removing the air pipe that is attached to the throttle assembly. Thus, you will provide a good overview and space for a comfortable dismantling process.
Checking and replacing parts
To make sure that the problem is a breakdown of the Lada Kalina speed controller, you need to use a tester. We remove the device and find the pulse contact using a multimeter. Next, connect the negative probe to the motor, and the positive probe to the impulse wire. We put a small tube on the axis of the device and scroll it.
In this case, a multimeter should be ready to immediately measure the voltage that arises. For a working sensor, the voltage should change from 0.5-0.6 V to 9.9-10 V. The speed sensor is replaced as follows. We will need two keys, 10 and 21. Now we need to disconnect the battery from the network, and then the sensor connector. Now you can begin dismantling the defective device.
If you notice that the rod is also faulty, then you need to remove the drive as well. The most important thing here is to be careful not to damage fragile parts or drop any of them into the gearbox. Now you need to take a new device and install it in place of the old one.
Tool:
- Multimeter
- Large flat screwdriver
The operating principles of the phase sensor and speed sensor are similar. The sensor pulses the circuit to ground when the camshaft pin (phase sensor) or the steel elements of the drive disk (speed sensor) passes near its end. We show the test using the example of a phase sensor.
1. With the ignition off, disconnect the engine control system wiring harness block from the phase sensor. The wiring harness block terminals “A”, “B” and “C” are marked on the block body.
2. To check the sensor's power circuit, connect the tester probes to terminals “B” and “A” of the wiring harness block. When the ignition is turned on and within 10 seconds after it is turned off, the voltage should be equal to the on-board network voltage.
3. Otherwise, we check the serviceability of the circuits (open circuit and short to ground) between terminal “B” of the wiring harness block and terminal “45” of the controller (“+” power supply), as well as between terminal “A” of the block and the grounding point.
4. If the circuits are working properly and there is no voltage, the controller is faulty. We connect the tester probes to terminals “C” and “A” of the wiring harness block.
When the ignition is on (and in the absence of a phase sensor signal), the controller, through its internal resistor, must output on-board voltage to terminal “C” of the wiring harness block.
Signs of a malfunction of the Lada Kalina speed sensor
The most common cause of failure is chemical oxidation of the contacts at the point of contact between the device connector and the contact chip. In second place is the failure of the device itself. Therefore, before making a replacement, it is necessary to take preparatory actions and identify the cause of the malfunction. Usually, diagnosing the speed sensor on a Lada Kalina car does not cause any significant difficulties, since the symptoms are very obvious. Some signs indicating possible problems:
- interruptions in engine operation (incorrect idle operation);
- periodic, spontaneous engine stops;
- incorrect display of speedometer readings (or complete absence of any data at all);
- speedometer and tachometer data that do not agree with each other (for example, when you are moving in first gear, the revolutions are within 1500, and the speed is indicated around 80 kilometers per hour);
- in some cases, errors and failure of the electric power steering.
Purpose of the sensor
A modern car is a complex structure in which every working operation is strictly controlled by special devices. The same applies to speed measurement. If previously the speed of the car was measured mechanically, now this function is performed at a higher level by a speed sensor.
The speed sensor is a complex electronic device installed on the gearbox speedometer drive. Its task is to transmit the movement impulse to the controller and record the slightest changes in the movement of the car. Finding the sensor is not difficult, you just need to remove the adsorber. Here you can see the wire that goes to the transmission, it connects the transmission to the sensor.
As practice shows, the speed sensor also has another, secondary operating function - fuel economy. Of course, in small quantities. Fuel saving occurs when the Lada Kalina car is moving at a speed slightly above 20 km/h on the coast, then no fuel is supplied, and therefore no fuel is consumed.
Replacing the speed sensor on a Lada Kalina
Now, it is necessary to consider in detail all the stages associated with replacing (removing) the element we need.
- The first thing that is recommended is to disconnect the negative terminal from the battery.
- After that, you need to remove the plastic cover protecting the engine housing (if you have one installed) and dismantle the air pipe that extends from the air filter housing. This is quite easy to do. You just need to loosen the clamps on the side of the throttle body and the air filter housing with a Phillips screwdriver. After the pipe is removed, you need to find the area where the gearbox is located.
- You can quickly determine the speed sensor we need by looking at the wire connected to it.
- Carefully remove the chip from the found element.
- We take the 10mm socket in our hand (if you don’t have one, you can use a wrench of the same size).
- Unscrew the holding nut.
- Now, to facilitate the removal process, take a flat, long screwdriver. It will help you pry off and conveniently remove the sensor. The part must be rocked from side to side and simultaneously pulled outward.
Done, everything is simple and fast enough!
Don't rush to throw it away
After successfully removing the product, do not rush to throw it away or replace it. A thorough inspection should be carried out for oxidized contacts of the product itself, the contacts of the chip connected to it, and the integrity of all wires. If you find areas of oxidation or contamination, carefully clean them. Place the sensor back into the socket and attach the power supply to it. Replace the air pipe and the negative terminal of the battery. Start the engine and test the operation of the instruments and the behavior of the engine. If the faults are not resolved, start the process from step No. 1 and replace the sensor with a new one. Note! After the initial cleaning of all contacts, you can immediately install a new product and not test the operation of the old one. It all depends on your goals and budget.
Please note!
After all the work has been carried out, it is necessary to reset the errors of the electronic control unit (if this error was previously displayed on the instrument panel). Now, all speed parameters, mileage and engine operation will comply with factory standards. Keep in mind that there are several types of speed sensors for Lada Kalina. The specific type depends on the year of manufacture of a particular car. Therefore, check all the details regarding compatibility with the auto goods seller.
Power supplies Lada Kalina
The on-board network of the Lada is characterized by direct current, the nominal voltage of which is 12 V. The electrical circuit of the VAZ 1118 is single-wire. The main elements of the Kalina network can be divided into 4 groups.
- Sources.
- Consumers.
- Protective elements.
- Sensors
Sources and consumers of electrical energy are connected by negative terminals to a metal body (“ground”), which acts as a second wire. Power for all electrical devices of the Lada Kalina car is supplied from two main energy sources: a generator and a battery. While the engine is running, power is supplied to consumers from the alternator. When the engine is turned off, the devices are powered by a battery. While the generator is running, the battery is charged.
A generator is an alternating current synchronous eclectic machine. The rotating crankshaft of the car rotates the moving element of the generator - the rotor. In this way, the mechanical energy of the crankshaft rotation is converted into electricity. The rotor shaft rotates in bearings located in the covers. The bearings are lubricated at the factory with a material that does not require replacement until the end of the generator's service life. The stationary element of the generator - the stator - is tightened with four bolts to the generator cover.
The generator is the main source of electrical energy in Kalina. It supplies power to consumers when the engine is running. The generator is equipped with a built-in rectifier and voltage regulator. The Kalina stator includes a three-phase winding. The permissible voltage range of the generator is 14.4–15.1 V. The gear ratio of the engine to the generator is 1:2.4. The maximum generated current is 85 A.
The leads of the field winding located on the rotor are attached by soldering to copper slip rings on the rotor shaft. The generator voltage regulator is a non-separable part; if it breaks, it requires replacement. In order to protect the Lada's on-board network from voltage surges during ignition, a capacitor is connected between ground and the positive valve.
When the engine is turned off, all electrical appliances in the Lada Kalina are powered by the battery. In addition to the fact that the battery is an auxiliary source of energy for consumers, it helps to start the engine. In the electrical circuit of the Lada Kalina, a parallel connection is used for the generator and battery.
The negative contact of the battery is connected strictly to the body of the Lada, and the positive contact is connected only to the “B+” terminal on the generator. Do not remove the battery while the engine is running. This can lead to voltage surges in the network, resulting in damage to circuit elements.