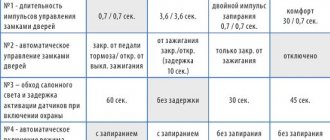
On the very first day, my hands itched, I smoked the group vk.com/ladammc In the group, I think you can find everything, and if you don’t find it, good people will definitely help, admin Alexey Voloboev helped me a lot, I thank him very much for that. The software version on the radio label is 2.0.2.32 stock - a completely stock version of the software (compatibility with other software is unknown) The radio was flashed with firmware for Prior/Kalin 23.0.2.38 I installed 21.0.2.38. Then I flashed the Can module with mms version 1.10. Then I installed the alternative menu Newmenu 8.4.8. It didn’t work out the first time, I took the instructions and firmware from the group, chose the menu on a whim, now I want to put singlemenu, because of the many skins, but I’m thinking a little later. I didn’t have any connectors for subwoofer/camera/channel bus. In the city of Tovarah Prikamye I found mini iso separately - 898 rubles, for the camera 1290 rubles, for the cable bus there is no. I think fuck you with your prices. I bought a Mini iso on Avito for 250 rubles, + two empty pads, green and blue. I somehow got out one pin with a thin wire, went to the store, bought “small pins”, one large pin for the camera, heat shrink, 3 meters of wire, and 2 plugs for obd2. Everything came out to 133 rubles.
I decided to do it in a simple way - Homeless Can) I attached a terminal for mms to the wire on one side, and a plug for obd2 on the other side. First wire: connect the mms terminal to pin 10 of the green block, obd plug to pin 6. Second wire: mms terminal in K12, obd terminal in K14. Now you can view and reset errors, it shows: instantaneous consumption, trip cost, speed, rpm, amount of fuel and much more, you can set the rpm to XX, turn on the Carlson at 95g, etc.
Description of types of firmware.
Versions 1.7 and 1.13 are stock. The navigation built into the car only works on 1.13, 1.23 and 1.24.
1.9, 1.10, 1.11 are based on 1.7; 1.23 is based on 1.13. In 1.7 there are only 11 IDs that can be forwarded to the COM port, no dividers, etc. no, and adding them is very difficult. In 1.13 there is an ID group (3 pieces 481, 551, 280) with dividers, an ID group without dividers (4Ax) and an ID group (8 pieces) without dividers disabled in the firmware. Also, information from some IDs is taken and processed inside the CAN controller. However, I don’t know how to get it. In 1.24 (modified 1.23) it was possible to receive IDs with a mask, that is, select the range of received IDs. I did this with the 7E8..7EF range to receive diagnostic requests from all controllers in our cars. ID 4A2 only for combinations with built-in GPS and only with a connected 6-button steering column switch.
Each version has its own pros and cons: Versions based on 1.7: + Reflashes well even with the engine running. — Data transmission is choked (if you often send data to the CAN controller, it stops being sent to the bus). — Not enough ID. Versions based on 1.13: + Data transfer does not choke. + Lots of IDs. + There are dividers (it really helps reduce the load, because ID: 180 messages are sent 100 times per second) - Flashing is very sensitive to bus activity, etc. (there have been cases of corruption).
CAN recovery using USBDM.
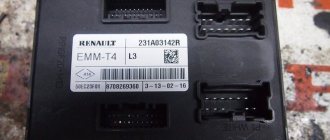
The archive contains instructions and files. Tested for MMC grants. If Kalina, RESET, BKGD and GND are looked for on the side service connector, VDD is possible next to the CAN controller.
Source kalina2sport.ru
In order for the MMS to show the engine temperature, is it necessary to connect the CAN bus to the MMS?)))) I found a post on Drive2, we flashed the MMS Grant Luxe, then everything was shown without connecting the bus.
Petro Canada everything is on fire mileage 55,000 thousand automatic transmission
by Adminrive · Published 01/29/2015
For driving with an expired MTPL policy you only face a fine of 800 rubles
by Adminrive · Published 02/21/2015
Description of the CAN module firmware process.
- Download the firmware version you need.
- Unpack the osfiles folder to the root of the memory card (SD). C USB is not sewn!
- Exit to the MMS desktop. Do not run any other programs before flashing the firmware. That is, close the altmenu or other applications that use the CAN bus and, accordingly, COM3.
- Run sdmmcosfilesUPPwriter.exe in Explorer
- We are waiting for the completion of the firmware process. At first, nothing will happen on the screen for about 20 seconds, then the firmware process will begin. Don't turn off MMS! Although for some the process did not start until they did OFF->ON ( Do not reboot! ).
- When finished, we can close everything that interferes and launch the altmenu again. A reboot is not required, but there is nothing bad about it either.
Direct firmware mms 2190 grant
The firmware process is quite simple! All you need is an SD card. Note! The SD card must be formatted in FAT16. A common problem after blinking is the Lada logo freezing on the monitor of the standard multimedia system. This problem may occur due to:
• Failure to comply with the parameters of the required formatting system; • An older model SD card other than SDHC.
If this problem occurs, you need to check that the previous two steps in the procedure for reprogramming the media to the destination key have been followed.
Once the flash drive has been formatted and the new software has been defined, for example - NewMenu V7.391Nitro, you need to download the new NewMenu V7.391Nitro firmware and unzip it directly to the SD card.
As for the FirmWare folder, the files in it need to be moved to the root of the SD card. The root of the SD card implies that the files are in addition to other moved folders.
The copying process is complete, which means it’s time to remove the flash drive from the computer. It is worth noting the need for mandatory safe removal, which all PC users have long known about.
The SD card with the files inserted on it must be inserted into the mms file. After the removable media has been inserted into the mms, it must be turned on. After waiting until the device is fully charged, long pressing the volume key will restart it.
The reboot occurs in four stages, as shown in the four-line boot example, once completed, mms starts in normal mode (standard browsing menu). A few seconds after the standard menu, the radio will go to the alternative menu.
Note! If any device is connected to the radio's USB port, the alternative menu will not launch. After removing the device, you need to restart the radio again.
The advantage of using the ATH-08 USB DNS Hub mentioned at the beginning of this article is its multi-polarity. The GPS receiver and other USB devices connected to the hub will not interfere with the launch of the alternative menu, but will become inactive.
Grant FL winding with ABS
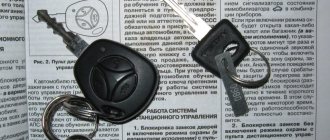
Do you drive a company car and need to periodically increase the odometer reading? – winding the Lada Granta FL speedometer will help you. The device has a simple connection to the standard OBD2 diagnostic connector, does not require intervention in the wiring and will allow winding in such a way that it will not be detected later during diagnostics at the OD.
Using the Granta FL spinner is extremely simple, see for yourself by watching the video:
What is it for
This device is designed specifically for winding the odometer up, which helps solve the problem of low fuel standards. The fact is that the consumption rate for departmental transport is most often simply taken from the factory characteristics. In fact, the car consumes fuel 15%-20% more than in the passport. And this doesn’t even take into account warming up, easy traffic jams and the cold season. As a result, it becomes common for a driver to cover the excess fuel from his own pocket.
You can get out of this situation on a more budgetary basis - every day after the shift, using the Lada Granta FL, add a little mileage. For a longer mileage, more fuel will be allocated according to the norm - the problem is solved.
Please note that we do not encourage using a winder to pour gasoline “into your pocket.” This is just a way not to waste your salary on work trips.
Unlimited mileage rewinders for other models: Lada Granta, Lada Vesta
How the device works
The operating principle of the Grant FL speedometer CAN is that after connecting such a device, it begins to transmit data packets to the car’s digital bus, similar to those sent to the CAN by the ABS unit while driving.
Of course, there is no traditional speed sensor on a gearbox equipped with an ABS system. Therefore, for her, the Lada Granta FL spinner is not a simple pulse generator, but a digital device, the circuitry of which is based on a 32-bit microcontroller, the “firmware” of which was developed by specialists from our company.
Also, do not forget that in almost all new cars, and, oddly enough, in domestic ones, the mileage traveled by the car is recorded, in addition to the speedometer, in the engine control unit. Official dealers can easily deduct this parameter when undergoing maintenance.
Therefore, our developers paid special attention to ensuring that the Lada Granta FL winder adds mileage to both the speedometer and the “brains”. This is achieved through a special algorithm, read from a real car and rolled on it. Learn more about this in the video above. There we connect the diagnostics, look at the mileage, then rewind and subtract the mileage again in the “brains”.
Also, a prerequisite for recording a new value in the Electronic Engine Control Unit is compliance with the connection algorithm. Namely, before winding, we will need to disable the ABS. To do this, simply pull out the corresponding fuse (F03) in the interior unit.
After the fuse is turned off, the ABS system indicator will light up on the dashboard.
Now turn on the ignition
We take the winding of the Lada Granta FL
We connect it to the OBD2 diagnostic connector
Pay attention to the instrument panel - the speedometer needle “lays down” to 200 and remains at this value, without “jumps” or jerks. It is in this mode that the mileage is recorded evenly and synchronously on the instrument panel and in the computer.
After reaching the required odometer value, turn off the Grant FL winder, turn off the ignition and return the fuse to its place.
Let's go through frequently asked questions
- I have a new Granta, it has ABS, but I didn’t find a speed sensor on the box. Can I be sure that your device will work?
Yes, sure. In principle, since 2016, these ATO models with a speed sensor are no longer produced; on the contrary, even the simplest equipment is equipped with ABS, which is responsible for reading the speed and mileage of the car. It is in such cases that it is advisable to use the CAN winding of the Grant FL speedometer, while there is simply nowhere to connect the pulse twister.
- Is it possible to adjust the winding speed? In the video the needle is at 200, is the speedometer stuck? At the MOT they won’t ask later where you got it so fast?
The problem of the speedometer needle jamming occurred on domestic cars produced 15-20 years ago. Modern devices do not suffer from such “sores”. And if you look carefully at the recorder table in the ECU, read by the diagnostics, you will not find a single line that is responsible for the maximum speed developed by the car. Those. making it smaller simply doesn't make sense.
- The car is equipped with the ERA GLONASS system, will it not be used to calculate the winding?
The ERA GLONASS system, which is equipped with all new cars in Russia, is designed to call emergency services in the event of an accident or other emergency. Vehicle movement, driving speed, etc. it does not measure, much less transmit anywhere.
- Is it necessary to remove the ABS fuse every time before winding? Why is this necessary? Is it possible to remove it and then not install it at all?
Yes, this fuse will have to be removed each time before winding. It is necessary to disable ABS so that with its messages to the CAN bus it does not interrupt messages from the winder and the winding process occurs synchronously in both the speedometer and the ECU. There is no other way to achieve this. It is also impossible not to install this fuse at all, because When the ABS is disabled, the speedometer simply will not work while driving.
Let's summarize. Our Lada Granta FL speedometer winding
- Unlimited, i.e. has no restrictions on the number of kilometers it adds. You can cover at least a hundred or two hundred thousand kilometers with this device, and after that it will not be blocked and will not require firmware.
- Precisely registers the mileage in the “brains”. This will allow you to avoid unnecessary questions and problems when undergoing diagnostics from an OD.
- It is delivered completely ready for work - our specialists will make all the necessary settings and check the device on a canbus analyzer before shipping.
- Will work on two, three or more identical cars. There is no connection to the vehicle's VIN code.
- Inexpensive. As manufacturers of our devices, we can offer you the most favorable price, because you buy directly, without intermediary markups.
- Has a 5 year warranty. Strict control over production quality, checking each device before shipping - all this allows us to provide such an impressive warranty period with free replacement in case of winder failure.
our company
- Has been developing, producing, selling and installing speedometer winders for more than 10 years. During this time, a significant amount of knowledge, experience and decisions on this issue have been accumulated.
- Offers you to purchase a Lada Granta FL winder at the best possible price and without prepayment! Payment occurs upon receipt by mail. Delivery at our expense! Upon receipt, you pay only the amount indicated on the website.
- You can always get advice from us on the installation and further operation of our devices. Please contact the contacts listed on the website.
Disadvantages and problems of the audio system in the Lada Granta
1. As you can see in the list of characteristics, the radio does not support reading compact discs; there is not even a connector for this case. This cannot be said to be a huge oversight, but this decision may still cause some inconvenience.
2. The Bluetooth function works quite slowly, and when transferring a large amount of information it may freeze completely.
3. Connoisseurs of pure sound in cars note the discrepancy between the output sound power of the radio and the 13-inch speakers provided for this. For the best sound effect, it is often necessary to replace speakers that simply do not perform well.
4. Poor video quality during playback, especially difficulties with the AVI 720 format.
5. Despite the built-in video input, connecting a rear view camera is impossible. However, this problem was successfully resolved in the firmware for the radio.
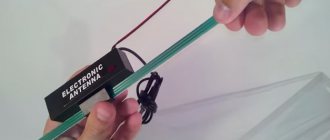
Connecting external devices
Domestic developers made sure that their creation was maximally adapted to work with third-party devices. The 2 din radio allows the use of wireless hands free, mobile phones and external information sources.
In order not to overload the Lada with unnecessary wires and inputs, the connection between the radio and an external device occurs via the Bluetooth protocol. It is enough to set the necessary settings once for the system to remember them.
If you wish, you can download music from external media to the internal memory of the radio or listen directly from a flash drive or phone. If the second is selected, then the sound comes from the speakers installed in the car or wireless headphones. When it comes to connecting memory cards, they must be formatted in a certain way - FAT16/FAT32. The connection connector is located on the back side.
Repair and warranty service are as follows. If the installation of the radio in Kalina was carried out correctly, then once a year it is necessary to do a preventive examination at a service center.
If the service period has passed, then everything can be done at home. All wires must be carefully disconnected. Using a screwdriver, loosen the fastenings and remove the radio. Then it is delivered to the workshop, where the failed element is replaced.
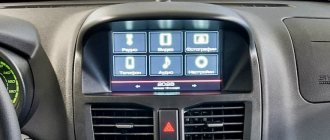
Review of the standard radio (MMC) of Lada Granta, Kalina 2 and Priora (luxury)
Currently, depending on the vehicle configuration, several types of 2 din radio can be installed.
The first is called “2 DIN audio system, without CD drive, without TouchScreen”, the other “multimedia system without CD drive, with a 7-inch display with TouchScreen” (MMC).
In the review we will talk about the MMC with a touch screen (LCD display), which is installed on the Granta (sedan and liftback), as well as on the Lada Kalina 2 and Lada Priora.
Catalog numbers MMS Lada:
Monoblock 2190-7900010-00 - MMC Lada Granta (luxury) and Lada Kalina 2 (standard) The screen is separated from the buttons 2192-7900200 - MMC Lada Kalina 2 (luxury) and Lada Priora (luxury)
MMC runs on the Windows CE 6 operating system. This is specially optimized for devices with a minimum amount of memory, by the way, in our case the memory is only 128MB. Despite this, turning on the radio does not take much time (about 2-3 seconds).
MMS screen
The display on the Granta and Kalina radio is resistive. Unlike a capacitive screen, it is able to work without failures in more severe conditions, for example, frost or heat. The display itself is quite bright and pressure sensitive. Due to the lack of a visor, there is glare in sunny weather, but not critical.
radio cassette player lada granta lux radio cassette player lada kalina 2 lux
How to determine the CAN bus in a car yourself
On-board electronics systems in modern cars and trucks have a huge number of additional devices and actuators. In order for the exchange of information between all devices to be as efficient as possible, the car must have a reliable communication network. In the early 80s of the 20th century, Bosch and developer Intel proposed a new network interface - Controller Area Network, which is popularly called Can-bus.
About the operating principle of the CAN bus network interface
The can-bus in a car is designed to provide connection to any electronic devices that are capable of transmitting and receiving certain information. Thus, data on the technical condition of systems and control signals pass over twisted pair cable in digital format. This scheme made it possible to reduce the negative influence of external electromagnetic fields and significantly increase the speed of data transfer via the protocol (the rules by which control units of various systems are able to exchange information).
In addition, diagnosing the ECUs of various car systems with your own hands has become easier. Due to the use of such a system as part of the vehicle’s on-board network, a certain number of conductors have been freed up, which are capable of providing communication via various protocols, for example, between the engine control unit and diagnostic equipment, alarm system. It is the presence of the Kan-bus in the car that allows the owner to identify controller malfunctions and errors with his own hands using special diagnostic equipment.
A CAN bus is a special network through which data is transferred and exchanged between various control nodes. Each node consists of a microprocessor (CPU) and a CAN controller, with the help of which the executable protocol is implemented and interaction with the vehicle network is ensured. The Kan bus has at least two pairs of wires - CAN_L and CAN_H, through which signals are transmitted via transceivers - transceivers capable of amplifying the signal from network control devices. In addition, transceivers perform such functions as:
- adjusting the data transfer rate by increasing or decreasing the current supply;
- current limiting to prevent damage to the sensor or shorting of transmission lines;
- thermal protection.
Today, two types of transceivers are recognized - High Speed and Fault Tolerant. The first type is the most common and complies with the standard (ISO 11898-2), it allows you to transfer data at speeds of up to 1MB per second. The second type of transceivers allows you to create an energy-saving network with a transmission speed of up to 120 Kb/sec, while such transmitters are not sensitive to any damage on the bus itself.
Features of the network
It should be understood that data is transmitted over the CAN network in the form of frames. The most important of them are the identifier field (Identifire) and the data system (Data). The most commonly used message type on Kanbus is Data Frame. This type of data transfer consists of a so-called arbitration field and determines priority data transfer in the event that several system nodes simultaneously transmit data to the CAN bus.
Each of the control devices connected to the bus has its own input resistance, and the total load is calculated from the sum of all executable blocks connected to the bus. On average, the input resistance of engine control systems that are connected to the CAN bus is 68-70 Ohms, and the resistance of the information and command system can be up to 3-4 Ohms.
CAN - interface and system diagnostics
CAN control systems not only have different load resistances, but also different message transmission rates. This fact complicates the processing of similar messages within the on-board network. To simplify diagnostics, modern cars use a gateway interface (resistance converter), which is either designed as a separate control unit or built into the car’s engine ECU.
Such a converter is also designed to input or output certain diagnostic information via the “K”-line wire, which is connected during diagnostics or changing network operating parameters either to the diagnostic connector or directly to the converter.
It is important to note that there are currently no specific standards for Can network connectors. Therefore, each protocol determines its own type of connectors on the CAN bus, depending on the load and other parameters.
Thus, when carrying out diagnostic work with your own hands, a unified OBD1 or OBD2 type connector is used, which can be found on most modern foreign and domestic cars. However, some car models, for example Volkswagen Golf 5V, Audi S4, do not have a gateway. In addition, the layout of control units and CAN bus is individual for each make and model of car. In order to diagnose a CAN system with your own hands, you use special equipment, which consists of an oscilloscope, a CAN analyzer and a digital multimeter.
Troubleshooting work begins with removing the mains voltage (removing the negative terminal of the battery). Next, the change in resistance between the bus wires is determined. The most common types of CAN bus malfunction in a car are a short circuit or line break, failure of load resistors and a decrease in the level of message transmission between network elements. In some cases, it is not possible to identify a malfunction without using a Can analyzer.
Main operating modes of the CAN bus: active (ignition on); sleeping (with the ignition off); waking up and falling asleep (when turning the ignition on and off). During sleep mode, the bus current consumption is minimal. However, at the same time, signals about the state of opening doors and windows, and other systems related to the security functions of the car are transmitted via the bus (at a lower frequency).
Most modern diagnostic devices provide a mode for diagnosing errors via the CAN bus. Technically, this is organized by directly connecting the conductors to the diagnostic connector.
Advantages and disadvantages of using a CAN bus in a car To begin with, if the CAN standard had not been proposed in the 80s of the last century, another type of interaction between car systems would have taken its place. It is possible, of course, to place all vehicle system control units in a single superblock, in which the interaction of different systems can be ensured by software. French manufacturers have made similar attempts. However, as functionality and performance increase, the likelihood of failures increases significantly. Failures, for example, of wipers, can lead to failure to start the engine.
The main advantages of using a CAN bus: the ability to carry out operational monitoring and diagnostics of all vehicle systems; combining information flows in a single noise-proof channel; universality, promoting the unification of diagnostic processes; ability to connect security systems via CAN bus (no need to run wiring to each control element). Disadvantages of the CAN bus: low reliability; Damage to one of the control units can lead to complete inoperability of the CAN connection. Troubleshooting There is no CAN fault indicator light on the vehicle dashboard.
You can judge that the functionality of the CAN bus is being disrupted by indirect indicators: several fault indicator lamps on the dashboard light up at the same time; coolant temperature and fuel levels disappeared; "CHECK ENGINE" light came on. First of all, you should perform a diagnosis. If it indicates a CAN bus malfunction, you should begin to fix the problem. Sequence of work: Find the conductors of the twisted pair bus. They are often black (high) and orange-brown (low). Check the voltage on the conductors with the ignition on using a multimeter.
Levels should not be 0 or more than 11 Volts (usually about 4.5 Volts). Turn off the ignition and disconnect the battery terminal. Measure the resistance between the conductors. If it tends to zero, it means there is a short circuit in the bus, if it approaches infinity, there is a break. Start looking for an open circuit or short circuit. If there is a suspicion that the bus is closed due to the failure of any control unit, you can sequentially turn off the control units and monitor the resistance and performance of the bus. A CAN bus malfunction is a complex malfunction of the vehicle's electrical equipment.
If the car owner does not have the necessary electrical repair skills, then it is better to use the services of a specialist.
A CAN bus is an electronic device built into a vehicle's electronic system to monitor performance and driving performance. It is a mandatory element for equipping a car with an anti-theft system, but this is only a small part of its capabilities.
Source: lubimauto.ru, voditeliauto.ru.
And finally: if you have any doubts, or do not have the proper experience or capabilities in diagnosing and determining the CAN line, it is better to use the services of certified service stations (car service stations), contact a dealership or an experienced diagnostician. Turning to fly-by-night specialists with pirated copies of diagnostic equipment can only aggravate the problem in cars and add new ones,
How to install 2 din in grant norm or standard
Everything is more complicated here. Need to:
- dismantle the center console trim - unclip the fastenings, move it forward and disconnect the buttons and heater handles;
- cut out a vertical plastic partition that will not allow you to install a 2 din device;
- file the plastic casing of the central air duct;
- try on a new acoustic unit, adjust the fastenings if necessary;
- install adapters from the delivery kit on the wiring (if required);
- install the device;
- if we leave the old center console trim: we cut out the partition, try it on, put it in place with the buttons and handles connected, adjust the decorative frame of the control unit, install it;
- if we install a new trim on the console under a 2 din device: we transfer the heater control unit and buttons from the old trim, install them in place, and put a decorative frame on the control unit.
Multimedia system Lada Vesta
AvtoVAZ does not forget about infotainment systems in its cars, and the Lada Vesta is an excellent example of this. Of course, in the basic configuration you are unlikely to discover anything other than the ability to listen to music and radio, but, fortunately, the manufacturer is not limited to the basic configuration and provides the opportunity to purchase the Lada with two more options for multimedia systems. Let's look at each of them:
- In the “Comfort” package you can order an audio system with a monochrome display (4.3 inches), FM/AM radio, USB and AUX inputs, an SD-card slot, Bluetooth technology, and Hands Free technology. All this is equipped with four speakers.
- More expensive versions of the “Comfort” package, as well as the Luxe package, include a more serious MMC, which will already have 6 speakers and a 7-inch touch screen.
Work order
The process itself is very simple. To use such a card, you must first format it in FAT16. During the flashing procedure, the Lada logo may freeze, this happens for the following reasons:
- Outdated map;
- The card was formatted in the wrong system as required.
Therefore, the procedure is simple, but it must be treated very carefully. You can download the new firmware on the official Lada website.
We connect the card to the multimedia system. Then we turn on the standard system itself. We wait for the system to start and then reboot the radio by pressing the volume key.
The program must go through four stages. Once enabled, you will see an alternative menu. This ends the preparatory stage. If everything is correct, you will see working Windows. Then all that remains is to install the software. Go to the folders Start – Setting – Control Panel.
If you experience freezing when moving from folder to folder, then simply reboot the system. Going to the panel, open the Stylus – Calibration icon. This menu will help you calibrate your screen.
Next, reboot the system again, press the volume key and hold for about ten seconds.
After turning it on again, open the Soft – radio folder and run the installation file.
These actions will help the system recognize files and stabilize the operation of your media system, as well as adjust the equalizer when you listen to the radio.
Then we set up a navigator if you need one. Go to the tools, connect the module, specify the path Staticstoredll2usb.dll. After finishing the search, press OK, and continue to press until the menu disappears from the display.