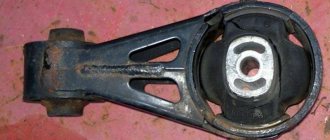
The Lada Granta has two oxygen sensors - control and diagnostic. The first sensor is responsible for the quality and quantity of the mixture in the combustion chamber, the second monitors the catalytic converter.
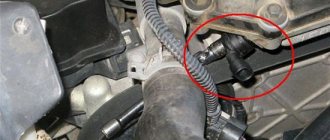
The control oxygen sensor on Grant is located in the upper part of the manifold, diagnostic behind the catalyst.
Types of lambda probes
Nowadays on the automotive equipment market you can increasingly find only 2 variations of the device:
- Probe based on a two-channel type of arrangement. This type of sensor was mainly used in cars of the 1980s, and is also used in modern economy class cars.
- Lambda sensor of broadband type. This type of probe is standardly used in 70% of medium and high class cars. This type of sensor not only accurately detects any deviations from the norm between elements, but also promptly reports this to the system for instant stabilization of the position.
All samples of modern lambda probes are mounted in a special exhaust manifold, where the hoses and pipes are directly connected. This sensor arrangement allows for maximum performance and accuracy of this device.
The main task of any lambda probe is to significantly increase the vehicle’s operating resources by reducing fuel consumption and increasing stability in maintaining speed during idle. As a result, this sensor does not provide specific values of the fuel mixture parameters, but reacts only when the obtained values are destabilized. After detecting a discrepancy with the specified parameters, the sensor transmits information to the central unit, which corrects the fuel-air ratio.
Advice: if you have replaced the fuel filter on a Priora or another car, be sure to check the correct operation of the probe. If this spare part is replaced, the correct operation of the device may be impaired.
Tips and tricks
Advice from more experienced craftsmen will never be superfluous for people who are replacing an oxygen sensor with their own hands for the first time. When performing this work, the following difficulties may arise:
- If you are using a Lada Granta with a sixteen-valve engine, then in order to get to the main DC you will need to dismantle the decorative plate covering the exhaust manifold. This element is held on by latches, so removing it will not be difficult.
- Due to operation at elevated temperatures, oxygen sensors may stick to the seat. For this reason, it will take considerable effort to dismantle them. In order to unscrew the parts, you will need to treat the threaded connection with penetrating lubricant.
- To provide freer access to the second sensor, which is located further along the smoke mixture, you can install the machine on an inspection pit or overpass before performing work.
If you take these nuances into account when performing work to replace sensors, then you can carry out all the necessary actions perfectly on the first try.
The main symptoms of a malfunctioning lambda probe
Among the signs that allow you to determine in advance whether the probe is working or not are the following:
- The appearance of instability during engine operation (the engine begins to rapidly gain speed and also stalls sharply);
- Deterioration in the quality of the fuel mixture pumped by air into the cylinder system (this leads to excessive consumption of fuel);
- Uncontrolled and ineffective fuel supply (malfunctions in the operation of the engine and electronic system of the machine);
- Gradual appearance of intermittency in engine operation at idle speed;
- Reduced engine efficiency at maximum speed;
- Problems in the operation of electronic systems (faults in the sensor lead to unstable operation of the engine compartments, since the fault signal is transmitted with a delay);
- The presence of periodic “twitching” of the car;
- The appearance of strange pops when the engine is running;
- Untimely (slow) response of vehicle engine systems to pressing the accelerator pedal;
- The appearance of a constantly flashing light indicating a sensor malfunction on the central instrument panel.
If you find one or more of these reasons in your vehicle, you should consider replacing this device.
Advice: one of the main indicators that the lambda probe has completely failed is a constant sharp drop in engine power as the engine speed increases.
Repair or replace the lambda probe?
Just like replacing a fuel pump on a VAZ-2110, repairing a lambda sensor should be carried out at a car service center. However, in most cases, this spare part is completely replaced, since it simply cannot be repaired further. The problem is the high cost of original sensors from an official dealer.
As a result, most motorists decide to switch to using a universal sensor, which is suitable for almost any make of car and costs much less than its original counterparts. In addition, if you want to save money, you can purchase a lambda probe from disassembly. These are used sensors, but they may have a long warranty period. You can also immediately purchase a full-fledged model of the exhaust manifold, in which a lambda probe is already installed.
If the problem is only a small error in the operation of the sensor, you can quickly fix it yourself. The main symptoms of a malfunction are associated with its severe contamination when fuel combustion products settle. In order to understand whether the tightening of the cylinder head bolts affected the operation of the probe or not, you just need to show it to specialists at an auto center. After the experts confirm that the lambda probe you removed is working, all you have to do is carefully clean it from dust and carbon deposits, and then put it back.
Recommendations for the selection of parts and components
For domestic car brands, service station technicians advise purchasing Russian-made parts, since their cost is 10-15% cheaper compared to foreign analogues. At the same time, the workmanship is identical.
Before purchasing, always check the catalog numbers with the actual data specified in the operating instructions for the technical product.
Use the services of certified service stations for prevention, diagnosis and replacement of faulty equipment.
DIY lambda sensor repair steps
To dismantle the lambda probe, you will need to first warm up its surface to a maximum of 60 degrees. Then carefully remove it and additionally take out the protective cap. After this, you can begin cleaning with orthophosphoric acid, which helps to easily deal with any (even the most persistent) flammable deposits.
Warming up the surface of the lambda probe
At the end of cleaning the sensor, it is necessary to soak the spare part. To do this, you can use products for flushing the engine cooling system or just clean water. At the end of the work, be sure to dry the sensor and install it in its proper place.
Tip: upon completion of work, before installation, do not forget to pre-lubricate the threads with a special sealant to ensure complete tightness of the product.
Self-replacement of the sensor
If after checking we are convinced that the sensor is faulty, it should be replaced. To do this, you need to contact either a car service, or do it yourself.
To replace the sensor we only need a 22mm wrench.
- Disconnect the negative terminal of the battery
- Carefully pull out the wire block from the sensor
- Using a 22mm wrench, carefully unscrew the old sensor and install the new one.
As you can see, everything is simple and easy. The main problem at the initial stage is determining whether the sensor (lambda probe) is faulty. Is this really the reason, after we are convinced of its malfunction, we can safely replace it with a new one.
Lada Kalina how to replace Lambda Probe 8 valve, video.
For 15 years I have been repairing various types of cars, including brands such as VAZ, UAZ, Chevrolet, Mazda, Kia and many others. Everything related to the gearbox, engine or chassis. You can write me your question below in the comments and I will try to answer it in detail.
Source
Video: how to check the lambda probe?
Publication date: December 20, 2016. Category: Automotive equipment.
A lambda probe is an O2 concentration sensor (or, more simply, an oxygen sensor) that allows you to estimate the volume of unburned oxygen contained in the exhaust gases. These indicators are extremely important, since by maintaining certain proportions of fuel and air, the most efficient combustion of the air-fuel mixture occurs. The best ratio is 14.7 parts oxygen to 1 part gasoline. If this ratio is violated, the mixture will be lean or, conversely, enriched, which, in turn, will affect fuel consumption and engine power.
Although outwardly the oxygen sensor does not look like a “vital” part, it performs a very important function, therefore any malfunction of the lambda probe, the “symptoms” of which we will consider, must be corrected immediately.
Reflashing the controller
Some particularly sophisticated car owners decide to reflash the control unit, which blocks the processing of signals from the second oxygen sensor. However, it must be taken into account that any changes to the system operation algorithm can lead to irreversible consequences, since returning the factory settings will be almost impossible and costly. Therefore, it is not recommended to perform such manipulations yourself. The same applies to ready-made firmware that is sold on the Internet.
Healthy! When flashing the lambda probes, they are removed.
If you still want to flash the system, then contact a competent specialist who can disable receiving DC data using specialized equipment.
It is also worth considering that almost any intervention in the operation of systems can lead to not the most pleasant consequences.
Signs and causes of lambda probe malfunction
According to statistics, oxygen sensors fail gradually, so you can identify its malfunction if you pay attention to the following “symptoms” in time:
- The idle speed began to drop or “float”.
- The car jerks, and after starting the engine, popping noises uncharacteristic of the engine are heard.
- The engine power has decreased and when you press the gas pedal there is a slow response.
- The engine overheats greatly and fuel consumption has increased.
- The smell in the exhaust pipe has changed (exhaust gases have become more toxic).
As a result of a failed sensor, the quality of the fuel mixture entering the combustion chamber deteriorates, which disrupts the smooth operation of the engine. There can be many reasons for this:
- Incorrect operation of the filament circuit or reduced sensitivity of the sensor tip.
- Low-quality fuel with a high content of iron, lead, oil decay particles and other harmful inclusions. All these substances stick to the platinum electrodes, causing the sensor to malfunction.
- Problems with the lambda probe heating system. If the heating stops functioning as it should, the oxygen sensor will produce inaccurate data.
- Overheating of the regulator housing. This happens if the ignition timing is incorrectly set.
- Worn oil scraper rings. In this case, engine fluid enters the exhaust pipe, which affects the lambda probe.
- If the engine is started repeatedly.
- Using sealants (especially silicone) to install lambda probes.
- The compression level in the engine cylinders is impaired. In this case, the combustible mixture burns unevenly.
- Clogged engine petrol injectors.
If you notice that the lambda probe is not working, you should not ignore the symptoms, as otherwise you will cause yourself a lot of problems with your car. The fact is that most modern cars are equipped with an emergency locking unit, which can work at the most unfortunate moment. However, the impossibility of further movement is not the worst thing. If the sensor becomes depressurized, the injection system will fail and you will have to pay for expensive repairs to a more serious unit.
Therefore, it is recommended to periodically check the condition of the lambda probe. You can do this yourself.
Electronic snag
Another way to eliminate problems with the DC is to use an electronic decoy of the lambda probe, the diagram of which is presented below. Since the oxygen sensor transmits a signal to the controller, a decoy circuit connected to the wiring from the sensor to the connector will “crude” the system. Thanks to this, in a situation where the lambda probe is faulty, the power unit will continue to operate correctly.
Healthy! The installation locations for such deception may differ depending on the PBX model. For example, it can be mounted in the central tunnel between the seats, in the dashboard or in the engine compartment.
The decoy circuit is a single-chip microprocessor that analyzes the processes in the catalyst, receives data from the first DC, processes it, converts it to the indicators of the second sensor and issues a corresponding signal to the car processor.
To install this type of snag, you will need a lambda probe connection diagram, which looks like this.
As you can see, there are different pinouts of the lambda probe (4 wires, three and two). The colors of the wires may also vary, most often there are products with 4 pins (2 black, white and blue).
To make a deception device, you will need:
- soldering iron with a fine tip and solder;
- rosin;
- non-polar capacitor with a capacity of 1 µF Y5V, +/- 20%;
- resistor (resistance) 1 mOhm, C1-4 imp, 0.25 W;
- knife and insulating tape.
Healthy! Before installation, it is best to place the circuit in a plastic case and fill it with epoxy.
Next, the electronic snag is mounted on the lambda probe with your own hands as follows:
- Disconnect the negative terminal of the battery.
- “Dissect” the wire that goes from the DC itself to the connector.
- Cut the blue wire and connect it back through the resistor.
- Solder a non-polar capacitor between the white and blue wires.
- Insulate connections.
Below is a do-it-yourself diagram of a lambda probe for pinout into 4 wires.
Checking the oxygen sensor
Typically, diagnostics of a lambda probe is carried out using a voltmeter and an ohmmeter or a multimeter, which replaces both of these testers at once. To check the filament coil of the regulator, you need to disconnect pins 3 and 4 of the connector from the block (usually these are brown and white wires) and connect the ends of the tester to their clamps. If the resistance of the spiral is at least 5 ohms, then this is a good sign.
Also, checking the lambda probe with a multimeter allows you to find out the sensitivity of the tip of the oxygen sensor. To find out the thermoelectric parameters of the element, you need to turn on and warm up the engine to 70-80 degrees. After that:
- Raise the engine speed to 3000 and hold this value for 3 minutes to allow the sensor to warm up.
- Connect the negative probe of the tester (signal wire) to the ground of the car, and the second one to the output of the lambda probe.
- Check the tester readings, the data should vary from 0.2 to 1 V and update up to 10 times per second.
- Press the accelerator pedal sharply and release it; if the multimeter shows a value of 1 V, and then sharply drops to zero, then the lambda probe is ok. If the data on the tester does not jump when you press and release the pedal, and the readings are about 0.4 - 0.5 V, this indicates the need to replace the sensor.
List of online stores selling parts (Moscow, St. Petersburg, Kyiv regions)
| № | Name | Address |
| 1. | "Prom.ua" | https://prom.ua/Datchik-kisloroda.html |
| 2. | "Ukrparts" | https://ukrparts.com.ua/category/lyambda-zond/c-88/ |
| 3. | "Tiu.ru" | https://spb.tiu.ru/Datchik-kisloroda-lyambda-zond.html |
| 4. | "How much" | https://www.avtostore.spb.ru/katalog/product/view/133/123 |
| 5. | "Carvilleshop" | https://carvilleshop.ru/catalogue/datchiki_reguliyatori/datchiki-kisloroda/ |
| 6. | "PRO-Sport" | https://www.pro-sport.ru/catalog |
How to repair a lambda probe
Repairing a lambda probe with your own hands is quite simple; to do this, you need to determine in which particular unit the failure occurred.
If the problem is related to the circuit contacts, then first of all you need to find the break point and check whether the contacts have oxidized. The signal may simply not come from the control unit. Therefore, check the lambda power supply. If the element contacts have oxidized, they must be treated with WD40.
If a lot of carbon deposits have formed on the probe body, it may be necessary to clean all parts of the system. And here a natural question arises: how to rinse the lambda probe. The fact is that it is strictly prohibited to process platinum electrodes and ceramic rods with sandpaper. Therefore, it is necessary to use specialized products designed to dissolve rust.
To clean the sensor, follow these steps:
- Remove the lambda probe after heating its housing to 50 degrees.
- Remove the protective cap.
- Soak the sensor in phosphoric acid for 30 minutes (it will cope with even the most difficult deposits).
- Rinse the lambda in water, dry it and install the element back. Don't forget to lubricate the sensor threads with a special agent to create a complete seal (but don't use silicone sealant).
Since the cost of sensors ranges from 1000 - 3000 rubles per element, it is quite reasonable to try to repair the lambda probe yourself (see video below), and only then proceed to install a new element.
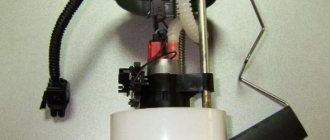
Device diagram
Let's look at the probe diagram, which gives an idea of the placement of nodes. Knowledge of the design allows you to understand the locations of parts that are prone to failure.
Probe design example
- 1 - metal fitting intended for installing a probe, there are turnkey edges on the outer surface, a thread is located below;
- 2 - ceramic insulator;
- 3 — sealing element for inserting the wiring harness;
- 4 - signal wires;
- 5 - metal protective cap, equipped with ventilation vents, designed to protect the measuring element from damage;
- 6 — spring contact part;
- 7 - sensitive element made of ceramic;
- 8 - heating rod;
- 9 - ventilation duct;
- 10 - outer metal casing.
Purpose
The lambda probe measures the amount of oxygen in the residual gases. The collected data is transmitted to the engine ECU. This allows you to determine the nature of fuel combustion. Without this, stable operation of the catalytic converter is impossible.
The window for effective catalyst operation is very small. Therefore, it is so important to identify signs of lambda probe malfunction in advance. After all, it is this device that is responsible for controlling the exhaust tract.
To understand why the lambda probe broke, you need to understand a little about its design. It is installed in the exhaust tract, near the catalyst. If the system meets the Euro 3 standard, then there must be another device at the output.
Diagnostics
The main indicator of a malfunctioning lambda probe is an incorrect output voltage. At idle speed at 2000 rpm. This indicator should be in the range from 0 to 1 V.
To measure residual oxygen in used gases, the temperature must be 300-400 degrees. At this temperature, the zirconium electrolyte becomes conductive. The difference between atmospheric oxygen and oxygen in the exhaust pipe causes voltage to appear at the electrodes of the lambda probe.
Therefore, to check for faults, diagnostics are carried out with the engine running. All measurements are carried out using a multimeter or oscilloscope.
Where is the oxygen sensor located?
The Lada Granta model is equipped with two DCCs: diagnostic and control. The first is located in the exhaust manifold housing, the second is after the manifold coupling.
Access to equipment for preventive maintenance from under the bottom of the car, as well as through the top of the engine compartment.
The average service life of the DCC is 80 – 110 thousand km. depending on the driver's compliance with the manufacturer's recommendations.
Symptoms of a problem
There are certain symptoms that allow you to determine in advance that the lambda probe is malfunctioning. If your engine stops running stably, the sensor may be the reason.
If the lambda probe is faulty, the quality of the pumped fuel mixture deteriorates. The delivery becomes uncontrolled and ineffective. Typically, the device exits its normal operating mode gradually. As a result, it is extremely difficult to notice a malfunction in the early stages of the process.
Any serious malfunction of the lambda probe begins with unstable signal transmission to certain engine compartments. Naturally, idling work goes wrong.
The revolutions fluctuate over a fairly wide range, which is why the quality of the fuel system and the efficiency of the entire engine deteriorate. One of the signs of serious damage to the lambda probe is the constant “twitching” of the car.
When the engine is running, strange popping noises are heard. The light on the instrument panel constantly flashes, indicating a malfunction of the lambda probe. The combination of these phenomena clearly demonstrates that something is wrong with the sensor. If you don’t do anything now, the device will soon fail completely.
The next stage of lambda probe malfunction is final failure. In addition to a drop in power, there is a slow response of the system when pressing the accelerator pedal. Popping noises are constantly heard from under the hood. The car "twitches".
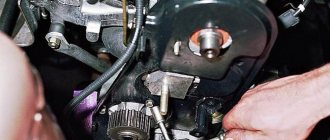
Installing an oxygen sensor on a Lada Granta
Preparatory stage:
- Key to "17";
- Rags;
- Additional lighting;
- Diagnostic and management controllers;
- Multimeter for measuring resistance in an electrical circuit.
Regulations:
- We place the car over the inspection channel (pit). If not available, use a hydraulic lifting mechanism;
- We turn off the engine, open the hood;
- We wait until the exhaust circuit cools down to a safe temperature so as not to damage the skin of the hands;
- From under the bottom we snap off the limit switch with the terminals on the diagnostic controller. We unscrew it and replace it with a new one. We put on the limit switches;
- By analogy, we replace the managing controller.
Replacement is complete. We start the engine and check the functionality of the equipment. Subject to compliance with the regulations, subsequent maintenance after 80 - 85 thousand km.
What happens if you ignore signs of trouble?
Naturally, every driver is interested in what the malfunction of the lambda probe affects. Most often, when this part fails, you can observe the following consequences:
- The car moves unnaturally.
- Fuel consumption increases significantly.
- An unpleasant, pungent odor appears from the exhaust pipe.
In modern cars with electronic filling, if the lambda probe breaks down, the emergency lock is immediately activated. This allows you to protect the car from serious damage, even if the driver did not notice any signs of a malfunction. In addition, driving with a broken lambda probe is simply unsafe.
The car behaves too unpredictably. Because of this, an emergency situation on the road may arise, which will endanger not only the life of the driver, but also the lives of other people. That is why it is so important to notice signs of malfunction in time and send the car for service. Moreover, for greater safety it is better to call a tow truck.
In the worst case scenario, the sensor depressurizes. In this case, further movement may lead to engine damage. Restoration will require at least a major overhaul.
When depressurization occurs, exhaust gases enter the intake channel. When braking, the lambda probe begins to detect a huge number of oxygen molecules. As a result, the injection system completely fails.
The main symptom of such a malfunction is loss of power. This is best noticeable at high speeds. At the same time, a mechanical knocking noise under the hood is constantly heard. An unpleasant odor and jerking are also present.
What are the consequences after installing decoys?
You need to understand that any deception is installed at the risk of the car owner. If the installation was carried out incorrectly, you may encounter the following problems:
- Due to the fact that the on-board computer cannot regulate fluid injection, engine malfunction may occur.
- If the circuit is not properly soldered, it may damage the wiring.
- In the process of installing the decoy, you can damage the oxygen sensors, after which you will not even know about their malfunction (since you will already have the decoy installed).
- After such interventions (not only during flashing), the on-board computer may fail.
Any inaccuracy will lead to disastrous consequences, so it is better to install a safer ready-made emulator. Unlike deception, it does not “deceive” the control unit, but only ensures its correct operation by converting the DC signal. A microprocessor is also installed inside the emulator (as in a homemade electronic decoy), which is capable of assessing exhaust gases and analyzing the situation.
Causes
It is best not to fix malfunctions in the car, but not to allow them to occur. There are a number of reasons that can lead to a lambda probe failure, the main ones include:
- Bad gasoline. Due to excess impurities, platinum electrodes become clogged.
- Unsatisfactory condition of oil scraper rings.
- A vehicle gets into an accident.
- Contact of solvents or antifreeze on the ceramic tip of the part.
- Overheating of the lambda probe housing. This occurs due to an incorrectly set ignition timing.
- Poor contact of the sensor output circuit.
- Malfunctions in the ignition system.
- Repeated attempts to start the engine with short rest periods. Because of this, unburned fuel accumulates in the exhaust pipe, which can ignite.
The average sensor resource is estimated at 30-70 thousand kilometers. Much depends on the manufacturer and operating conditions of the vehicle. This is why it is so important to know the signs of a possible breakdown. This information will help you always be on guard and prevent more serious problems.
According to statistics, heated lambda probes have a longer service life. It is not surprising that the main sign of a malfunction of such a device is non-working heating. Performance also decreases.
Purchasing an oscilloscope allows you to protect your car from malfunctioning lambda probes and costly repairs. If you do not want to do the diagnostics yourself, just take the car to a service center; the check procedure will not take much time.
Reviews
| № | Positive |
| 1. | Vasily: I have been successfully using the car for two years now, there are no comments on the engine’s performance. I fill up with high-octane fuel, buy high-quality oils, and drive carefully and non-aggressively. |
| 2. | Gennady: for a year and a half of active driving there were no breakdowns. Minor defects were eliminated on my own. After all, the car is in the budget segment, you must always remember this and be prepared for minor defects. |
| 3. | Ivan: I’m pleased with the build quality and workmanship of the Lada Granta, there are no complaints. Over the course of a year and a half, I once made an unscheduled visit to a service station to diagnose the exhaust system. It turned out that the contact of the block was weak, as a result of which the error indicator on the dashboard came on. |
| 4. | Vladimir: I replaced the DC on my own at around 85,000 km, which is very good for a domestic car. The average service life is 70,000 km. The replacement process is not complicated, the work was completed within half an hour. My recommendations to motorists. |
| 5. | Ignat: I’m happy with the Lada Granta car, despite a number of negative reviews about the brand. Subject to careful treatment and timely maintenance of the technical equipment, the period of its trouble-free operation can be increased by 10 - 15%. |
| 6. | At 80,000 km I replaced both oxygen sensors, which turned out to be not difficult at all. More time was spent on preparatory work. At the same time, I carried out diagnostics of the chassis and suspension. Recommendations for motorists - look under the bottom of the car more often. |
| 7. | Vladlen: my positive review of the Lada Granta car. Build quality, manufacturing of parts at a decent level. The driver is required to provide systematic care, refilling with high-octane fuel and engine oil. |
| Negative | |
| 1. | Dmitry: already at 50,000 km I replaced the control oxygen sensor on the Lada Granta. Dissatisfied with the quality of workmanship. The operating instructions indicate that the average service life is 70 - 75 thousand km. |
| 2. | Ivan: in a year and a half of driving the car, I twice unscheduledly contacted the service station for repairs under warranty. |
| 3. | Victor: I do not recommend the Lada Grant for purchase. It’s better to spend a few tens of thousands and buy a Renault Logan. |
Related link:
How to remove the rear shelf of a Lada Granta to install speakers yourself
Lambda probe malfunctions in Lada Kalina
Unfortunately, the domestic car has already become famous due to many malfunctions of the lambda probe. Signs of failure are no different from standard ones, but the reasons are largely related to the not entirely practical design.
If, while driving, you notice any signs of malfunction described in the previous sections. There is a simple and reliable way to check Kalina’s lambda probe without additional equipment. Just turn off the ignition, disconnect the harness connector and check contact X1/C4. If there is no short circuit with the on-board network, the device is faulty.