The fuel pump of the Lada Granta car is equipped with electric submersible fuel pumps. The pump supplies and circulates the mixture in the fuel system. Recently, the car has been equipped with an electric submersible fuel pump from the Bosch brand. This device has the following characteristics:
- rated voltage - 13.5V, operating - in the range from 6 to 15 volts;
- maximum volume of pumped mixture
- the frequency of replacing the fuel filter is 1000 operating hours;
- range of fuel classes: AI-92 - AI-95.
Replacing the fuel pump on Grant
Before changing the fuel pump on a Lada Granta, the motorist must relieve the pressure inside the fuel lines. To “zero” the car’s fuel system, you must:
- Put the Granta at neutral speed;
- Apply the parking brake;
- Remove the rear sofa;
- Disconnect the wiring from the fuel pump;
- Start the Lada and wait for it to stall;
- Crank the starter for a few seconds.
To work with the fuel filter, the car enthusiast will need:
- flathead and Phillips screwdrivers;
- spanner set to “10”;
- hammer;
- rags.
After resetting the fuel lines, it is necessary to remove the terminals from the battery so that the possibility of supplying power to the fuel pump is completely excluded.
Installing a new fuel pump
The first step is to open the fuse panel (on the left side of the front panel) and remove the element responsible for the operation of the unit.
Next, dismantle the rear sofa and remove the plastic trim. Below it is the fuel tank flap (on the right side). The hatch cover is held on by four screws - remove them using a screwdriver. Next, disconnect all the fittings from the cover of the old fuel pump.
Using a “10” wrench, unscrew the nuts of the pressure ring of the fuel pump, of which there should be 8 pieces along the entire diameter of the ring. Next to the clamping ring there is a pin with which the ground wire is in contact. We throw off the wire, and then completely remove the clamping ring. The ring unscrews counterclockwise; for ease of dismantling, it needs to be tapped with a hammer.
You need to make sure once again that all wires and lines adjacent to the part are disconnected. Only then can you remove the used unit and place a new one in its place. You also need to install a new O-ring between the tank opening and the pressure ring - it is made of rubber and wears out quite quickly.
Installation of a new pump is carried out in the reverse order. Before disassembling, draw a diagram or photograph the original location of all fittings and hoses on the fuel pump cover.
Operating principle and design features
The VAZ 2114 fuel pump is located inside the car’s gas tank, which is why access to it can be problematic if you don’t know which side to approach. To free up access to the fuel pump, you need to remove the rear seat from the fourteenth, under which you will find a rectangular hatch hiding access to the fuel module.
Just fold back the back seat and see for yourself
In addition to the pump itself, the VAZ 2114 fuel module includes:
- A float sensor that monitors the fuel level in the gas tank;
- Chamber for fuel intake;
- Mesh filter for coarse cleaning.
The gasoline pump has a built-in electric motor, which pumps up the pressure of the pumped fuel. The motor itself is powered from the vehicle's on-board network. The VAZ 2114 gasoline pump is located so that even with a minimum level of fuel in the tank, it is constantly washed with gasoline, as this is necessary for normal cooling of the unit, which gets very hot during operation.
The main working element of a gasoline pump is a membrane, which during operation performs reciprocating movements. During normal operation, when the device is fully operational, the following pressure levels must be maintained in the fuel rail:
- For 1.5 l engine. – from 285 to 326 kPa;
- For 1.6 liter engine. – from 375 to 390 kPa.
As evidenced by reviews from owners of fourteenth VAZs, in practice BOSCH pumps have proven themselves to be the best.
Unlike domestically produced units, they cost almost 20-30% more, but at the same time they have an order of magnitude better build quality and reliability. The estimated cost of the fuel module for a 1.5 liter engine of the fourteenth is 2.5 thousand rubles, for 1.6 liters. – 2.6 thousand
However, rational savings are possible here - in most cases it makes sense to purchase a fuel pump separately, rather than the entire module, since, as a rule, the pump itself “dies”, and the remaining parts of the module remain in working order. Its cost, if taken separately, is 1-1.5 tr.
Cleaning the part
Replacing the Lada Granta fuel pump in some cases is not the only way to get rid of fuel supply problems in some cases. To restore the functionality of the fuel pump, it requires thorough cleaning. To do this, you need to dismantle the unit using the method described above.
Next, unscrew the lower part of the fuel pump cup. The glass has a filter mesh that needs to be removed using a screwdriver. The mesh will need to be cleaned with a rag and rinsed in solvent. After this, the remaining elements of the fuel pump are cleaned.
After cleaning is completed, it is recommended to install a new coarse mesh, as the cells on the old one may be damaged.
Before performing work, read the operating instructions so that you know in advance where the Lada Granta fuel pump is located, as well as how to attach it. It is better to carry out work in a well-lit room away from open flame sources. For protection, use gloves to avoid damaging your skin with gasoline or solvent.
Stable, reliable, uninterrupted operation of the Lada Kalina engine is ensured by a complex of systems, the most significant of which is the fuel system.
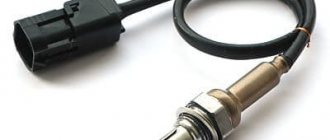
DD location
To see where the knock sensor is located, you need to look at the cylinder block. The DD is located at the place where its sensitivity to detonation is highest. On most engines, the meter is installed between the second and third cylinders.
The knock sensor is located on a level surface. It is pressed tightly against the surface of the power unit.
The knock sensor is located in such a way as not to come into contact with antifreeze and other technical fluids. Some meters have a thread on the body, with which they are screwed into the mounting hole. Most DDs are secured with a separate bolt running through their center.
In this case, it is extremely important to maintain the tightening torque for proper operation of the sensor.
What is a fuel pump
The gasoline pump is a key component of the power system; its job is to ensure an uninterrupted, timely supply of fuel to the system.
In each model, the design and location of the fuel pump is unique; for the Lada Kalina, this device is located on the opposite side of the power unit.
On the one hand, this arrangement allows you to benefit from the technical capabilities of the machine, but on the other hand, the device requires more powerful operation than models in which the fuel pump is located closer to the engine.
In order for Kalina’s fuel pump to cope with its job, it is presented in an electric version. Its advantages are:
- simplicity of design;
- good fuel supply;
- safety.
But, as one might expect, Kalina’s electrics are not yet a strong point; they often break down, which is the main disadvantage.
In addition, the disadvantages of the Lada Kalina gas pump include increased noise levels, sensitivity to the quality of gasoline, and the fact that it requires cooling.
The issue of high-quality gasoline in our country, unfortunately, still remains unresolved; this is one of the reasons why the fuel system of the Lada Kalina fails.
Filters become clogged, which disrupts the operation of the entire mechanism and ultimately leads to pump failure.
This is why filters, or meshes as they are also called, need to be changed regularly.
We’ll talk about this, but first, let’s figure out what malfunctions happen with the Kalina fuel pump?
Types of faults:
- One of the most common pump malfunctions is a rapid decrease in pressure after the engine starts. This fact indicates serious violations that can be caused either by a valve defect or a breakdown of the pressure level regulator; it is quite possible that the injectors are also clogged. A sharp drop in pressure leads to problems in starting the engine , which, if the breakdown is not corrected, can even lead to engine failure.
- It also happens that the engine loses power, or the engine does not start at all, even when cold or hot. All this happens when a membrane or spring breaks, a rod wears out, or filters become clogged, and the latter happens more often than anything else.
- In any case, having discovered that there is something wrong with the fuel system, you should first check the condition of the filters, because, due to low-quality gasoline, they become clogged quite quickly, and it is better to change them in a timely manner, without waiting for problems. Now let’s talk about how to change the mesh from the pump yourself.
Specifications
How to change the ignition switch on a Daewoo Nexia: photos and videos
The composition of power units on the domestic market for the crossover has not changed. The base Lexus RX is equipped with an inline two-liter turbocharged four that produces 238 horsepower and 350 Nm of thrust. It is mated with a hydromechanical automatic transmission, as well as front-wheel drive or all-wheel drive. Acceleration from zero to hundreds will take 9.2-9.5 seconds, maximum speed is 200 km/h, and fuel consumption is 7.8-7.9 liters per hundred in the combined cycle. For an additional fee, you can order a 3.5-liter V-shaped naturally aspirated six with 300 horses and 370 Nm. It has the same transmission and exclusively all-wheel drive. In this configuration, the car reaches 100 km/h in 7.9 seconds, develops 198 km/h and consumes 10.7 liters. The older trim levels will receive a hybrid power plant. It is based on a similar V6 with reduced performance and an electric motor. This tandem develops a maximum of 263 hp and 335 Nm. The hybrid version accelerates to hundreds in 7.7 seconds, reaches a maximum speed of 200 km/h and consumes 5.2 liters in the same mode.
Changing the mesh with your own hands
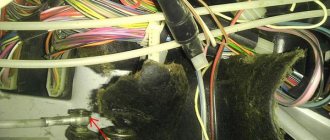
So, the mesh located in the fuel pump is forced to constantly come into contact with dust and dirt, because the pump itself is located between the seats, and dust constantly settles on its body.
That is why experienced motorists are not lazy to wipe the pump body with a damp cloth from time to time to avoid untimely clogging of the system.
- The very first thing we do is buy a new filter.
- Raise the rear seats to provide access to the pump.
Motorists advise carrying out such work every 45,000 - 50,000 km. mileage, this is exactly the time during which the Kalina mesh wears out. Of course, this work is classified as dusty, but, in principle, it is not as difficult as it seems, it can be done alone, in half an hour - an hour.
If the engine power of a Lada Granta car drops, increased noise occurs, or whines are periodically heard when the fuel pump is operating, then most likely the fuel pump is faulty. First check the pressure in the fuel supply system by connecting a pressure gauge to the fitting on the fuel rail in the engine compartment If the pressure in the power system is higher than 400 kPa (4.0 kgf/cmg), then the pressure regulator installed in the fuel pump module is faulty and must be replaced (see “Repairing the fuel module of Lada Granta.”)
Repair
Repair of a mechanical fuel pump Repair
of a mechanical fuel pump consists of installing a new repair kit (diaphragm and valves) and, if necessary, a worn pusher with a spring. A deeper repair of this device is impractical, since the costs of purchasing and repairing worn parts are close to the cost of a new product. If the pump housing is deformed or damaged, it must be completely replaced.
Electric fuel pump repair
The electric fuel pump is equipped with a non-separable housing, and if it breaks down, the product is replaced with a new one. Without special skills, equipment and spare parts, opening and repairing it is impossible. But some workshops undertake similar work, the price of which is lower than buying a new pump. The main failures of the device are as follows:
- Damage to brushes and motor commutator. Repair involves replacing them with new ones.
- Breakage of the plastic coupling connecting the rotor and the motor armature shaft. The clutch is replaced with a new one.
- Anchor failure. The repair involves rewinding this part.
The described actions allow us to eliminate the gas pump malfunction on all models of the VAZ: 2101, 2102, 2103, 2104, 2105, 2106, 2107, 2108, 2109, 21099, 2110, 2111, 2112, 2113, 2114, Niva, Priora, Kalina, Grant, Vesta and most foreign cars.
Operations performed when removing the Lada Granta fuel pump
Removing the fuel module is shown on a car with a VAZ-21116 engine. On cars with other engines, this work is performed in the same way.
1. Reduce the pressure in the supply system.2. Fold the rear seat cushion forward.3. Lift the cut out parts of the carpet and the thermal and noise insulating lining above the hatch at the base of the body.
4. Remove the four screws securing the hatch cover above the fuel module.
5. ...and remove the cover.
6. Disconnect the wiring harness block from the fuel module by releasing its spring clip.
7. Disconnect the fuel hoses from the module fittings by pressing the buttons of their spring clamps and sliding the hoses along the fittings.
Disconnect the hoses from the fuel module fittings carefully, avoiding lateral forces, so as not to break the fittings.8. Using a screwdriver, slide the spring plate of the fuel module bayonet mount counterclockwise and turn the plate until the seven cutouts in it align with the protrusions on the fuel tank flange.
9. Remove the plate.
At the factory, the spring plate securing the fuel module is tightened (or, if necessary, unscrewed) with a special tool. If it is absent, a strongly tightened plate can be moved out of place with light blows of a hammer, resting the drift on the bent upward tendril of the plate.10. Remove the module from the tank by tilting it to the side...
11. ...to avoid bending the fuel level indicator sensor lever and turning the float on the lever. Otherwise, the indicator readings in the instrument cluster will be incorrect.
When removing the fuel module from the tank, immediately place a cleaning cloth under it, as gasoline may leak from the module’s glass.
12. Remove the rubber O-ring from the tank flange. Be sure to replace a heavily compressed, hardened or torn ring to avoid gasoline leakage.
13. Install the fuel module and all removed parts in the reverse order of removal. After installation, slightly tighten the spring plate of the module with light blows of a hammer through a drift (see note above). When installing the module into the fuel tank, the installation arrow on the module cover should be directed towards the rear of the car.
When connecting fuel lines, follow the direction of gasoline supply indicated on the fuel module fittings
I think there is no need to explain once again that the design of the fuel pump on Kalina and Grant cars is not at all different. That is why the entire process of replacing the components of the fuel pump on the above cars will be the same. Also, it is worth noting that when compared with the models of the 10th VAZ family, there are some points that differ.
Features of appearance and modifications
In the post-war years, almost all trucks had a bunch of shortcomings; the emphasis was on quantity rather than quality. However, by 1956 the situation had changed and the ZIL 130 was transformed from its predecessors.
Over the entire period of production, many different modifications were produced, including special fire engines, on-board vehicles, dump trucks, truck cranes, etc. Having a lifting capacity of three tons, it received the following versions:
- 130A – tractor equipped with a coupling device and a combined brake system;
- 130B – ZIL 130 dump truck with a standard base of 3.8 m;
- 130V – with a base of 3.3 m;
- 130 VT – reinforced bridges;
- 130G – designed for transporting oversized cargo;
- 130 D – short dump truck for construction with a short wheelbase;
- 130B1 - a truck tractor, the total weight could reach more than 14 tons;
- 130D1 - the base model for ZIL MMZ 4502 trailers, could weigh up to 15 tons.
The manufacturer also produced limited-edition lettered trucks designed for operation in various climate conditions with any tires and attachments.
Causes of clogged strainer on Grant
It is not necessary to change the grid so often, since when refueling with normal fuel, it can easily travel more than 100,000 km. But symptoms may appear that indicate a clogged fuel pump mesh:
- poor engine start
- insufficient pressure in the fuel system
- dips when pressing the gas pedal
- the engine began to slowly gain speed
If you begin to notice the problems described above, then the first thing you should do is look at the mesh filter and, if necessary, replace it.
How do you know if the valves on a specific make and model of car are bent?
This is actually a good question, and all drivers need to know the answer. Be prepared, in the event of a broken timing belt or chain, for repairs such as replacing valves, adjusting them, and so on, or, knowing that it does not bend, do not worry once again, but carry with you a spare timing belt (if it is a belt drive) .
If the owner's manual for a particular make and model says it won't bend and you don't trust it, or it doesn't say this information at all, there is a practical method for calculating whether the valves on that machine will bend.
In order to find out, you will need:
- remove the casing;
- remove the timing belt;
- set the first piston to TDC;
- slowly rotate the camshaft 720 degrees (that’s two full turns). If the valve does not rest against the piston, it means it does not reach it.
- set the second piston to TDC;
- Also, turn the camshaft 2 full turns. If the piston does not touch the valve, then everything is fine.
Procedure for replacing the fuel pump mesh on a Lada Granta
Since the fuel filter on a Lada Granta car is located directly in the tank, it must be removed from there. To do this, one half of the rear seat is folded back, after which the two screws securing the hatch are unscrewed. Below it is the fuel pump. To remove it, you need to do the following:
- Relieve pressure in the vehicle's power system
- Disconnect the block with power wires
- Disconnect the two fuel pipes from the fuel pump cover.
- Move to the side the retaining ring that secures the pump in the tank
- Pull out the entire module assembly
Problems with standard electrical equipment and gas wiring
The range of faults here is extremely wide, but most often the problems are associated with a failed MAP sensor or gas pressure sensor. In this case, the ECU does not receive impulses about the presence of gas, its pressure and temperature, so the car automatically switches to gasoline mode.
A common cause of MAP sensor failure is that the basic filter in the LPG system is unable to clean the fuel; we recommend installing a reinforced filter with a sump.
By the way, problems also occur after poor-quality installation of gas equipment. Any breaks or short circuits in the wiring, associated with careless connection or insulation of the wires, mislead the gas “brains”, so the system immediately switches to the main fuel.
Removing and disassembling the Lada Granta fuel module
Tools:
- Open-end wrench 10 mm
- Medium Phillips screwdriver
- Medium flat screwdriver
- Small hammer
- Pliers
- Side cutters
Parts and consumables:
- Clamp for fastening the corrugated fuel supply pipe to the pump fitting
- Fuel pump (replacement if necessary)
- Strainer retaining washer (replacement if necessary)
- Engine oil
- Rags
Notes:
The work is performed to clean the strainer, replace the fuel level sensor, fuel pressure regulator or fuel pump.
1. Relieve pressure in the power system as described here.
2. Disconnect the wire terminal from the negative terminal of the battery as described here.
3. Inside the vehicle, remove the rear seat cushion as described here.
4. Bend down the soundproofing flap located under the seat cushion.
5. Unscrew the four screws securing the fuel module hatch cover and remove it.
6. By releasing the clamp of the wiring harness block, disconnect the block from the fuel module connector.
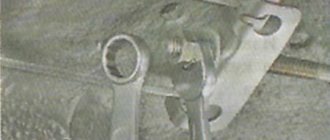
7. Remove the fuel hoses from the fuel pump cover, which are secured with clips (see first photo). Use one screwdriver to press the latch on one side. Using another screwdriver, pry the fuel hose in the direction of the arrow and remove it.
8. Wipe the pump with a rag.
9. Remove the retaining ring using screwdrivers and a hammer. The arrows in the first photo indicate the direction of torsion. The system of "pits" and "grooves" makes it easier to remove the retaining ring.
Note:
As soon as you loosen the ring, some gasoline will flow out (this is normal).
10. Carefully, being careful not to damage the fuel level indicator sensor float, remove the fuel module from the tank.
11. Remove the rubber gasket.
12. Cover the opening in the fuel tank with cloth or cardboard to prevent foreign objects from getting into it. Disconnect the ground wire terminal from the slip ring terminal on the fuel pressure regulator housing.
13. Press the antennae of the fuel pressure regulator mounting bracket on both sides and remove it.
14. Remove the slip ring (if equipped) from the regulator body. The photo below shows fuel pressure regulators with a removable slip ring and a contact soldered to the regulator body.
15. Using pliers, remove the fuel pressure regulator from the module cover socket.
Note:
The regulator connections are sealed with two rubber rings.
16. Using a slotted screwdriver, press the latch (indicated by an arrow in the photo) of the wire block and disconnect it from the cover connector. Similarly, disconnect the wire block from the fuel pump connector.
17. Using your fingers, press out the upper latches of the fuel level indicator sensor and slide the sensor along the grooves of the module cup.
18. Remove the fuel level indicator sensor assembly with the float, wires and wire blocks.
19. Carefully press out the three plastic clips and remove the lower glass.
20. Use a slotted screwdriver to pry and remove the strainer.
21. Remove the lock washer from the slot in the strainer housing.
22. Having pressed the latch (indicated by a red arrow), remove the fuel pump from the holder, and also use side cutters to cut the clamp securing the corrugated fuel supply tube (indicated by a blue arrow).
23. Heat the corrugated tube (you can pour boiling water on it) and remove the tube from the pump fitting.
24. Using a slotted screwdriver, push the tip of the fuel drain tube out of the socket in the glass.
25. A valve is installed in the fuel module cup to prevent fuel from leaking out.
26. Assemble and install the fuel module in the reverse order
When installing the strainer, pay attention to the condition of its lock washer (item 21). If the lock washer is dented, it must be straightened or replaced.
If the lock washer is dented, it must be straightened or replaced.
27. Replace the clamp securing the corrugated fuel supply pipe to the pump fitting with a new one.
28. Before installing the fuel pressure regulator, apply a thin layer of engine oil to its O-rings.
29. When installing the fuel module into the tank, arrow 1 on the fuel module cover should be directed back (towards the trunk). Arrows 2 on the bosses of the cover fittings indicate the direction of fuel movement.
30. Place the tips of the fuel pipes onto the fittings of the module cover until the spring clips click.
31. Having connected the wire terminal to the “negative” terminal of the battery, start the engine and check the tightness of the connections of the fuel pipes.
The article is missing:
- Photo of the instrument
- Photos of parts and consumables
How to replace the fuel filter Lada Kalina
The fine filter
is located in the area of the right rear wheel directly next to the jack cup.
Replacing the fuel filter Lada Kalina. Fuel pump repair: replacing the mesh
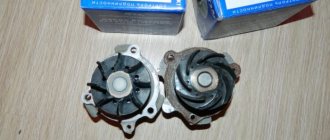
- The photo shows a disassembled used fine filter
.
Replacing the fuel filter Lada Kalina. Fuel pump repair: replacing the mesh
- Be sure to replace the fuel pump mesh if the fuel filter is being replaced.
- Clean the fuel level sensor with solvent.
- You need to replace the fuel pump, fuel filter and flush the gas tank at the same time.
Any car, as you know, requires fuel. She won't go anywhere without him. But in the fuel system of any car, minor but very annoying problems periodically arise, which the car owner can fix on his own. The main thing is to know how to do it. Today we will tell the reader how to independently replace the fuel pump grid on a Lada Kalina. But, before moving on to the practical part, let's try to understand in more detail what a fuel pump is and why it is so important.
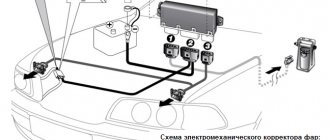
Pinout BN VAZ 2113, 2114, 2115
— block headlights; — gearmotors for headlight cleaners*; - fog lights*; — ambient temperature sensor; - sound signals; — engine compartment lamp switch; — electric motor of the engine cooling system fan; — generator; — low oil level indicator sensor; — washer fluid level sensor; — front brake pad wear sensor; — wire tips connected to the common windshield washer pump**; — windshield washer pump; — headlight washer pump*; — wire ends for connecting to the rear window washer pump on VAZ-2113 and VAZ-2114 cars; — low oil pressure indicator sensor; — engine compartment lighting lamp; — wire lug for connecting to the wiring harness of the engine control system; — gear motor for windshield wiper; — starter; — a block connected to the wiring harness of the ignition system on carburetor cars; — coolant temperature indicator sensor; — reversing light switch; — low brake fluid level indicator sensor; - accumulator battery; — low coolant level indicator sensor; — relay for turning on fog lights; - mounting block; — brake light switch; — plug socket for a portable lamp; — hydrocorrector scale illumination lamp; — switch for the parking brake indicator lamp; — block for connecting a backlight lamp; — switch for instrument lighting lamps; - Understeering's shifter; - hazard warning switch; — front seat heating element relay; — ignition switch; — rear fog light circuit fuse; - fuse for the front seat heating elements; — door lock circuit fuse; — front ashtray illumination lamp; — ignition relay; - cigarette lighter; — glove box lighting lamp; — switch for the glove compartment lighting lamp; — heater fan electric motor; — additional resistor for the heater electric motor; — heater fan switch; - heater switch illumination lamp; — lamp for illuminating the heater levers; — gear motors for electric windows of the front doors; — power window switch for the right front door (located in the right door); — gear motors for locking front door locks; — wires for connecting to the right front speaker; — gearmotors for locking rear doors; — wires for connecting to the right rear speaker; — door lock control unit; — wires for connection to radio equipment; — headlight cleaner switch*; — rear window heating element switch; — relay for turning on the rear fog lights; — block for connection to the heating element of the right front seat; — rear fog light switch; — switch for the heating element of the right front seat; — fog light switch*; — switch for external lighting lamps; — left front seat heating element switch; — block for connection to the heating element of the left front seat; — wires for connecting to the left front speaker; — power window switch for the left front door (located in the left door); — power window switch for the right front door (located in the left door); — wires for connecting to the left rear speaker; — side direction indicators; — courtesy light switches on the front door pillars; — courtesy light switches on the rear door pillars; - lampshade; — ceiling lamp for individual interior lighting; — block for connecting to the wiring harness of the electric fuel pump; — trunk light switch; — instrument cluster; — trunk lighting lamp; — display unit of the on-board control system; - trip computer*; — block for connecting the wiring harness of the engine control system; — rear exterior lights; — rear interior lights; — pads for connecting to the rear window heating element; — license plate lights; — additional brake signal located on the spoiler.
Important points
The procedure outlined above seems quite simple, but, nevertheless, there are a couple of nuances that should be mentioned.
Firstly, gasoline. When the gas lines are unscrewed, it begins to flow directly onto the cap (this happens especially often if the car owner forgot to relieve the pressure in the gas line using the breather, as mentioned above). Yes, a little gasoline leaks out, but the smell of gasoline in the cabin is not what a car owner needs, right? Therefore, before removing the fuel lines, you should put a cloth on the pump cover and carefully insert it with a screwdriver into all the cracks. The rag will absorb the leaked gasoline, then you can throw it away, which will help get rid of the smell in the cabin.
Secondly, the fuel pump retaining plate. As practice shows, this is a fragile thing, and breaking it by carelessly prying it with a screwdriver is not just easy, but very easy. But it’s difficult to find this part on sale; it is only sold complete with a complete fuel pump, and this is a waste of money. The matter is further complicated by the fact that it is not always possible to move this plate out of place with just a flat screwdriver (especially if the car owner is trying to disassemble the pump for the first time), so sometimes you have to resort to using a hammer and chisel, and this, in turn, increases the risk many times over plate breakage.
As you can see, there are no difficulties with independently replacing the pump grid on the Lada Kalina, and if you strictly follow the above instructions, even those who are doing it for the first time will not have any problems. The main thing is to be patient and follow safety precautions. It is imperative to remove the terminal from the battery! Otherwise, a banal mesh replacement can turn into a fire.
The gasoline filter is the most important element of the fuel system of any modern car. Failure to replace it in a timely manner can lead to dire consequences. This is especially true for injection engines that are installed on cars of the Lada Granta family.