Published: 10/20/2020
- Design
- Replacing a hydraulic corrector with an electric one
- Replacing a hydraulic corrector with an electric one
- MALFUNCTIONS OF THE ELECTROMECHANICAL CORRECTOR
- CHECKING POWER WITH A MULTIMETER
- How does headlight hydrocorrector work on Grant?
- Operating principle of the device in Grant
- Checking and adjusting Lada Granta headlights
- Installation of PTF
- Is it possible to repair a hydraulic corrector?
- Replacing a hydraulic corrector with an electric one
- How to turn on near or far
- We improve the quality of work done
- What is a hydraulic corrector and how does it work?
- Electric corrector
- Procedure for adjusting the headlights of a Lada Granta with your own hands
- Adjusting headlights on a Lada Granta with your own hands: video and photos
- Fog lights VAZ 2114 and VAZ 2115: what you need to know
- Do-it-yourself adjustment of Lada Granta headlights
Replacing a hydraulic corrector with an electric one
If you still want to install a more reliable electrical device, there should be no difficulties with installation - everything will fit without problems. What should be done:
- Remove the used hydraulic device as described above.
- Disconnect the negative terminal from the battery.
- Electrical mechanisms are installed in the places where the working cylinders stood. It's a good idea to replace the O-rings.
- The positive wire is connected to terminal “20”, the negative wire is connected to ground.
- The wiring is attached where the connecting tubes were, or is wound to a common electrical wiring harness.
- All that remains is to put the negative terminal on the battery and check how the electric headlight range control works.
That's it, quick and easy. And your Lada Granta not only has a brand new headlight level control, but also works. So now you can load the trunk to capacity - there will be no problems adjusting the angle of rotation of the lampshade.
Instructions for replacing parts
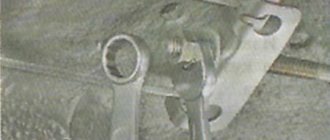
To replace the headlight hydraulic corrector on a Lada Granta car, you will need a wrench (head 21). Algorithm of actions:
- The adjustment knob on the dashboard is removed. There is a nut behind it that can be unscrewed with a knob. Afterwards you can pull out the main cylinder.
- Under the hood, the clamps holding the hydraulic mechanisms are pressed out. To pull them out, you need to turn the cylinders counterclockwise.
- The connecting tubes are secured with clamps having screw clamps. They need to be unfastened and brought into the car interior using the hole previously hidden by the seal.
After dismantling the old device, a replacement should be installed.
Installation of both hydraulic and electrical correctors is carried out through the vehicle interior. First, the device is pulled through the hole in the shield, then mounted in its usual place.
To electric
A more reliable and attractive electric headlight corrector on the Lada Granta is installed as follows:
- Before installing the headlight electric corrector, it is necessary to dismantle the failed device - first by disconnecting the main cylinder, then by disconnecting the hydraulics and leading the pipes through the passenger compartment.
- The negative terminal is disconnected from the battery.
- Electrical mechanisms are located where the working cylinders were installed. If the O-rings are worn out, they are replaced.
- The negative wire is connected to ground, the positive wire is connected to terminal 20.
- The wiring runs in the space previously occupied by connecting pipes.
The corrector lever is dismantled when installing the element.
Having finished with the wiring, you need to return the terminal to negative. The performance of the new system must be tested.
To hydraulic
If the owner is satisfied with the hydraulics, then replacing the headlight hydraulic corrector on the Grant is done in the same way:
- the old system is dismantled, connecting pipes are removed;
- new elements are installed in the same way in place of failed elements;
- O-rings are checked;
- Full testing is carried out.
Replacing a hydraulic corrector with an electric one
When the driver notices that one or even both headlights do not respond to control, the symptom indicates that the device is not working. Common reasons:
- the working cylinder is jammed, one of the lamps does not turn;
- depressurized due to wear of sealing components;
- the rod and lever of the actuator are not fastened tightly enough;
- the connecting tubes are damaged, which caused a loss of tightness.
Violation of integrity leads to the fall of reflectors on both sides - they end up in the lowest position.
There are several ways to deal with the problem that has arisen on the Lada Granta:
- replace the hydraulic regulator with an electric corrector;
- fill the working cylinders with antifreeze;
- replace faulty cylinders with plugs for headlights;
- install self-tapping bolts, fixing the reflectors.
Plugs or bolts will make the system functional but unregulated. Filling with antifreeze allows you to adjust the position, however, the measure still remains temporary, since then a full replacement will be required.
In order to replace the hydraulic corrector for headlights on a VAZ 2110, you need to stock up on a wrench with a 21 and half hour head. The actions are performed in this order:
- The adjustment knob is removed (you need to pull it) on the dashboard. Under it there will be a nut 21, which should be unscrewed. This releases the master cylinder and can be removed.
- We open the hood and find headlights and working hydraulic mechanisms installed on top. On each one you need to release the latches, turn the cylinders counterclockwise and remove them.
- Disconnect the tubes (most often they are secured with clamps with a screw clamp). Now all the elements of the system located under the hood need to be brought into the cabin through an opening closed with a pliable seal.
- Install all elements of the new Lada Granta hydrocorrector. The sequence is reversed.
If you still want to install a more reliable electrical device, there should be no difficulties with installation - everything will fit without problems. What should be done:
- Remove the used hydraulic device as described above.
- Disconnect the negative terminal from the battery.
- Electrical mechanisms are installed in the places where the working cylinders stood. It's a good idea to replace the O-rings.
- The positive wire is connected to terminal “20”, the negative wire is connected to ground.
- The wiring is attached where the connecting tubes were, or is wound to a common electrical wiring harness.
- All that remains is to put the negative terminal on the battery and check how the electric headlight range control works.
That's it, quick and easy. And your Lada Granta not only has a brand new headlight level control, but also works. So now you can load the trunk to capacity - there will be no problems adjusting the angle of rotation of the lampshade.
Let's summarize
- Adjusting the headlights of a Lada Granta requires five meters of space, a machine, a Phillips screwdriver and a tape measure;
- to turn on the light in the trunk, turn on the low light and open the trunk;
- You can repair the hydraulic corrector yourself, or you can buy a new one for up to a thousand rubles.
Even more articles about the repair and maintenance of Grants are here.
Good afternoon, colleagues!
There is such a nuisance as bad light, not in the sense that the headlights themselves shine poorly, but they shine in the wrong direction. I mean, on the road, but “under the nose.” The headlights began to “fall” in the spring, but somehow they lost a couple of meters in distance. But on vacation, the driver’s side suddenly sat down, literally in two days, bam and 5 meters, even if you turn it on far:
30-33mm, I hit 33 - it turned out to be too much)))) - clamp for the rod (made from a steel plate from something in a couple of minutes)
Off we go: 1 - snap off the hydraulic cable from the headlight 2 - bite the hydraulic cable off the line, for the second don’t be afraid the contours are different (be careful with your eyes - it clicks like hell and in all directions):
In general, after such an intrusion, adjusting the headlights is inevitable, but I no longer had time. And I missed the length of the pipe section by about 2 mm, the light was too high - I decided with the regulator and turned it all the way out:
Expenses - 95 rubles. Savings of almost 200 rubles, not counting replacement services (if done at a service center). A new kit costs from 275 rubles per Grant.
All work will be shown using the example of VAZ cars, in particular the Lada Granta, but the design will not be much different on other models.
Removing a faulty hydraulic regulator:
- remove the lower decorative panel to the left of the steering column (held on by clips);
- remove the hydraulic corrector switch handle. To dismantle, just pull the handle towards you;
- the main mechanism is secured with a 21 nut, which can only be unscrewed using a socket head. Since the clamping force of the nut is small, a 22 socket is also suitable for unscrewing;
- pull out the main mechanism from the inside;
- Each headlight housing has its own working cylinder. To pull it out, turn the actuator body counterclockwise until the latches are released and pull it towards you;
- it is necessary to release the tubes, which are attached to the body with special clips with clamps. If you are not going to repair the hydraulic corrector, then the tubes can be cut off, which will greatly simplify their dismantling (they can simply be pulled out by pulling the piece of tube near the left headlight). It happens that the hydraulic corrector does not work, but there is still quite a lot of liquid in the system, so prepare a container in advance to drain it;
- remove the negative terminal and dismantle the battery to gain access to the service hole in the engine shield (socket wrenches 10 and 13 are required);
- First press one of the edges of the rubber seal with a screwdriver, then gradually push it into the interior;
- pull out the tubes along with the seal by pulling the main mechanism in the passenger compartment. Most likely, you will have to disconnect the connectors at the pedal assembly, which will block the exit of the seal.
MALFUNCTIONS OF THE ELECTROMECHANICAL CORRECTOR
An electric drive system is much more reliable than a hydraulic corrector, but it is not without its drawbacks.
Possible malfunctions:
- breaking off, chafing of wires, formation of oxides in connectors;
- wear of electric motor elements;
- burnout of circuit elements (for example, due to overvoltage in the machine’s on-board network or moisture entering the control unit housing). Faulty resistors can cause the corrector to operate incorrectly or only within a limited adjustment range. Often the problem is wear of the resistive tracks, which causes contact chatter. The ECU will constantly try to equalize the voltage, as a result of which the microcircuit elements fail due to overheating.
We will consider the process of diagnosing the electromechanical forced-action headlight range control. Diagnosing complex faults in automated systems that use ride height sensors requires much more specialized technical training.
CHECKING POWER WITH A MULTIMETER
If you have not previously encountered diagnostics of electrical appliances, we recommend that you read the instructions for using a multimeter. The first thing you need to check is whether there is a constant “+” at the gearmotor connector and whether there is a “ground” on it. Also, in direct current measurement mode (DCV), connect the positive probe to the signal wire, and the negative probe to the ground pin.
When turned off, the voltage is minimal, while when the switch is rotated it should be from 3 to 10 V. Before checking, you must turn on the low beam headlights.
If “–” or “+” does not come into the chip, the same operation should be carried out with the connector connected to the control unit in the car interior. If power leaves the ECU chip, but does not reach the connector, then the problem is a broken wiring. If there is no power to the gearmotor at the connector, you should check the “ground” and “+” of the control unit itself. A situation where power comes to the unit, but the ECU does not react in any way to changing the position of the switch, indicates a malfunction inside the headlight range control unit.
It is not recommended to directly apply battery voltage to the terminals of the gear motor for a long time in order to check its performance. To correctly diagnose the electric drive, you should include a 10 kOhm trimmer resistor in the circuit.
CIRCUIT DIAGRAM
Before starting diagnostics, you should study the electrical diagram for connecting the gearmotors on your car.
Most often, 2 typical connection schemes are used:
- with 5-wire gearmotor connector. This connection method can be found not only in standard systems, but also in kits for installing an electrical corrector with your own hands (for example, EMKF 11);
- with a 3-wire connector for gearmotors (most often found on modern cars). Accordingly, one of the contacts will be “ground”, the second will be a constant “+”, and the third will be a signal wire.
Despite the different pinouts, the electric headlight corrector works on most cars according to a similar principle. The operating principle is based on a constant comparison of the voltage across two variable resistors. One of the resistors is connected to the headlight range control switch on the dashboard, and the other to the actual position sensor of the electric corrector rod. Comparing voltages with a differential amplifier allows you to realize voltage equalization in the event of a mismatch error. Thus, turning the switch on the dashboard causes the headlight range control motor to extend by a fixed distance.
How does headlight hydrocorrector work on Grant?
By extending a special actuator directly built into the rod mechanism, the so-called headlight range control changes the angle of the lighting.
The mechanism is driven directly by an electric drive or a certain level of pressure from the hydraulic fluid filled. As it turned out experimentally, a short time after purchasing a new Lada Granta, a device such as the headlight hydrocorrector fails, and many people have a logical question: how to carry out the repair yourself? However, we will talk about this below. Experts have identified several obvious signs that indicate a malfunction of the mechanism we have identified:
- The connecting tubes on the device are damaged in some way (possibly cracks have formed).
- The tightness of the regulation system is broken.
- One of the existing cylinders is jammed.
If the tubes are damaged, then there will be no adjustment at all, and the light illuminates the road around the car. Such lighting does not correspond to the safety of driving directly at night. Consequently, many owners of the domestic Lada Granta are beginning to look for all sorts of ways to fix this problem.
Finding the cause of the problem is quite quick, since every experienced driver can understand that it is the headlight range control unit that is to blame for this problem. Many car owners are concerned with the question: is it possible to do it yourself in this case? If your car is still under warranty, the issue will be resolved automatically, since you will receive a free replacement under warranty. However, in most cases, the problem occurs when the car is no longer under warranty. What to do in this case? Also, not everyone can urgently go to the automobile center; driving a personal vehicle is necessary, but it is not safe. Therefore, you will have to carry out the repairs yourself. There is nothing super complicated about this.
Repairing the device, as mentioned above, is not difficult and does not require you to have special devices or any improvised tools. It is enough to take with you a sharp awl, the most ordinary pliers, some antifreeze, and a self-tapping screw, the sharp end of which must first be cut off.
Operating principle
The corrector is designed to adjust the level of the cut-off line in low beam headlight mode. For the long-range glow mode, this option is not so important, since only the low beam headlights have a clear cut-off line (the conventional border of the light flux, abruptly turning into a practically unlit area). The low beam of the headlights should illuminate the road well, but not dazzle oncoming drivers.
The level of the cut-off line depends on the shape and vertical angle of the reflector. It is the last parameter that needs constant adjustment, since the angle of the headlights depends on the degree of load and distribution of cargo in the car. The more the rear part is loaded, the more the front of the car will be raised. Accordingly, even correctly adjusted headlights will now blind drivers of oncoming cars.
According to the requirements for cars manufactured in Europe, all cars approved for operation after 1999 must be equipped with a headlight leveler as standard. Such systems are not installed on cars with active suspension.
Enforcement systems
The headlight range control is controlled by changing the position of the switch on the dashboard. The main types of drives used in the design of manual correctors:
- mechanical. The design can only be called a headlight corrector, since the device is an adjusting screw mounted in the headlight housing. Screwing or unscrewing the latter leads to a change in the vertical angle of inclination of the reflector;
- hydromechanical;
- electromechanical;
- pneumatic. Due to its complexity, the pneumatic headlight leveler has gained little popularity. The system can have manual or automatic adjustment. In the first case, the pneumatic actuators are controlled by the driver via an n-position switch on the dashboard (most often used in conjunction with halogen lighting). The operation of the automated system involves body position sensors, a control unit, and actuators (used in conjunction with xenon lamps). The position of the reflector is regulated by changing the air pressure in the corresponding lines.
Hydrocorrector
This system is well known to domestic car enthusiasts, since manual headlight levelers of this type were installed on VAZ 2107, 2109, 2110, 2114, Niva, and Granta.
- 6 – knob for adjusting the light beam;
- 1 – main adjustment mechanism;
- 2 – working cylinders with a rod acting on the headlight reflector.
The operating principle is based on adjusting the position of the corrector rod by moving a special fluid along the lines. The switch is mechanically connected to the piston of the main hydraulic cylinder. When the regulator handle is operated to raise the reflectors, the fluid pressure in the system increases, which drives the working cylinders, thereby extending the rod. Since the system is completely sealed, moving the handle back has the opposite effect.
Electromechanical corrector
The electrically driven headlight reflector adjustment system has become the most widespread. The electric drive allows for both forced change in the height of the light beam boundary and automatic adjustment depending on actual driving conditions.
Operating principle of the device in Grant
- The corrector cylinder must be controlled using the handle.
- The cylinder is responsible for regulating the pressure in the hoses extending to the pusher.
- The pushrods are located in the headlights. The higher the pressure rises in the tube, the more dynamically the liquid presses on the rod (located in the internal compartment of the pusher).
- The main position for adjusting the headlights is the position in which the rod itself is located.
When the corrector on the Grant is damaged (one headlight does not respond to it), the pusher should be put in order. It is the malfunction of the latter that mainly provokes the breakdown of the entire device. There are 2 ways to repair a pusher. With the first, no further adjustment is provided. To implement this technique you need to do the following:
- remove the damaged pusher from the headlight;
- warm up the pusher hose (which gives greater flexibility), and then remove the pusher from it;
- tighten the self-tapping screw from the side of the hose (you need to tighten it at an angle, since the level of protrusion of the rod directly depends on the depth of tightening of the screw);
- adjust the length of the screw to obtain the desired result.
To work on adjusting the headlights, you need to prepare the tool in advance:
- 6 mm hexagon or Phillips screwdriver;
- a sheet of chipboard 3x3 m or a vertical flat panel made of another material;
- tape measure or long ruler;
- a couple of crayons;
- several newspapers.
Checking and adjusting Lada Granta headlights
Adjusting headlights, both left and right, is necessary both on a new car and after repair.
Left headlight of Lada Granta
The methods used for checking and adjusting the light are identical for different car models. The Lada Granta has two headlights with halogen lamps. The function of adjusting the light of the lamps from the interior of the Lada Granta is performed by a hydraulic corrector; there is a delay function for turning off the low beam after turning off the ignition after 45 seconds.
To carry out the adjustment, you need to prepare the following materials and tools:
- a set of keys;
- Phillips screwdriver;
- spare wheel;
- full tank of gasoline.
The last two points are needed to give the machine a full load. To check, the car must be installed horizontally (video author - Autonakat).
Further actions consist of the following steps:
- First you need to start the engine and let it idle. To fix the position, you need to put the car on the handbrake.
- Next, you should check the tire pressure and bring it back to normal.
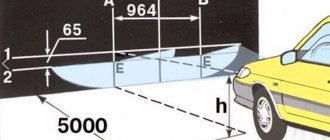
- In front of the car, at a distance of about 3 meters, you need to install a special wall 1.8-2 m high and apply markings on it.
- You need to place a weight of up to 70 kg on the driver's seat to align the low beam line with the bulbs.
- To remove vibrations from the shock absorbers and body, the car should be slightly rocked.
- The light correction control must be set to the “one person” position, which corresponds to the load on the driver’s seat.
- Next, you need to turn on the low beam and adjust the left and right headlights separately. Both the left and right headlights need to be adjusted using a corrector. The rays of light from the light bulbs should shine according to the markings.
Low beam adjustment circuit
You also need to set up the light-off hold function. If desired, you can turn off the function within 45 seconds.
Headlight adjustment (adjustment dials)
Using the thumbwheel, you adjust the low beam horizontally, and using the hex bolt, you adjust the light in the vertical plane. You can raise or lower the beams from the headlights if, for example, the rear of the car is loaded. Ideally, the light beams should exactly match the markings on the wall.
After adjusting the low beam, you need to perform a test drive in order to check the correctness of the adjustment after repair. The light from the headlights should not blind drivers on oncoming vehicles.
Recommendations for quality improvement
To properly adjust the low beam, you need to check the body. There should not be any deformations on it, as they can affect the quality of light; the rays from the lamps will shine scatteredly. If the body has flaws, it needs to be repaired. In addition, in order for the bulbs to shine brightly, you need to check the cleanliness of the glass on the headlights. Dust that has accumulated on them can be removed with a vacuum cleaner.
During use, scratches may appear on the glass. In this case, it is not necessary to change the headlight; you can polish the glass surface. If problems are identified with the reflector, it cannot be repaired and should be replaced with a new one. To make the adjustment correctly, the machine must have lamps of the same power and size.
Halogen lamp for car
You can distinguish a car from the crowd using tuning:
- install eyelashes;
- dim the headlights;
- install lensed headlights;
- make lighting from LEDs.
The simplest tuning option is to purchase ready-made eyelashes and stick them on the top of the Lada Granta headlights. You can give the eyelashes the desired shape using a stationery knife. Tuning can be done with eyelashes made yourself. The materials used to make eyelashes can be different; film materials are suitable.
You can buy vinyl film, cut a template out of paper, and then cut out the eyelashes from vinyl. Tuning is done by gluing eyelashes onto an applied soap solution. You can perform tuning with plastic eyelashes.
Tuning - eyelashes on headlights
There are many tuning options used during car repairs. It all depends on the capabilities and imagination of the driver.
Adjustment
There are 2 types of settings:
- Lamb - left, right.
- Plastic white nut - up, down.
You need to rotate it through the hole shown in the photo.
To do this, you will need a long hex wrench with a ball on the end, since the hole does not coincide slightly with the location of the nut. Therefore, the ball will help turn the key at a certain angle. You can use a hexagon with a small cardan, size H6.
We insert it into the indicated hole, get into the nut and rotate it. First, adjust the low beam of the left headlight. It is recommended to do this on the road with an oncoming car. The beam of light must be raised up so that it does not hit the windshield of an oncoming car. Otherwise, your headlights will blind the driver.
The light should fall approximately at the level of the bumper with a small margin in height. If there are passengers in the rear seats, the car will sit down and the beam of light will rise. For this you need a headroom.
After adjusting the left headlight of the Lada Granta, park the car near the wall. Then adjust the height of the right headlight beam to the level of the left one, focusing on the edge of the light. This completes the adjustment, good luck to everyone on the roads! We look forward to your comments and opinions on this issue!
Source: xn—-21-43dabppn4d4dn.xn--p1ai
Installation of PTF
The entire installation process is divided into two stages according to complexity:
- Direct preparation of seats and securing PTFs in them;
- Integration of electrical components into the standard wiring system.
Seating equipment
To carry out this operation you must:
- Remove the front bumper;
- Cut holes;
- Provide reliable fixation of lighting fixtures.
The bumper from the Granta must be removed
After dismantling the bumper, you need to install it on a flat surface. Then arm yourself with a sharp needle file and start cutting out holes.
Do the work slowly - this way you will avoid breakdownsAs a result of this work, the edges of the holes will be uneven.
But it's not a problem:
- Take a small diameter sanding stone;
- Clamp it into a drill or cordless impact wrench;
- Carefully trim the edges of the holes.
Be careful when working with plastic
The housings must now be installed into the prepared holes.
To do this, turn the bumper over and:
- Insert PTF;
- We combine the mounting holes with the fastening points;
- We fix them using self-tapping screws;
- We inspect from the front side the correct installation;
- If everything is in order, use a screwdriver to tighten the screws until they stop.
The photo shows the process of fixing PTF
Connection to electrical circuit
The instructions included in the installation kit prescribe the following connection procedure:
- Insert incandescent lamps;
- Fix the pads on the plinth;
Fully assembled PTF
- Pull the wires from the headlights through the engine compartment into the car interior;
- Install the relay and fuse into the mounting block;
It is important to securely fasten the wiring
- Connect one of the wires to the rear PTF power button;
- Install the bumper on the car;
- Connect the battery and check that the fog lights are working correctly. (see also the article VAZ wiring: the need for modernization)
The control button will combine the operation of the PTF
Is it possible to repair a hydraulic corrector?
Manufacturers of correctors for the Lada Granta did not provide for the possibility of restoring the device. It is assumed that the driver should make a change. However, it is possible to repair the hydraulic corrector yourself, although it eliminates the problem only for a while. It is impossible to achieve full functionality, however, the lampshades are installed in the working position and secured in it.
The choice between an electric corrector or a hydraulic regulator is based on several parameters:
- cost – hydraulics will cost much less than an electric corrector;
- operating conditions - when the car often finds itself in situations with sudden temperature changes, it is worth paying more, but getting a reliable adjustment system;
- car model - not all cars allow you to connect an electric corrector, however, it is possible to install one on a Lada.
Step by Step Actions
The first step is to assess the general condition and find the cause of the problem. If the tubes are damaged - cracks or breaks are noticeable, the connecting elements must be replaced. When the crack is located near the corrector, the tube is bitten off; if the damage site is not nearby, the entire length is replaced. Next, the system is pumped with antifreeze:
- The corrector plug is removed.
- The actuator rod extends.
- Using a syringe, antifreeze is introduced into the system, the entry of air is strictly excluded.
- Instead of a plug, a self-tapping screw without a sharp part is installed.
If there is no adjustment because the rod is damaged or broken off, extension is carried out.
Replacing a hydraulic corrector with an electric one
If you still want to install a more reliable electrical device, there should be no difficulties with installation - everything will fit without problems. What should be done:
- Remove the used hydraulic device as described above.
- Disconnect the negative terminal from the battery.
- Electrical mechanisms are installed in the places where the working cylinders stood. It's a good idea to replace the O-rings.
- The positive wire is connected to terminal “20”, the negative wire is connected to ground.
- The wiring is attached where the connecting tubes were, or is wound to a common electrical wiring harness.
- All that remains is to put the negative terminal on the battery and check how the electric headlight range control works.
That's it, quick and easy. And your Lada Granta not only has a brand new headlight level control, but also works. So now you can load the trunk to capacity - there will be no problems adjusting the angle of rotation of the lampshade.
Higher education: secondary specialized. Specialty: Auto mechanic. Good knowledge of the design of foreign-made passenger cars. Work skills: replacing the timing belt of the cylinder head, chassis wheel alignment and maintenance. Repair…
1 comment
Vitaly says: Thanks to the author, it’s very interesting and informative, I’ll look at something with one headlight on Bedakuril in the near future.
Replacement with a new one
Manufacturers of auto parts assure us that the hydraulic corrector cannot be repaired. Let's believe them for a moment and decide to replace him. The price of a new part starts from 400 rubles.
- Service life from 1 to 3 years. Even if you don’t use it, it will find ways to fail and bring you a lot of “hemorrhoids”
- Replacing the old one is another quest. It is installed differently on different VAZ models, but you will have to lie upside down in the cabin
Now think for yourself, if it will serve you faithfully when new, and you will use it once a month, at best, and it will break in a year, then why would you again pay 400 rubles and stand on your own to replace it? How feasible is this procedure? Based on my experience working at a service station, not many people come to us to replace it. Why? - because after one or two cases of replacement, everyone “forgets” about it and drives as is.
If you still decide to change the VAZ hydraulic corrector, then watch the video:
How to turn on near or far
The light switch on the Grant is located below the left of the steering wheel - similar to the tenth family.
Switching the handle clockwise gives the headlight and low beam modes.
To turn on long range:
- turn the light knob to the extreme right clockwise - the low beam will turn on;
- push the left steering column switch forward (the one that controls the turn signals);
- your high beam will light up - and a blue headlight icon will appear on the panel - keep an eye on it so as not to leave the car with high beam when it is no longer needed.
This icon indicates that the high beam is on.
We improve the quality of work done
In order to increase the efficiency of roadway lighting, we check body elements for defects, damage, and deformation. By ignoring the curvatures on the body, it is impossible to achieve maximum concentration of the light beam.
We check the integrity of the headlight glass and the tightness of the sealing elements. There is dust and dirt inside the optics module - a sign of poor sealing. Replace the rubber seal, update the silicone sealant.
Long-term operation of the machine on rough terrain or unpaved surfaces leads to damage and scratches on the optics. It is not at all necessary to change the headlights; it is enough to carefully polish them with special means.
If the reflector or mirror surface is damaged, unconditional replacement of the optics. Such a defect cannot be restored.
Installation of lamps strictly in accordance with catalog articles. Purchasing components other than factory ones does not guarantee the quality of lighting or service life.
What is a hydraulic corrector and how does it work?
The hydraulic headlight corrector is installed on the Grant from the factory. This device adjusts the headlights higher or lower depending on the vehicle's load.
You need to adjust it yourself - there is no automatic setting.
The corrector control is located under the light switch handle. Position 0 corresponds to a car with one person - the driver.
Principle of operation:
- the handle controls the hydraulic corrector cylinder;
- the cylinder regulates the pressure in the flexible tubes that go to the pushers;
- pushers are installed in the headlights - the higher the pressure in the tubes, the stronger the liquid inside the pusher presses on the rod;
- the position of the rod deeper/further is responsible for adjusting the headlight higher/lower.
The operating principle of the hydraulic corrector is clearly shown below:
Visual representation of the headlight hydraulic adjustment system
What to do if the hydraulic corrector is broken
Have both or one headlight stopped responding to the hydraulic corrector? Most likely your pusher is broken.
If you want to fix the pushrod, there are two ways.
Table 1. Options for repairing the headlight range control pusher.
Option 1 is barbaric.
No further adjustment.
Link to a detailed description of the second method with comments here.
A corrector kit costs about 700 rubles - it may be easier to replace it
How to replace a hydraulic corrector with an electromechanical one
Do you want to replace the hydro with an electric corrector (EMKF)? The process is simple, as there are ready-made solutions from the factory.
To replace, you only need straight hands - depending on the manufacturer of the EMKF:
- dismantle the old hydraulic corrector;
- We install a new corrector control unit in place of the cylinder - we run the wiring according to the instructions;
- we pull the wires through the elastic band along which the hydro pipes went;
- We put the regulators in their standard places in the headlights.
The process is described step by step from personal experience here.
What to do
On my Lada Grant the stove didn't heat well
There is a simple way to return the headlights to their normal state. You need to remove the hydraulic corrector by rotating it counterclockwise.
The work of the Lada Granta proofreader is as follows. When you turn the regulator inside the car, the rod extends from the cylinder and raises the headlight.
When the fluid pressure decreases, the rod is completely immersed inside the cylinder and becomes shorter. The headlights go down and the regulator no longer works.
I suggest increasing the length of the rod with a plastic tube. To do this, you can use a dowel-nail for construction work.
8 – diameter, 80 – length. The part with the cap is used. First, we measure 15 mm from the dowel-nail, which were determined through experiments.
This will maintain the factory settings. If the length is longer, the setting will be disrupted. Do not cut it off right away to make it easier to put it on the hydraulic corrector rod. The tube fits tightly onto the rod, so to make work easier, heat it with a lighter for 2 seconds.
After heating, immediately put it on the rod and cut along the marked line. I did so, and the result was the following:
I melted the edges with a lighter flame so that they were not sharp. The stem mates with the cup, and this rounded shape suits it better. Now you can install it in place. Similar to withdrawal. There is no need to press the latch; insert and rotate clockwise.
The same procedure must be carried out with another headlight. There is also no need to remove anything; you can easily get to the hydraulic corrector. After lengthening the corrector rods, you need to adjust the headlights.
Electric corrector
If, using methods for searching for defects in power wiring, you still cannot solve the problem of a faulty electromechanical corrector, you should start by diagnosing the gearmotor.
By assembling the circuit shown in the figure, you can check the smooth operation of the servo drive. If the gear motor does not respond to power supply, you can safely proceed to replacing or disassembling it. In most cases, the housing is secured with plastic latches. If the latches cannot be snapped off, they can be carefully cut off, and when installing part of the body, they can be joined with dichloroethane (special glue for plastic). The electric motors themselves fail extremely rarely, but they are also sold separately.
Sensors, controls
The control board inside the case will also be secured with latches. Armed with a magnifying glass, carefully inspect the board for microcracks in the solder joints - this is the most common cause of failure. To eliminate the defect you will need a soldering iron, rosin and some solder. It is also possible for the resistive layer of the rod position sensor to wear out. Due to the appearance of a constant mismatch error, the electronic control unit overheats and fails. If desired, the microcircuit can be replaced separately. For example, the tda3619 microcircuit is the basis for controlling the electric headlight leveler on a Daewoo Lanos car. It's worth looking for it separately on eBay or just buying a used spare part at a disassembly site - it's up to you.
On systems with automatic headlight control, the body position sensor most often fails. Typical faults: broken tie rod attachment points, souring of rods inside silent blocks, oxidation of connector contacts and sensor insides.
Procedure for adjusting the headlights of a Lada Granta with your own hands
Tool preparation: screwdriver, hexagon.
- Installation of the machine within the perimeter of the repair area, on a flat platform.
- Checking the tire pressure, the presence of a spare tire in the trunk, the weight of the load on the driver's seat is 75.0 kg.
- Adjustment / correction of the light beam at a distance of no more than 3.0 meters from the wall.
- Check the illumination angle of each headlight one by one.
- Completion of work, testing for serviceability and accuracy of lighting.
Adjusting headlights on a Lada Granta with your own hands: video and photos
Lada Granta has become one of the most affordable cars of our time. This is what made him so popular. The situation is also improved by the fact that it has good technical characteristics, including high-quality optics, regardless of configuration (standard, standard, luxury).
Checking and adjusting Lada Granta headlights
Let's talk about adjusting the headlights, which is similar to how adjustments are made on other car models. This procedure must be carried out both on a completely new car and after driving on a rough road.
If your low beam headlights stop working, the culprit may be a relay or fuse. But if, on the contrary, the low beam does not turn off, then most likely your relay is stuck.
To make adjustments, we will need to acquire a Phillips-type screwdriver, a standard tool, as well as a spare tire and a full tank of gasoline (if possible). The last points are needed to ensure that the vehicle is fully loaded.
- The car must be placed on a flat, completely horizontal surface.
Checking the vehicle's leveling - After this, the car starts and idles. To fix its position, the handbrake is depressed. If the hand brake is not tightened or does not work, you can install a wheel chock under the rear wheels.
- Check the tire pressure. If it does not correspond to the norm, then pump them up or deflate them.
- Next, a special wall is installed in front of the machine, the height of which reaches two meters, and the distance to it is about three meters.
In principle, you can make the wall yourself from chipboard or plywood, as well as other available materials. Or the car is placed in front of a flat wall, onto which markings are applied. Adjustment diagram for adjusting headlights - A load weighing up to seventy kilograms is placed on the driver's seat, which is necessary to align the line of the headlights. You can ask your partner to drive.
- In order to remove vibrations of the body, as well as its shock absorbers, the car gently rocks.
- Next, we move the Lada Granta hydrocorrector light control to the “one person” position.
This position corresponds to the load in the car on the driver’s seat. Hydrocorrector in position “0” - We turn on the low beam, studying the output and the actual deviation of the headlight beams on the car.
Headlight adjustment (adjustment dials)
The thumbwheel is used for adjustment in the horizontal plane, and the hex bolt adjusts the position of the light beam vertically. If possible, the beams should correspond as closely as possible to points on the manufactured wall, both in the vertical and horizontal planes.
In the photo there are two headlight adjustment dials
The most difficult to reach vertical adjustment bolt
It is considered that the optics are correctly adjusted when the rays go directly to the places of the required projections, previously applied to the wall, according to the operating rules of the machine.
Now a so-called test run is being carried out. This must be done in order to secure the headlight adjustment, and also to check whether the work was done correctly. Make sure that the beams of light do not blind drivers coming towards you.
conclusions
As you can see, the procedure for adjusting the headlights on a Lada Granta with your own hands is not at all complicated. The whole procedure, if you have a ready-made “wall”, will take no more than twenty minutes.
The right headlight literally “fell” down, it’s dangerous to drive like that
As a rule, optics do not have a clear operating time. The duration of use is not limited in any way, since everything depends on the road conditions, as well as the style in which the driver drives the car.
But, even with normal output data, optics rarely withstand more than one hundred thousand kilometers, since its surface is covered with an abundance of small scratches. As we have already said, such scratches can be removed with polishes or a more significant abrasive, but the resources for such restoration are not unlimited.
Give some attention and power to your halogen headlight. The fact is that deviations up or down can lead to the fact that the adjustment of the headlights on the Lada Granta cannot be performed efficiently.
In addition, each batch of cars may have its own characteristics of setting up the light beam, which you can find out about by simply looking at the operating instructions.
Why is the setting broken?
Expert advice on replacing the clutch cable on a Lada Granta
Light angle adjustments get lost for several reasons:
- after mechanical impact during an accident;
- due to deep potholes, holes, speed bumps and uneven road surface joints;
- due to the installation of low-quality lamps of questionable manufacture.
The angle of the light beam may be lost due to an accidental collision with a deep pothole at high speed. Granta's suspension cannot completely absorb the force of a powerful impact of the wheel on the asphalt, and inertia is transmitted through the body. The headlight reflector suddenly accelerates up or down, the adjustment screw slips, and the light beam shines incorrectly. Frequent rolls over curbs or a high garage threshold can also have this effect.
During the journey, drivers find themselves in different traffic situations, accidentally falling into deep holes or driving over speed bumps at high speed. All this over time disrupts the position of the adjusting screw in the headlight reflector. However, the installation of Chinese low or high beam lamps affects the angle of the light beam. This parameter is affected by the location of the filament. If the bulb of the installed part is slightly offset vertically, then the standard optics will not be able to correctly collect the light beam and transmit it to the road surface. In this case, you will also need to adjust the light angle or replace the lamps.
Fog lights VAZ 2114 and VAZ 2115: what you need to know
So, in order to decide which PTF is better for the VAZ 2114 or 2115, it is worth noting that the choice must be approached responsibly. First of all, early versions of the VAZ 2114 were produced without fog lights, but subsequent “fourteenth” and similar “tags” may initially have standard PTFs.
If there are no fogs, in the second case there are still bumper plugs. This makes installation much easier. Let’s also add that many drivers of VAZ 2114 or 2115 are simply not satisfied with the standard VAZ fog lights. One way or another, owners are looking for the best option for both installation and replacement. Let's figure it out.
Stub
Yes, you heard right. Some manufacturers have realized that few people want to go through the hassle of constantly repairing or replacing hydraulic correctors in headlights on VAZs. That's why they came up with plastic plugs instead of working cylinders. It is enough to pull out the old ones and insert the plugs in their place. They have the right size, so they will fit into the seats like “native”.
- Cheap and cheerful. I bought it once and forgot about the problems with the hydraulic corrector
- Ease of installation
- Lost the ability to remotely adjust the headlight angle when the vehicle is fully loaded
Here is a video of what they are and how to install them in headlights: