Many Samar owners, especially in winter, sooner or later encountered the fact that cold air was blowing from the stove instead of hot. Why is this happening? First you need to make sure that the entire heater system is in good condition:
The antifreeze level in the expansion tank is between the min and max marks. And it doesn't fall.
- Thermostat is OK.
- The heater radiator is not clogged
- The engine warms up to operating temperature.
- There are no air pockets in the cooling system.
- The heater flap rotates with a cable and is working properly
- The pump is working properly.
The serviceability of the thermostat is checked as follows. On a cold engine, the coolant should be circulated in a small circle, i.e. bypassing the radiator. Therefore, we touch the lower radiator pipe; it should be cold until the engine warms up to operating temperature, after which it will become hot.
The heater radiator is difficult to check. Ideally, it should be removed and washed. But few people do this; as a rule, from replacement to replacement, it passes fluid normally.
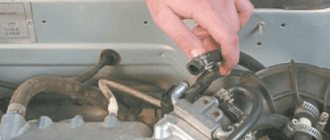
of air jams as follows. We remove the hose from the carburetor and pour antifreeze into the expansion tank and create pressure (you can use your mouth) until it flows from the carburetor heating hose.
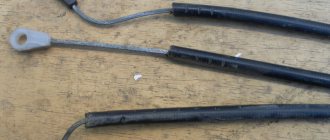
The damper and cable are checked visually.
To modernize the VAZ 2108-09-099 heater, we will need pliers. Next, with a flashlight, we climb under the steering wheel on the driver’s side and on the right side of the tunnel wall we see a flap and a cable. All we have to do is bend it. We grab the cable between the jacket and the damper clamp with pliers and twist it clockwise 50-60 degrees. It should look like this:
While the car is new there should not be such problems, although they do happen. But over time, the details become loose and become inconsistent. Plus, the heater's foam seal prevents the doors from closing tightly.
Video about putting the stove in order with a “new” torpedo. Suitable for 2113-14-15
1200 rub. for the photo report
We pay for photo reports on car repairs. Earnings from 10,000 rubles/month.
Write:
The presence of air in the cooling system is fraught with problems for both the engine and other components of the car. In particular, overheating may occur or the stove will heat poorly. Therefore, it is useful for any motorist to know how to remove an air lock from the cooling system. This procedure is quite trivial, so even a beginner and inexperienced car enthusiast can do it. Due to its importance, we will talk about three methods of removing air. But first, let's talk about how to understand that air jams are occurring and the reasons for their occurrence.
Symptoms of airiness
How can you tell if there is an air lock in the cooling system? When this phenomenon occurs, several typical symptoms occur. Among them:
- Problems with the thermostat . More specifically, if after starting the engine the cooling fan turns on very quickly, then there is a high probability that the thermostat has failed. Another reason for this may be that air has accumulated in the pump nozzle. If the thermostat valve is closed, the antifreeze circulates in a small circle. Another situation is possible when the coolant temperature needle is at “zero” when the engine has already warmed up enough. Here again, two options are possible - a malfunction of the thermostat, or the presence of an air lock in it.
- Antifreeze leak . It can be checked visually by traces of antifreeze on individual elements of the engine or chassis of the car.
- The pump starts to make noise . When it partially fails, extraneous noise appears.
- Problems with the stove . There are many reasons for this malfunction, but one of them is the formation of an air lock in the cooling system.
If you find at least one of the symptoms described above, then you need to diagnose the cooling system. However, before doing this, it will be useful to understand what caused the possible problems.
Malfunctions in the system
In a domestic car VAZ-2109, you can independently identify problems in the cooling system.
For example, system overheating occurs if:
- lack of coolant - check, add if necessary;
- the pump belt is torn or worn - replace it;
- the radiator is clogged with dirt - flush or replace;
- The fan may be broken.
There are also a number of other malfunctions:
- Coolant leak. Hoses may be damaged or parts may crack. If fluid is lost, the system is overfilled.
- Corrosion can occur if the water is contaminated or the antifreeze solution is not formulated correctly.
- Air locks (warm up the engine properly, then let the car sit, remove the hose and start the engine again - this will help expel the air).
Causes of air locks
Air in the cooling system can be caused by a number of malfunctions. Among them:
- Depressurization of the system . It can occur in a variety of places - on hoses, fittings, pipes, pipes, and so on. Depressurization can be caused by mechanical damage to its individual parts, their natural wear, or a decrease in pressure in the system. If, after you have removed the air lock, air appears in the system again, it means that it is depressurized. Therefore, it is necessary to do diagnostics and visual inspection in order to identify the damaged area.
You need to pour antifreeze in a thin stream.
Each of the reasons described above can damage the components and mechanisms of the car. First of all the engine suffers because its normal cooling is disrupted. It overheats, causing wear to become critical. And this can lead to deformation of its individual parts, failure of sealing elements, and in especially dangerous cases, even to jamming.
Airing also leads to poor stove performance. The reasons for this are similar. Antifreeze does not circulate well and does not tolerate sufficient heat.
Next, let's move directly to the methods by which you can remove the air lock from the cooling system. They differ in the method of execution, as well as complexity.
Heater diagram
The heater is mounted in the cabin under the dashboard using nuts on bolts that are welded to the air supply box. The air heated in the heater through channels (air ducts) enters the interior of the cabin. The air ducts are located at the bottom of the dashboard and have sealing gaskets.
If you plan to carry out repair and maintenance work, or replace failed components yourself, you definitely need to study the design of the stove and become familiar with the location of the components.
Based on the diagram below, we will introduce you to the design of the VAZ 2109 stove.
Scheme
| Item number | What is this |
| 1. | Bracket for fixing stove casings |
| 2. | Heater control damper |
| 3. | Left heater casing |
| 4. | Flap rod for heating the foot area |
| 5. | Radiator gasket |
| 6. | Radiator |
| 7. | Gasket sealing stove |
| 8. | Electric stove motor |
| 9. | Heater fan shrouds |
| 10. | Fan impeller |
| 11. | Heating damper |
| 12. | Air duct for heated windshield |
| 13. | Side nozzle duct |
| 14. | Side nozzle |
| 15. | Center nozzle flap |
| 16. | Pusher (blades); |
| 17. | Blade axis |
| 18. | The blade itself |
| 19. | Center nozzle closing lever |
| 20. | Heated windshield damper rod |
| 21. | Lever for changing air flow directions |
| 22. | Air heating control knob |
| 23. | Windshield air handle |
| 24. | Leg air handle |
| 25. | Bracket for control levers |
| 26. | Rod sheath fixation bracket |
| 27. | Stove valve control rod |
| 28. | Stove control damper rod |
| 29. | Heated footwell flap |
| 30. | Air control lever axis |
| 31. | Screw clamp |
| 32. | Stove valve |
| 33. | Heater valve body |
| 34. | Valve lever |
| 35. | Hoses connecting the faucet to the heater radiator |
| 36. | Internal ventilation duct |
| 37. | Heated windows for rear footwells |
| 38. | Stove tap |
| 39. | Window for heating the driver's foot area |
| 40. | B-pillar trim |
| 41. | Inner cavity of the central pillar |
| 42. | Exhaust ventilation duct |
| 43. | B-pillar trim |
| 44. | Hood deflector lining |
| 45. | Rubber valve |
| 46. | Deflector housing |
| 47. | Exhaust ventilation deflector |
| I | Heater |
| II | Stove operation diagrams |
| III | Stove tap |
| IV | Interior exhaust ventilation |
Having become acquainted with the components of the VAZ 2109 stove, let's find out in more detail how everything is arranged and functions here.
Device location
Methods for removing air lock from the cooling system
How to remove an air lock from the cooling system of a VAZ classic
There are three main methods by which you can eliminate an air lock. Let's list them in order. The first method is great for VAZ cars . Its algorithm will be as follows:
- Remove from the engine all protective and other elements that may prevent you from reaching the expansion tank with coolant.
- Disconnect one of the pipes that are responsible for heating the throttle assembly (it doesn’t matter whether it’s direct or reverse).
- Remove the expansion tank cap and cover the neck with a loose cloth.
- Blow inside the tank. This will create a slight excess pressure, which will be enough for excess air to escape through the pipe.
- As soon as antifreeze comes out of the hole for the pipe, immediately put the pipe on it and preferably secure it with a clamp. Otherwise, air will get back into it.
- Close the expansion tank cap and reassemble all previously removed engine protection elements.
The second method is carried out in accordance with the following algorithm:
- Start the engine and let it run for 10.15 minutes, then turn it off.
- Remove the necessary elements in order to get to the expansion tank with coolant.
- Without removing the lid from it, disconnect one of the pipes on the tank. If the system has been aired, then air will begin to escape from it.
- As soon as the antifreeze flows out, immediately replace the pipe and secure it.
The third method of how to remove an air lock from the system must be done as follows:
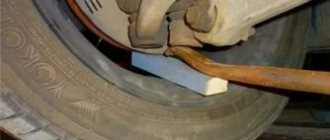
- It is necessary to place the car on a hill so that its front part is higher. It is important that the radiator cap is higher than the rest of the cooling system. At the same time, put the car on the handbrake, or better yet, put chocks under the wheels .
- Let the engine run for 10.15 minutes.
- Unscrew the caps from the expansion tank and radiator.
- Periodically press the accelerator pedal and add coolant to the radiator. This will cause air to escape from the system. You will notice it by the bubbles. Continue the procedure until all the air is released. In this case, you can turn on the stove to maximum mode. As soon as the thermostat opens the valve completely and very hot air enters the cabin, it means that the air has been removed from the system. At the same time, you need to check for bubbles coming out of the coolant.
As for the last method, on machines with an automatically turned on cooling system fan, you don’t even have to over-gas, but calmly let the engine warm up and wait until the fan turns on. At the same time, the movement of the coolant will increase, and under the influence of circulation, air will leave the system. In this case, it is important to add coolant to the system in order to prevent airing again.
As you can see, the methods of how to get rid of an air lock in the engine cooling system are quite simple. They are all based on the fact that air is lighter than liquid. Therefore, it is necessary to create conditions under which the air lock will be forced out of the system under pressure. However, it is best not to bring the system to that state and take preventive measures in a timely manner. We will talk about them further.
Airing the stove - solution to the problem
We have already talked about why the stove on a VAZ 2114 will blow, now we will tell you how to fix it.
The first thing every motorist should check is the coolant level. Normally, it should be close to the Mach mark, and in winter it should even be slightly above it. If the coolant level has dropped noticeably, then it should be replenished and again checked how the stove works. If everything returns to normal, then this was the reason, if not, then you should continue the search.
The antifreeze level should be checked as often as possible. After all, operating a car with a low coolant level can lead to serious breakdowns, including engine damage.
If the fluid level is OK, then you should check the heater tap. In most cases, it is he who is to blame for poor heating of the interior. To do this, you just need to tighten its cable (this needs to be done from the gas pedal) using pliers. In more than 90% of cases, this simple operation will help return the stove to normal operation.
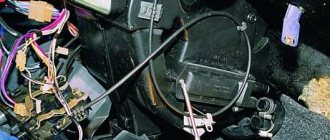
The next thing to check is the fan.
There may be 3 reasons in this case:
- Its a complete breakdown.
- Incorrect operation (sensor failure).
- Incorrect impeller.
You can check whether the fan is working in principle by connecting it directly to the power supply. If it starts to rotate, then everything is in order and you should check the temperature sensor. If not, the fan should be completely replaced. If there are problems with the fan sensor (which turns it on when the coolant reaches a certain temperature), the first one should be replaced. This is not difficult to do (the sensor is located at the bottom of the radiator), and it costs very little.
The third reason for possible fan problems is an incorrect impeller. Some companies produce fans with impellers operating in different directions (forward or backward). If the fan has recently been replaced and it turns out that it has an incorrect impeller that sends air in the opposite direction, then it will have to be replaced again, nothing can be done about it.
If it turns out that the fan is working, you should move on to checking the thermostat. Very often the reason why the VAZ 2114 stove heats up only at high speeds is precisely this.
You can check it as follows:
- turn off the machine and let it cool down;
- start the engine;
- check (touch) the lower thermostat pipes - they should be cold;
- wait until the coolant temperature according to the instrument on the panel reaches a temperature of 85 C;
- Check the lower pipes again; if the thermostat is working, they should begin to heat up, which should increase with increasing temperature.
If everything happens as described above, then the thermostat is working; if not, it should be replaced urgently.
If all of the above methods do not help, you should try replacing the pump (sometimes it breaks and the pressure it creates is simply not enough to pump coolant normally). If replacing the pump also did not help, you should try removing the radiator and cleaning it (the easiest way is to blow it out with pressurized air supplied by a compressor). Very often this simple situation is enough to correct the situation.
General recommendations for prevention
The first thing you need to pay attention to is the level of antifreeze in the cooling system . Always monitor it and top up if necessary. Moreover, if you have to add coolant very often, then this is the first call indicating that something is wrong with the system, and additional diagnostics are necessary to identify the cause of the malfunction. Also check for stains from antifreeze leaks. It is better to do this in the inspection hole.
Try to use the antifreeze recommended by your car manufacturer. Make purchases in trusted, licensed stores, minimizing the likelihood of purchasing a counterfeit. The fact is that low-quality coolant can gradually evaporate during repeated heating, and instead of it, an air plug forms in the system. Therefore, do not neglect the manufacturer's requirements.
Instead of a conclusion
Finally, I would like to note that if the described signs of airing in the system appear, it is necessary to carry out diagnostics and check it as quickly as possible. After all, an air lock significantly reduces the efficiency of the cooling system. Because of this, the engine operates under conditions of increased wear, which can lead to premature failure. Therefore, if you detect airing, try to get rid of the plug as quickly as possible. Fortunately, even a novice car enthusiast can do this, since the procedure is simple and does not require the use of additional tools or devices.
Maintaining the temperature regime of the power plant is only possible if the coolant fills all channels of the system. But it happens that air pockets form inside, which disrupts the normal functioning of the cooling system.
Choice
When choosing a new radiator for the stove of your VAZ 2109, you should understand what exactly you want to achieve and what budget you have.
Today, consumers are offered two types of units to choose from.
Radiator type
Peculiarities
Aluminum
A relatively inexpensive radiator option, which is characterized by high thermal conductivity. However, such a device cannot be repaired, which is its main drawback.
But in practice, repairs are not carried out so often, so few people pay attention to this disadvantage
Copper
If necessary and a leak is detected, the copper radiator can be repaired - soldered. Thermal conductivity indicators are slightly higher when compared with aluminum analogues
But at the same time, the price is quite high - both for repairs and for the radiator itself
Aluminum unit
Due to unprofitability and high cost, most VAZ 2109 owners choose aluminum radiators. But it all depends on your personal decisions and preferences. When actively using a car in harsh winter conditions, a copper radiator is fully justified.
Copper unit
Why is an air lock dangerous?
An air lock is an accumulation of air inside the channels of the cooling system, which impairs the circulation of coolant. It acts as a gap in the flow that antifreeze cannot overcome. The consequences of an air lock are serious:
- uneven heat removal from the components and mechanisms of the power plant;
- motor overheating;
- incorrect display of information from engine sensors;
- thermostat damage;
- the interior heating system stops working.
Dangerous consequences include uneven heat dissipation and overheating. Due to the temperature difference in the nodes, uneven expansion of the metal occurs, which causes warping of the composite mechanisms. And overheating of the motor leads to a violation of the geometry of the block head.
Reasons for appearance
There are several reasons why air accumulates in the cooling system channels. An air lock is formed due to:
- System leaks. Leaks at the junctions of the pipes lead to the fact that when the liquid flow moves, a vacuum is formed, which sucks air into the system. Gradually the amount of air increases, then it accumulates in one place, forming a plug.
- Loss of tightness in the water pump. If the sealing gasket under the pump is damaged, the unit will suck in air during operation.
- Violation of technology for replacing or adding antifreeze. If you immediately pour a large amount of liquid, the air in the pipes will not escape and the antifreeze will push air bubbles into the system with its own weight. After starting the engine, the air will gather in one place, interrupting the flow.
- Damage to the cylinder head gasket due to overheating. If the resulting breakdown connects the cooling system channel to the atmosphere, the liquid will draw in air from outside. Airing appears if a breakdown connects the channel to the cylinder. In this case, exhaust gases will break into the cooling system, which, in addition to the appearance of an air lock, is accompanied by the bubbling of antifreeze in the expansion tank.
If you suspect that a plug has formed in the cooling system, first make sure that air has occurred. Overheating of the power plant occurs due to jamming of the thermostat, which is also an unpleasant situation.
BEHIND THE STEEL
An air lock in a car's cooling system can create a lot of problems for the car owner. This article will help you figure out how to remove air from the cooling system of a VAZ 2109 and learn how to do it yourself.
- Automobile.
- Assistant.
- Two jacks.
If air gets into the cooling system, it can cause various problems. For example, due to the smallest air lock, the car’s heater, at best, will simply not work very well or not work at all.
Many inexperienced car owners assume that an air lock that has appeared in the cooling system needs to be removed using some special equipment. Although, in fact, you can deal with this yourself, just by asking someone you know to help a little, and not resorting to the help of specialists from a car service center. This process takes about half an hour. Well, or due to inexperience, you can spend an hour on everything about everything. But in order to save yourself from the torment of an airlock, you can tinker for an hour with your favorite iron horse, which will then work much better. It will also be possible to avoid many breakdowns, and, accordingly, save money on repairs.
Since it’s easy to remove air from the cooling system of a VAZ 2109, and other domestic cars, it’s even easier to do this with a foreign car. Before you begin the procedure for removing the air lock from the car’s cooling system, you need to make sure that it is tight and identify the reason for the appearance of air in it. This may happen because antifreeze or water was not poured into the radiator correctly, or there is simply a hole in the system through which antifreeze or water flows out and air enters instead.
Before removing air from the car radiator, you need to check how tightly the drain plug is screwed on. If everything is in order, then you need to check the expansion tank housing as carefully as possible for cracks. The next thing to check is the hoses that connect all parts of the system into a single whole. The rubber they are made of may have dried out due to too much or aggressive use, resulting in cracks. The radiator itself or the cylinder head gaskets may also be leaking. If the system is completely sealed and coolant does not leak from anywhere, you can safely get to work.
Since you need to remove air from the cooling system once and for all, it is best to start by lifting the front of the car. This can be done by parking it safely with its front end on any hill, or using a couple of jacks for this purpose. This is done with the goal that the air bleed screw, located directly on the radiator, becomes the highest point of the entire system. Then the air will flow freely from there. Next you need to open the stove tap. In this case, the heater control regulators must be placed in the extreme position in which they are usually found in winter. You also need to set the airflow intensity to the middle position. After completing these steps, you need to unscrew the cap on the expansion tank and unscrew the screw so that air begins to escape from the cooling system.
Once the air is out, the next step is to start the engine. The car must idle for some time until the engine warms up. The temperature and engine speed readings should reach normal operating values. Now you need to ask someone to get behind the wheel of a car. In order to completely expel the remaining unwanted air from the cooling system, you need to periodically accelerate the engine several times and thereby increase the engine speed. These actions will allow coolant to circulate throughout the system. At the same time, you need to pour water flowing out of the system into the expansion tank and carefully watch when air bubbles disappear from it.
An assistant, in addition to operating the gas pedal, must monitor the heater. If, after several presses on the pedal, the stove begins to confidently do its job - supplying heat to the interior of the car - then everything has been done correctly. Now you need to tighten the air bleed screw back well and let the car quietly rumble a little more at idle. Next, all that remains is to pour antifreeze or water into the expansion tank to the maximum level, and then close its lid very tightly. After completing all the manipulations, you need to let the car run for about another minute. Having made sure that each cap and plug are tightly tightened, you can turn off the engine with peace of mind and remove the car from the jacks, since you managed to remove air from the cooling system on the first try.
Determining the cause
Video: Second car with a problem: the stove does not heat - there is air in the system!
The main indicator of the appearance of an air lock is that the stove is not working or is not working well. But this can also happen due to the fault of the same thermostat. If it gets stuck in the open position (the antifreeze constantly moves in a large circle), then the engine simply will not reach operating temperature and the stove will not heat up.
Therefore, if you decide to fix problems with the cooling system, first check the operation of the thermostat. This is easy to do; let’s look at the steps using the VAZ-2109 as an example.
Blown engine head gasket
The thing is that the motor is not a monolithic structure; it has a block head and the block itself. They are connected through a special gasket. If this gasket is broken (and this happens, for example, due to poor broaching), then the coolant will go into the cylinders or the muffler ( white thick smoke will come out ). Thus, there will not be enough coolant in the system (possible air pockets) and therefore the stove will heat poorly! It is urgent to change the head gasket, otherwise you can kill the engine through overheating.
These are probably all the main reasons when the stove does not heat well! On a personal note, I would like to note that in most cases this is a thermostat malfunction (about 70%). So the first thing to check is to change it.
Now let’s watch a short useful video.
And that’s all, read our AUTOBLOG.
(
49 votes, average: 3.94 out of 5)
How to remove an air lock using the example of a VAZ-2109
To ventilate the cooling system, three methods are used, each of which copes with the task.
The simplest method, which is applicable both for the VAZ-2109 and other cars, is to remove the air lock from the engine. To do this, find a steep slope and drive the car up onto it with the front end up.
Air accumulates at the highest point of the system - in the stove radiator. After installing the car on a slope, the highest point becomes the upper tank of the main radiator, connected by a return pipe to the expansion tank.
After placing the car on the slope, we immobilize it with the handbrake (chocks or other stops will not hurt).
It’s easy to remove air in this way - after installing the car, set the engine speed to medium and hold it. The pump actively pumps liquid and pushes the plug to the top point.
During work, the liquid circulates and its level in the expansion tank may drop, so monitor the amount of antifreeze and add it.
Since the radiator is connected to the expansion tank, when the pump operates intensively, air will first enter the radiator and then be forced out by liquid into the expansion tank.
An indicator that air has left the cooling system will be a stable stream of antifreeze without air bubbles coming out of the return pipe coming from the radiator.
You can remove the cork using another second method.
To do this, find the carburetor heating pipe (throttle valve - on the injection version of the VAZ-2109) and remove it. Then unscrew the cap of the expansion tank and add fluid if necessary.
To expel the plug, create pressure in the system. To do this, blow forcefully into the tank. But it’s easier to find a suitable cap and embed a spool from a tubeless tire into it, then create pressure in the system with a pump or auto-compressor.
The essence of the method is that by creating pressure in the tank, we push the liquid out of the tank. In this case, the liquid, having reached the plug, will begin to shift it to the place where the pressure drops. This is a removed carburetor (throttle) heating pipe. A signal that the plug has come out will be the appearance of a stream of antifreeze from the pipe.
The third method is built on the same principle as the second, but it uses the engine itself to create pressure. We start the engine and let it run for 15-20 minutes (during this time, pressure will build up in the system due to the expansion of antifreeze when heated).
Then we unscrew the carburetor (throttle) warm-up pipe and wait until the pressure causes the plug to come out and antifreeze flows out of the removed tube. But this method is only applicable if the expansion tank cap valves are working properly and do not allow air to pass through.
Using such simple methods, you can de-air the cooling system of the VAZ 2109. The main indicator that the procedure was a success is the restoration of the functionality of the interior heating system. But if the stove does not heat, the procedure will have to be repeated.
Let's get started:
First you need to drain the coolant into a special separate container. The liquid remaining in the radiator should be removed using a hose and funnel
Carefully remove the air ducts and, be sure to pay attention to possible misalignment of the holes that are located in the panel with the stove nozzles. If the misalignment exceeds 50%, you need to cut the interior heater. Next, having previously marked the connectors of the switches and light bulbs, remove the instrument panel
We disconnect the steering wheel, steering column trim and steering column switches. Next, we dismantle the heater: unscrew the 4 M10 nuts, disconnect the wire connector and all connectors on the heater body. Disconnect the radiator hoses and remove the heater valve cable latch. Next, carefully remove the heater, after unscrewing the two fan screws. Remove the radiator by unscrewing the three bolts. Be careful - there may still be coolant left here. Then make turbulators. These are special plastic spirals that increase the heat transfer of the radiator. “According to the rules,” they should be installed at the factory, but most often they are not. To make them yourself, you need to cut aluminum or copper plates, the width of which is 6 mm and the thickness is 1.5 mm. One side of such a plate should be clamped in a drill, and, at the same time, the other, using a vice, should be twisted into a spiral. Carefully inspect the bottom of the heater. Make sure there are no deformations, displacements, breaks or other defects. Then disassemble the stove by separating the body into two halves. To do this, use a screwdriver to open the latches and then unscrew the screw under the central nozzle. Remove the damper control levers. Carefully inspect the inside surface of the stove. If the foam has come loose, carefully glue it back, you can add strips of bitoplast. The housing should be made as airtight as possible. Adjust the center shutter. Before you begin assembling the heater, be sure to lubricate the places where the dampers are attached with a special grease. At the same time, when connecting the halves of the case, apply silicone or acrylic sealant to the connector. The heater should be assembled in the reverse order of disassembly. If there is deformation on the bottom wall, fill the gap with sealant. There should be no gaps between the stove body and the radiator. In the places where the housing is connected to the radiator, bitoplast should be glued. Next, you need to balance the fan impeller by winding wire around the blades. The wires must be routed through a special rubber plug located in the heater housing. Be sure to adjust the travel of the dampers. You need to be guided by the fact that the levers should always be clearly fixed in their extreme positions. Adjustment must be carried out by selecting the positions of the braid. Next, adjust the stove tap. You should choose a position in which the tap will not close completely. It is necessary to lubricate the hoses and radiator tubes with sealant before installing them. New clamps should be used. When the assembly is completed, you have filled in the coolant and warmed up the engine, you should tighten the clamps again. Before installing the instrument panel, you need to glue foam and bitoplast to the inlet holes of the nozzles.