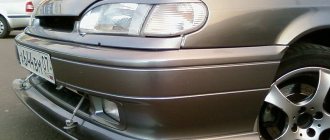
Owners of VAZ 2114 cars often complain about the carelessness and short-sightedness of the domestic manufacturer. In their opinion, some systems of the fourteenth Samara model have specific shortcomings. Take, for example, the cabin filter of a car, which receives the most complaints. It consists of a strip of filter material placed between two plastic grids. The configuration of such a flimsy filter is capable of retaining only the largest debris, allowing all other small particles of dirt and various gaseous compounds to enter the cabin.
Of course, given this state of affairs, any VAZ 2114 car owner will dream of installing a normal cleaning element. And this can be done, but first you should take care of purchasing a cabin filter adapter. This is exactly what we will talk about in our article. You will learn what functions it performs and how you can make it yourself.
What does the cabin filter adapter look like and what functions does it perform?
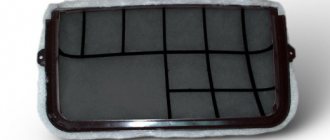
Cabin filter adapter with a filter installed in it (new model) from VAZ-2110
The cabin filter adapter allows you to install a modern cleaning element in your car, which will retain dust and prevent it from settling on the inside of the windshield, dashboard and interior trim.
The product is a modernized casing for the cabin ventilation system with the function of integrating a cabin filter from VAZ 2110 cars. It has a detachable metal structure, consisting of two parts - front and rear, into which the filter is installed. The joints of both parts of the adapter are sealed with rubber gaskets, which improve the tightness of the structure and prevent moisture from entering the interior blower fan. The lower plane of the adapter is also treated with the same seal. The sides of the front part are responsible for keeping the filter dry when it rains or when washing the car. The location of the adapter in the car ensures that the filter is installed forward in the direction of travel of the vehicle. This orientation of this design allows the installation of a pleated cabin filter of the tenth Samara family. At the same time, removal and installation of the filter component for its periodic cleaning and replacement can be done in a few seconds. The adapter can be installed on cars with various modifications of the standard casing, and all thanks to the universal fastening of the adapter. There is no need to remove the heater fan during installation.
Device functions
The functions of the cabin filter adapter may differ slightly from each other, depending on the modification made to it.
The main functions inherent in any adapter include:
- Purification of air coming from the street;
- Retention of dust, debris and harmful automobile exhausts;
- Providing the salon with clean, fresh air.
More expensive and high-quality filters have a number of additional functions, such as:
- Air purification from bacteria and microorganisms;
- Adding activated carbon sorbent;
- Extending service life;
- Possibility to install a filter of a more modern design into the adapter.
You can buy such a thing at any car store for about 1,500 rubles. But, let's consider the option of making an adapter yourself.
Advantages of the VAZ 2110 cabin filter
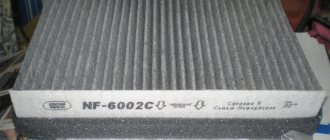
Carbon and anti-allergenic dust filters for VAZ-2108, -2109, -21099, -2114, -2115 (Samara family) VAZ 2110 cabin filter It is
not for nothing that we say that it is better to install a filter of the tenth Lada family on a VAZ 2114 car. A reasonable question arises: what are its advantages over the “Samarov” filter?
Even if you just look at these two filter elements, you can already see that the working surface area of the VAZ 2110 interior compartment is much larger than that of the Samarovo one. To be more precise, 6 times. This configuration of the cabin filter allows, with significantly lower air resistance, to improve the filtration of polluting particles through more dense packing of the paper element. According to filter manufacturers, the efficiency of filter material in filtering out dust particles up to 1 micrometer in size is 95%. Mechanical contaminants measuring 2 micrometers are retained by 98%. Thus, installing an adapter can allow you to enjoy all the benefits of a modern cabin filter without significant loss of air volume.
Why is replacement needed?
The main reason for replacing the cabin filter is dust. The most active period of pollution is summer and spring. The weather is dry, and therefore a very large amount of dust forms on the roads and on the street.
Obviously, the replacement is carried out in order to increase the efficiency of cleaning the air that we breathe while inside the car. If you ignore the need to change the filter element, you will soon begin to inhale large amounts of dust and microparticles that can cause diseases of varying degrees of complexity.
Young children can develop serious allergies if they constantly drive a car with an old cabin air filter. Therefore, this is primarily a health issue.
Price issue
Experts advise replacing the element twice a year - at the end of summer and at the beginning of spring. That is, before and after the active period of dust spreading.
This entails the need for certain costs to purchase two filters per year. But there is no need to worry, since the price of a regular filter component is only 150 rubles. A higher quality carbon filter costs a little more - 300 rubles. It's a small price to pay to stay healthy and comfortable inside your car.
Where can I get a cabin filter adapter for a VAZ 2114?
You can purchase a cabin filter adapter for a VAZ 2114 in three ways.
The simplest of them is purchasing a product in an online store. For example, on the website adaptech.spb.ru/order.htm they offer to purchase an adapter for only 1,600 rubles.
The advantages of this method: The original adapter is much better - thick metal, powder paint.
Cons: Painfully expensive delivery, and the price is too high.
The second way to acquire a treasured item is to buy it through the same ubiquitous Internet from the St. Petersburg Samodelkins.
The advantages of this method: Low price
Cons: You can also get confused yourself.
Well, and finally, the third way to get the desired spare part is to make your own interior adapter.
The advantages of this method: Savings and a sense of personal satisfaction from the work done to improve your “pelvis”.
Cons: 8 hours of effort and preliminary preparation of the necessary materials.
But we are not afraid of difficulties, right? And we can modernize our bird ourselves in our garage. And with the money saved, we’d better buy a new carbon filter from the “ten”.
Adapter
Alas, the quality and efficiency of the standard cabin filter provided for the VAZ 2114 leaves much to be desired.
Essentially, it is a strip of filter material that is located between two plastic grilles. The effectiveness of this design is insignificant, which forces car owners to take certain measures.
The best measure is to install a filter adapter. Making it yourself is not difficult, although there are other ways to obtain this design.
Adapter drawing example
Thanks to the adapter, it becomes possible to install a truly effective air purifier for the cabin, which retains the smallest particles and does not allow the driver and passengers to breathe dust.
Externally, the adapter is an improved housing for the interior ventilation system with a filter built into it. The design consists of two elements - the rear and the front. A filter is inserted into the rear component, and the joints between the adapter parts are sealed with rubber gaskets. This ensures the necessary tightness. The design nuances will allow you to avoid moisture penetration even when washing the car.
When planning the installation of the adapter, experts strongly recommend using a pleated cabin filter borrowed from the VAZ 2110.
The simplicity of the adapter design makes it possible to replace the filter with your own hands in the shortest possible time. And during installation you do not have to remove the heater. So this is an ideal solution to significantly improve the ventilation system of your VAZ 2114.
Options for obtaining an adapter
If you have made the right decision that you want to get an adapter for your VAZ 2114, you need to decide how exactly you will get it.
There are three main options for this.
| Option | Advantages | Flaws |
| Buy a device in the online store | You get a high quality device, made of thick metal and powder coated | The high cost of the product itself, plus equally expensive delivery |
| Order from those who make them with their own hands | The purchase will be much cheaper compared to an online store | If desired, you can make such a device yourself, spending only on consumables. Quality may be poor |
| Do it yourself | Significant financial savings, the ability to produce a truly high-quality adapter. You will know what it is made of and how | You will have to spend a lot of time and effort on manufacturing |
You should start making your own adapter only if you are completely confident in your own abilities. Spend the money you save on purchasing a high-quality carbon filter from a VAZ 2110.
Making the adapter
The instructions for creating an adapter with your own hands are quite simple. Another question is how accurately you can implement your plans.
- Find diagrams to create an adapter. Now there are many of them on the Internet. Just keep in mind that you need an adapter specifically for the VAZ 2114.
- Make a layout out of paper so that you understand exactly where each part goes and how they are connected to each other.
- Stock up on the required amount of stainless or galvanized steel. Some people use plastic, but it is a little more difficult to work with, plus it can cause problems when getting bends.
- Cut out the necessary adapter elements from the material, guided by the drawing and layout.
- Use a vice and mallet to make bends. The walls will be thin, so do not use a metal hammer. It is better to take a wooden or rubber mallet.
- The parts are connected using M3 bolts or rivets.
- The advantage of rivets is that you do not need to drill holes in the metal. But they also have a drawback - a high probability of damage to a thin sheet of metal.
- At the last stage, carefully treat all joints, connections and holes with sealant. This will allow the structure not to make unnecessary noise while driving.
Finished design
The manufacturing process will take at least 6 hours. Plus, you will additionally have to spend time studying diagrams, drawings and creating a layout. So be patient.
Step-by-step instructions for making a cabin adapter
- So, before you start working with metal, you should make templates for parts from paper. We print out drawings of the parts of the structure and glue them together. Here's what we got:
Printed from Compass 3D V12 1:1
- After this, we take the resulting stencils, metal scissors and cut out the galvanized parts.
- Next, we bend the parts in a large vice, using a wooden mallet so as not to spoil them.
- Then we drill holes with a drill, metal drill bit 3.
- We fasten the parts with M3 bolts.
- Next, you can install our craft. First, the part for the motor. Then on top is the part with the frame for the filter.
- To make installation easier, the plastic grille to protect against leaves was removed.
- We treat the adapter itself with glass sealant, carefully coating all the cracks and joints so as not to siphon, otherwise the whole point of the installation will be lost.
- We also treat the places where the adapter comes into contact with the car body with auto sealant (silicone will not work)
- The final touch is a rubber seal on the top of the adapter to protect the hood trim.
- Now you can install a cabin filter of the new tenth sample.
Bottom line: if you wish, you can also paint the resulting upgrade and begin to fully enjoy the clean air of the cabin!
Making a stainless steel adapter
In order to make a cabin filter adapter with your own hands, you will need the following materials and tools:
- Several sheets of stainless steel;
- Metal scissors;
- Drill;
- A drill designed for drilling metal;
- Bolts brand M3, 50 pcs.;
- Auto-sealant, in a medium-sized tube;
- Vise;
- Mallet (necessarily made of wood or rubber);
- Pliers;
- Sheets of A4 format, with drawings printed on it, which will be used in the future as a stencil;
- And most importantly - a lot of free time.
Why filter cabin air?
MB W140 - the first mass-produced affordable car with cabin air treatment
In the early 2000s, Mosekomonitoring conducted a series of studies that related to the levels of carbon monoxide, nitrogen oxide and sulfur in traffic jams. It turned out that the consumption of this muck by car drivers and their passengers exceeds the permissible level by 14 times. Moreover, a pedestrian who is 5 meters from the car inhales polluted air with a concentration that is only twice the permissible level. It’s also not sugar, but this cannot be compared with the conditions in which the driver finds himself.
In Europe, similar measurements began to be taken 30 years earlier, and the first cabin filters from Bluher began to be installed on expensive cars as a series. The first examples of air purifiers were similar to power system air filters, only with greater air flow capacity. The fact is that the heater engine is not able to create such a high vacuum as in the intake tract of the power system. The resistance of the cabin filter must be ten times lower, otherwise the air simply will not be able to overcome the resistance.
Video tutorial on replacing cabin filter 2114
A serial affordable car with cabin air treatment appeared only in 1991 and it was the MB W140 S-Class. A primitive corrugation was installed on it, which could trap 96% of solid particles - dust, rubber, suspension from worn brake pads, plant pollen and other more or less large fractions, ranging in size from 6 microns. Only the filters could not cope with carbon monoxide, so to deactivate harmful substances, the corrugation was impregnated with activated carbon. It's there in Europe. Our air was no cleaner, and if you believe the studies we mentioned, the situation was completely critical.
VAZ did not consider this a problem at all, so all classic cars were produced without any means of preparing the air in the cabin. VAZ 2108, VAZ 2109, 21099 were produced with an open air intake and not only particles 5 microns in size could get into the cabin, but often it was necessary to rake leaves and insects out of the air ducts, not to mention dust, which easily entered the lungs. The most vigilant owners of eights and nines simply pulled tights over the receiving frame of the ventilation system, but there was no talk of any serious filtration.
Installing the adapter and replacing the filter
The finished cabin filter adapter must be completely dry. The sealant will harden instantly, but it is better to let the product sit for several hours in the garage. During this time, you can make sure that you have a new stove filter on hand. You need to choose carefully; reviews from other motorists will help with this.
Now on the market you can find reusable options that can be cleaned. Advice: it is better to take a disposable one, as it has a long resource, but the price is much lower when compared with the reusable option.
Before installing the adapter and the new cleaning element in the VAZ 2114, you need to remove the old one and clean the cavity from dust and dirt. Replacement sequence:
- You need to open the hood and remove the rubber seal. It must have locking devices.
- Next, the screws are unscrewed and secured with nuts.
- There will be plastic plugs in front of the frill - they should also be pulled out.
- The frill is detached.
- It has a plastic mesh that needs to be pulled out - it is attached with self-tapping screws.
- Now access to the stove filter is open. You need to take it out and use a regular vacuum cleaner to blow out all the dust from there.
- An adapter is placed in the cavity, and a new cabin filter is placed in it.
- The final step is to reassemble all the parts in reverse order.
Design features of the VAZ-21099
When designing the VAZ-2109 car, after which modification 21099 appeared, the designers did not include the ability to install cabin filters on these cars. As a result, the air entering the cabin from the outside environment was not cleaned. The driver and passengers had to literally breathe in dust, which disrupted the level of comfort and also negatively affected the health and well-being of people. Somewhat later, when the designers took into account their shortcomings, they tried to find a way out of the current situation. As a result, they created a filter that could be located in a car, based on the design features of the ventilation system. The result certainly did not satisfy the needs of consumers, since it is very difficult to call such a design a full-fledged cabin filter, even with a stretch. The thing is that the manufacturer did not want to make any design changes to the car. This is due to additional financial costs, the need to redesign the assembly process and reconfigure conveyors. In an effort to still install a filter, but to save as much as possible on its implementation, buyers of the VAZ-21099 received a certain strip of filter element, which was installed between two plastic grilles.
Such a conditional filter allows you to retain only large debris, dirt, and foreign objects in the form of leaves or poplar fluff. Many motorists who do not make any changes to their VAZ-21099 and leave the car with the factory filter are surprised at how clean it remains even after 10 thousand kilometers. But this is not surprising, since all small debris and dust pass through the consumable. All this ends up in the cabin, and the driver and passengers are forced to breathe dirty air into their lungs with all the possible ensuing consequences. What's the result? Although the VAZ-21099 may have a filter, if you bought a car from a later production year, there is no need to talk about complete filtration of the air entering the cabin. The conditional filter itself is presented in the form of a plastic grid on which the filter element is fixed. It fits onto the heater's electric fan casing in the area where air is taken in.
There are a huge number of disadvantages to this design. You should start with ineffective protection from external pollution and dust. The consumable is simply not capable of holding anything other than large debris. Plus, when operating a car with such a filter, the air flows coming out through the deflectors into the VAZ-21099’s interior become significantly slower. This will be most noticeable in winter, when the interior begins to slowly warm up. If you are concerned about your own health and comfort in the car, then you should think about some modernization of the cabin air filtration system. And there is a way out of this situation. Moreover, it is quite simple to implement and does not require significant financial investments.
Conclusion
In a VAZ 2114 car, incorrect operation of the cabin filter does not always occur, and you may not need an adapter. But, if you are still unlucky when buying a car, then this article will help you cope with this problem. Naturally, this will entail costs, since the adapter will need to install a filter from a VAZ 2110, which in its cost significantly exceeds the cost of a standard VAZ 2114 filter. Well, this is better than weekly cleaning of the interior in a car wash.