Among the total number of motorists, there are always people who strive in various ways to improve their “iron horses”, increase their performance, reliability and durability. The vast majority of these drivers install metal struts (aka braces) on their cars for the front and rear struts. But such an improvement causes a lot of controversy, and the number of supporters and opponents of such tuning is approximately the same. Therefore, it is worth taking a closer look at the question of why stretch marks are needed and how to make them with your own hands.
- 2 How necessary is a crossbar - video opinion
- 3 Pros and cons of using front strut braces
- 4 Types of spacers
- 5 Preparing for self-production
- 6 Making a spacer with your own hands
6.1 How to make a spreader with your own hands - photo
- 6.2 Video about making a front brace
The role of spacers in strengthening the car body: why is it needed?
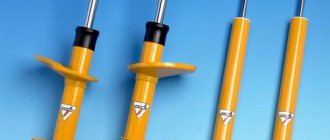
The stretcher is an additional rigidity installed between the upper supports of the struts (most often the front ones). It is made of a metal pipe, the ends of which are attached to two support flanges. The latter have holes that match in diameter and placement with the studs on the rack cups. The flanges are put on them, adjacent to the planes of the glasses, and screwed with standard nuts.
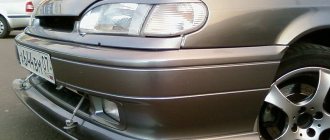
This is what stretching on a car looks like
Reference. Since the distance between the supports and mounting bolts differs for different car models, the spacers are made for a specific car brand.
The body of a modern car is made of thin sheet metal, interconnected in such a way as to ensure maximum structural rigidity. However, when rolling, turning and driving on bad roads, the body experiences high loads, causing it to deform elastically. This behavior has a detrimental effect on handling and reduces the life of the machine for the following reasons:
- the lower the rigidity of the body, the more it “twists” when turning or when hitting a bump;
- over time, the metal “gets tired”, causing cracks to form in the load-bearing elements;
- from constant impacts from the wheels, the side members bend inward, which is why, at a certain moment, adjusting the camber of the front wheels becomes impossible.
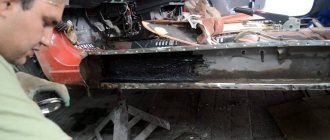
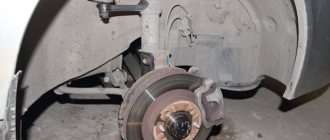
Extracting the side members on the stand, after which you need to install the cross member
Note. As a rule, the effect of “lost wheels” is observed on cars that have served for more than 10 years in difficult conditions. Their side members are so concave that there is not enough adjustment to align the wheels, so the tires wear out on the inside. The problem is solved by drawing out the side members on the stand and installing elements that strengthen the structure.
The spacer located between the pillar supports provides additional rigidity to the body and reduces the amplitude of deformation. That is, its installation gives a real positive result, no matter what opponents of such tuning say. The stretcher can be installed on any car, but there are certain cases when it brings particular benefits:
- with constant use of a passenger car in rural areas on bad roads;
- on machines that have undergone the procedure of stretching the side members due to metal fatigue and excessive deflection;
- on amateur cars taking part in sports racing.
Cars with such a frame do not require bracing
Reference. In professional motorsport, spacers are not used as a separate element. In specially prepared vehicles, a supporting frame is installed into which body elements are attached.
There is a type of car that does not require any additional reinforcement. These are framed all-wheel drive SUVs such as Jeep Wrangler or Land Rover Defender. In small cars and minibuses, where the pillars go under the dashboard, installing the jumper is technically difficult. At the same time, on some models, amplifiers are installed at the factory and are standard design elements.
This car has spacers from the factory.
General overview
The body of any vehicle is assembled from many elements that are connected to each other by welding, bolts, rivets, etc., so if a certain load is applied, they gain some degree of freedom of movement in relation to each other. Most likely, anyone who has gone through extreme driving school knows this firsthand.
And the lower the degree of such freedom, the more integral the body becomes, approaching the state of a single whole. In other words, it becomes more rigid, and the higher this parameter, the better its control. This is especially felt when performing various maneuvers at high speed.
Pros and cons of using front strut braces
According to the results of tests conducted by some automotive publications and reviews from many drivers, installing a spacer provides the following advantages:
- The car's controllability and steering sensitivity are increased, especially in high-speed turns.
- Body vibration is reduced.
- Stability increases when moving in a straight line.
- The risk of cracks due to metal fatigue is minimized.
- Simple installation with 6-8 threaded connections, which can be performed by almost every car enthusiast.
The jumper is placed on standard studs and screwed with nuts
It is not recommended to operate vehicles that are 15 years old or more and have had their side members stretched without front strut struts. The reason is the same “tired” metal, more prone to deflection from impacts from the suspension. Without reinforcement, the body will quickly return to a state of disrepair.
Reference. According to reviews from owners of Russian-made cars, thanks to the tightening of the pillars, one of the common “diseases” - the creaking of the plastic dashboard - has disappeared.
Of the negative aspects of using stretch marks, three significant ones are worth noting:
- any impact, including when falling into a hole or bump, is transferred from one wheel to another;
- the opposite part of the body may be damaged from a side impact to the place where the pillar is attached;
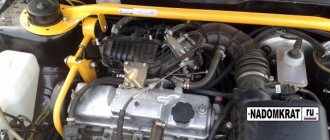
- A rod standing in the engine compartment can block access to elements of various systems, for example, an expansion tank with brake fluid.
Here you can see how the stretcher rests on the brake system reservoir
The last drawback can be avoided by using a spacer made by yourself, taking into account all the protruding parts. Prices for factory hardnesses are quite affordable and start from 1000 rubles.
Advantages and disadvantages
The mechanism has both pros and cons. It’s better to start with the good, namely with the advantages:
- Preservation of welds in vulnerable areas of the body;
- Improved control, namely, more stable movement of the car in a straight line and sharper turns;
- The car is controlled more accurately;
- “tolerance” of the car during an aggressive driving style and increased loads;
- The body is subject to minimal risk of deformation, even when used on poor quality surfaces.
Many motorists think that if they don’t like an aggressive driving style, then they don’t need a spacer. However, this is not always the case. Thanks to the spacer, you can enter a turn at speeds higher than normal without losing control. This saves a lot of time and makes movement less difficult.
There is only one drawback to installing rack extensions, but it is very significant. Because of this, in the event of an accident, the damage is more severe. If the blow falls on the side where the spacer is installed - into the wing, then not one “glass” will be damaged, but two at once. In this case, it will be necessary to replace not just one side, but the entire front part at once, which in the future may also compromise the rigidity of the body. However, if the blow is delivered exactly in the center of the front part, then the strut can save the life of the driver and passenger, as it will prevent the body from folding towards the passenger compartment.
Recently, the production of spacers with notches has begun, thanks to which, in the event of an accident, it is not the body that will bend, but only the spacer, which will reduce costs in the event of repairs after an accident.
Due to the design of some vehicles, the spacer may reduce access to the brake fluid reservoir.
Types of spacers
A jumper made from a profile pipe looks more beautiful
Jumpers for racks are made of round and rectangular pipes. There is no particular difference in their operational parameters, except that the profile pipe looks a little prettier. There are 2 ways to attach the rod to the mounting flanges:
- rigid, made by welding;
- movable, made on a hinge.
Hinge type stretcher
The hinged design is more reliable than the rigid one, since welded seams can burst over time due to body deformations. According to the method of fastening, spacers are divided into 2 groups:
- Two-point. They are attached to the front pillar glasses, that is, they have 2 support points.
- Three-point with intermediate fastening to the body.
- Three-point with additional engine mount.
The third fulcrum is the engine
The last type of guy wires is equipped with a bracket attached to the bar through a rubber support. The upper part of the engine is screwed to it, which allows you to significantly reduce the vibration transmitted to the entire body of the car.
Here the third point of support is the body
According to functionality, jumpers are divided into regular and adjustable. In the latter, the rod consists of two parts, rigidly connected by means of a threaded coupling, whose rotation lengthens or shortens the pipe. The idea is that the strut should be suitable for cars of any age, including old ones, where the struts are already shifted towards the center.
Two-point stretch with adjustable length
On most factory cross members, manufacturers make special deep notches. In this way, they are trying to neutralize the main drawback of all stretch marks - the ability to transfer impacts from one side of the body to the other. According to the sellers, in the event of an accident with a side collision, the notched element will simply fold and will not transfer the impact energy to the opposite pillar.
Conventional cross member and with engine mount
Reference. In reality, much depends on the strength of the mechanical force and the angle at which it is applied. Practice shows that even spacers with notches sometimes do not save and the second rack still has to be straightened.
Adjustable rear cross member
As a rule, cross members are installed only on the front strut cups. But there are also rear struts, although they are not so popular for the following reasons:
- a jumper in the trunk often becomes an obstacle to the transportation of goods, since it blocks part of the compartment;
- the use of a rear strut does not provide such noticeable improvements in handling and stability as the front;
- Not every car has the opportunity to mount a bar, unless you make a homemade one.
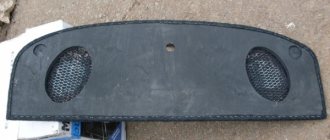
Strengthening the rear of the car reduces trunk volume
Note. Along with stretching the struts, car tuning enthusiasts sometimes use lower struts installed under the bottom of the car between the tie rod mounting brackets. The operation gives results precisely when two jumpers work together - upper and lower.
The lower spacer is placed in the eyelets of the rods
Advantages
Many car owners doubt the effectiveness of such tuning. They treat metal guy wires with doubt and are in no hurry to install such products. Inexperienced drivers should consider a number of advantages that these stretchers have. Among them it is necessary to highlight:
- affordable price;
- ease of use;
- ease of installation;
- increasing vehicle maneuverability;
- improved body rigidity;
- increasing driving stability;
- stopping body rocking.
In addition, metal braces act as additional engine support. When turning, they reduce lateral roll. These products have different designs and fastenings - the functionality of the stretch marks depends on these parameters. Therefore, it is necessary to choose the type of such devices with the help of a specialist.
Preparing for self-production
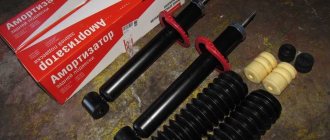
To make a jumper for the front pillars yourself, you need to prepare the following materials:
- sheet steel with a thickness of at least 3 mm;
- pipe with a diameter of 32-40 mm with a wall thickness of 3 mm or more;
- thin cardboard and marker for making a template;
- primer for metal and paint in an aerosol can.
A thick-walled pipe is what you need to make a guy wire
Regardless of which cross member design you choose - rigid or with hinges, you will not be able to do without a welding inverter, as well as without the skills to work with it. The easiest way is to weld a rigid, non-adjustable spacer, clearly defining all the dimensions. In addition to welding, other tools will be required for the job:
- an angle grinder (in common parlance - a grinder) with a circle for cutting metal;
- electric drill with a set of drills;
- plumbing tools - hammer, core, round file and pliers;
- metal brush;
- spanners;
- measuring devices - tape measure, ruler, square;
- welding gloves and safety glasses.
Required tool kit
Advice. To make a stretcher of the desired shape, which also looks nice in appearance, you will probably need a machine - a pipe bender. Since not every car enthusiast has one, you will have to contact a specialized workshop or bend the pipe manually. To obtain a beautiful turning radius, the metal must be heated.
At the preparatory stage, it is important to decide where in the engine compartment to place the pipe and whether it can be made straight. The jumper should not interfere with vehicle maintenance or block access to the brake system or clutch reservoirs. At the same time, it is necessary to provide a distance of 3-5 cm from the closed hood so that the lid does not rub against the metal of the cross member and mounting flanges.
Advice. When developing the spacer design, keep in mind that the pipe can be moved back or forward within the diameter of the rack cups. It is not allowed to extend it further by welding a long bracket, because in this case forces will act on the flange, tending to rotate it around its own axis.
What other stretch marks are there?
In addition to non-adjustable and adjustable spacers, there are other types, it all depends on the attachment points of the spacer:
- Two-point - ordinary tubes that are attached to the shock absorber strut cups.
- Three-point – usually this design has the shape of a triangle. Such spacers are attached in the same way as two-point ones, but there is one more point for mounting on the body. Because of this, the rigidity is even higher.
The fact that the 3-point bracing gives a lot of extra rigidity to the body is definitely a plus. However, the large time investment required to install this type of structure is a clear disadvantage.
Making a spacer with your own hands
The first thing to do is to make flanges. To do this, unscrew the nuts securing the stands to the glasses and, placing cardboard on them, mark the future holes with a marker. Then cut them out in paper and put it on the pins. Now all that remains is to outline the outline of the flange according to the shape of the glass and trim off the excess cardboard. Inside the template, make a round opening corresponding to the protruding part of the support.
Ready cardboard template with holes
Important point. Make the outer edge of the template facing the engine not round, but straight, since a rib for attaching the pipe will be welded to it.
Perform further operations in this order:
- Attach the cardboard template to the sheet of metal, outline it with a marker and cut out the steel flange using a grinder. Round all edges and sand to ensure there are no burrs.
- Mark the centers of the holes and drill them according to the diameter of the studs. Use a small drill first and then a large one. Bevel both sides of the holes and try the part in place. If a discrepancy is found, widen each hole slightly with a round file.
- Cut a 4cm wide strip of steel and weld it at a 90° angle to the straight edge of the flange. To prevent the strip from bending back under pressure from the pipe, make triangular stiffening ribs and weld them along the edges.
- Place the flanges on the studs and check for distortions. Press them with two nuts and carefully measure the distance between the strips to cut the pipe as accurately as possible.
- Disconnect the battery and cover the engine compartment with a damp cloth. Attach a pipe cut to size to the flange brackets and securely weld it at both ends. Check the gap between the hood cover and your structure.
- Unscrew the nuts and remove the brace from the car. Boil all the seams thoroughly, remove the slag and try to put it back. If the structure has been welded so badly that the flanges do not fit on the studs, file the holes again.
- Remove the finished spacer again, clean it with a brush from rust, degrease it and paint it in 2 layers, after applying a primer. Place the jumper in place and finally tighten it with nuts.
Advice. If you plan to bend the spacer, do it before cutting the pipe to size.
The coupling for regulation is placed in the pipe gap
If you are a specialist in welding, then you can easily make the stretch adjustable. To do this, buy a ready-made threaded coupling of the required diameter and weld it in the middle of the cross member, having previously cut it into 2 parts. After welding, twist them together, secure the coupling with a locknut, and only then cut the pipe exactly to size between the flanges.
Note. The described method is quite suitable for making a back stretcher, if you want to do it yourself. In this case, think carefully about the design so that the jumper takes up minimal space in the luggage compartment and does not block it in the middle.
Successful design of the stretcher - it stands right behind the seats
How to make a spread with your own hands - photo
A workpiece cut from metal The workpiece must be rounded and cleaned The part is tried on in place Strips and stiffeners are welded to the homemade flange The pipe must be carefully grabbed to the flange Correct design - the pipe goes around the tank with liquid After painting, the spacer is finally attached To distribute the load, a gusset must be welded to the pipe Last fitting spacers before painting First you need to unscrew the fastening nuts
Clear benefits
Car body struts have both their advantages and disadvantages. But perhaps it’s worth starting with something pleasant. The obvious advantages include:
With regard to cars with high mileage and at least a shorter service life (15 years or more), one thing can be said: after the procedure of retracting the side members (and with such a long history it is necessary to do this in any case), it is recommended to install stretch marks. This is due to the previously mentioned reason – metal “fatigue”. Without proper reinforcement, the car body can quickly become unusable.
How to install?
After purchasing the part, you can install it yourself with your own hands.
It is very important that the car is parked on a level surface, otherwise the non-adjustable strut will not go into place, and the adjustable strut will not be installed correctly.
Step 1: Open the hood and unscrew all the nuts on the strut cups
Step 2: Install the spacer. The part should easily snap into place, the holes should align with the studs. If this does not happen, then either the car is not on a level surface, or it is time for it to go for a wheel alignment.
Step 3: If no difficulties arise, install the washers above the spacer and, without overtightening, tighten the nuts. If the stretch is adjustable, now is the time to adjust it.
Ready. We enjoy the result!
Suspension improvement
Car front strut brace . Essentially, a spacer is a transverse beam, the ends of which are attached to the upper support cups (glasses) of telescopic struts and sometimes to the body.
There are two types of spacers:
Point-to-point . Actually, these are ordinary linear beams, the ends of which are attached to glasses.
Three-point. Made in the form of triangles. The difference from two-point ones is that the third corner is attached to the body to increase structural rigidity. From a purely physical point of view, the front strut brace influences stiffness as follows:
- If earlier the energy of suspension vibrations seemed to “fold” the car into a bound book in the center of the hood, then with the presence of an additional upper stiffener rib, all such influences go directly to it.
- at the same time, the service life of the three-point strut coincides with the time that the suspension will be in good condition, taking into account the fact that with additional rigidity on top it can be 100 or 120 thousand kilometers.
Key Features
To summarize, here are some key points to better understand the role of spacers. When driving on a bad road (potholes, potholes, country roads), rolls, turns, strong loads act on the car body, which deform it. This negatively affects the vehicle's handling, which ultimately leads to a reduction in its service life. And there are reasons for this:
- The weaker the rigidity of the body, the more it will “twist” when entering turns or hitting bumps.
- Metal tends to “get tired” over time, which is why cracks appear in the load-bearing elements.
- The constant impacts that fall on the wheels are also transmitted to the side members of the body. Over time, they begin to bend inward, which can lead to the fact that at one point it will become impossible to adjust the camber of the front wheels.
Benefits of purchasing body shop equipment from:
It’s worth buying equipment for car body repairs in, and here’s why:
- All equipment for auto body work presented in the catalog is available in stock, and you do not have to waste time waiting for delivery.
- For all products sold, we provide a full package of documents, including a warranty from the manufacturer.
- If necessary, you can order not only delivery (across the Russian Federation, Belarus and Kazakhstan), but also installation of the purchased equipment.
- Customers of the master-tool company can take advantage of a flexible system of discounts, as well as various payment methods for purchased products. It is also possible to purchase products on credit or in installments.
That's why, if you need body equipment, you should buy it on the best terms, namely in. Tel.
0 0 vote
Article rating
Spacers, braces, engine mounts: engine compartment ponies or practical details?
- Popularity of the front strut
- When is an engine mount needed?
- Purpose of the rear beam stabilizer
Every second car enthusiast is trying to improve the performance of their car. Therefore, when they see the notorious spacers, various extensions, additional spacers and supports in the auto shop, they dream of installing them. However, most do not understand the purpose of these elements. What is this kind of rally technology really for?
Briefly about car suspension
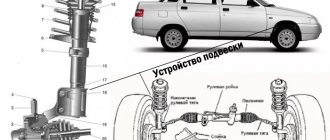
It is the main element of this type of car suspension. The front pillar consists of many different parts, only those that play a key role are listed below:
Shock absorber strut. The main element that provides damping (quick attenuation) of suspension vibrations. Rounded fist . Used to attach the front strut to the wheel hub. Swivel lever. Needed for a movable connection between the shock absorber and the rod. Suspension spring. Absorbs energy resulting from vertical vibrations of the suspension.
In the photo: according to No. 1, the rotating arm of the front suspension is indicated:
Upper and lower support cups . Inside them there is a hinge connection between the pillars and the body. As for the maximum service life of the front drain, it is about 70-80 thousand kilometers, which is, on average, 3.5-4 years. However, the original design of the MacPherson suspension, although superior to competitors in reliability, is far from ideal.
With sufficient wear and tear, the car begins to behave poorly in corners and when changing lanes, controllability is lost, which can ultimately lead to dire consequences. To date, a very effective solution to these problems has been found, which will be discussed below.
When is an engine mount needed?
Any engine braking, sudden starting, hitting various bumps - all this is smoothed out by additional support, limiting the maximum movement of the motor. It can also prevent the gears in the box from switching off automatically.
This can happen when approaching a roundabout, when the throttle begins to be released, while the gear remains engaged. Having assessed the situation, you suddenly decide to press the gas again in the hope that you will have time to overtake the person in front. The engine howls and there is no traction on the wheels due to a gear slipping out. There is no need to talk about the consequences, they will be disastrous. Therefore, installing additional support will be the right decision. In addition, it is easy to install it yourself.
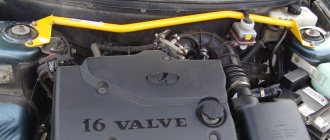
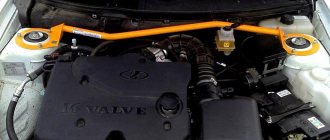
In the case of an eight-valve injection engine, it is worth purchasing a bracket designed to transfer the ignition module. This will have a positive effect on the module, raising it higher and also protecting it from road moisture.
Step-by-step instruction
How to install front strut spacers for DIY assembly:
- The instructions given below are definitely suitable for self-installation of telescopic strut struts on most cars:
- The first thing to do is remove the screws from the top support cups. It is not difficult to determine their location under the hood - they are quite large.
- The stretcher should be well attached to the studs; it should also be attached with screws, which, as a rule, come complete with the beam itself.
- If you have a three-point front strut brace, you will need to find a specific place under the hood that can be set aside for the third mount. Sometimes it’s not so easy to find it, but usually they choose a small free piece of the rear wall of the engine compartment.
Information from the article will help you understand what the suspension lift of a Niva car is and how it is installed, but how the air suspension is controlled and how to install it yourself is described in detail in this article.
You may also be interested in learning about how wheel rims become loose.
But what the wheel rim bolt pattern compatibility table is, you can see in this article.
A little story
At first, such front strut struts were installed only on station wagons and sports cars. Why? The fact is that a sports car, which differs from ordinary transport, was constantly subjected to various loads. But that was a long time ago, now you can install a tuning element on absolutely any vehicle.
The strongest spacers are, of course, made of steel. However, you can buy spacers made of aluminum, but they will not be as strong as those made of steel.
Information for beginners: if you like fast off-road driving, then of course you can install aluminum spacers. Well, if you like to drive through forests and on bad roads, then it is advisable to install a steel spacer.
Let's look at everything in more detail. The front part of the car is essentially considered weak, because there are many different elements there. A large number of parts in one place wear out quickly enough, and this can lead to poor vehicle resistance to external influences. How do we understand this external influence?
For example, if you are driving and suddenly brake, or, for example, turn sharply to the side, then you simply will not be able to control the vehicle normally. After all, the car on the road will simply start to skid. Of course, if you are not driving on the highway, then nothing bad will happen. Well, if there are trees or a pedestrian crossing ahead, or other cars on the road, then the outcome can be disastrous.
It is for this reason that it is necessary to eliminate the deformation of the front part of the body and install spacers.
Important! If you have a new car that doesn't have a spacer, you'll need to spend a little extra money to install one to be on the safe side.
Driving on uneven or dirt roads
In addition to the above advantages, it is worth considering the behavior of the car when driving on uneven roads, as well as when cornering. Let's start with the peculiarities of moving on uneven terrain: in this case, the wheels are constantly subjected to heavy loads.
Here is another argument for those who doubt the question of why the front strut strut is needed: as the speed of the vehicle increases, the impact force will also increase. Because of this, the lower suspension arms suffer, which can lead to their deformation. Thanks to the installed spacer, shocks are absorbed by it. As a result, part of the load is removed from the main suspension elements, which helps protect them from harmful effects.