If you are interested in improving the performance of your Lada, tuning it and improving it, it is useful to know about the strut brace. The Priora strut extension is a monolithic metal pipe-shaped part that adds rigidity to the front end of your “swallow”. The stability of the car increases, the precision of cornering becomes better.
Similar stretch marks were invented for sports cars. But the suspension of domestic cars is far from perfect, as is the quality of the country’s roads. Therefore, the issue of installing spacers on ordinary civilian cars is becoming increasingly relevant. The price tag is not that big. Installation at a service station or self-assembly - the choice is yours. Let's look at how to secure the front strut strut on a Priora with your own hands.
Front top and bottom
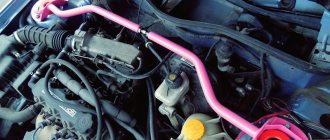
The upper and lower parts are reinforced at the front. The most popular amplifier is the upper extension of the cups of the front shock absorber elements on the Lada Priora. Firstly, they are easy to install, and secondly, they are clearly visible under the hood; their presence, in the opinion of many, gives the car a sporty look. Such designs are indeed widely used in professional motorsport. But a brace alone doesn't make a car a race car.
The part is attached to the front suspension strut cups from above, which creates a rigid connection between the right and left parts of the body. The cost of these parts is 700-1600 rubles. The original Lada Sport spare part is designated by number 21100-8403770-87. Price about 900 rub.
In the manufacturers' catalog there are amplifiers designated as two- or three-point amplifiers, but they are called four- or six-point amplifiers. They differ in the number of mounting holes:
- For two-point ones - 2 on each side, 4 in total.
- Three-pointers have 3 each, for a total of 6.
Expensive models are available with six mounting holes on each side:
- Adjustable - the length can be changed, providing ease of installation on an old car with broken body geometry.
- Non-adjustable - simpler in design, more rigid, but suitable only for machines with the correct distance between glasses.
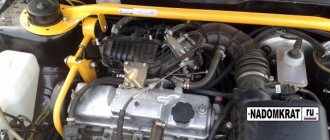
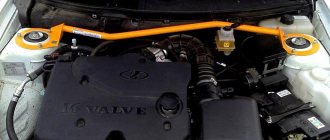
- A special type of strut is a stretching of the front struts for a Priora car, with an additional support attached to the engine (for a Priora with a 16 valve engine). The part allows you to increase the rigidity of the body and the mounting of the power unit. It has a complicated design and a price of 1600–2200 rubles.
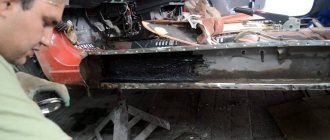
The lower brace strengthens the suspension arms. The price of the lower part is 500–1200 rubles. The number of the lower reinforcing element of Lada Sport is 21100-5301265-87. Costs approximately 750 rubles. Many car enthusiasts note that installing a lower brace creates a more noticeable effect than adding reinforcement to the cups.
see also
Comments 36
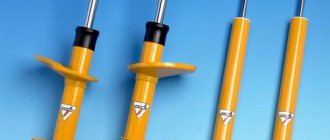
That X-shaped stretch (red in 1 photo) gives less rigidity than in 2 photos. verified. 15% versus 25% (on Prior)
I made my own body amplifier. Works very well. You can look here www.drive2.ru/cars/lada/2…raft-pro/journal/1969918/ Also read the comments in that post, I answer there and explain many points.
As far as I was told, the spacer as in 2 photos is better than 1 for torsion, and personally it seems to me that monolithic joints will behave better than bolted ones
why even bother buying a pipe and electrodes for a lot of time, it definitely won’t work out yet when the store costs 2500 auto product/technician, he didn’t install these for a long time, he says they all got up normally, well, he installed a lot of them
For some people it’s easier to make it yourself than to buy it!) You can’t buy it in our city! Just don’t order through!) And if you order in the city, the price will be very high (
Is it so difficult to order from the net? delivery TC rubles 300 I ordered the exhaust for the entire line 500 rubles delivery especially since if you do it yourself as in option 2, many people simply bend the pipe, it wrinkles and becomes soft at the bend, but as in the photo, if you see it, it was done there on a pipe bender, again personal opinion if you want to suffer... go ahead))
Turning the pipe is sold in the store!) It’s up to everyone to do it themselves or buy it) Personally, I like to do it myself (currently in plans) To suffer? Then it makes sense to buy the Russian auto industry!
Why is it needed on a sedan at all? Are you going to the track?
not on the river It’s just that there’s a pit in our city. and very deep. Sometimes you carefully drive in with your front wheel and scratch the bottom of the hole with your front bumper (stock suspension). So I want to install a rear strut to extend the life of the body. Justified?
Well, the back part will become stronger, the center will curl up more...
Why is it needed on a sedan at all? Are you going to the track?
I have an amplifier from Tehnomaster, in my opinion, which is the top one in the photo, with a cross. The thing is good with front extension and lower control arm extension. But there is one drawback - this is the attachment to the cups, there are two pins with ears that simply do not want to be installed in the cup and the welding on the cups is very weak... the moment is lost a little and the pin breaks off.
I have a drawing of the spacer) I found it somewhere on the drive) I can email it to you!)
yes there is, that's what they told me at the store. I also read it on the website, I need to clarify.
In any case, you will have to adjust everything in place before welding it!
I also plan to do it myself) In principle, I have all the materials) All that remains is to buy the turn of the pipe and go into battle)
In any housing and communal services, a locksmith will bend it for you for 100 rubles. on a pipe bender)))
I have a drawing of the spacer) I found it somewhere on the drive) I can email it to you!)
Ass around the perimeter and only between the glasses
To strengthen the rear of the machine, three types of struts are used:
- Single strut brace attached to the top of the rear shock absorber cups.
- A rectangular “TV” located around the perimeter of the opening between the elements.
- A set forming a cross-shaped structure.
These amplifiers are either unregulated or adjustable. The original rear strut strut is designated by number 21100-5601265-87. Price – 1000–1100 rubles. The lower one, from Priora, costs about the same, similar to other manufacturers.
Its installation makes it impossible to transport large items inside the cabin; when sporting a car, its cargo characteristics do not matter.
The rectangular rear strut brace includes four components:
- 2 horizontal (top, bottom).
- 2 vertical.
The parts are connected to each other at their ends, forming a rectangular structure. The upper horizontal pipe is attached to the top of the rack glasses. Bottom - to the transverse floor panel. On some models of “TVs,” quick-release upper horizontal elements are installed between the rear pillars; this helps maintain a large volume of luggage compartment when the rear seats are folded. Cost – 3700-4500 rubles.
The rear cross-shaped amplifier is present in the Lada Sport range. Article – 21100-5601260-87. Price – from 3000 rubles. Stretches of similar design are produced by many companies.
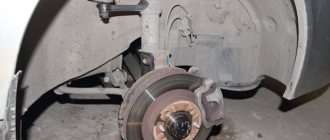
A few words about signs of silent block failure
If you notice:
- Creaking of rubber when driving over uneven surfaces;
- Knocking while driving over uneven surfaces;
- Backlash in connections when checking the chassis;
- Deterioration or cracks in silent blocks;
- Uneven tire wear disrupts wheel alignment.
It is necessary to take immediate action and replace faulty silent blocks.
To work you will need:
- New lower control arm silent blocks - rubber or polyurethane;
- Set of keys, hammer;
- Soap solution;
- Liquid WD-40;
- Lift or inspection hole;
- A device for pressing out and pressing in silent blocks or, in extreme cases, a vice and tubes with washers of the appropriate diameter for pressing in silent blocks. If you don’t have either one or the other, you can make just such a “device” that works 100% and costs a penny. It consists of several washers, a piece of pipe and a long “12” bolt - see photo.
Pros and cons of stretching the front struts
Strengthening the car's body, both front and rear, makes it stiffer. For example, the upper part of the struts reduces the movement of the suspension mounts, reduces stress at the mounting points, and increases rigidity. Thereby:
- The car becomes more composed when cornering.
- The maneuverability of the vehicle increases due to increased control accuracy.
- Improves stability during straight-line movement.
- Body deformation is reduced when driving on uneven roads.
- The likelihood of fatigue cracks in metal elements is reduced.
- The main disadvantage of installing reinforcement is that due to the rigid connection between the right and left parts of the car, elements on both sides are damaged in an accident.
In addition, boosters violate the vehicle's manufacturer-designed crumple zones, which impairs safety in serious accidents. Therefore, using the part for civilian use is inappropriate in most cases.
The purpose of the front, lower, rear, and other reinforcements is to increase body rigidity. This improves the driving characteristics valued in motorsports, but reduces the safety and practicality required for normal use of the car.
Source
practical guide
To ensure proper rolling of the vehicle's wheels, taking into account the operation of the suspension and steering, the front suspension elements must be installed in a certain position.
It is recommended to check and adjust the angles of the front wheels in specialized technical centers that have the appropriate equipment.
The installation angles of the front wheels are indicated in the “Reference Data” section.
The camber angle of the front wheels is the angle of inclination of the plane of rotation of the wheel relative to the vertical. Incorrect camber angles of the front wheels cause the car to pull to the side when driving in a straight line. Too much positive camber (where the top of the wheel sticks out) will cause the outside of the tire tread to wear faster, while too much negative camber will cause the inside of the tire tread to wear faster. The camber angle of the front wheel is adjusted by the upper bolt securing the steering knuckle to the strut. The bolt holds the eccentric head, and it holds a special washer.
Toe of the front wheels is the angle between the plane of rotation of the wheel and the longitudinal plane of symmetry of the car in the position of straight-line movement. Toe is defined as the difference in distances between the rims of the front wheels in millimeters (B - A, Fig). Misalignment of the front wheels impairs the vehicle's handling and directional stability and leads to intense tire wear.
The toe-in of the front wheels is adjusted by changing the length of the steering rods by rotating the threaded inserts.
The longitudinal inclination of the steering axis is the angle between the steering axis of the front wheel and the vertical in a plane parallel to the center line of the vehicle. Violation of the correct angle of inclination of the steering axis of the front wheels causes deterioration in vehicle handling. A large caster angle increases the resistance to rotation of the steering wheel, while a small caster angle impairs the stability of the front wheels in the direction of travel straight ahead.
The inclination of the steering axis of the wheel is adjusted by changing the number of washers installed at the ends of the longitudinal extension of the front suspension.
1. We prepare the car for work.
2. Unscrew the nut of the bolt securing the stabilizer bar to the lower arm of the front suspension and knock the bolt out of the holes in the strut and arm.
Similarly, remove the bolt connecting the stabilizer link to the right suspension arm.
3. Using a 13 mm socket wrench with an extension, unscrew the two nuts securing the bracket of the left stabilizer bar cushion to the body.
Pros and cons of stretching the front struts
Initially, the front strut brace was used on sports cars that were operated under extreme load conditions. It strengthened the body when driving off-road, jumping from springboards, and also increased the sensitivity of the steering wheel. But currently this accessory is actively used among Lada car enthusiasts (XRAY, Vesta, Largus, Granta, Priora, Kalina and even Niva 4x4). How the “glasses” shift while moving is shown in the video:
Advantages:
- steering sensitivity increases when maneuvering (by increasing the angular rigidity of the body);
- the vehicle's stability increases when moving in a straight line;
- body deformation is reduced when cornering and on uneven roads (reduces the likelihood of cracks appearing on the body), and the stress at the attachment points of the front suspension supports is also reduced.
- In the event of a side impact, the opposite pillar may also be damaged.
Why are they needed?
UAZ on tracks
When traveling on straight and level terrain, instability is difficult to notice. But if you drive onto a bumpy path or try to take a turn, you will instantly feel that something is wrong with the car. It may happen that you leave the road when turning at high speed.
If you install struts in your car, both front and rear, the rigidity of the body will increase, which will make the car more “assembled,” that is, it will be easier to drive. There are two types of spacers: adjustable and non-adjustable. The first type is considered universal, they are not tied to certain parameters of the car, but they are quite weighty and not as rigid as non-adjustable ones, which, in turn, are made for a specific car model.
Experts recommend installing spacers on cars that have been around for quite a long time, since their body is initially less rigid than that of modern cars.
Which front strut brace is better to choose?
It is recommended to choose body reinforcements that meet the technical specifications and have passed the test cycle. Try to buy such accessories from trusted manufacturers (for example, TechnoMaster or AvtoProdukt).
Types of front strut struts:
- without adjustment (check before purchasing that the spacer fits the mounting points);
- with adjustment (easier installation, since it is possible to adjust the mounting points);
- with a hood stop (when it is possible to additionally install a gas hood stop);
- with an additional engine mount (an additional engine mount to reduce shocks/vibrations/jerking when starting to move/braking or when you sharply press/release the gas pedal, as when installing the rear gearbox mount on a Priora).
Installation of the spacer is shown in the video:
Preparing for self-production
To make a jumper for the front pillars yourself, you need to prepare the following materials:
- sheet steel with a thickness of at least 3 mm;
- pipe with a diameter of 32-40 mm with a wall thickness of 3 mm or more;
- thin cardboard and marker for making a template;
- primer for metal and paint in an aerosol can.
A thick-walled pipe is what you need to make a guy wire
Regardless of which cross member design you choose - rigid or with hinges, you will not be able to do without a welding inverter, as well as without the skills to work with it. The easiest way is to weld a rigid, non-adjustable spacer, clearly defining all the dimensions. In addition to welding, other tools will be required for the job:
- an angle grinder (in common parlance - a grinder) with a circle for cutting metal;
- electric drill with a set of drills;
- plumbing tools - hammer, core, round file and pliers;
- metal brush;
- spanners;
- measuring devices - tape measure, ruler, square;
- welding gloves and safety glasses.
Required tool kit
Advice. To make a stretcher of the desired shape, which also looks nice in appearance, you will probably need a machine - a pipe bender. Since not every car enthusiast has one, you will have to contact a specialized workshop or bend the pipe manually. To obtain a beautiful turning radius, the metal must be heated.
At the preparatory stage, it is important to decide where in the engine compartment to place the pipe and whether it can be made straight. The jumper should not interfere with vehicle maintenance or block access to the brake system or clutch reservoirs
At the same time, it is necessary to provide a distance of 3-5 cm from the closed hood so that the lid does not rub against the metal of the cross member and mounting flanges.
Advice. When developing the spacer design, keep in mind that the pipe can be moved back or forward within the diameter of the rack cups. It is not allowed to extend it further by welding a long bracket, because in this case forces will act on the flange, tending to rotate it around its own axis.
Feedback after installing the strut stretcher
Analyzing the reviews of car enthusiasts, we can conclude that the majority (about 85%) consider the front strut brace to be a useful accessory and recommend its installation, even during normal, everyday driving.
One of the video reviews that most viewers agreed with:
How do you feel about this type of car tuning? Is it worth installing a front-end amplifier or is it all at the level of self-hypnosis? Participate in the survey and leave your feedback on this improvement.
Let us remind you that a more controversial issue arises after installing the reinforcement for the rear part of the body (trunk). By the way, have you heard about the bumper booster?
Share on social networks:
Found an error? Select it and press Ctrl+Enter..
Making a spacer with your own hands
The first thing to do is to make flanges. To do this, unscrew the nuts securing the stands to the glasses and, placing cardboard on them, mark the future holes with a marker. Then cut them out in paper and put it on the pins. Now all that remains is to outline the outline of the flange according to the shape of the glass and trim off the excess cardboard. Inside the template, make a round opening corresponding to the protruding part of the support.
Ready cardboard template with holes
Important point. Make the outer edge of the template facing the engine not round, but straight, since a rib for attaching the pipe will be welded to it.
Perform further operations in this order:
Attach the cardboard template to the sheet of metal, outline it with a marker and cut out the steel flange using a grinder. Round all edges and sand to ensure there are no burrs. Mark the centers of the holes and drill them according to the diameter of the studs. Use a small drill first and then a large one. Bevel both sides of the holes and try the part in place. If a discrepancy is found, widen each hole slightly with a round file. Cut a 4cm wide strip of steel and weld it at a 90° angle to the straight edge of the flange. To prevent the strip from bending back under pressure from the pipe, make triangular stiffening ribs and weld them along the edges. Place the flanges on the studs and check for distortions. Press them with two nuts and carefully measure the distance between the strips to cut the pipe as accurately as possible. Disconnect the battery and cover the engine compartment with a damp cloth. Attach a pipe cut to size to the flange brackets and securely weld it at both ends. Check the gap between the hood cover and your structure. Unscrew the nuts and remove the brace from the car. Boil all the seams thoroughly, remove the slag and try to put it back. If the structure has been welded so badly that the flanges do not fit on the studs, file the holes again. Remove the finished spacer again, clean it with a brush to remove rust, degrease it and paint it in 2 layers, after applying a primer. Place the jumper in place and finally tighten it with nuts.
Advice. If you plan to bend the spacer, do it before cutting the pipe to size.
The coupling for regulation is placed in the pipe gap
If you are a specialist in welding, then you can easily make the stretch adjustable. To do this, buy a ready-made threaded coupling of the required diameter and weld it in the middle of the cross member, having previously cut it into 2 parts. After welding, twist them together, secure the coupling with a locknut, and only then cut the pipe exactly to size between the flanges.
Note. The described method is quite suitable for making a back stretcher, if you want to do it yourself. In this case, think carefully about the design so that the jumper takes up minimal space in the luggage compartment and does not block it in the middle.
Successful design of the stretcher - it stands right behind the seats
Video about making a front brace
Judging by the practical experience of many drivers, installing the front strut struts is not a necessary step, but in many cases it is useful. Installation of the finished product is easy, so there is no need to go to a car service center. Since the design of the element is not complicated, skilled motorists can save money and do the stretching themselves, provided that the garage has the necessary tools.
We attach the front strut braces to the Priora
Lada Priora is a domestic car, the production of which started in 2007. It begins its history with the sedan model. Quite quickly, this model aroused the trust of buyers and gained great popularity. The Priora car, in addition to the sedan model, also has a hatchback and a station wagon.
Owners of any car want to improve its performance by constantly supplementing, equipping and tuning their “iron horse”. Likewise, Priora owners try to improve their car with each repair, adding more and more necessary car parts to it.
Pressing in the silent block
To press in the new silent block, we need the old wheel bearing, namely its inner race. It consists of two separate parts that have a large chamfer, with the help of which we will tuck the side of the silent block into the lever. This is what one inner half of the wheel bearing looks like.
Using a bolt with a nut, washers and the internal parts of the wheel bearing, we assemble such a sandwich.
We generously lubricate everything with silicone grease, coat the threads of the bolt and washer with lithol or something similar and begin tightening the nut (pressing in the silent block). We tighten it until the silent block is completely installed in its place, disassemble everything, and rejoice. If everything is done correctly, then replacement does not take much time and effort.
0 0 vote
Article rating
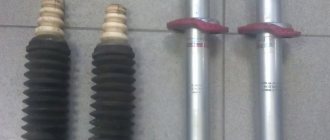
Purpose and replacement of front struts
Quite often you can meet motorists who are interested in stretching the front struts on a Lada Priora car. Today, in automobile markets and in auto stores, it is possible to purchase a wide variety of extensions, so-called spacers, for domestic cars.
Most tuning enthusiasts prefer to improve the car with their own hands, but it is worth recalling that currently there are many car services, car dealerships and car repair shops. Therefore, if a car owner values his time, but wants to improve his car, this will not be difficult. Specialists will carry out both high-quality repairs and adjustments.
But what should those who undertake to replace the front strut themselves do? How to change front struts? What are they needed for? Which ones are better? Stretching the front struts of a car is designed to prevent movement of the struts on the front suspension. Due to it, the vehicle's handling is improved, the service life of the body is extended, and the car safety of the Priora is increased. There are two types of struts on Priora:
Which ones are better, what is the difference? The difference between them is that the three-point one is attached to three bolts on each side, respectively, the two-point one is attached to two bolts. Without a doubt, the fact remains that the three-point stretch has advantages over the two-point stretch. When choosing a spacer, there are many factors to consider.
For example, if your car has air conditioning and ABS, or has an electronic gas pedal, then certain models may not be suitable for you. Before buying a strut, it is very important to study all the intricacies of the car and the strut, because now they will have to complement each other.
Guys are made from aluminum or steel. Most automotive experts believe that it is better to choose aluminum, since in the event of a possible road accident, such a spacer will simply break and will not damage the struts.
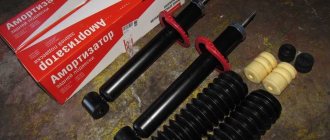
Step-by-step installation of a stretcher.
- Replacing the front braces begins with unscrewing the screws from the shock absorber struts. Next you need to remove the washers.
- If a motion sensor is installed on any rack in the car, you need to remove it, remembering the location.
- Next, you need to fix the bracket with the sensor under the spacer plate itself so that after installation it is in its usual position.
- After this, a stretcher is installed on the supports. Fits on stiletto heels. It is necessary to begin all actions on the right, then move to the left side.
- Tighten the screws on the rack supports.
Return to contents
Installing rear independent suspension on a car
When operating a vehicle on which a standard rear suspension is installed, the vehicle beam shifts towards the arch when cornering by approximately 1 cm. If the vehicle is equipped with a rear independent suspension, then such a beam displacement is not observed under similar operating conditions. The rear independent suspension is attached rigidly to the body, without using silent blocks in mounting the rear suspension on the Priora, which avoids lateral displacement of the beam.
Silent blocks, which are part of the design of the rear and front suspensions, perform the function of damping all torques and bending moments that may occur during movement, thereby ensuring a stable position of the vehicle on uneven road surfaces and when turning.
Silent blocks are mounted on a car as an element of the chassis and suspension, since this structural element is one of the most reliable and economical ways to prevent the influence of various types of deformations and loads that can occur during the operation of the car on the car body. Installation and replacement of silent blocks on Priora is provided for in some vehicle suspension components:
Pros and cons of installing a front brace
- the car stays on the road more confidently, takes turns better due to an increase in the level of rigidity of the vehicle;
- more accurate and clear trajectories when turning;
- lower likelihood of age-related cracks on the car body;
- no deformation of the car body when used on uneven roads;
- increased vehicle stability when moving forward.
- If there is a possible impact or the stretcher stops on one wheel, the second one also receives a blow. But modern models have special notches so that when an impact occurs, the part itself bends without transferring the impact to the other wheel.
- When using a two-point strut, deformation of the front struts is possible due to uneven distribution of the load on them. As a result, replacement becomes necessary. The driver understands that it is time to replace the front struts when he begins to hear dull clicks from under the wheel arches. This knocking noise is especially pronounced when driving over small bumps.
Return to contents
Selecting New Items
Polyurethane To replace and ensure reliable operation of the car, you need to purchase good silent blocks. Choosing them is not difficult if you know some nuances:
- For the VAZ 2110 model, elements with catalog number 2110 2914054 are suitable. They have the required outer diameter corresponding to this specific VAZ model;
- Do not try to purchase a silent block from a “nine” and install it on your “ten”. Nothing will come of such events, no matter what anyone says;
- Make sure of the quality of the products. Low-grade silent blocks have flooded the market, but their service life leaves much to be desired. Good parts are made from high quality materials that can withstand extreme loads and temperatures.