The main function assigned to the VAZ 2110 knock sensor is to dampen detonation in the engine by adjusting the ignition timing. Among the factors that ensure reliable stable operation of the engine, the ignition overtaking (advance) angle is not the least important.
If it is too early, the power decreases, detonation appears, as well as malfunctions, including burnout of the valves. When it is “lagging,” the engine heats up excessively, the car loses throttle response, and fuel consumption also increases.
So a small device actually plays a very important role. It notifies the engine management system that detonation has begun, and it makes appropriate adjustments.
Types of sensors
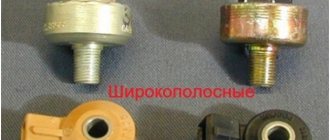
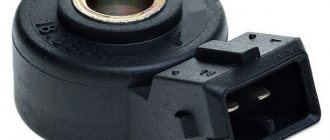
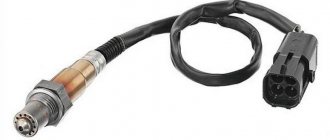
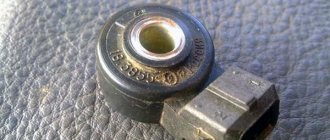
The VAZ 2110 is equipped with two types of knock sensors: broadband or resonant. Wideband constantly captures the entire spectrum of noise and also signals about it. After this, the signal is processed and engine operation is adjusted accordingly.
Wideband knock sensor
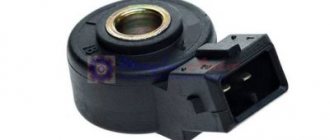
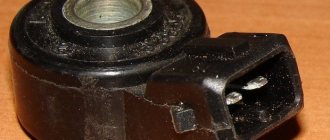
Resonant ones do the same thing, but their difference is that they give a signal only when the detonation changes. But in fairness, it should be noted that both of these types of devices are very reliable in operation; their malfunctions are the exception rather than the rule, and therefore replacement is not often required.
Resonant knock sensor
The main reason should be sought in the fact that somewhere there is a break in the electrical circuit, after eliminating which the sensor will again give correct readings.
Self-replacement of sensor 21120385501001 on a VAZ 2110
Replacement of the resonance sensor is carried out according to the instructions below
- Install a new sensor, tightening to a torque of 20 Nm.
- Connect the connector.
How to check functionality?
If error code 34 appears on the display, this indicates a sensor malfunction. It is possible to check whether it is still operational or whether it needs immediate replacement. Having completely reset the self-diagnosis results, you need to drive a couple of kilometers and turn on the self-diagnosis system again.
If a new check shows an error again, then replacement is still necessary. If the error is not displayed, then you can still operate the old device. But since code 34 was still displayed earlier, it’s worth checking the connection for a break, that is, carefully inspect the wires, contacts, tighten them, clean them, and you’ll see that replacement won’t be needed.
Errors on the instrument panel display
Considering that the VAZ 2110 can drive for some time without a knock sensor, you can carry out a more thorough check of it, but for this you will have to remove the device.
Functionality check
An error code 34 may appear on the display located on the dashboard of the VAZ 2110. It indicates that the knock sensor is faulty and some measures should be taken.
- But don't rush to buy a new device. It is quite possible that the old sensor is working, and the problem lies somewhere else.
- Reset the vehicle's self-diagnosis indicators, drive a few kilometers, and then run the self-diagnosis procedure again.
- If the error appears on the display again, you will have to change the meter. In a situation where the error has stopped appearing,
- You can use the car for now. Nothing bad happened.
- The periodic appearance of error 34 tells you that there may be a break in the connection. Examine the condition of the contacts and wires, strip them, tighten them better. This often solves the problem.
Dismantling
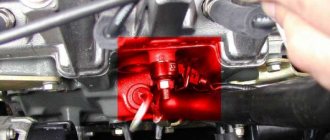
First you need to find the sensor. It is located on the left side of the engine, where the line is half of the cylinder block. Next to it is the air filter.
To determine the malfunction or its absence, it is necessary to remove it in the following sequence:
- Disconnect the car from power by removing the negative terminal from the battery;
- Disconnect the block with wires from the contacts of the knock sensor. To do this, press the latch;
- Unscrew the nut securing the device and remove it from the mounting stud.
Please note that during further installation or replacement you will need a torque wrench (tightening force should be 20 Nm).
Replacing the device
It should be clear that the connection of a new detonation device VAZ 2110 8 valves or 2112 16 valves is carried out after dismantling the old one. This process will not take much time. The only thing to keep in mind is that you will need a torque wrench.
Installation sequence:
- Turn off the ignition if necessary.
- Remove the wiring block.
- Unscrew and remove the old device. It is unscrewed with different keys depending on the type of device itself. For broadband you will need the thirteenth key, and for resonant - the twenty-second.
- Install a new device.
- Start tightening the nut from 10 to 23 Nm.
If you did everything correctly, your engine will operate stably, and the ECU will receive signals in a timely manner.
Remember that only when you have checked the device with a multimeter and you can completely verify that it is faulty can you replace it. This will allow you to save not only money, but also the time that you will have to spend on replacing and installing a new device.
Measurements
Now you can check with a multimeter set to the minimum value. If the sensor is single-contact, then the negative wire of the multimeter (it is usually black) is connected to the place where the mounting bolt is installed, and the positive wire (usually red) is connected to the signal contact in the connector.
Checking the two-contact sensor is carried out by connecting the multimeter wire to the corresponding contact “-” to “-”, “+” to “+”. Further actions are identical. To activate the sensor, you need to tap it with something not very hard (for example, a screwdriver).
If there are no faults, voltage surges will be observed. Approximately 40 to 200 mV. In addition, it would not hurt to check the internal resistance, which should tend to zero. If you find that the sensor is fine, then look for an open circuit. In this case, the best advice is to replace the entire block with wires.
If the resistance is different, or there are no voltage surges, it means that there is something wrong with the sensor itself and it needs to be replaced. The new one is installed in the reverse order of removal.
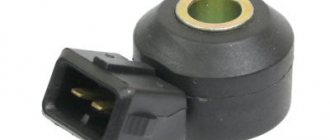
Two types of sensors can be installed on VAZ 2111 engines: single-contact and two-contact.
To remove the two-pin sensor, disconnect the electrical connector with the ignition of the VAZ 2112 off (for clarity, we perform the operation on a dismantled engine).
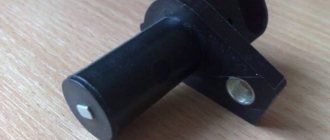
Using a 13mm wrench, unscrew the sensor mounting nut...
...and remove the washer and sensor from the stud.
To remove the single-contact knock sensor of the VAZ 2112, disconnect the electrical connector.
Use a 22 key to unscrew the sensor...
...and remove it.
To check the sensor, we connect a tester to its contact and body.
By lightly tapping the threaded part of the sensor with a soft metal mandrel, we measure the voltage pulse. Depending on the intensity of the shock, the voltage pulse of a working sensor varies within 40–200 mV.
Install the sensor in reverse order.
Tightening torque 20–25 N•m.
Knock sensor
A single-contact knock sensor is screwed into the upper part of the VAZ 2110 cylinder block, a two-contact sensor is mounted on a stud.
The operation of the sensor is based on the piezoelectric effect: when a piezoelectric plate is compressed, a potential difference occurs at its ends. When detonation occurs, voltage pulses are generated in the sensor, by which the controller regulates the ignition timing of the VAZ 2110.
At a minimum, it is not advisable to overpay for excessive fuel consumption. But this is exactly what happens if the knock sensor (DS) on your VAZ 2112 car fails. Even broken spark plugs or low quality gasoline are not such a big problem if you can prevent the moment of fuel detonation inside the internal combustion engine thanks to smart electronic control of the ignition timing of the mixture in the engine.
A serviceable engine guarantees stable power for your iron horse and long engine life, protecting it from overheating and adverse operating conditions. Therefore, we should never forget about the “Check Engine” control indication, which hints to us about problems with the knock sensor on VAZ 2110-2112 cars.
You can change the DD on a VAZ 2110 in about twenty minutes without any problems. The skills to diagnose a fault are also not particularly difficult. So is it worth spending precious money and time on a trip to a service station for something that you can do just as well yourself in the same time frame and with the same effect?
Replacing a faulty device
Device diagnostics
To be sure that the 2110/2112 knock sensor is faulty, it is worth checking it. This is done with a multimeter.
After all, you should understand that not in all cases the knock sensor will need to be replaced. In some cases, cleaning it will help. Sometimes other faults are detected that do not relate to the device itself. For example, an open circuit (network break). But in this case, the working connection diagram is subject to diagnosis.
If you don’t know how to check the device, then just follow the steps presented:
- Turn on the multimeter.
- Connect the wires to the two contacts of the broadband sensor. But there is a small note here: if we are talking about the resonant type, then the negative wire must be closed on the body, but the positive wire is in the center of the sensor.
- Take a screwdriver or any other metal object and start making small impacts on the sensor. But we’ll look at what this affects a little lower.
The thing is that, based on the force of the blows applied, the values on the measuring device will gradually change. They should fluctuate between 40–200 mV. This is the norm, which corresponds to the fact that the device is in good condition. But any serious damage to it will be reflected on the multimeter screen as a zero value.
Note that checking the knock sensor does not end there. Now you will need to identify the cause of the problem. Moreover, you need to look for it in the wires. In some cases, you may only need to replace the pad. The thing is that it is the one that is most exposed to the environment, which leads to corrosion on the contacts.
If you are interested in the question of how to diagnose an 8-valve injector, then you should note that in this case the process is more labor-intensive. The thing is that sometimes you need to spend extra time to remove it.
You will need:
- Dismantle the device.
- Set the multimeter to measure the applied voltage at about 200 mV.
- Place one probe on the connector of the device, and the second on the opposite connector.
- Start tapping with a screwdriver, as you did in the previous case. But focus your attention on the force of the blow, since the stronger it is, the higher the signal level should be.
- Finally, check the resistance of the piezoelectric element.
In general, the VAZ 2110 8-valve injector sensor breaks down extremely rarely. The most common reason for the absence of a signal on the ECU is a break in the connection circuit.
If this device is seriously damaged, you should consider purchasing a new one. But you definitely need to familiarize yourself with how to replace the knock sensor, because installing it incorrectly can lead to the problem not being resolved.
Purpose of the VAZ 2110-2112 knock sensor and its operating principle
In modern “tens” with an injector, a VAZ 2110 knock sensor is needed to control the electronic logic of the setting moment for igniting the fuel mixture with spark plugs. Late ignition causes large excess fuel consumption, reduced power and overheating of the internal combustion engine. Too early causes valve burnout, micro-explosions (detonation) and a drop in power.
Thus, if you have a corresponding indicator on in your cabin, indicating that the VAZ 2110 knock sensor is faulty (Check Engine), you should immediately take care of its repair. In this case, the electronics switches the engine control system to a safe mode, which is not optimal in terms of internal combustion engine power and fuel consumption.
The operating principle of any DD on the VAZ 2112, 2111 and 2110 is based on the piezoelectric effect, when the level of generated voltage directly depends on the degree of physical impact on the piezoelectric element. The greater the shake, force, pressure or pressing, the greater the voltage pulse generated.
On VAZ 2110-2112 cars, two possible types of knock sensor can be installed:
- broadband;
- resonant type.
In the first case, the ADC converter of the control controller perceives the entire range of analog current signals generated by the sensor. In the case of using the phenomenon of resonance, the measuring unit perceives only vibrations of a certain frequency, characteristic of the moment of detonation inside the internal combustion engine.
Wideband and resonant VAZ knock sensors are not interchangeable, since they differ in signal levels. Therefore, if the question arises about which sensor to use specifically in your case, always start from what exactly was installed under your hood all this time.
Signs of malfunction of the DMVR
Mass air flow sensor design
Signs of a malfunctioning mass air flow sensor can be direct or indirect. Let's consider all possible options:
- Check Engine light on the dashboard. In most cases, the CHECK indicator lights up due to the failure of one of the sensors, so you need to connect to the ECU to accurately determine the fault.
- A drop in power is only an indirect sign, since there may be another reason for this malfunction.
- Increased fuel consumption. Of course, everything can be attributed to the fuel pump, but the fuel pressure sensor must also be checked. About standard fuel consumption indicators here.
- Reduced acceleration dynamics. An incorrect amount of air mixture that enters the combustion chambers produces a poor ignition mixture, which in turn does not allow the car to accelerate normally and leads to jerking when the gas pedal is sharply pressed.
- Poor start-up or inability to start. A rich or lean fuel mixture cannot detonate normally, which will lead to just such problems. It is also possible that fuel will not burn through and there will be popping noises in the muffler.
- Floating idle speed. Different amounts of air entering the fuel mixture will have an effect when the speed will either decrease or increase.
To accurately determine the malfunction of the DMVR sensor, it is necessary to diagnose it.
How to check the MAF sensor?
The mass air flow sensor is checked using a multimeter
The mass air flow sensor is quite easy to check. For diagnostics you will need a multimeter.
- We disconnect the chips from the sensor power supply and insert the probes of the measuring device.
We connect the probes of the measuring device: red to yellow, and black to green (to sensor ground).
Voltage readings of a working and faulty sensor
- 1.01-1.02 - readings of the new sensor, everything is normal.
- 1.02-1.03 - there is wear, but the parameters are within normal limits.
- 1.03-1.04 - the parameters are working, but there is already wear.
- 1.04-1.05 - critical parameters, get ready for replacement, if you have the money, then we change it. Fuel consumption may be reduced.
- 1.05 and higher - the mass air flow sensor is not working.
Measurement using paper clips - there may be an error on the device. According to the readings, it is clear that the sensor “ordered to live long”
The second way to check the performance of the mass air flow sensor is to disconnect the power from it and drive a few kilometers. If engine performance has improved, then the problem is in the mass air flow sensor.
Knock sensor VAZ 2110, main symptoms of malfunction
Before replacing the DD with a new one, it is recommended to check the electrical circuit of its connection. Also, very often, sensor failure is associated with oxidation of its contacts, in which case they should be cleaned. In general, the element is characterized by extremely high reliability and durability.
Problems with the sensor can be determined by conducting both computer diagnostics and drawing a conclusion based on the characteristic “symptoms” that appear when driving, namely:
- the car noticeably lost power;
- The “Check Engine” indicator lights up periodically: during acceleration, starting to move, or going uphill;
- the engine troits (runs with uncharacteristic sounds).
After reading the electronic fault codes of the internal combustion engine injector, you can draw the following conclusions regarding the state of your VAZ 2112 knock sensor:
- code 0325 hints at network problems. For example, a break in the wiring or acidification of the plug contacts. In this case, we call the electrical circuit connecting the sensor, clean the electrical contacts;
- if the above steps did not help, all that remains is to check the timing belt; its slippage may also be the cause of the problem;
- codes No. 0326, 0327, respectively, tell us about a poor signal level from the knock sensor of the VAZ 2112. Again we clean the contacts, check the tightening torque of the nut (from 10 to 24 N*m) or replace it with a new one;
- code 0328 indicates that the control signal from the knock sensor is too high. It is possible that the element is breaking, the wiring is faulty, or it is also necessary to check the engagement of the timing belt.
In this way, you can diagnose a malfunction on almost any VAZ 2110-2112 car of the injector type, except for the earliest models produced since 2002.
Common faults
Before changing the device on the 8-valve motor, you need to take time to diagnose it; to do this, first check the power wiring. As practice shows, the phase sensor error is often caused by oxidation of the contacts; if this is the case, then they only need to be cleaned. Typically, this regulator is very reliable; signs of malfunction in its operation rarely appear.
But if the controller on a motor with 8 or 16 valves breaks down, you can either check it with a computer or analyze the signs of a malfunction:
- drop in power of an 8- or 16-valve engine;
- From time to time, the Ckeck Engine indicator may appear on the dashboard, especially when increasing power, at the very beginning of driving, or when driving uphill;
- signs of malfunction also include engine tripping - when driving at low speeds, the engine begins to shake;
- car self-diagnosis will also show errors 0325, 0326, 0327, 0328, which indicate problems in the electrical circuit of the device.
How to check a newly purchased VAZ 2112 knock sensor or the condition of an old one
Despite the low cost of the product (approximately 100-200 rubles), there are often cases of purchase when you receive a low-quality VAZ 2112 knock sensor or just a dummy disguised as one. Therefore, it will be useful to understand exactly how to check and diagnose a sensor removed from a car or purchase a new one.
To check, you will need an electrical multimeter set to a measurement range of 200 mV DC voltage. Connect the probes of the device to the connectors of the broadband sensor to measure electrical quantities (in the case of a resonant one, one probe measures relative to the body).
Tap the sensor body with a screwdriver. The absolute voltage values recorded by the device will directly depend on the degree of physical impact on it: the stronger the impact, the higher the voltage pulse. If the dependence can be traced, then the DD is working.
Now we switch our multimeter to measuring resistance. The measured ohmic load in a working sensor should be in the range from 1 to 10 MOhm. Naturally, a faulty DD or its dummy will show infinite resistance, and a broken one will show very small resistance, on the order of a few tenths of an ohm.
Testing with a Multimeter
A highly sensitive voltmeter is taken in the mode up to 200 MV; in the new sample, both connectors are connected to the meter. In the old model, the first contact is attached to the probe of the device, the other is connected to the body. A massive object, a key or pliers is tapped without force on the body, changing the power, the voltmeter needle should react sensitively and deviate in proportion to the force of the impact. If this does not happen, the device has worn out and needs to be replaced. Move the multimeter controller to the resistance scale. The load in a working sensor will be from 1 to 10 MOhm. A broken controller will show an infinite value, and a broken one will show too small, less than 1, about a few tenths of an ohm.
Another diagnostic method is recommended to check for the presence of voltage on the DD. The multimeter is switched to the millivolt scale, the “+” probe is connected to the connector that supplies the signal, the negative probe is thrown to the ground of the sensor (the hole from the motor mounting bolt). DD, hold in your hand and tap on some hard metal surface, numbers from 30 to 40 mV should appear on the scale. If the display is empty (potential difference), this indicates a sensor malfunction.
Methods for self-diagnosis of DD in old and new samples are almost the same. The method of checking an existing sensor is also suitable when checking a new instance. It is better to do this directly at the time of purchase.
If, after replacing the sensor, the ECU still detects that it is faulty, then detonation occurs for indirect reasons: it depends on the quality of gasoline, there are problems with compression, the spark plugs are either burnt out or flooded.
Replacing the knock sensor VAZ 2110-2112
If your car unexpectedly reported problems with the VAZ 2112 knock sensor, and preliminary diagnostics indicated the failure of the element directly controlling detonation, you can begin the process of replacing it. Buy a new element for 100-200 rubles, having first checked its performance with a multimeter, and get ready for replacement. This process will take no more than 10-20 minutes of your personal time.
- 1. The first thing you should do is understand where the VAZ 2112 knock sensor is mounted on the internal combustion engine under the hood of your car. You can find it between the second and third cylinders; there is also an oil dipstick nearby;
Replacing a faulty element
- 2. Turn off the ignition and discard the electrical contact connector for connecting the VAZ knock sensor;
Replacing a faulty element
- 3. Taking a 12 or 13 mm wrench in your hands (depending on the type of sensor), unscrew the fastening nut. Now the DD can be safely removed from the hood.
Pay attention to the markings on your knock sensor. Despite the external similarity, their different models may differ slightly in the level of generated signals. Also do not forget that the wideband sensor is only replaced with a similar one. The same applies to similar resonant-type devices.
- Operating principle of the device
- Signs of a broken knock sensor
- Checking at home
- Replacing the device
- Conclusion
Maintenance of the knock sensor on VAZ cars from diagnostics to replacement.
The knock sensor is one of the most important components in the electronic engine management system, the correct functioning of which allows you to achieve fuel efficiency and fully realize the full power potential of the engine. What the VAZ 2110 knock sensor is, the principle of its operation, diagnostics and replacement will be discussed within the framework of this material.
Main purpose of the device
A very unpleasant phenomenon is natural explosions in a car engine, which can be caused by uncontrolled and completely spontaneous combustion of diesel fuel. This process takes place in the fuel chamber. But the knock sensor installed in the engine system of a VAZ 2112 or 2110 vehicle controls this process.
Moreover, this device establishes this fact at the initial stage of the process, transmitting the relevant information to the main unit. But the ECU automatically corrects the ignition timing process in order to prevent undesirable consequences. This is how the knock sensor works in the old-style VAZ 2110 car and the newer model installed in the VAZ 2112.
Operating principle of the device
On cars of the VAZ family, both those equipped with a carburetor and those with an injector installed, two variations of knock sensors can be used. The first of them is broadband (tablet), the second is resonant (barrel), which are not interchangeable with each other.
The degree of detonation, which underlies the operation of such devices, is that part of the combustible mixture that burns during the detonation process, and the following factors can be the reasons for its occurrence:
- Fuel octane number;
- Design features of the engine structure (arrangement of the combustion chamber, compression indicators and location of spark plugs);
- Conditions of use (engine load, composition of the air-combustible mixture used, carbon deposits formed on the walls of the combustion chamber, etc.).
The VAZ 2114 knock sensor itself is mounted directly on the cylinder block, and its operating principle is based on the piezoelectric effect. The vibration that occurs during the detonation process causes compression of the piezoelectric element plate and, as a result, the formation of a potential difference at its ends. Based on the impulses emitted by the sensor, the engine control unit selects the most optimal ignition timing, which allows for the most complete and efficient combustion of the entire combustible mixture entering the cylinders, and in addition ensures painless adaptation of the system to fuel with different octane numbers.
Where is the knock sensor located?
The sensor element is located on the engine block between the 2nd and 3rd cylinders, since this is the hottest place on the engine, and the optimal distance in relation to both cylinders. The selection of the location of the sensor is not accidental, since detonation begins to develop precisely in the hottest combustion chamber, in contrast to the remaining cylinders, where the temperature has just reached the permissible value.
The location where the sensor is fixed must have a flat, level surface to prevent sound distortion or acoustic impedance. The body of the device is always fixed with a threaded rod, which guarantees a high-quality fit to the desired location.
Checking at home
To check the serviceability of this device, you will need a voltmeter or multimeter, a socket wrench set to “22” or “13” (based on the variation of the installed sensor) and a screwdriver, and the test itself is carried out as follows:
- Remove the device from the engine block;
- We turn on the prepared measuring device, setting its limit to 200 MV;
- We connect the electrodes to the outputs of the knock sensor and knock on the body of the unit with a screwdriver;
- If the device screen displays changes, the indicators of which depend on the strength and frequency of impacts, then everything is fine with the sensor. If he does not react in any way to what is happening, it is time to replace him.
Checking DD yourself
The knock sensor is located between cylinders 2 and 3 on the radiator side directly on the engine block. Checking the knock sensor is a simple matter, especially if you have ever looked under the hood of the fourteenth.
Replacing the knock sensor VAZ 2114
- The key end is 13 for a single-pin DD (resonant) and 22 for a two-pin DD (broadband)
- Simple screwdriver
- Multimeter
How to check the knock sensor
The first thing to do is remove the DD. It’s easier to remove the single-pin one: don’t touch the ignition, turn it off and unscrew the sensor from the engine. The two-pin one is more complicated: we also don’t touch the ignition, but we also need to remove the negative from the battery. Then, remove the wires of the block, unscrew the DD fastening and remove it.
Second, we switched the multimeter to a voltmeter and set the limit to 200 MV. We connected it to the DD and carefully hit it with some piece of iron (the same screwdriver). When impacted, the voltage should jump; if there is no jump, the sensor is dead, go to the store for shopping.
When a two-pin DD is connected, its terminals cling to the multimeter, when a single-contact DD is connected, one contact and its body are clinging.
Third, we look at the wiring, as already mentioned, most often it’s a matter of frost, or broken contacts.
A simple plan on how to check the knock sensor in your garage with properly trained hands.
Opinions agree that a non-working DD should not be replaced with an analogue from the factory. You will buy a pig in a poke with a 1 in 10 chance that you will get a working one. For the fourteenth, DD from 406 engines for the Volga or universal imported Bosch are perfect.
Replacing the device
If malfunctions in the operation of the device are detected, you should, without wasting time, take care of replacing it. This procedure is not particularly difficult, but its essence is as follows:
- First of all, we make sure that the engine has cooled down and touching it will not cause a burn;
- Remove the negative terminal from the battery;
- We disconnect the power wires going to the sensor, for which we press the steel lock and slightly move the plug towards its removal;
- Unscrew the fastening nut using a regular wrench or ratchet;
- We remove the sensor from the pin and install a new device in its place;
- We carry out the assembly in reverse order.
Conclusion
The knock sensor, however, like any other component or assembly of a modern car, requires constant attention and monitoring. Its serviceability and normal functioning have a significant impact on the operation of the engine, and timely diagnostics make it possible to protect the vehicle from various emergency situations on the road. Be careful and watch your car.
Warning. Before performing repair work, familiarize yourself with the precautions for repairing the engine management system (see “Precautions for repairing the engine management system”).
To carry out repair work to replace the knock sensor on a VAZ 2110 car, you will need a multimeter (in voltmeter mode).
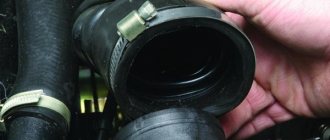
Note. Access to the DD sensor is made difficult by the intake module. Therefore, you will have to remove it by touch. You can remove the engine protection and perform the work from below the car (on an inspection hole or overpass).
How to check?
During operation, the knock sensor may produce strange errors or instability in the operation of the power unit may occur. In this case, it is necessary to diagnose or replace the VAZ 2114 knock sensor.
Of course, you shouldn’t spend money on a new unit right away - you can do some work yourself. To check the knock sensor of the VAZ 2114, stock up on a set of socket wrenches and a voltmeter.
Proceed in the following order:
- Remove the sensor from its place (here you may need a twenty or thirteen key);
- set the voltmeter to operating mode (limit 200 mV) and connect the edges of the wires from the DD to it;
- tap the back of the screwdriver on the body of the device and observe the numbers on the display. If there is no reaction, then the sensor is faulty and the only solution is to replace it.
Do not despair if a sensor malfunction is detected. Purchasing the device is not a problem - it can be done in any store and its price is not at all high.
Detailed video about replacing the knock sensor on a VAZ 2114, checking it for malfunctions.
Removal
1. We prepare the car for work (see paragraphs 1 and 2 “Preparing the car for maintenance and repair”).
2. Using a 13 mm socket wrench, unscrew the bolt securing the knock sensor to the cylinder block.
3. Remove the sensor from under the intake module.
4. By pressing the latch, disconnect the wiring harness connector from the sensor.
How to replace the sensor yourself?
Most car enthusiasts prefer to replace the described element at the nearest service station. This operation takes a minimum of time from specialists - literally 15–20 minutes. Moreover, their services will cost more than the cost of a new mechanism.
Not all drivers are willing to pay their own money for such an insignificant and, by and large, not at all complicated service. We will tell them how to replace the knock alarm. It is located near the air filter on the left side of the car engine, between the cylinder blocks (between the second and third). It’s not easy to get to it in your own garage, but it’s quite possible.
Having determined the location of the sensor, arm yourself with a wrench that will allow you to unscrew the bolt by 12, and proceed to replace the failed element according to the following scheme:
- dismantle the sounded bolt;
- we press on the latch (it is made in the form of a regular bracket) holding the plug of the supply wires, and pull out this same plug;
- install a new sensor by removing the old one;
- insert the plug back and tighten the bolt to 12.
Home →
Maintenance and Repair → Repair → Diagnostics →
Examination
1. Connect a multimeter to the sensor terminals (in voltmeter mode with a measurement limit of up to 200 mV).
2. Lightly tap the sensor with a metal object (bolt, screwdriver), and voltage surges should be observed on the voltmeter. A faulty knock sensor does not respond to impacts. In this case, the knock sensor must be replaced.
Note. The sensor can be checked more accurately only on a special stand.
We check and change the knock sensor on the Priora ourselves
Knock sensor on Priora - all the details of operation and replacement
Purpose and location of the knock sensor
A knock sensor (DS) is a device that is installed on the outside of the cylinder block wall to monitor the occurrence of abnormal vibrations caused by detonation in the engine. that is, explosive self-ignition in the combustion chamber of the working mixture. The DD produces an alternating current signal, the voltage amplitude and frequency of which depend on the vibration parameters of the cylinder block.
Each level of intensity and frequency of oscillations of the engine walls corresponds to its own signal. The engine control controller constantly analyzes the data received from the engine. When detonation occurs in the cylinders, the amplitude of vibrations of the corresponding frequency increases, and the DD generates a signal, after processing which the controller adjusts the ignition timing, making it later, which leads to the suppression of detonation of the working mixture.
The Priora DD consists of a washer-shaped plastic body, which has a hole in the center for a bolt with a 13-head head, and on the side there is a two-pin connector for connecting wires from the controller. The main part of the DD is located inside the case - a sensitive piezoceramic disk element, which, in fact, generates voltage (signal) when exposed to vibration.
The DD Priora is installed on the cylinder block, namely: on its front wall under the intake module, next to and slightly above the dipstick socket for monitoring the oil level in the engine. It is not visible from the top of the hood. It can only be seen from below, for example, from a pit, when the lower engine protection is removed.
When is the DD changed on Priora?
The DD is removed for inspection or replacement if signs of its malfunction appear or if it is diagnosed at an engine operation test bench. The sensor cannot be repaired, and if it breaks, it must be replaced. When the DD or the electrical circuit from it to the controller fails, the latter (control unit) signals this to the driver by turning on a warning lamp on the instrument panel.
At the same time, the controller switches to another engine control mode, called reserve, in which the ignition timing is constantly at a late angle. This mode is characterized by increased fuel consumption and lower engine power.
The error code indicating a breakdown of the Priora DD is 0327.
The appearance of this error is the main reason why the sensor is changed. However, in some cases, the DD may be only partially faulty, that is, it will work, but incorrectly. In this case, the warning lamp will not light up, no error will be displayed, but the engine will begin to detonate in certain modes. However, there can be many reasons for such motor operation, and if a malfunction of the motor is suspected, it is removed for inspection.
How to remove and check the sensor?
Access from above to the Priora DD is difficult due to the intake module located above it. The easiest way to get to the sensor is from below, first removing the engine protection or at least unscrewing and folding its front part. When working from above, you will have to do everything by touch. In any case, before starting work, it is necessary to disconnect the ground wire attached to the “negative” terminal from the battery.
To remove the crankcase protection, you need to:
- unscrew 5 nuts with a 10mm head;
- unscrew the 2 19 nuts installed on the back of the shield;
- remove protection.
- by pressing the metal latch of the DD connector, disconnect the block of wires going to the controller;
- using a 13mm wrench, loosen the bolt securing the sensor;
- Unscrew the bolt and remove it from the threaded hole, removing the sensor.
- We connect a multimeter to the DD terminals. We set the device to voltmeter mode, choosing a measurement limit of up to 200 mV.
- We take a metal object - pliers or a bolt - and lightly tap it on the DD.
When you tap on a working sensor, the voltmeter will show voltage surges. A faulty DD will not react in any way. A more accurate diagnosis of a removed sensor can only be done using a special stand.
Installation of a new DD is carried out in the reverse order of dismantling. Experts recommend installing a similar Bosch instead of the “native” one. Before going to the store for a new sensor, you should write down the markings of the removed sensor. The bolt securing it to 13 must be tightened with a slight force - 10.4–24.2 Nm (1.1–2.5 kgf). Tightening too tightly will affect the operation of the sensor.
https://carnovato.ru
Knock sensor (DS) VAZ 2110 | VAZ 2111 | VAZ 2112 - removal and inspection
To carry out repair work to replace the knock sensor on a VAZ 2110 car, you will need a multimeter (in voltmeter mode).
NOTE Access to the DD sensor is made difficult by the intake module. Therefore, you will have to remove it by touch. You can remove the engine protection and perform the work from below the car (on an inspection hole or overpass).
2. Lightly tap the sensor with a metal object (bolt, screwdriver), and voltage surges should be observed on the voltmeter. A faulty knock sensor does not respond to impacts. In this case, the knock sensor must be replaced.
NOTE The sensor can be checked more accurately only on a special stand.
On engines 2111 and 2112 (8 or 16 valves) of the VAZ 2110 car, two types of sensors can be installed: single-pin and two-pin. Replacing the knock sensor on a VAZ 2110 is described in this article below
To remove the two-contact knock sensor of the VAZ 2110, disconnect the electrical connector with the ignition off
Using a 13mm wrench, unscrew the sensor mounting nut and remove the washer and sensor from the stud.
To remove the single-contact knock sensor of the VAZ 2110, disconnect the electrical connector and use a 22 key to unscrew it and remove it
Sensor cost
The sensor has extremely low maintainability, so if it fails, it must be replaced with a new sensor. On cars with engines with 8 and 16 valves, sensor 21123855020, manufactured by Lada, is installed. Its price is 180-400 rubles. If it is impossible to purchase the original, you should buy any of the analogues presented in the table below.
Table - Good analogues of the original Lada Priora knock sensor
| Manufacturer | vendor code | Approximate cost, ruble |
| Decaro | 2112-3855020 | 360-490 |
| Road map | 21123855020 | 260-380 |
| Samara 2112 | 3855020 | 200-250 |
| Fenox | SD10100O7 | 210-420 |
| ERA | 550489 | 300-340 |
Design and principle of operation
Principle of operation
As we know, and some only guess, the maximum efficiency of the engine (dynamics, power, fuel consumption) is greatly influenced by the correctly set ignition timing, which, moreover, must optimally adapt to different engine operating modes. Deviations from the optimal ignition timing parameters are as follows:
- A late ignition timing is fraught with deterioration in vehicle dynamics, engine overheating and increased fuel consumption;
- An early ignition timing angle, in turn, manifests itself in the form of microexplosions in the combustion chamber (detonation), which entails a drop in power and increased valve wear (valve burnout).
And in order to eliminate these deviations, the car’s electronic control unit strives to set the ignition timing as large as possible, but at the same time does not allow it to go into the detonation zone, which the knock sensor reports to the controller. The operating principle of this device is based on the piezoelectric effect. The knock sensor is mounted on the engine block.
Replacing the knock sensor VAZ 2110
And since detonation is, in fact, a micro-explosion, when it is present, vibration appears on the engine body, which compresses the piezoelectric plate, as a result of which a potential difference appears at its contacts.
Device
At the moment, the modern automotive industry produces two types of knock sensors - resonant and broadband types.
VAZ knock sensor interchangeability
As you can see in the above photo, each type of sensor has a completely different operating principle:
- A broadband type sensor records and transmits the entire spectrum of noise to the electronic control unit, which, in turn, processes the received signal and independently detects the noise corresponding to detonation.
- The resonant type sensor is tuned to the frequency of micro-explosions, and accordingly sends a signal to the controller only if it is detected.
Attention! Replacing the knock sensor for VAZ 2110, 2112, 2114, 2115 does not accept replacing one type of sensor with another.
The following can be summarized:
- Under conditions when the vehicle is operated under normal conditions (high-quality gasoline, serviceable spark plugs, etc.), the electronic control unit does not use the subsidy sensor circuit and switches the engine to operation in the optimal parameters mode.
- When, for some reason, detonation begins, an impulse from the knock sensor tells the control unit that the ignition timing must be shifted in one direction until the detonation disappears. In this way, the ECU creates optimal operating conditions for the engine under any operating conditions.
- This method of adjusting engine operation is called “closed loop” and is used by the electronic control unit not only when working with the knock sensor, but also in adjusting other important parameters.
Checking the functionality of the sensor
The self-diagnosis system of the VAZ 2110, when the described device fails, displays error signal 34. It tells the driver that the sensor needs to be replaced. You will have to install a new mechanism after such a message in any case. But sometimes he can work for a while longer. In order to find out how quickly (immediately or a little later) you need to change the element, you can follow these steps:
- reset the indicators generated by the self-diagnosis system;
- then travel 2–4 kilometers by car;
- restart the self-diagnosis system.
A completely non-functioning sensor is indicated by the appearance of the same error 34. If the message does not repeat, it is allowed to operate the device for some time. But remember that you need to replace it as quickly as possible.
If the car does not have an ECU, the following phenomena may be symptoms of a breakdown of the VAZ 2110 knock sensor:
- poor acceleration dynamics of the vehicle;
- “triple” of the engine at idle;
- the appearance of the “CHECK” indicator on the dashboard at the beginning of a trip or when accelerating the car.
Why did it happen so?
Perhaps the automatic requests do not belong to you, but to another user accessing the network from the same IP address as you. You need to enter the characters into the form once, after which we will remember you and be able to distinguish you from other users exiting from this IP. In this case, the page with the captcha will not bother you for quite a long time.
You may have add-ons installed in your browser that can make automatic search requests. In this case, we recommend that you disable them.
It is also possible that your computer is infected with a virus program that is using it to collect information. Maybe you should check your system for viruses.
If you have any problems or would like our support team, please use the feedback form.
1. Check the presence and reliability of the connection of the harness socket to the sensor plug.
2. If the connection is normal, then disconnect the socket of the wiring harness from the sensor, remove its rubber cover and inspect the condition of the socket contacts and the wires connected to it. If necessary, straighten the connector contacts or replace them.
3. To check the malfunction of the harness circuit, disconnect the sensor and the unit from the wiring harness and, with the ignition off, check the integrity of circuit “11” of the harness with an ohmmeter: from contact “2” of the sensor socket to contact “11” of the block socket. If necessary, restore the indicated circuit.
4. After eliminating the malfunction, turn on the ignition and check that there is no fault code “041”.
Broken shield braid of the knock sensor wire
1. Check the presence and reliability of the connection of the harness socket to the sensor plug.
2. If the connection is normal, then disconnect the socket of the wiring harness from the sensor, remove its rubber cover and inspect the condition of the socket contacts and the wires connected to it. If necessary, straighten the connector contacts or replace them.
Purpose
Based on the name, it becomes clear that this sensor is used to control detonation in the car. This element is installed on all injection cars. As for carburetor "ten", their engines do not have such a mechanism. Thanks to the work of this element, a more balanced preparation of the mixture is realized. This reduces fuel consumption and improves engine response.
What is detonation? This is the process of spontaneous ignition of a combustible mixture, which is accompanied by a significant impact force. Along with this, extraneous metallic sounds arise (as if fingers are knocking on a piston).
List of errors associated with DD from the on-board computer
The cause of the failure can be found out by analyzing the error signal on the console:
- 0325 indicates a break in the DD circuit, which can be eliminated by cleaning the sensor connectors from oxidation and ringing the wiring;
- 0325 may also indicate that the timing belt is shifted by one tooth; it is necessary to check that the belt is installed correctly;
- 0326, 0327 indicates a low controller signal, requires checking the connectors, securing the nut with a force of 10-23 Nm, the action is performed with a special torque wrench.
- 0328 - the control signal is higher than normal, may appear when the electrical circuit is broken, a piercing element, or a faulty DD.
Transition from old-style DD to new-style DD
After the purchase, I discovered that there was no knock sensor at all))) I began to figure out what was what and came to the conclusion that the former owner did not install an old (resonant) type sensor because of the cost (about 2000 rubles) After rummaging through the Internet and Having collected a bunch of information, I decided to switch to a new type of sensor (broadband, price from 200 rubles) And so: 1. I bought the sensor itself.
2. Microphone cable (shielded) 120 rubles 3. A tricky sensor mounting pin (one end, LIKE, 12mm, the other 8mm) 50 rubles 4. Knock sensor connector 80 rubles And so it began... I actually installed the sensor itself. Then I connected the cable core to pin 1 of the connector, the screen to pin 2. Next I ran the cable to the ECU (I have BOSCH 1.5.4). The core was connected to ECU contact 11 (knock sensor contact), the screen was connected to ECU contact 30 (sensor ground). Started it! Aaaand, nothing happened))) After studying materials from the Internet, I realized that the operating principles of the sensors are different and it is necessary to change the firmware for a broadband sensor. Next, I removed the ECU, as firmware can only be updated by replacing the chip, and disassembled it (the chip was installed in the “bed”, so I didn’t have to solder anything). At the nearest radio store I bought a w27c512-45 chip (120 rubles) and downloaded the m1d13a64 firmware (at a computer repair office for 300 rubles). And so the result: 1. Started with half a kick)) 2. While driving, the car became a lot faster)) (there was no joy), acceleration was clear and smooth starting from low revs. 3. There are no errors, the flight is normal. Next up is replacing the receiver! I'll do it myself)))
Source