We have a NIVA VAZ 2121 car under repair, on which it is necessary to replace the rear axle gearbox oil seal. We will show you how to do this operation yourself, as quickly and correctly as possible.
There is a problem with the car, the gearbox is leaking. According to the technical regulations, according to the rules, the gearbox must be removed and adjusted on the stand. As a rule, a new oil seal during active use of the Niva lasts for an average of 10-15 thousand km. As you understand, no one will remove and adjust the gearbox several times a year.
In order for the oil seal to serve you as long as possible, you need to periodically inspect the breather:
It often boils and jams; you just need to work it out a little with your hands, moving it from side to side, up and down. When the breather is jammed, excess pressure of crankcase gases is created, which we squeeze out the oil seal and can escape through the axle shaft.
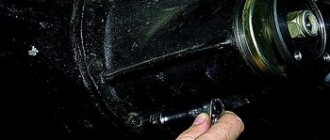
Let's start replacing. Unscrew the filler plug (it’s also a level plug):
Then unscrew the drain plug and place a container where the used oil will be drained:
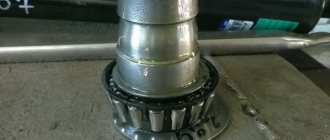
After the oil is completely drained, tighten the drain plug. Use a 24mm wrench to unscrew the nut:
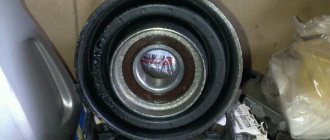
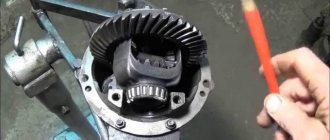
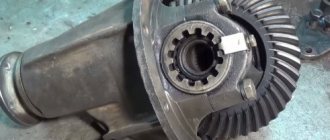
We remove the flange, inspect it for the presence of wear, if there is one on it, then the flange must be replaced, otherwise replacing the oil seal will be pointless. It happens that oil leaks not because of the oil seal, but because the splines on the flange are broken.
We clean the flange seat and the old oil seal so that dirt and sand do not inadvertently get into the system. To dismantle the old rear axle gearbox oil seal, take a regular bolt and tap one of the sides:
In this case, one of the sides is recessed, and the other, on the contrary, leaves the cordon. Next, we take a flat-head screwdriver, pry up the protruding side and pull out the oil seal completely:
We thoroughly clean the oil seal seat, apply a small amount of sealant to its body (optional, just to be on the safe side). We install the oil seal and tap it lightly with a hammer; there is no need to use a mandrel for this:
We tighten the flange so that there is no play; special attention is paid to this in the video. After tightening, it should not wobble, neither up or down, nor left or right. You also can't drag it. Fill in new oil and reassemble in the reverse order.
Purpose of the Niva rear gearbox oil seal
The rear axle gearbox oil seal (REA) is a lip seal located in the mechanism housing on the installation side of the bevel gear bearings. The main function of the oil seal is to ensure the tightness of the gearbox, eliminating the leakage of lubricant located in the rear axle housing.
Causes of wear
The lip seal of any vehicle component wears out over time, losing its properties. One reason is physical wear and tear. But the oil seal can also be damaged by the aggressive influence of oil on it, for example, when using low-quality lubricant. In addition, the oil seal itself may be initially defective.
If the oil has barely come out, then there is no need to rush to replace the cuff, but you need to periodically monitor the condition of the element and, if a leak occurs, make repairs.
Signs of wear
The main sign of a worn VAZ 2121 shank oil seal is the presence of oil leaks on the rear axle in the area where the REM flange is located. To identify a faulty element, it is enough to drive the car into an inspection hole or overpass, or simply crawl under the car. If the cuff is worn heavily, then after a long period of parking an oil puddle will form under the rear axle. If you neglect to timely replace the rear gear oil seal, this will lead to increased wear of the internal elements of the mechanism due to lack of lubrication and their subsequent failure.
Replacing the cuff
If the lip seal has become unusable, it only needs to be replaced, since the element is non-repairable (rubber ages over time and cannot be restored). To replace the oil seal, you need to know the size of the element:
- outer diameter 68 mm;
- internal diameter 35.8 mm;
- height 12 mm.
To carry out repairs, you will need to prepare the following list of tools:
- key to 13;
- 24mm head and knob;
- hexagon 12;
- powerful slotted screwdriver;
- hammer;
- dynamometer and torque wrench;
- container for draining oil.
The process of replacing the shank oil seal is carried out with the rear axle hanging and is carried out as follows:
- Unscrew the rear axle housing plug and drain the lubricant into a prepared container.
- We unscrew the fastening bolts of the rear cardan to the RZM flange, move the shaft to the side and secure it with wire to the longitudinal link of the bridge.
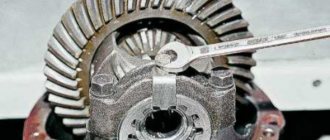
- Using a dynamometer, we determine the moment of resistance to gear rotation by turning the flange nut clockwise.
- To hold the flange, insert the cardan bolts into the holes and screw the nuts onto them.
- We place a mounting spatula or screwdriver between the bolts and unscrew the nut with a socket and wrench.
- Remove the nut and washer from the shank.
- We dismantle the flange itself by hitting it with a hammer through a wooden adapter.
- To remove the oil seal, hook it with a screwdriver and remove it.
- We apply Litol-24 to the working edge of the new cuff, after which we mount the part into the crankcase using a suitable attachment.
- We put the flange and washer in place and tighten the nut with a torque wrench with a torque of 117–255 N*m (12–26 kgf*m), using a dynamometer to control the moment of resistance of the bearings to turning the drive gear. If during the initial measurement of the moment of resistance the value was at least 6 kgf*cm, then when re-tightening it is necessary to increase it by 1-2 kgf*cm. If initially the value was 6 kgf*cm, then we achieve a torque of 6-9 kgf*cm. At the same time, the tightening torque should not exceed 12-26 kgf*m. If, while tightening the nut, the moment of resistance exceeds 9 kgf*cm, the spacer sleeve on the bevel gear will need to be replaced.
- After the adjustment work, we install all the elements in the reverse order.
Video: replacing the shank seal of a classic Niva
Replacing the RZM oil seal on a VAZ 2121, when the corresponding signs appear, is, although not a complicated procedure, but necessary. Even a novice car enthusiast can perform the repair by reading the step-by-step instructions and preparing the necessary tools.
Similar articles:
There are no similar articles on the topic, but there will be some soon.
Source
When to change the seal
Replacing the axle seal is not tied to a specific mileage, but is done in connection with the following defects:
- Transmission oil leakage from the rear axle of a Chevrolet Niva. It is characterized by the appearance of oil stains on the brake casing and the “stocking” on the side where the axle shaft seal has lost its seal.
- In case of accidental damage to the seal when replacing the axle bearing. Happens when a part is pulled out of its socket.
A distinction should be made between transmission oil leakage from the axle seal on either side of the rear beam and from the gearbox shank where the driveshaft is secured. In the second case, greasy stains and dirt cover the rear axle gear housing, located in the middle.
If for various reasons you need to replace the axle bearing, then you should also change the oil seal at the same time. This will save you from having to disassemble the unit again due to leakage of the old part. The part costs mere pennies, its catalog number for the Chevrolet Niva is 2110-2301034 (right) and 2110-2301035 (left), and the overall dimensions are as follows:
- outer diameter - 57 mm;
- width - 9 mm;
- The diameter of the hole along the protruding rubber (or silicone) edge is 35 mm.
The catalog number and dimensions of the O-ring of the Niva VAZ 21214 axle shaft are identical. In addition to the oil seal itself, transmission oil will be needed to replenish the lost amount in the gearbox. TAD17I brand oil is considered “native” for all types of VAZ gearboxes.
Replacing the drive gear seal of the rear axle VAZ-21213
The cuff can be replaced without removing the gearbox from the car.
To do this, after hanging the rear axle, drain the oil from the crankcase, remove the wheels and brake drums, disengage the axle shafts from the differential gears (see the article on removing axle shafts - How to remove and repair the axle shaft of the VAZ-21213 rear axle).
We disconnect the driveshaft from the drive gear flange (see the article - “Removing and installing the driveshaft”) and move it to the side.
Using a dynamometer, we turn the drive gear clockwise by the flange mounting nut and determine the moment of resistance to gear rotation.
There is another way to determine the moment.
We tightly wind a strong thread around the neck of the flange in several turns and attach a dynamometer to it (to put it simply, a hand scale).
The force at which the flange begins to rotate uniformly, multiplied by the journal radius, will give the value of the desired moment.
Having inserted two bolts into the holes of the flange and holding it from turning with a mounting blade, use a 24 mm wrench to unscrew the nut
Remove the flange from the splines of the main gear drive shaft.
If the flange sits tightly on the shaft splines, then use a hammer with a plastic striker to knock the flange off the splines
Using sliding pliers or a powerful screwdriver, remove the cuff
Lubricate the seating surface of the cuff with Litol-24 grease and lightly blow a hammer through a piece of pipe of suitable diameter to press in a new cuff.
Install the flange and washer on the drive gear.
Holding the flange, we tighten the nut of its fastening to a torque of 118-255 Nm (12-26 kgf.m), periodically checking the moment of resistance to rotation of the drive gear (by turning the gear clockwise with a dynamometer).
If the initially measured moment of resistance to rotation was not lower than 59.0 Nm (6 kgf m), then the new moment should be greater than this value by 9.8-19.6 Nm (1-2 kgf m).
If the initial torque was less than 59.0 Nm (6 kgf.m), then tighten the flange mounting nut until a torque resistance to rotation of 59.0–88.0 Nm (6–9 kgf.m) is reached, without exceeding the tightening torque 118–255 Nm (12–26 kgf.m).
If, when tightening the nut, the moment of resistance to rotation of the drive gear exceeds 88.0 Nm (9 kgf m), which indicates an excessive preload of the bearings, replace the gearbox spacer and carry out the adjustment again.
We carry out further assembly and installation of units in the reverse order.
Source
Replacement
Unscrew the cardan (4 bolts), drain the oil. Individual bolts may not give in; they will have to be cut off with a grinder, and the rods themselves will have to be drilled out for subsequent assembly. Drain the oil from the bridge.
Further actions should follow the following scheme:
1. Using a 17-mm spanner, unscrew the four nuts of the bolts securing the axle shaft to the beam flange.
2. Using a slotted screwdriver, bend the locking plates of the axle shaft mounting bolts and pull out the bolts.
3. Using the back side of the wheel, fix it on the axle shaft. As a rule, a few turns of three nuts are enough for this, since this is not done for travel.
4. We take the wheel and with a moderate-strong jerk, move it from the seat and remove the axle shaft. At the same time, a plate on which the bearing ring is fixed will come out.
5. Dismantle the beam flange ring.
6. Install the bolts into the holes of the brake system shield and the bridge beam. This is necessary to avoid hanging the shield on the brake pipe.
7. Take the “Goebbels” and use it to hook the oil seal, pull it out.
8. Using a piece of metal pipe of the required diameter, we press the new part and seal it with gasket sealant. The last condition is not mandatory.
9. We carry out the assembly using the proposed diagram from top to bottom.
If you find deformation of the axle shaft, damage to the splines, or bearing failure, then we are no longer talking about replacing the oil seal, but about purchasing a new entire unit.
Important: at the beginning of the article we talked about the need to drain the oil. This condition is also not mandatory and is only met if you planned to replace this consumable. In other situations, you should simply check the oil level upon completion of work and add it if necessary.
Replacing the gearbox seal of the Niva rear axle (2121) with your own hands
We have a NIVA VAZ 2121 car under repair, on which it is necessary to replace the rear axle gearbox oil seal. We will show you how to do this operation yourself, as quickly and correctly as possible.
There is a problem with the car, the gearbox is leaking. According to the technical regulations, according to the rules, the gearbox must be removed and adjusted on the stand. As a rule, a new oil seal during active use of the Niva lasts for an average of 10-15 thousand km. As you understand, no one will remove and adjust the gearbox several times a year.
In order for the oil seal to serve you as long as possible, you need to periodically inspect the breather:
It often boils and jams; you just need to work it out a little with your hands, moving it from side to side, up and down. When the breather is jammed, excess pressure of crankcase gases is created, which we squeeze out the oil seal and can escape through the axle shaft.
Let's start replacing. Unscrew the filler plug (it’s also a level plug):
Then unscrew the drain plug and place a container where the used oil will be drained:
After the oil is completely drained, tighten the drain plug. Use a 24mm wrench to unscrew the nut:
We remove the flange, inspect it for the presence of wear, if there is one on it, then the flange must be replaced, otherwise replacing the oil seal will be pointless. It happens that oil leaks not because of the oil seal, but because the splines on the flange are broken.
Technical features
The oil seal is located in front of the bridge. Its function is to prevent oil leaks at the junction of the cardan and the axle. Since this part of the car bears a large number of loads, it turns out that this element fails most often. The constant exposure of this part to reagents in winter also has a negative effect.
But, before starting replacement work, you should determine whether it is needed. The diagnosis here is quite simple. First, check the oil level in the gearbox; if it is not enough, add it to the maximum. Then drive the car into a pit or overpass and hang the rear wheels.
Next we proceed to diagnosis
:
- We start the engine and engage 4th gear;
- We keep the speed sufficient to maintain the speedometer speed around 100 km/h;
- We wait about 10-15 minutes;
Rear axle oil seal Niva 21214
Install the flange and washer on the drive gear. Holding the flange, tighten the nut securing it to a torque of 118–255 N.m (12–26 kgf.m), periodically checking the moment of resistance to rotation of the drive gear (by turning the gear clockwise with a dynamometer). If the initially measured moment of resistance to rotation (see photo 3 ) was not lower than 59.0 N.cm (6 kgf.cm), then the new moment should be greater than this value by 9.8–19.6 N.cm (1– 2 kgf.cm). If the initial moment was less than 59.0 N.cm (6 kgf.cm), then tighten the flange fastening nut until a torque resistance to rotation of 59.0–88.0 N.cm (6–9 kgf.cm) is reached, not exceeding at the same time, the tightening torque is 118–255 N.m (12–26 kgf.m). If, when tightening the nut, the moment of resistance to rotation of the drive gear exceeded 88.0 N.cm (9 kgf.cm), which indicates an excessive preload of the bearings, replace the gearbox spacer (see Disassembling the rear axle gearbox ) and make the adjustment again. We carry out further assembly and installation of units in the reverse order.
Replacing the oil seal of the rear axle gearbox of a VAZ 2121 Niva Gearbox VAZ 21213 No. 3 Replacing the oil seal of the rear axle gearbox REPLACEMENT OF THE REAR AXLE GEARBOX SEAL of VAZ 2106 TOP 5 mistakes when repairing the rear axle gearbox (2101-07, Niva) and nuances
Important nuances
- The dynamometer readings were mentioned above, and this is no coincidence. Tightening the flange is a very responsible process, and it can only be done using a torque wrench. This allows you to avoid excessive squeezing of the oil seal, which leads to a violation of the tightness of the entire gearbox. This is done like this: if at the first measurement the force on the dynamometer was 2.8 - 3 kg, then the force on the torque wrench when tightening should not exceed 6.3 kg. If the dynamometer showed 4.3 kg, then when tightening the key there should be no more than 9 kg, etc. If the dynamometer showed 2.7 kg, and the key when tightened shows 9 kg or more, it means that the gearbox adjusting sleeve is completely worn out and needs for urgent replacement.
After removal, the flange should be carefully inspected for severe abrasions and cracks. If there are any, the flange must be replaced. If this is not done, the new oil seal will very quickly become unusable.
Before driving the oil seal with a tube, it is recommended to lubricate it with lithol. This makes it much easier to fit the new oil seal into its original place. When striking a pipe with a hammer, there is no need to be too zealous: with a strong blow, the pipe easily cuts the seal.
Site about off-road vehicles, SUVs, off-road vehicles
The oil seal of the drive gear (shank) of the gearbox of VAZ and Lada Niva cars works in difficult conditions. So, when driving at a speed of 80-90 km/h, the temperature of the gearbox, and with it the oil seal, reaches 90 degrees after 15 minutes. A large temperature difference (due to heating and cooling of the air inside the gearbox and, accordingly, an increase and decrease in its volume) required the installation of a breather.
Replacement of the drive gear (shank) seal of the VAZ and Lada Niva gearbox, signs of malfunction and diagnostics of the condition.
On the other hand, the driven gear rotates at high speeds at more than 1000 rpm. The presence of teeth on it makes it an effective pump that throws oil into the upper channel and delivers it into the space between the bearings and further to the oil seal. In turn, tapered roller bearings also have a pumping effect.
In this case, the rear bearing throws oil into the crankcase, and the front bearing throws oil to the oil seal. To protect the oil seal, there is an oil deflector and a side channel for draining oil into the crankcase. The difficult operating conditions of the oil seal also explain some assumptions. Oil fogging of the crankcase neck and even the formation of individual drops in quantities not exceeding a certain norm are allowed.
Therefore, if the breather is clogged with dirt or you forgot to install an oil deflector when assembling the gearbox, then the oil seal will no longer hold the oil. To clean the breather, just turn its cap 2-3 turns. The reason oil enters through the oil seal may be an excessively high level in the crankcase. It is possible to fill more oil than necessary if the car is parked on an inclined overpass with the front end down.
The need to replace the oil seal is determined by reducing the oil level in the rear axle housing to a level that disrupts the normal operation of the gearbox during a mileage (after adding oil) of up to 30,000 kilometers.
Determining the condition of the drive gear oil seal (shank) of the VAZ and Lada Niva gearbox.
The condition of the oil seal can be determined as follows. The rear axle is hung up and placed on stands, the engine is started, gear 4 or 5 is engaged, the oil warms up to 80-90 degrees. After which, at a speed of 100 km/h (according to the speedometer), an oil leak is detected within 15 minutes - more than 5 drops is a sign of a seal failure.
But in practice, other signs are usually used. As a rule, if the oil seal is leaking oil, you will find an oil puddle under the car. You have to inspect the car from below at least once every 10,000 kilometers (engine oil change). It is impossible not to notice that the gearbox housing and the underbody above the drive gear flange are all covered in oil.
Removing and replacing the drive gear oil seal (shank) without removing the gearbox.
Next, we will consider replacing the oil seal with minimal labor costs, that is, without removing the gearbox and, accordingly, the wheels, brake drums, unscrewing the nuts securing the brake shield to the bridge beam and removing the axle shafts from the differential box.
How to unscrew the drive gear shank nut and how to tighten it was described in the previous material. The only difference is that when tightening the nut and monitoring the moment of resistance to rotation of the drive gear, in addition to the torque of 4-6 kgfcm (bearing preload), another 1-2 kgfcm (resistance of the new oil seal) is added to the previously measured torque (with the nut loosened).
When purchasing an oil seal, you need to pay attention to the following. Firstly, oil seals 2101-2402052-01 and 2121-2402052 differ little in appearance. The difference is in the screw notches and in the direction of rotation of the shafts, which is indicated by arrows on the seals.
When driving forward, the driveshafts and drive gears rotate clockwise when looking at the vehicle from the front. And if you look at the drive gear of the front axle of the Lada Niva from its flange, the rotation occurs counterclockwise. If instead of the oil seal 2101-2402052-01 we install 2121-2402052, there may be an oil leak and even water getting inside the gearbox. Also pay attention to the working edges - they may be poorly cut.
Having disconnected the flanges of the universal joint and the drive gear, move the propeller shaft to the side and unscrew the shank nut. Remove the drive gear flange. Pay attention to the surface (diameter 38 mm) in contact with the oil seal. It must be polished. If the working edge of the oil seal has developed a deep groove, it is better to press the oil seal with an offset of 1-1.5 mm from its previous position.
How to remove the oil seal? Of course, you can “rip it out” with a suitable hook, skinning your hands along the way. But you can do this easily by using the device shown in the figure below.
A device for removing and replacing the drive gear oil seal.
We install the legs of the device into the grooves of the splines of the gear shank, as shown in the figure at the top. After the tabs are installed in the grooves, we bring them to the outer diameter of the slots. Next, install the screw with the nut and, by rotating the screw, press out the oil seal. It is necessary to take into account that the screw of the device rests on the drive gear, which, moving inside the gearbox, in turn rests on the differential box.
If the gear “hits” the differential box window, then the screw travel will not be enough. It is necessary to rotate the driven gear approximately 90 degrees. Before pressing in, lubricate the edges of the new oil seal and the seating surface in the crankcase neck with transmission oil. The pressing process itself, especially if this is done for the first time, is a rather delicate matter.
Due to the high interference in the connection, the oil seal is constantly distorted. Therefore, you need to be careful when using the right mandrel (see picture below). The mandrel is quite massive. There should be a hammer to match it. The splined end of the gear shank does not serve as a support, since the bearings are not tightened. The position is uncomfortable, hands up. Therefore, it is convenient to use the mandrel when the gearbox is removed and disassembled (there is no drive gear).
Video about the difference between RPM Shniva and VAZ 2121:
Knowing the reason for the gearbox wedge and knowing how to fix it, I went to a hardware store and bought 6 liters of kerosene. Kerosene turned out to be very expensive, 2 bottles of 3 liters cost me 700 rubles... I also went to Automaton in search of new bolts for the planetary gear, but found only ordinary ones, with a strength of 8.8... I bought a thread locker, sealant, a new spacer sleeve, oil seal and CV joint lube . Then I remembered that at my dacha I had the offal from a new factory gearbox, and from them I took the necessary bolts. I came home and started repairs. Using a Grover, I removed the roughness and burrs from the gearbox that arose from loose bolts. I took out the drive gear and washed its bearings in kerosene. I washed the pads on the self-block and the self-block itself, the main pair and also the gearbox housing itself. I put the spare parts under the battery to dry.
The stench from kerosene was all over the house, but there was nowhere to go... The next day, in order not to rush to the dacha, my friend and I moved the table with a vice to the house and we began assembling the gearbox. The old oil deflector washer was somehow all mangled, so I replaced it with a new one, and also installed a new oil seal, since the old one was torn.
Before screwing them into the GP driven gear, I lubricated all the bolts with blue thread locker.
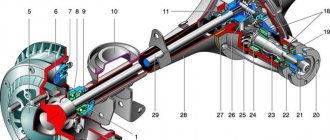
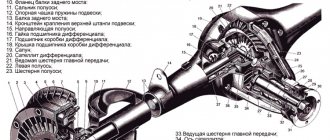
Chevy Niva front axle structure:
1 – mud deflector; 2 – lower cover of the gearbox housing; 3 – drive gear bearings; 4 – differential housing; 5 – drain plug; 6 – filler and control hole plug; 7 – bearing of the internal hinge housing; 8 – oil seal; 9 – housing of the internal wheel drive hinge; 10 – spring washer; 11 – retaining ring; 12 – bearing cover; 13 – adjusting nut; 14 – differential box bearing; 15 – bearing cover; 16 – cover fastening bolt; 17 – support washer; 18 – satellite; 19 – axle gear; 20 – gearbox housing; 21 – breather; 22 – bearing cover of the internal hinge; 23 – satellite axis; 24 – adjusting ring; 25 – drive gear; 26 – bearing spacer; 27 – drive gear oil seal; 28 – flange.
The front axle of the Niva Chevrolet consists of a main gear and a differential installed in one housing. The differential, final drive gears and gearbox bearings of the front and rear axles are the same. The front axle gear housing is cast, covered with covers at the front and bottom. The crankcase covers are sealed with gaskets.
Replacing the main gear drive gear oil seal Niva 2121, Niva 2131
rear axle, maintenance
We carry out the work on an inspection ditch or a lift. We hang up the rear axle.
Drain the oil from the rear axle housing (see Changing the oil in the rear axle). We remove both axle shafts (see Removing the axle shaft and replacing the oil seal Niva 2121). We disconnect the rear propeller shaft from the flange of the rear axle gearbox of the VAZ 2121 (see Removing the driveshaft).
We move the cardan shaft away from the gearbox flange.
We tie the driveshaft by the hinge fork to the upper longitudinal rod.
Using a dynamometer, we turn the drive gear clockwise by the flange mounting nut and determine the moment of resistance to gear rotation.
We insert the bolts into two nearby holes in the flange and screw the nuts onto them.
By inserting a powerful screwdriver between the bolts, we hold the flange from turning, and use a 24mm head to unscrew the flange securing nut.
The flange can also be secured with a mounting spatula.
Remove the flange mounting nut and washer.
Using a hammer with a plastic striker, we knock the flange off the splines of the VAZ 2131 drive gear...
Use a slotted screwdriver to pry off the drive gear seal...
Lubricate the working surface of the new VAZ 2121 oil seal with Litol-24...
...and press it into the socket of the gearbox housing with a suitable piece of pipe.
We install the flange and washer on the drive gear Niva 2131. Holding the flange, tighten the nut securing it to a torque of 118–255 N.m (12–26 kgf.m), periodically checking the moment of resistance to rotation of the drive gear (by turning the gear clockwise with a dynamometer). If the initially measured moment of resistance to rotation was not lower than 59.0 N.cm (6 kgf.cm), then the new moment should be greater than this value by 9.8–19.6 N.cm (1–2 kgf.cm). If the initial moment was less than 59.0 N.cm (6 kgf.cm), then tighten the flange fastening nut until a torque resistance to rotation of 59.0–88.0 N.cm (6–9 kgf.cm) is reached, not exceeding at the same time, the tightening torque is 118–255 N.m (12–26 kgf.m). If, when tightening the nut, the moment of resistance to rotation of the drive gear exceeds 88.0 N.cm (9 kgf.cm), which indicates an excessive preload of the bearings, replace the gearbox spacer (see Disassembling the rear axle gearbox) and carry out the adjustment again. We carry out further assembly and installation of Niva 2121 units in the reverse order.
This is interesting: Repair and operation of VAZ 21214
Rear axle VAZ 2121, Niva 2131
- — Rear axle device
- — Features of the rear axle
- — Changing the oil in the rear axle
- — Axle shaft and oil seal replacement
- — Removing and installing the wheel stud
- — Transmission drive gear seal
- — Rear axle gearbox
- — Disassembly and assembly of the gearbox
Units and transmission device VAZ 2121, VAZ 2131
Maintenance and operation of the Niva 2121 box. Repair instructions for the cardan, axle and wheel drive Niva 2131.
Replacement: step-by-step instructions
First, unscrew the bolts securing the cardan to the flange and hang the cardan shaft under the bottom. After this, you need to measure the torque of the shank using a dynamometer or canter. To do this, wind a cord around the flange, tie its end to the measuring device and pull. Memorize or write down the force at which the shank begins to rotate. This will come in handy when assembling the unit.
Next you need:
- Hold the flange with a wrench and unscrew the fastening nut.
- Remove the shank from the splines using a puller.
- Use pliers and a screwdriver to remove the cuff.
- Install a new oil seal and moisten its seal with transmission oil.
- Carefully slide the shank onto the slots and insert into place.
- Tighten the nut with a torque wrench with a force of 12-15 kgf.
- Check the rotation force of the shank with a cord and a canter (dynamometer).
- If necessary, tighten the fastening nut.
- Screw the cardan to the flange.
The work takes no more than two hours. After replacing the oil seal, especially if it had to be changed due to oil leakage, it is necessary to check the transmission level in the gearbox.
What tool is required for the job?
Once the tool is prepared, you can begin to work by performing the following series of actions:
- Lower the parking brake all the way down
- Drain the oil from the rear axle gearbox
- Both axle shafts are removed
- Disconnect the cardan drive from the flange drive gear
- Unscrew the nut that secures the flange
- Let's take it off
- Using a screwdriver, remove the old oil seal
- Lubricate the outer edge of the new oil seal and install it in place using a mandrel of suitable diameter.
- Screw the nut and washer into place
At this point, the work on replacing the oil seal on the Chevrolet Niva can be considered completed. The removed parts are installed in the reverse order of removal. If difficulties arise during the replacement, then it is better to contact a specialized service, where specialists will carry out the replacement.
When to change the seal
Replacing the axle seal is not tied to a specific mileage, but is done in connection with the following defects:
- Transmission oil leakage from the rear axle of a Chevrolet Niva. It is characterized by the appearance of oil stains on the brake casing and the “stocking” on the side where the axle shaft seal has lost its seal.
- In case of accidental damage to the seal when replacing the axle bearing. Happens when a part is pulled out of its socket.
A distinction should be made between transmission oil leakage from the axle seal on either side of the rear beam and from the gearbox shank where the driveshaft is secured. In the second case, greasy stains and dirt cover the rear axle gear housing, located in the middle.
If for various reasons you need to replace the axle bearing, then you should also change the oil seal at the same time. This will save you from having to disassemble the unit again due to leakage of the old part. The part costs mere pennies, its catalog number for the Chevrolet Niva is 2110-2301034 (right) and 2110-2301035 (left), and the overall dimensions are as follows:
- outer diameter - 57 mm;
- width - 9 mm;
- The diameter of the hole along the protruding rubber (or silicone) edge is 35 mm.
The catalog number and dimensions of the O-ring of the Niva VAZ 21214 axle shaft are identical. In addition to the oil seal itself, transmission oil will be needed to replenish the lost amount in the gearbox. TAD17I brand oil is considered “native” for all types of VAZ gearboxes.
Re: Frequent replacement of seals in bridges
Re: Frequent replacement of seals in bridges
Article, size and manufacturers of reinforced cuffs
Initially, oil seals with an outer diameter of 68 and an inner diameter of 35.8 mm were installed in the transfer case. two types:
- 2121-2302052 — one oil seal. A similar part is installed on the drive gear of the front axle;
- 2101-2402052-01 — two oil seals in the Republic of Kazakhstan. The same part is located on the drive gear side of the rear axle.
The installation of different seals is explained by the different directions of rotation of the drive shafts.
Useful! Nowadays oil seals with article number 2123-1802120-12 are installed in the RC and axles of the Niva Chevrolet. They are designed for shaft rotation both clockwise and counterclockwise.
Spare parts from the Balakovo plant (Rosteco) are popular. According to reviews from Chevrolet Niva owners, they are characterized by high wear resistance at an affordable price.
Useful video
Replacing the rear axle shaft seal of Niva 2121 will not take you more than 1 hour if you follow the suggested instructions.
1. NIVA gearbox seals :
-Oil seal for the input shaft of the gearbox (gearbox) NIVA-2121, -21213, -21214, -2131, -2123:
Catalogue number: 2101-1701043
oil seal dimensions: 28x47x8mm
- Seal of the secondary shaft of the gearbox (shank) VAZ-2121, -21213, -21214, -2131, -2123:
Catalogue number: 2101-1701210
oil seal dimensions: 32x56x11mm
2. NIVA front axle oil seals:
-Oil seal for the front axle gearbox NIVA- 2121,-21213,-21214,- 2123,-2120
catalog number: 2121-2302052
Dimensions: 35.8 x 68 x 11mm
-Drive seal -2121,-21213,-21214,-2131,-2123, universal (without direction)
Catalog number: 2123-2303120 / 121 2 pcs.
seal dimensions: 57.15 x 40 x 9mm
But it is better to install seals with a notch (left, right):
Left drive oil seal -2121,-21213,-21214,- 2123
Catalog number: 21213-2301035 1 piece.
Oil seal dimensions: 57.15 x 40 x 9mm
Right drive oil seal -2121,-21213,-21214,-2123
Catalog number: 21213-2301034 1 piece.
Oil seal dimensions: 57.15 x 40 x 9mm
3. Transfer Case Seals 3pcs:
2 identical oil seals are installed on the valve:
catalog number: 2101-2402052-01 (this is the rear axle gearbox seal on the VAZ-2101 and NIVA-2121 of right rotation),
one is installed on the drive shaft of the RK:
(in the lower diagram), the second is on the front shaft of the RK differential (see the upper diagram - highlighted in red)
Dimensions of these seals in mm: 35.8 x 68 x 10(12) 2 pcs.
An oil seal is installed on the rear shaft of the RK differential - this is the 3rd oil seal (highlighted in blue in the top diagram)
with catalog number: 2121-2302052 left rotation 1 pc.
Dimensions in mm: 35.8 x 68 x 11(12)
4. Rear axle gear oil seal :
catalog number: 2101-2402052-01 (rear axle gearbox VAZ-2101) 1 pc.
dimensions: 35.8x68x10
5. Axle shaft seals for Chevy NIVA-2123:
catalog numbers of oil seals: 2110-2301034 right - 1 piece
2110-2301035 left - 1 piece.
gland dimensions in mm: 57 x 35 x 9
In the photo: VAZ-2123 axle seals (BRT) red-left, black-right.
The arrow on the oil seal indicates the direction of rotation of the shaft (when the vehicle is moving forward).
What tools are needed to replace the oil seal?
To replace the oil seal yourself, you will need:
- pliers;
- hammer;
- large flat screwdriver;
- a powerful wrench for unscrewing and tightening the nut on the shank;
- standard set of wrenches;
- puller;
- torque wrench;
- a universal wrench or tool that secures the shank flange;
- dynamometer;
- durable elastic cord.
The oil seal cannot be replaced without the part itself, which must first be purchased. The key that holds the shank flange can be replaced with a homemade device. These are two M8 bolts and a knob that securely hold the part and eliminate the possibility of it turning. Bolts are inserted into the flange holes, and a knob is placed between them.
Preparation and disassembly
To independently remove a leaking rear axle oil seal on a Niva Chevrolet, you will need the following tools:
- standard set of wrenches;
- slotted screwdriver and wheel wrench;
- jack;
- hammer;
- wooden stand;
- cloth gloves.
This is interesting: Adjusting the carburetor of the Husqvarna 128r trimmer
Never neglect gloves when repairing a car: they will protect your hands from damage due to accidental impacts. The height of the wooden stand should be enough to support the rear axle with the wheel removed and the shock absorber unscrewed, otherwise oil will leak from it.
Before removing the old seal, you will have to disassemble the rear hub assembly and remove the axle shaft. Disassembly is carried out in the following sequence:
- Place the car on a level surface and secure it with wheel chocks. Make sure the handbrake is turned off.
- Loosen the wheel nuts, jack up the car and remove the wheel.
- Clean the rear axle flange that protrudes beyond the brake drum from rust. Additionally, you can treat this area with WD-40 lubricant.
- Unscrew the 2 bolts securing the drum with a 12 mm wrench, then gently tap with a hammer to move it out of place.
- The drum is removed in 2 ways: by squeezing it out with the same bolts, screwed into other holes, or by knocking it with a hammer through a piece of wood. The methods can be combined, just be careful not to damage the edge of the drum with the blows.
- After dismantling, clean the seat on the axle shaft again to make the drum easier to remove.
The next step is unscrewing and removing the axle shaft. In the VAZ 2131 Niva Chevrolet, 4 bolts securing it are held on the other side by a bracket holding the shock absorber.
After unscrewing the bolts, the shock absorber will no longer hold the rear axle, and the spring will push it down, causing oil to flow.
To avoid this, you need to first adjust the stand by jacking the car higher. The rear axle “stocking” must rest with a slope in the other direction so that the oil does not leak out.
The 4 bolts holding the rear axle shaft are unscrewed with a 17 mm wrench. Pay attention to the growers: they should not get lost in the brake mechanism. If you ignore the loss of the groover and install a new one, then the old one will subsequently get between the block and the drum while driving and the wheel will jam.
After unscrewing the bolts, with a sharp movement, remove the axle shaft with the bearing from the cage. If this fails, attach the wheel to the studs with 3 nuts and try to pull it. The last option is to use a special inertial puller for removal. There is also a popular method: tie the axle shaft with a rope to an iron garage door and hit it with a hammer to knock it out of the cage. But for this you need to carefully park the car closer to the gate.
What to do with VAZ
Initially, we will discuss these types of repairs in relation to the “classic” Zhiguli. We will tell you how to replace the gearbox seal of the rear axle of a VAZ 2107.
- wrenches;
- screwdriver;
- mounting blade;
- Litol type lubricant;
- sandpaper;
- mandrel and hammer;
- a special key for holding the flange - a tube with two bolts inserted into the holes of the part.
Find out also how to remove the brake drum on a VAZ 2109 and about replacing the coolant on a VAZ 2110.
Begin.
- First of all, drain the oil from the assembly unit.
- We remove the axle shafts from the beam.
- We use a screwdriver to disconnect the cardan flange from the mating part of the tail gear, having previously unscrewed the bolts. We keep the cardan from turning with a mounting blade.
- We wrap a strong rope around the neck of the counter element of the drive gear and attach a hand scale to it. The force of uniform rotation of the part (kg s) multiplied by the radius of its neck gives the value of the required moment - we write down this value.
- Unscrew the tail gear flange nut, holding the part with a special wrench.
- We remove the detached element and the washer.
- Using a screwdriver, we remove the reinforced rubber product.
- Clean the seat with sandpaper and lubricate it with Litol.
- We press in the new spare part with a mandrel using hammer blows until there is a gap of 2 mm from the end of the crankcase to the part embedded inside. Now the reinstallation of the differential assembly cuff can be considered completed.
- We install and screw the flange element, holding it with a special key. If the initially measured moment of resistance to rotation was at least 6 kg s x m, then the new moment should be greater by 1 kg s x m. In any case, we tighten until the moment reaches 6 kg s x m, but not higher than up to the moment 12 – 26 kg per x m.
- Then we collect everything along the way in reverse.
- Add oil.
This is how a defective oil seal is replaced on a VAZ 2107.
It should be added that the replacement of a defective VAZ 2106 part is carried out exactly according to the same scenario. By the way, as you can see, at the same time we changed the oil in our gearbox.
To completely reinstall the entire assembly unit, immediately after separating the parts according to point 3 of the instructions given, unscrew the bolts securing the beam. This is how the rear axle gearbox of the “classics” – VAZ 2106, 2107 and others like them – is replaced. Let's also consider replacing the leaking oil seal on the VAZ 21213 Niva. Let's take the same tools as for the “classics”.
- We also drain the oil.
- After hanging the drive, remove the wheels, then the brake drums.
- Having disengaged them from the differential gears, we remove the axle shafts.
- We also disconnect the cardan from the counter element of the tail gear.
- Then we measure the moment.
- Everything else, including the tightening torque values, is followed according to the instructions for the “classics”.
If you need to replace a broken gearbox, say, on a Niva 21214, disconnect its housing from the beam after separating it from the cardan. The same can be said about replacing a defective gearbox on a Chevy Niva.
However, here we must remember that an important rule must be observed: both differential elements of the all-wheel drive must have the same gear ratio. Therefore, when replacing a broken VAZ rear axle gearbox on an all-wheel drive vehicle, you need to know the gear ratio of the second unit.
At the same time, changing a bad oil seal on a Chevrolet Niva is carried out according to the instructions already described.
What to do with Gazelle
Now let’s look at the procedure for carrying out these procedures for popular domestic trucks. Let's study the replacement of the oil seal on the Gazelle. For this we need:
The actions are as follows.
- Having supported the front wheels, we hang the driving part of the car.
- We separate the elements of the cardan and tail gear by first unscrewing the bolts. For convenience, we hold the propeller shaft or rotate it with a mounting blade.
- Having unscrewed the fastening of the drive gear flange, we remove this element together with the reflector.
- Using a screwdriver, we take out the rubber product to be replaced.
- We press the new spare part in, cleaning and lubricating the seat. We use a mandrel and a hammer.
- We do the assembly in reverse.
The differential link design on more powerful trucks is similar. The flange of the drive gear also sits on the splines, so when unscrewing the nut it does not need to be held, as was the case with the Zhiguli.
Consequently, replacing the rubber rubber of the rear axle gearbox, say, from a GAZ 66, can be done according to the instructions just given. Moreover, this instruction is even suitable for replacing a bad Mercedes 124 oil seal.
Price and a few words in conclusion
The described operation is not a simple one, therefore, many will be interested in its price in a car service center. We collected average data for major Russian cities. They are in the following table. City
Only approximate values are given here. The actual cost of the procedure may differ slightly, but not much. It all depends on the specific service chosen and its price list.
Above, we described in full the technology for reinstalling the cuffs of differential units of rear-wheel drive and all-wheel drive cars. Along the way, they gave several recommendations. All this information is intended to help car enthusiasts.
Replacing the Chevrolet Niva front axle oil seal.
- First you need to remove one or two drives, depending on where replacement is needed.
- After this you need to remove the locking ring
- Using a hammer, knock out the bearing. If you have problems with removal, you can use WD-40 lubricant
- The cover is removed, the old oil seal is knocked out using a pipe.
- The installation site is lubricated and a new O-ring is installed.
- the unit is reassembled.
Hello! Most Chevy owners service the unpretentious units of this popular car themselves. During intensive use, you often have to change consumables, especially in the chassis. I will tell you about this type of service, such as replacing the front axle oil seal of a NIVA Chevrolet. The replacement operation is carried out when oil leaks from the axle housing. A clogged breather causes lubricant to squeeze out.
If grease drips immediately after stopping (while the gearbox is hot), and then the flow stops, the breather must be cleaned. When it is clogged with dirt, the heated air is not released outside during movement. Under pressure, the working fluid of the gearbox will be squeezed out even through serviceable gaskets and seals.
If the breather is in order, but oil still leaks, you will have to replace damaged cover gaskets or O-rings. There are three of them in the front axle, and they are different:
The oil seal that seals the drive gear axis is located at the rear of the axle, at the location where the front propeller shaft is attached. Oil seals for the right and left drive (inner axle joint).
ATTENTION! The left and right oil seals are not the same; they have a direction of rotation. This must be taken into account when purchasing
The direction of rotation of the wheel when moving forward is indicated by the arrow. If the oil is installed incorrectly, the removable notches will drive the lubricant out.
To understand the device, here is the layout of the front axle:
The oil seal is replaced without removing the front axle. If the work is carried out independently, and it is not possible to use a lift, the car is placed on an inspection hole or overpass. We tighten the hand brake and install supports under the rear wheels. Gearbox and transfer case levers in the “Neutral” position. The front part is lifted with a jack and fixed on stops.
We clean the bridge from dirt and leaks of technical fluids. Unscrew the crankcase drain plug and drain the oil from the gearbox. Screw the plug into place.
- Socket wrenches 13, 17 and 24 Hexagon 12 Mounting blade (mount) Wooden block; Hammer; Flat screwdriver; Universal puller, two or three legs; Retaining ring remover; A piece of pipe according to the diameter of the seals; Flushing fluid (kerosene, Carbcleaner, Vince, Laurel); Brush with stiff bristles; Lint-free rags.
- We disconnect the driveshaft from the gearbox by unscrewing the bolts securing it to the flange.
- We separate the internal CV joint housings from the drive gears.
- Using a dynamometer, we determine the moment at which the drive gear begins to rotate freely. To do this, turn the flange mounting nut until the gear begins to rotate. We fix the magnitude of the moment.
- We tighten the bolts into two adjacent flange holes (for fixation).
- We insert a mounting spade between the bolts, hold the flange from turning and unscrew the fastening nut.
- Remove the washer and flange from the spline joint. If it is impossible to remove it by hand, use a universal puller.
7. Remove the oil seal using a flat-head screwdriver. 8. Rinse and thoroughly wipe the replacement area. 9. Replacement of the front axle drive gear oil seal is carried out only with original Chevrolet spare parts. To facilitate pressing, any grease (litol, grease) is applied to the sealing ring. 10. Press in the ring using a pipe of suitable diameter. 11. Place the flange on the spline connection and put on the washer. 12. Tighten the nut to the torque determined when unscrewing. 13. Fasten the cardan shaft.
- We remove both drives (or the one that requires replacement)
- Remove the retaining ring and spring washer;
- Using a hammer, carefully knock down the bearing. If removal is difficult, treat with a penetrating lubricant, such as WD-40.
- Remove the bearing cap with the old seal.
- Using a pipe, knock the oil seal out of the cover;
- Lubricate the new spare part with any grease and press the o-ring into the cover.
7. We assemble the unit. We fill the gearbox with oil in accordance with the maintenance instructions, do a test drive, and check for oil leaks.
Installing a New Seal
After removing the axle shaft, the metal shield where the brake pads are attached will remain hanging on the copper pipe with the fluid, so it should be fixed by inserting the 2 upper bolts back into the holes. Then follow the instructions:
- Remove the thick rubber gasket from the rear axle flange.
- Pull out the old oil seal by prying it with a screwdriver or pliers. Clean the seat and wipe with a rag.
- Lightly lubricate the new seal with transmission oil and insert it into the socket of the Niva rear axle as evenly as possible.
- Using a round pipe adapter, press the oil seal into the socket with light blows of a hammer. You can use an old seal as an additional attachment.
At the end of the procedure, you must thoroughly wipe all parts free of oil - the brake cylinder, pads, drum and metal shield. Before reassembling, it would be a good idea to check the axle bearing for wear and grease. Wear is indicated by difficulty turning, binding, or slight noise. If you discover a malfunction, take the axle shaft to the nearest car service center; you will not be able to replace the bearing without special equipment.
This is interesting: Repair of the VAZ 2107 clutch master cylinder
To check the grease inside the bearing, you need to pry the plastic covering the rollers with an awl and remove it. Then add thick Litol-type lubricant inside and put the plastic in place, and then begin assembly.
At the end, it is important to check the oil level in the rear axle gearbox of the Chevrolet Niva. The test is carried out on a fully assembled car, standing on a level area. The filler plug is unscrewed from the gearbox housing, after which the oil level is determined visually or using a thin wooden stick. If there is a shortage, you need to insert a hose of a suitable diameter into the filler neck with a watering can at the end, where the lubricant is poured. It is more convenient to top up with an assistant: you control the level, and the assistant gradually adds oil.
Rear axle
View of the rear axle from the gearbox side (rear axle drive shaft removed): 1 support; 2 — gearbox flange; 3 — flange fastening nut; 4 — gear housing; 5 screw for fastening the gearbox housing; 6 - drain plug
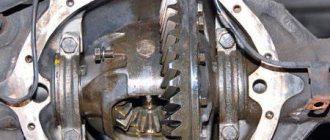
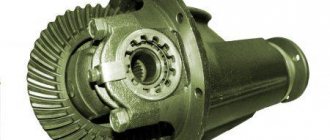
The rear axle consists of a beam, a gearbox with a differential and two axle shafts. The main gear is hypoid, its gears are selected for noise and contact, so they can only be replaced as an assembly (the pair is marked 2106). The drive gear of the main gear is made integral with the shaft (shank) and is installed in the neck of the gearbox on 2 tapered bearings. The outer rings of the bearings are pressed into the neck seats, and the inner rings are mounted on the shank. A spacer is installed between the inner rings; When the shank nut is tightened, the bushing is deformed, ensuring a constant preload of the bearings.
The bearing preload is kept under control by the moment the drive gear rotates (other parts are not installed in this case). For new bearings, the turning torque should be in the range of 157–197 N.cm, for bearings after a run of 30 km or more – 39.2–59.0 N.cm. In this case, the shank nut is tightened to a torque of 118–255 N.m, occasionally checking the rotation of the drive gear. If this turning torque has already been reached, and the tightening force of the nut is less than 118 N.m, you need to replace the spacer sleeve with a new one, because the old one is very deformed. Replacement of the bushing is also necessary in this case, when the turning torque is higher than permissible (due to inattention when tightening).
If the main pair or drive gear bearings are replaced, you need to re-select the thickness of the adjusting ring. It is installed on the shaft between the drive gear and the inner ring of a huge bearing. The method for selecting a ring is described in the section Disassembling the rear axle gearbox.
Some of the defects of the rear axle
The driven gear of the main gear is attached to the differential box flange with special bolts without washers. These bolts must not be replaced with any others. The differential box rotates in 2 tapered bearings. Their preload, as well as the gap between the teeth of the main gear gears, is adjusted by nuts screwed into split bearing beds. The side gears are installed in cylindrical sockets of the differential box and rest on it through support washers. These washers are selected in thickness so that the gap between the teeth of the satellites and semi-axial gears is within the range of 0–0.1 mm. The satellites are installed on an axle with constant engagement with the semi-axial gears. The axis has spiral grooves for supplying lubricant to the rubbing surfaces.
One end of the axle shaft rests on a single-row ball bearing installed in the socket of the rear axle beam, and the other (splined) end enters the axle gear. The inner ring of the bearing is fixed to the axle shaft by a locking ring installed with an interference fit (burning fit). The outer ring of the bearing is fixed by a plate, which, together with the oil deflector and brake shield, is secured with 4 bolts and nuts to the rear axle support.
1.3 liters of gear oil with property class GL-5 is poured into the rear axle housing (in fact, up to the lower edge of the filler hole). The exits of the axle shafts from the beam are sealed with oil seals. If the oil seals are leaking, the oil is drained through the oil deflector to the outside of the brake shield - this way it does not get on the brake pads. The oil seal installed in the neck of the gearbox runs along the surface of the flange. An oil deflector is installed between the bearing and the flange. Oil leakage from under the self-locking flange mounting nut (the same nut adjusts the bearing preload) indicates that it is loose. Operating the vehicle with the gearbox nut loose can lead to its breakdown.
To equalize the pressure outside and inside the rear axle housing, a breather located on the rear axle support above the gearbox is used. At each maintenance check to see if the breather cap is stuck.
Replacing a stuffed box Chevrolet Niva gearbox for the rear axle
Replacing a stuffed box rear axle on a Chevrolet Niva. Breath test. Box number for interior:.
- We disconnect the drive shaft from the gearbox by unscrewing the bolts to the flange.
- Separate internal housings CV connection from actuators.
- Using a dynamometer, we determine the moment when the gear begins to rotate freely. To do this, turn the flange nut before rotating the gear. We reinforce the meaning of the moment.
- Thread bolts into two adjacent flange holes (for mounting).
- Insert the mounting blades between the bolts, hold the flange from turning, and unscrew the mounting nut.
- Remove the washer and flange from the keyway. If it is impossible to remove it by hand, we use a universal puller.
Remove the seal using a flathead screwdriver. 8. Wash and thoroughly wipe the replacement area. 9. Replacing the front axle gearbox seal Made only with unique Chevrolet spare parts. Apply any lubricant (lithol, hard oil) to the seal. 10. Insert a pipe of the appropriate diameter into the ring. 11. Place the flange on the detachable connection and put on the washer. 12. Tighten the nut to the point indicated during loosening. 13. Secure the drive shaft.
- Remove both disks (or the one that requires replacement)
- Remove the retaining ring and spring washer;
- Carefully prime the bearing with a hammer. If difficult to remove, treat with a penetrating oil such as WD-40.
- Remove the bearing cap from the old shipping box.
- Using a pipe, remove the filled box from the lid;
- Lubricate the new part with any lubricant and place the O-ring on the cover.
Assemble the assembly. Fill the box with oil in accordance with the maintenance instructions, do a test drive, check for oil leaks.
At the end of the procedure, you need to carefully wipe off oil from all parts - the brake cylinder, pads, drum and iron shield. Before reassembling it, it wouldn’t hurt to check the axle bearing for wear and grease. Wear is indicated by difficult rotation, binding, or slight noise. Having found a fault, take the axle shaft to your nearest car service; you will not be able to replace the bearing without special equipment. To check the lubrication inside the bearing, you need to pry the plastic covering the rollers with an awl and remove it.
Finally, it is important to check the oil level in the rear axle gearbox of the Chevrolet Niva. The check is done on a one hundred percent assembled car, standing on the most level surface possible. The filler plug is removed from the gearbox housing, after which the oil level is determined visually or using a narrow wooden stick.
If there is a shortage, you must insert a hose of a suitable diameter into the filler neck with a watering can at the end, where the lubricant is poured. It is more convenient to top up with an assistant: you control the level, and the assistant adds oil. Removal is a separate scribe!
At first, he somehow unscrewed four nuts and broke the key on one. Later I hammered it with a hammer, but without a puller it was useless to remove this thing. We are Engineers! From the means at hand, a puller was assembled, two almost parallel fittings, at the end of which there was an angle on one side and a CV joint on the other side, put on the axle shaft through the front hub disc!
And voila! This did not make the difficulty any less. How to remove the retaining ring? Cut the old bearing with a grinder and knock out the ring. Later, knock out the remaining bearings. It is convenient to install a new bearing through the old bearing ring, and simply put the same retaining ring on top of each other and beat it in a circle with a hammer! Enjoy watching! Unfortunately, it didn’t get to the point of reinstalling it; there was no new retaining ring.
Thinking out loud. Since they were taking out the axle shaft, I suggested that he install rear disc ones, but as annoying as it may sound, there was no money, otherwise it would have been absolutely cool! The axle shafts in the rear axle of the Niva Chevrolet experience very serious loads. The oil seals and, naturally, the bearings, which will be discussed now, get a fair amount. If there is talk about replacing them, the manufacturer timidly recommends replacing them together with the axle shafts.
READ Replacing Injectors Umz 4216 Video
It’s expensive, so now we’ll try to replace the axle bearing on a Niva Chevrolet, look at the article numbers and manufacturers, and listen to the advice of professionals.
Since our car is often operated in very difficult conditions, the loads on the bearings are very high. Apart from loads, the bearing can be attacked by water when the axle seal fails.
At the same time, oil may begin to leak from the rear axle housing.
Advice on how to remove drives without dismantling the Niva front gearbox
- To dismantle the drives, it is necessary to unscrew the fastenings of the gearbox (in this case, some kind of stop is placed under it).
- Then the steering knuckles are released. To do this, simply unscrew the shock absorber mount from the lower arm and the lower ball joint.
- To relieve the load, jack up the lower suspension arm.
- Unscrew the hub nut and remove the centering ring. The nut is too tight, so we use a wrench extension (for example, a metal pipe).
- We move the steering knuckle to the side. The drive can then move freely.
- To ensure free movement of the drive during removal, the gearbox must be moved back slightly.
- We remove the drive, being careful not to damage the anthers. If the boot is torn, it must be replaced.
- The procedure for removing the right and left CV joint drives is similar.
Before dismantling, it is necessary to mechanically remove dirt from the inside of the steering knuckles and from the bottom of the car above the work area. The best option is to wash the bottom with a high-pressure apparatus one day before carrying out work.
Source