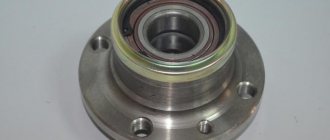
Why is there a bearing in the hub?
The wheel rim or the wheel rim itself is attached to the hub flange. Elements of the brake system are also installed on it. If the wheels attached to the hub are driven, it acts as part of a car transmission. The front steering wheel hub is a steering element. The diameter of the hub is significantly larger than that of its internal hole, where the bearing is pressed. Its length usually exceeds the diameter of this hole.
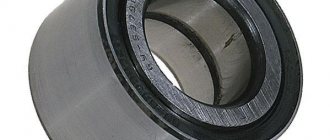
The high strength and design of the hub does not require frequent replacement. At the same time, replacing the wheel bearing pressed into it should be done more often. This part, together with other similar bearings, holds the weight of the machine, allowing the wheels to rotate. In the hubs of driven axles that do not experience heavy loads, single-row tapered bearings are usually used. For driving applications, tapered bearings with two rows are used, which can withstand twice the load than single-row bearings.
Wheel bearings have a closed design, which means they can be used until they are almost completely worn out. They do not need to change the lubricant. However, timely replacement of the wheel bearing is necessary, first of all, because it ensures safe movement under the influence of severe radial and lateral loads.
Replacing the front wheel hub bearing of Lada Granta
Tools:
- Jack or ditch lift
- Stand - 2 pcs.
- Wheel key
- Medium flat screwdriver
- Hammer medium
- Kerner
- Driver for socket attachment
- 10mm wrench attachment
- 19mm wrench attachment
- 30mm wrench attachment
- Torx wrench attachment E12
- Torx wrench attachment E14
- 7 mm straight box spanner
- 17 mm straight box spanner
- Punch
- Bolt M12×1.25 mm - 2 pcs.
- Bench vice
- Chisel
- Double jaw puller
- Cup puller
- Circlip Pliers
- Metal brush
- Needle file
Parts and consumables:
- Grease "CV joint-4"
- Rags
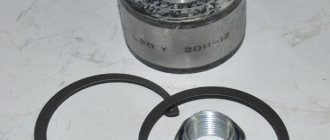
- Wheel bearing - 2 pcs.
Notes:
Replace the bearing when it fails. There are two ways to replace a bearing. The first is by removing the steering knuckle assembly, the second is without removing it from the car. The operations for replacing the wheel bearings of the left and right wheels are similar. Carry out the work on an inspection ditch or overpass.
1. Apply the parking brake, raise the front of the vehicle using jacks or a trench lift, and place it on stands.
2. Remove the wheel using a wheel wrench.
3. Using a screwdriver, remove the protective cap from the hub.
4. Using a hammer and a center punch, straighten the collar of the hub bearing nut that has been dented in two places.
5. Have an assistant press the brake pedal; At the same time, use a 30 mm wrench to loosen the hub bearing nut.
Note:
The nut is tightened with a large torque, so the attachment and wrench must be strong enough to transmit the necessary force.
6. Unscrew the hub bearing nut completely and remove the washer.
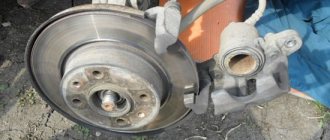
7. Remove the front brake disc as described in this article.
8. Disconnect the wheel drive from the hub. How to do this, see here (for the right wheel) or here (for the left wheel).
Note:
In order not to disturb the wheel alignment angles, you can replace the bearing without removing the steering knuckle.
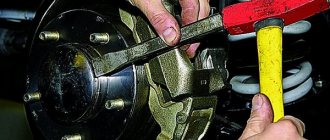
9. Connect the ball joint to the knuckle and compress the hub. There are two ways to remove the hub: 1) by striking through a soft metal drift;
2) Using the front wheel brake disc. Pass M12×1.25 mm bolts about 130 mm long through two diametrically opposite holes in the disk and screw them into the holes of the hub to a depth equal to its thickness. By sharply hitting the bolt heads with the disk, compress the hub.
10. If it was not possible to remove the hub in this way, remove the steering knuckle. To do this, unscrew the nuts of the bolts securing the shock absorber strut to the steering knuckle and remove the bolts as described here. Disconnect the ball joint and remove the steering knuckle.
11. Place the steering knuckle on the vise jaws and press the hub out of the knuckle through a mandrel or head of a suitable diameter, applying force to the end of the hub.
12. Remove the hub from the fist. In this case, the outer part of the inner ring of the bearing remains on the hub.
13. Remove the mud ring from the hub.
14. Insert a blunt chisel between the ends of the inner ring of the bearing and the hub and, using a hammer on the chisel, move the inner ring.
15. Use a puller to compress the inner race of the bearing.
16. Using snap ring pliers, remove the bearing snap ring.
17. Using a cup puller, press the bearing out of the steering knuckle and remove it with the puller.
18. Remove the bearing from the puller.
19. Clean and lubricate the inner surface of the steering knuckle with grease.
20. Using a needle file, clean out the nicks from the chisel on the hub. Press the new bearing into the steering knuckle, applying force to the outer race of the bearing.
21. Install a retaining ring into the groove of the steering knuckle socket. When pressing the hub, rest the puller washer on the inner race of the bearing.
22. Carry out further assembly in the reverse order, tighten the bearing nut to the prescribed torque, and be sure to lock it by jamming the collar.
Note:
Before installing the brake disc, thoroughly clean the mating surfaces of the hub and brake disc from rust and scale, since even the smallest particle sandwiched between the mating surfaces will cause the brake disc to run out and vibrate during braking.
If the bearing was replaced with the steering knuckle removed, then it is necessary to check and adjust the wheel alignment angles at a service station.
The article is missing:
- Photo of the instrument
- High-quality photos of repairs
When to change a bearing
The wheel bearing directly affects the vehicle's ability to move confidently on the road without endangering those inside and outside the vehicle. If at least one of these bearings fails, there is a risk of vehicle uncontrollability and an emergency. In order to understand in time whether the wheel bearing needs to be replaced, you should rock each wheel with both hands every couple of weeks to detect any play or extraneous sounds.
Sure signs that your wheel bearing needs to be replaced are:
- detection of noticeable play in the wheel when it rocks in different planes;
- the appearance of a monotonous hum emanating from the wheel while driving;
- howling or noise that disappears when turning sharply;
- The hub or hub cap is hot to the touch.
The reasons for such phenomena may be loss of lubricant due to high temperature, washout if the car often overcomes water obstacles. Fine sand and dust can get into the bearing housing and have an abrasive effect.
In any case, it is worth thinking about how to change the wheel bearing. After all, its wear also affects the vibration of the steering wheel when the car is moving. Usually this procedure is carried out after 110-130 thousand km. mileage However, this indicator may vary depending on the operating conditions of the car and its driving style. It is believed that every fourth car with a mileage of over a hundred thousand kilometers requires special attention to the condition of such bearings. To prevent problems with them, car owners should make it a rule to regularly diagnose wheel bearings on their own or using the services of a car service center.
At the same time, it is important to remember that attempts to repair it yourself or how to replace the hub bearing cheaper will not lead to anything good, since it cannot be repaired. If it fails, it simply needs to be replaced.
Symptoms of a problem
Problems associated with the front hub are identified by the following symptoms:
- extraneous, unnatural noise from the wheel during rotation;
- wheel beating, vibrations of varying degrees of intensity;
- sounds of scraping metal;
- front wheel play appears.
Causes of breakdowns
- Unsatisfactory condition of roads. The fact is that when driving on an uneven surface, wheel bearings take on increased load, sudden impacts, and exposure to high and low temperatures. Over time, the metal components of the product become brittle and begin to break down.
- Aggressive environments. Due to the fact that the element is located in the center of the wheel, it is constantly in contact with moisture, water, dust, and dirt. In winter it is exposed to cold temperatures and in summer to hot temperatures.
- High operating temperatures. The rotation process is accompanied by the natural release of heat; constant heating and cooling occurs (especially in winter conditions), which has a detrimental effect on strength and wear resistance.
What you need to replace a wheel bearing
To replace a wheel bearing with your own hands, you need to be extremely careful and not overestimate your strength. In a service station, this is much easier and faster to do. Most of these enterprises employ experienced craftsmen who use professional tools to knock the bearing out of the hub.
Having decided to carry out the work on your own, you need to answer the question of how to remove the wheel bearing and how to replace it with a new one.
To do this you need to prepare:
- new bearing, preferably made in Europe, retaining rings and hub nut;
- hub diagram and detailed instructions for carrying out work;
- a repair room with a vice and good lighting of the unit being repaired;
- special device for removing the bearing;
- a set of keys and sockets with a knob;
- round nose pliers, which may be needed to remove the retaining ring;
- lubricant (litol);
- a piece of pipe up to a meter long as a lever.
Before starting work, you should consider in detail how best to remove the wheel bearing. When doing this for the first time, it is better to invite an assistant. The wheel bearing puller deserves special attention during preparation. With its help, you can carefully remove the bearing without damaging the wheel and other parts of the car. It is better to familiarize yourself with its structure and operating principle in advance. Typically, such a wheel bearing puller has a fairly simple device.
It is based on a metal rod and two or three metal legs connected to it. Their ends are bent inward. The paws can be easily moved along the shaft for easy grip. They can be unfolded to remove the bearing or other parts. Using the clamps included in the kit, the damaged bearing can be removed more easily. To remove stuck bearings, a service station can use either a mechanical or hydraulic puller to remove the wheel bearing. Working with the bearing removal device requires care and precision. Here a sledgehammer and a drift are unacceptable, because... the hub seat may be damaged.
Replacing the front wheel bearing on a Lada Granta with your own hands - step-by-step instructions
- We remove the wheel, tear off the hub nut, for this you will need an extension in the form of a pipe or a wrench.
- Then we lift the car on a lift or jack up the hub we will be working with.
- Using a “12” socket, unscrew the two bolts securing the brake caliper to the steering knuckle.
- We remove the brake caliper and hang it so that it does not interfere.
- Unscrew the brake disc guides and then remove it.
- Next we dismantle the hub. To do this we use a hub puller.
- We take pliers and remove the retaining ring; if it is soured, then first we try to move it with a chisel.
Replacing the rear wheel bearing
Before replacing the bearing on the rear hub, you need to remove the wheel and brake drum as usual, and unscrew the hub nut. The brake pads can be left untouched. After removing the hub using a puller, remove the bearing from its seat. Replacement of the rear wheel bearing is carried out after a careful inspection of the hole in which it was located, cleaning it, and removing possible burrs.
The hub must be cleaned of dust and dirt, old grease. The rear wheel bearing should be replaced only after these procedures have been completed and the bearing seat has been lubricated with lithol. To do this, use a puller to press the bearing all the way and install the retaining ring. Reinstall the entire assembly in reverse order. Generously fill the bearing seat with grease. Close it with a plug placed on the sealant.
Replacement procedure
- We place the car on a level area with sufficient lighting, placing stops under the stern wheels.
- On the side planned for replacement, we loosen the tightening torques of the Lada Granta wheel bolts.
- Armed with an extended lever, we loosen the central hub nut.
- We hang the car or lift it with a jack from the side of the bearing being replaced.
- We remove the plastic cap protecting the central nut.
- Use a hammer and a core to align the collar of the hub nut.
- We unscrew the nut itself and remove it together with the washer.
- We dismantle the brake disc and caliper.
- We remove the CV joint shaft from the splined engagement with the hub on the LADA Granta.
- We unscrew a couple of bolts that hold the shock absorber strut on the steering knuckle.
- Disconnect the lever from the steering axle. The fist itself can now be removed.
- Having placed the steering knuckle and hub assembly in a vice, take a mandrel of a suitable size and compress the hub itself.
- We dismantle the protective ring on the LADA Granta.
- We use a chisel and a hammer, striking the ring until it moves to the side. Then we remove this element with a special puller.
- Having removed the retaining ring using the pliers indicated earlier, we remove the bearing from the seat in the fist.
- We clean the internal cavity of the journal with a wire brush and then coat the bearing seat with a special lubricant.
Now you can begin installing a new Lada Granta bearing. The procedure for this action is the reverse of dismantling manipulations.
Recommendations
Replacing wheel bearings may vary from vehicle to vehicle. Modern cars may be equipped with various easily damaged electronic devices that must be removed when replacing a bearing. Therefore, if you are not a highly qualified car mechanic, it is better to entrust this work to car service specialists.
It is also worth doing a wheel alignment after replacing the wheel bearing. An adjusted wheel alignment will improve the car's road holding on turns and straights, eliminate vibration, and also reduce tire wear and fuel consumption. Vibration may also occur due to a crookedly inserted bearing. To eliminate it, you need to knock out the bearing again and check the tightness of the wheel nuts.
After I published an article about identifying a CV joint failure , questions about other components began pouring into my blog. Namely, how to determine this or that malfunction. And now several people are asking a question about the wheel bearing, namely how to understand that it is faulty. Today I will also try to explain simply and clearly how to identify a breakdown with your own hands...
CONTENTS OF THE ARTICLE
The wheel bearing is a very important element; without it, the car wheel would not spin. It experiences really high loads, and therefore must be made of wear-resistant, high-quality materials. However, over time, due to high mileage or simply improper use of the car, this part can fail. It is a MUST to change it, otherwise you can provoke a big accident.
Replacement algorithm
- We drive onto a viewing hole, lift or overpass;
- Remove the corresponding left or right wheel;
- By unscrewing the two nuts, remove the brake caliper and move it to the side so that it does not interfere with the process;
Place it on a flat surface
, we begin to carry out diagnostics. First of all, immediately replace the seals, no matter how intact they look, it is better to replace them. Temperature does its job. Carefully tapping it with a wooden tip, we remove the wheel bearings and wash them in kerosene to make diagnostics possible in the future.
It happens that the product is externally normal; you just need to clean the groove, replace the lubricant and that’s it. True, this happens extremely rarely lately, and the only way out is to buy a new part.
Having prepared the place for the new part, using the old bearing as a cage, we press in the new one. Remember, you need to change only in pairs; one at a time will not work. Some car enthusiasts recommend replacing the rotating mechanisms as a whole, but this cannot be done, since the ability to set wheel camber is lost. Because, despite the same type, everyone has a different angle of inclination.
Other self-taught people advise installing “ Iveco”
”, but then you need to use a lathe for turning, as there are inconsistencies.
- We install the entire module in reverse order;
- At the same time, we diagnose the brake pads and replace them if necessary;
- Upon completion, we test the car at different speeds and turns left and right.
If all is well, then replacing the wheel bearing on the Niva was successful.
Causes of failure
To be honest, the bearing is a very durable part of the hub. And to “kill” him you need to try! Most likely, all kinds of racks, rubber bushings and other attached parts will fail, but if you “try” you can also damage this element.
1) Long mileage . No matter how trivial it may sound, a long mileage of a car wears out all the components, and the bearing is no exception. This is the main cause of the malfunction, the rest are secondary. After approximately 70 - 120,000 kilometers, different manufacturers have different ways. You will hear a characteristic crunch. It says that this part needs to be changed.
2) Loss of tightness . The bearing has a little lubricant, which is covered with special casings made of rubber or plastic. If they break, the lubricant comes out and wear becomes much greater. After just a couple of thousand kilometers you can hear a characteristic hum, which indicates a malfunction.
3) Sloppy driving . If you constantly fly into holes at high speeds, this will also wear out this unit a little. Although, as I wrote above, other suspension elements will fail faster.
4) Incorrect pressing . This is a secondary reason; during repairs, the new bearing may be pressed in incorrectly, for example, obliquely. Thus, when driving, it will not stand correctly, which will wear it out quite quickly; after about a couple or three thousand kilometers it will need to be changed again.
5) If you tighten it too much . This happened especially on our domestic cars; the bearing was overtightened during replacement, so it heated up more than usual, which also contributes to a decrease in service life and subsequent breakdown. So you need to take into account the twisting force; it is usually indicated in the instructions.
These are all the main reasons, but as you can see, the last two are the “crooked hands” of the car service. So we only replace them at trusted stations that provide a guarantee on the work. Sometimes it is more profitable to look at official stations.
Causes of malfunctions
The resource of this part is very impressive and can reach 100 thousand km, subject to gentle operation. Modern realities show that the front hub bearing can become unusable much earlier than the specified regulatory period.
Next, we will identify three significant factors that can cause premature wear of a part such as the front wheel bearing in a Lada Granta car.
- The state of domestic roads, the quality of which is far from ideal. When driving over bumps, the front wheel bearing experiences enormous stress. Also, critical temperatures and dynamic impacts (shocks) can have a negative impact on their condition. All this leads to the structure of the material from which the front hub bearing is made losing its strength properties, which provokes destructive processes.
- Exposure to aggressive environments. Due to the structural location of the bearing, it is doomed to constant contact with moisture, dirt and other negative atmospheric factors. The influence of heat and cold is also detrimental to his condition.
- Increased operating temperature. During the rotation process, natural heat generation occurs. Temperature changes, especially in winter, also have a detrimental effect on the strength parameters of the product.
What will happen if you don't change
Many car enthusiasts drive with faulty wheel bearings, and even accelerate at 100 kilometers per hour or more - guys, this is very dangerous, remember this is the connecting element of the wheel, which is responsible for its rotation. If it is broken, it can jam at any moment. And this is a sudden stop of one of the front wheels. Now imagine if your speed is 100 km/h - at that speed you will simply fly off to the side of the road, this is the best case scenario, but you can also fly into oncoming traffic, and then you’re not far from an accident. There have been cases when cars overturned. So guys, the hub bearing is very dangerous, if you don’t want to change it, drive at low speeds, up to 40 km/h, otherwise everything can end very badly.
Replacing the front wheel bearing of a VAZ Kalina/Granta car.
Replacing the front wheel bearing of a VAZ Kalina/Granta car is carried out in an identical way. This is due to the fact that the Granta hub design is a modernized Kalina hub.
A wheel bearing is one of the main components of the chassis, the integrity of which affects not only the performance of the vehicle, but also the safety of road users. Therefore, diagnosis of this element should be regular.
It is recommended to replace the bearing when the mileage reaches 80-100 thousand km. But situations arise when replacement must be made ahead of schedule, this is due to the influence of internal or external factors.
1.Noise in the wheel area while the car is moving;
2. Vibration, grinding or beating of the wheel while the car is moving;
2. The wheel spins to identify the type of noise;
We determine the problem ourselves (at home)
In general, in addition to the crunching noise that you will constantly hear when moving. You can determine by the signs yourself literally around the house.
1) Place the car on a flat, preferably paved area.
2) You need to check the play along the vertical axis. To do this, we take the wheel at the top point and try to swing it with all our might. If you hear clicks and there is play, then this is definitely “hub”.
3) To be completely sure, you can lift the wheel on a jack and rotate it. If you hear a crunching sound, there is a malfunction.
4) There is another method (works only on front-wheel drive), but it is advisable to do it on a lift. You need to lift the car, start it, put it in gear and accelerate the wheels, then turn off the engine and listen. The side that makes noise, crunches and vibrates is faulty.
Now a short video version of the article
About replacement
What I want to say is to change the bearing correctly, it’s quite difficult to do it yourself. You need at least a couple of pullers, as well as knowledge of the car's suspension. It’s not for nothing that many automakers change the entire wheel hub.
When replacing it is important:
1) The bearing can be pressed in only with special, even races (ideally, use a housing from an old one). Press-fitting with “rolling bodies” is not allowed.
2) Avoid pressing with sharp tools, which may damage the O-ring, which will then lead to lubricant leakage.
3) When pressing, you need to maintain the correct gap and plane; distortions are not allowed. Incorrect clearance - misalignment will lead to rapid failure.
That's all, in conclusion I would like to say that I myself changed the wheel bearing a couple of times. In a garage environment, and even if you don’t have the skills, it’s very difficult to do this (you can ruin the new one), so it’s better not to waste money and give it to a proven station. Save your nerves, money and energy.
That's all, read our AUTOBLOG.
( 45 votes, average: 4.60 out of 5)
Typically, bearings do not fail unexpectedly. This is preceded by many signs. How to determine when it’s time to change a bearing, and how to make it last long?
Where are the front and rear hubs on the Lada Grant? Description, purpose
The front hub joint is located on the front left (right) side of the axle shaft. The rear hinge is located in the rear left (right) suspension block.
The main purpose of the bearing is to firmly hold the hub and ensure wheel rotation. Structurally, the front (rear) hub consists of:
- outer and inner metal frame;
- a separator in which metal balls and rollers are located;
- insulating rings;
- special filler - graphite-based lubricant.
000_moto_0611_070
“Bearing” stands for lining under a tenon (axle), and its purpose was once to reduce friction between the axle and the carriage wheel. Today, the first thing that comes to mind when thinking about a bearing is two rings with balls between them. But there are many types of bearings - tapered roller, rotary, and plain bearings (the latter in design resemble that very “spike lining” and are used mainly in the engine - in conjunction with the crankshaft). But today we will focus on those that most often fail on a motorcycle, and which, in principle, can be changed independently. And sometimes on the road there is no other way out!
The most vulnerable parts of a motorcycle are the wheel bearings. When driving through puddles and fords, the hub cools and water tends to get in there. Equipment owners also help this process by washing hard-to-reach areas of the motorcycle with a jet of water under pressure. If you drive off-road, grass often wraps around the axle, squeezing out the seals and again opening the way for dirt and moisture to the bearings. And road dust slowly wears away rubber and steel, breaking through. The main sign of wheel bearing wear is play, which can be easily assessed by shaking the suspended wheel in the transverse direction. The howl of such a bearing, as a rule, is drowned out by the noise of the engine and transmission.
By the way, on parts of the enduro the seals are installed with springs outward - it is believed that this way they better block the path of water when a vacuum occurs in the hub. To ensure your wheel bearings last a long time, keep the protective seals in good condition. Wheel seals are the first to fail on off-road motorcycles, so their owners should pay special attention to their condition and promptly replace them with new ones. At the same time, take the time to inspect the mating surfaces of the bushings. Worn metal (and it is quickly and inevitably pierced by the springs of worn oil seals) will immediately ruin the new oil seal. You can try to polish minor defects, but it is best to order new bushings to replace the worn ones in advance, before replacing the bearings, otherwise you will soon have to buy a set again - bearings, seals, bushings. It is equally important to be careful when replacing wheels and make sure that dust or sand does not stick to the axle and bushings that are removed for a while. The required amount of lubrication on the wheel axle is also vital for the normal operation of the unit. Typically, aluminum or copper-filled greases are recommended for lubricating motorcycle axles.
Reviews
| № | Positive |
| 1. | Gennady: I’ve been actively using the car for two years, there are no comments on the chassis or suspension. Once I replaced the rubber boot on the left CV joint. |
| 2. | Kirill: I have driven the car over 80,000 km, I can say that the CV joint still has service life, but it is necessary to prepare for repairs. In general, the parts are maintained within the period specified by the manufacturer. |
| 3. | Vyacheslav: the car is a year and a half old, I bought it at a dealership, no complaints. I systematically carry out technical inspections, buy original consumables, and do not skimp on preventative maintenance. |
| 4. | Dmitry: replaced the “grenades” only at 90,000 km. The service station master said that the mileage is good, not every car gets that much mileage. I believe that careful driving contributed to extending the life of the vehicle's chassis. |
| 5. | Leonid: I’m pleased with the build quality of the car, there are no complaints. Breakdowns happen, but they are insignificant, I fix them myself. |
| 6. | Vasily: if you don’t take into account minor flaws, then the car is good, better than previous generations. |
| 7. | Victor: I drove Grant for a year and a half, didn’t do any repairs, visited a service station only for diagnostics. |
| Negative | |
| 1. | Ivan: I replaced the right CV joint for the first time at 45,000 km, after which the left one needed repairs. In general, the workmanship is low, I am dissatisfied with the machine. |
| 2. | Alexander: standard CV joints are weak and poorly made. After purchasing a car, experts recommend installing foreign analogues. True, the cost is 15% more expensive than domestic ones. |
| 3. | Vladlen: after two years of active driving, I can’t say anything bad. Minor defects are present, but they can be easily fixed. |
001_moto_0611_070
Such a tool is available in every properly equipped workshop. Before removing the bearing, it is necessary to thoroughly clean the surrounding surfaces so that dirt, residues of old grease with sand or oxidized aluminum do not prevent the bearing from coming out. On some motorcycles (where the bearing fits tighter than normal), it is recommended to heat the hub to 100°C.
You can also use a hammer to press in a new bearing. But only in combination with a mandrel with a diameter half a millimeter smaller than the outer race of the bearing. It could be, for example, a used socket head. The main thing is that the load falls only on the outer ring. A more civilized, but not always more effective tool is a device consisting of disks of various diameters and a long threaded rod. Using a disc of the required diameter, any bearing can be carefully pressed into place. Both methods require great care at the very beginning of the process, when the bearing has only slightly entered the hub. The outer race of the bearing must fit into the mounting hole without distortion. If the bearing nevertheless deviates from the desired direction, it can be directed with very light blows of the mallet. And also, before pressing the bearing, be sure to lightly lubricate the seat and the outer edge of the bearing with engine oil. After installing the bearings, make sure they rotate freely.
It happens that the internal spacer sleeve in the hub
Replacing the rear wheel hub of a Lada Granta
- We place the car within the perimeter of the repair area and secure the front row of wheels with wheel chocks.
- Using a wheel wrench, we tear off the mounting nuts, jack up the car, and remove the wheel.
- We unscrew the screws securing the brake drum to the structure.
- Remove the hub cap and remove the axle shaft from the splines.
- We fix the structure in a stationary vice. Gently tap the outer edge with a chisel.
- If necessary, use WD-40 liquid to remove deposits and rust.
- We dismantle the hinge and use a vice, although some craftsmen use special pullers. In general, whatever is more convenient for you.
- Using a metal mandrel, we knock out the inner ring.
- To finally press out the hinge, use a hammer and chisel and gently tap along the outer perimeter of the frame.
002_moto_0611_070
a fraction of a millimeter longer than necessary, resulting in excessive friction inside the bearing and the bearing becomes difficult to rotate. To correct this situation, it is necessary to slightly loosen the bearing by moving it outward. When assembling the wheel, pay special attention to the outer bushings between the bearings and the fork stays. If you forget one of these bushings or mix them up, the entire system will not work correctly, which can lead not only to rapid wear of the parts, but also to a fall.
Review of manufacturer prices for front and rear hinges
How to choose and buy quality parts
Service center specialists strongly recommend purchasing consumables and components exclusively from specialized stores, representative offices, and official dealers.
To a lesser extent, you need to use the services of unverified suppliers who sell spare parts at an unusually low cost.
When purchasing, check the catalog numbers with the actual data specified in the operating instructions for the technical device. If such a brochure is not available, consult a specialist.
003_moto_0611_070
Often you have to deal with the steering column bearings. The main thing is to tighten them in a timely manner, without allowing it to play. In the steering columns of modern motorcycles, thrust ball bearings are often found, primarily supporting loads directed parallel to the axis of the steering column. If play appears in such a bearing, it begins to break quickly. At first, a slight click appears when braking, but if the situation is not corrected in time, the steering wheel will begin to rotate worse and may jam at the most inopportune moment. To tighten the steering bearing, you first need to find the nut that holds it in place. As a rule, it is located under the upper traverse and sometimes it is supported by a second one of the same kind. Often these nuts have a castle crown and require a special wrench. The motorcycle must be positioned so that the front wheel hangs in the air and the steering wheel rotates freely. Remove the upper crossbar and begin to tighten the bearing nut little by little, while checking that the system rotates easily. As soon as there is a force during rotation, stop tightening the nut and turn it back about a quarter of a turn. The steering wheel should rotate freely, and the play should disappear.
An important point: if clicks from the steering column appeared on a completely new motorcycle, it is possible that the bearing did not fully fit into its seats during assembly at the factory. In such cases, it is useful to first tighten it with a fairly large force, about 25–30 Nm, and only then loosen it and perform the procedure described above.
Replacing steering bearings is sometimes a difficult task and requires good equipment and skills. And if you can still handle wheel bearings in a garage, then you can’t do without the right equipment to work with steering bearings. Driving with worn bearings - no matter the wheels or steering column - is dangerous!
Every motorcycle has many other components where bearings work, but most of them are in the engine, and thanks to excellent lubrication and cleanliness, they last a long time and do not require replacement. And if it so happens that one of the bearings of the engine or gearbox fails, then there was a very serious reason for this (usually a problem with the lubrication system) and replacing the bearing alone will not end the matter. But let's not talk about sad things. After all, if you regularly monitor your motorcycle and maintain it properly, nothing bad will happen to it.
Replacing wheel bearings (using the example of Suzuki DR-Z 250):