Print this article Font size 16
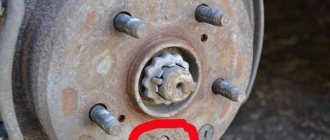
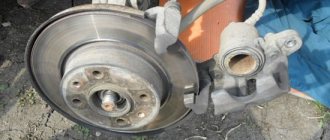
Malfunction of the front hub of a VAZ 2109 car caused by faulty bearings can lead to quite dire consequences.
Without a properly functioning hub, the wheels stop rotating at the required speed. This leads to damage to the braking system, and then the entire car breaks down.
If any malfunctions are found, they should be corrected immediately.
Replacing the front wheel bearing on a VAZ 2109 (21099, 2108) with photos and videos
- ➡️ Diagnostics, causes and signs of breakdown
- ➡️ Initial operations: dismantling and removal
- ➡️ Read more about ways to replace a bearing on a VAZ 2109
- ➡️ How to choose a bearing: price, dimensions, number ➡️ Manufacturers of front bearings
➡️ Methods for replacing and preparing for hub repair
The front wheel bearing on VAZs is the weak link of the front part of the car. As stated by the manufacturer, on average, replacement is required every 60-80 thousand km, but if road conditions and vehicle operation are not satisfactory, the front wheel bearing will have to be replaced even earlier.
In 2022, the VAZ 2109 is no longer produced, but this article is suitable for both owners of new VAZs (VAZ 2110-2115) and owners of Priora and Kalina. The reason for this is the front suspension, and specifically the hub unit, it is no different in these cars, so the technology and the replacement of the front wheel bearing of the VAZ 2109 is similar to the models of cars of the VAZ family of current years.
There are several methods for replacing a bearing on a VAZ 2109, but before you get acquainted with them, let’s first say a few words on how to diagnose and determine the faulty unit, and also let’s talk about the causes of such a breakdown.
Rear wheel bearing for VAZ 2108: price, part numbers, dimensions – which one is better?
Today there are many offers on the market, sometimes significantly different in price. Which rear wheel bearing for VAZ 2108 is better to buy? The answer is simple - it corresponds to the basic characteristics. Attention should be paid not to the price, but to the dimensions and manufacturer of the bearing.
In addition, the product must have a certificate of conformity to GOST 520-2002 or ISO 15:1998, protective holograms and be well packaged.
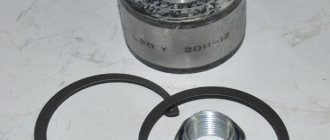
- The VAZ 2108 rear wheel bearing number in the international system is VA2B633313С.
- Marking (number) according to GOST: 6-256706AC17.
NOTE: Low-quality Chinese counterfeits should be avoided, giving preference to original Saratov Bearing (VBF) or Samara-made (SPZ-4) parts. The table below will help you choose the right spare part.
Wheel bearing diagnostics, causes and signs of failure
Let us briefly list the signs of this breakdown:
- Noise when driving from the front (right or left), and when turning there is also a noise or howling.
- Vibration in the interior is a sign that repairs are required, as the lubricant may have dried out or a lot of dirt has entered.
- A grinding or crunching sound means that the front wheel bearing has already fallen apart.
Before jumping to conclusions, do a step-by-step diagnosis:
- Jack up the side where there are characteristic signs, but before doing this, remove the wheel.
- Rotate the disk by hand; if there is a “rolling” sound or other noise, a replacement is needed. When the product is in good working order, rotation is smooth, without jamming or noise.
- Remove the brake disc, check the hub play by moving it by hand in the axial direction - if you feel the movement without measurements, then the front hub bearing needs to be replaced.
Reasons for failure:
- Not economical driving, over pits and potholes in the asphalt.
- Frequent overheating of the mechanism.
- Damage to the boot, contamination of the spare part from the inside.
- Wear of the product according to the warranty service life (60 thousand km stated).
- Malfunction of other elements (the brake disc is unbalanced, the rotating mechanism is worn out or the wheels are unbalanced, etc.).
REPAIR RECOMMENDATIONS
When disassembling in the field, drivers often encounter problems.
- For example, VAZ 2108 rear wheel bearings from SKF, made in Sweden, are popular among motorists. However, sometimes they may resist removal. An original device made from a towing strap and a jack can help you with this procedure outside of the service center.
- In addition, during repairs, it is also important to pay attention to the wear of the drum brake pads and conduct a thorough diagnosis of the suspension. Sometimes it happens that beating or knocking occurs due to “tired” silent blocks.
- When tightening the wheel fastenings, the torque wrench should be set to 186-225 nm or 19-23 kgf.
Didn't find the information you are looking for? on our forum.
Three ways to replace the front wheel bearing on a VAZ 2109 with your own hands
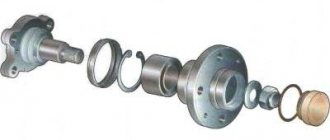
There are three popular methods that vary in speed and quality of replacement. Depending on your needs, choose the replacement option that suits you. Before performing any operations, familiarize yourself with the unit structure.
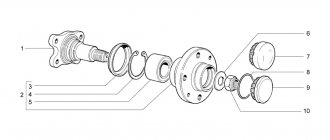
| P.P. | Designation | Name |
| 1 | 2108-3001014 | Steering knuckle |
| 2 | 2108-3001060 | Inner anti-splash ring |
| 3 | 2108-3001061 | Dirt-proof steering knuckle ring |
| 4 | 2108-3103032 | Lane bearing retaining ring. |
| 5 | 21080-3103020-02 | Bearing 256907 front hub |
| 6 | 2108-3103012 | Hub |
| 7 | 2108-3103061 | Front hub mud ring |
| 8 | 2108-3103079 | Hub washer |
| 9 | 2108-3103065 | Hub cap |
| 10 | 2108-3103068 | O-ring for hub cap |
| 11 | 2110-3103065 | Hub cap |
| 12 | 1/40442/71 | Hub nut |
Preparatory activities before replacement
Regardless of the chosen replacement option, you will need a minimum set of tools:
- Large screwdriver.
- Keys: 17, 13, 10.
- Hexagon 10.
- Hammer and chisel.
- A long 30mm wrench or a 30mm socket with a knob.
- Wheel puller for VAZ (photo).
- Mandrels (or heads) for knocking out the old part from the hub.
- Torque wrench.
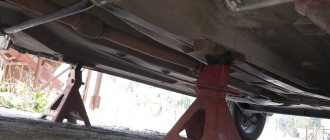
We prepare the car, place it on a flat surface, you will also need bright lighting. You will complete all the work faster with an assistant, and also if you use an inspection hole (overpass). Put the car in first gear, and be sure to put chocks under the rear wheels.
A quick overview of wheel ball bearing pullers
It is impossible to choose a universal kit for all types of car repairs, since the range of actions is limited:
- a variety of shapes, sizes for charging to the starting position;
- limited work space.
Cup - “Force 9T0311”
- Internal mandrels 34-80 mm.
- External mandrels 44-90 mm.
- The dimensions of the outer diameter of the cups are 44-90 mm.
- Rod (stud) with nuts.
- The plates fit a wide range of sizes.
- The steering knuckle remains in place.
- The set is included in the workshop press kit.
- Pressing-pressing takes place in one step.
Three-jaw – “KS TOOLS 630.3002”
Garage tool. Suitable for use in restricted access work areas.
- Long life if you follow the manual.
- The articulated design of the paws engages securely.
- Removing stuck parts from shafts and machine axles.
- Wide grip range - 20-230 mm.
- Maximum force - 4.5 tons.
- Screw rod dimensions: M18 x1.5 x 240.
- The dimensions of the bolts for the hinges are 19 mm.
Two-grip universal – “Kukko K-2030”
The tools from the set of the German manufacturer Kukko are well-thought-out forms of gripping mechanisms. On the traverse, the paws move along guides, and the suspension screws fix the specified position.
- Grasp the paws at an angle parallel to the axis of the tension force.
- Reliability of engagement.
- Maximum tension - 5.5 tons.
- The legs rotate 180 degrees.
- Wide grip range.
- Double acting.
- Suitable for use in confined spaces.
Hydraulic pullers
You can also find hydraulic pullers on the market. The operating principle of hydraulic SSPs is similar to jacks. Designed for repair shop mechanics, no muscle power required, speeding up the repair time. Pay attention to the quality of the metal, the rotation of the screw rod, and the condition of the hinges.
Replacing the front wheel bearing of a VAZ 2109 - first steps
Regardless of the replacement method, the initial operations will be similar:
- Before putting the car on a jack, it is recommended to loosen the front hub nut.
- Then loosen the front wheel mounts.
- After removing the wheel, unbend the locknut collar.
- Next, tighten the bolts that hold the caliper, top and bottom, one at a time.
- Then use a screwdriver to straighten the pads in the caliper.
- We hang the caliper or move it to the side. Further operations will follow, based on the specific replacement option.
Products
The brand produces a large number of agricultural equipment, the most popular being tractors, precision farming systems and combines.
Today the following series of tractors are produced:
Precision farming systems are used in many modern agricultural enterprises. Automated control and synchronization of operations significantly increases work efficiency. Deutz-Fahr offers reliable and highly precise automation. The precision farming system from Deutz-Fahr is:
- Reception of signals using all satellite systems, including corrective ones.
- A single interface for all processes and applications. Its diagonal can be 8 or 12 inches.
- Steering systems are represented by visual, power steering.
- High-precision sectional control that eliminates overlaps and skips.
- Possibility of complete automation of data management.
- A security system for large tractors has been introduced; the cameras have a wide viewing angle.
Replacing the rear wheel hub bearing on a VAZ 2108, 2109, 21099 and their modifications
A failed rear wheel wheel bearing indicates a problem with a constant, often ear-piercing howl. It comes from the rear and does not go away when driving in neutral. As bearing wear increases, this sound may become increasingly louder. The rear wheel bearing needs to be replaced.
This work can be done most quickly using special devices (pullers). If they are not there, then to achieve the goal, you should use available materials. Let's consider replacing the bearing with this particular slope.
Checking the rear wheel bearing
We hang the wheel on the bearing of which there are suspicions. We rotate it by hand. A wheel with a working bearing rotates almost silently. A faulty bearing reveals itself by noise and a sound “as if balls are rolling in the bearing.” The degree of noise and rolling depends on the degree of wear of the wheel bearing itself. For comparison, you can hang a wheel with a working bearing and listen to the sound it makes.
Required Tools
— An extended 30mm head with a long wrench, or a curved box wrench of a similar diameter (or a similar socket wrench, etc.)
To loosen the wheel hub nut.
— Thin chisel, center punch
To bend back the jammed edge of the hub nut.
— Three-legged puller (optional)
To remove the hub from the wheel axle.
— Two-legged puller, or a special semicircular one (optional)
To remove the inner bearing race from the wheel axle.
— Puller – pliers
To remove and install the retaining ring
— Puller for pressing the bearing out of the hub/pressing the bearing into the hub (optional)
— Open-end or any other key for 12 (11, 8, 7, depending on the type of pin)
For unscrewing the guide pins securing the brake drum.
— Key for 13 (14)
To loosen the parking brake adjusting nut.
- Hammer
Rear wheel bearing for VAZ 2108, 2109, 21099 cars with nut
Preparatory work
It is best to carry out work in a pit (inspection ditch), it is more convenient. But if there is no hole, you can do without it.
— We fix the car by placing it on a level surface, in first gear, placing wheel chocks under the wheels.
— Under the bottom of the car, loosen the handbrake tightening nut.
If the car is not installed in a pit (inspection ditch), then to perform this operation you will have to jack up one of the wheels, put a safety stop under the car and lie down to get to this very nut.
The procedure for replacing the rear wheel hub bearing on VAZ 2108, 2109, 21099 vehicles and their modifications
— Remove the protective cap on the wheel hub
— Removing the dent on the side of the hub nut
Using a thin chisel or core and hammer, straighten the jammed edge. For greater clarity, the wheel in the image has already been removed.
Wrinkled edge of wheel hub nut
- Loosen the hub nut
To do this, use a 30 mm socket with a long wrench (or a special wrench) to unscrew the nut. You may have to apply considerable force and extend the handle of the wrench with a metal pipe, as it may become stuck or rust over time. Also, to prevent the wheel from turning, an assistant inside the car can press the brake pedal.
Loosen the rear wheel hub nut
— Remove the wheel
Loosen the rear wheel mounting bolts, jack it up, place a safety stop, unscrew the bolts, and remove the wheel.
- Remove the brake drum
Using a 12 wrench (11, 10, 8, 7 - the pin size may be different), unscrew the two guide pins securing the brake drum. If they don’t want to turn away, lightly tap them with a hammer.
VAZ 2108 hub and bearing - self-replacement
- Preparing to replace the hub or bearing
- Changing the wheel bearing "eight"
- Hub installation and assembly
Replacing the wheel bearing or the wheel itself is inevitable. The reason is simple - these are parts that wear out over time, no matter how carefully you operate the car. The VAZ 2108 hub is less subject to wear than the bearing, but it does not last forever. To replace one or another element, you can contact a service station, but the process is not so complicated, if you follow the technology described below, you can do everything yourself. In essence, changing the 2108 hub bearing is somewhat easier than replacing the complete hub itself, but the technology is practically the same.
Preparing to replace the hub or bearing
Replacing the front bearing on a VAZ 2108
Any technological process of car repair begins with diagnosing and identifying the fault, studying the manual, preparing spare parts and tools for repair. The first thing you need are the following tools:
- jack;
- pullers or pieces of metal pipe with a diameter of 3 and 6 cm;
- pliers;
- wrenches 12 and 30.
Please note that the bearing, the dimensions of which should be: outer and inner diameters of 60 and 30 mm, height - 37 mm, must be of high quality, since there is a lot of Asian consumer goods on the market. You need to approach the choice of the hub itself in the same way - it is better to purchase a high-quality part once, and subsequently permanently lay the car down.
Step-by-step procedure for removing the hub
- We get to the hub - fix the car with the handbrake (parking brake), put shoes under the wheels and loosen the wheel bolts.
- Then we jack up the side where we will do the work, completely unscrew and remove the wheel.
- If you change the bearing or hub of the rear wheel of a VAZ 2108, you will need to remove the drum.
- If the front one is a brake disc.
- To do this, unscrew the guides and try to remove them. If this doesn’t work, you’ll have to shoot it down.
- To remove the drum, you need a wooden spacer (any piece of block or board will do) with which you need to tap it from the inside.
- If the work is carried out on the front wheels, changing the bearing of the front hub 2108 or the front wheel hub itself of the VAZ 2108, first remove the caliper and hang it to the lever using ordinary wire.
- When there is access to the hub, remove it. If you have a puller, this is not difficult to do, but if you don’t have one, you will have to do it the old-fashioned way. We screw the wheel with its outer side to the hub (otherwise it will not fit into the wheel arch) and pull it towards ourselves several times.
- When it is removed, a new front or rear hub of the VAZ 2108 is installed, and if necessary, the bearing is changed.
Changing the wheel bearing "eight"
Replacing the VAZ CV joint and wheel bearing
After the hub is removed, you need to:
- press out or knock out the bearing. It doesn’t matter whether you are changing the rear wheel bearing of a VAZ 2108 or the front one - the process is the same. You need to remove the stopper and boot from it using pliers, and then carefully knock out or press out (which is preferable) the bearing.
- treat the seat on the hub with lubricant,
- then install a new bearing. If it is not possible to press it in, you will have to hammer it with a pipe with a diameter of 6 cm, along the diameter of the outer ring.
- then install the boot and stopper (preferably new ones).
When the bearing is tightly seated, we proceed to install the hub back.
Hub installation and assembly
To install the hub, you need to fill the bearing using a spacer or a pipe with a diameter of 3 cm, along the diameter of the inner race. Then, when the hub is completely seated on the steering knuckle, we install a new (mostly) lock nut and bend the petals. Then we do everything in reverse order - if the rear hub 2108 or its bearing was replaced, we install the drum in place and fix it.
If the bearing or front hub of a VAZ 2108 has been replaced, install and fix the disc and caliper. It happens that the caliper is difficult to put on the disc - press out the brake pads with a flat-head screwdriver (after this you will need to press the brake pedal several times to get them into place). Next we assemble the wheel, as in the case of the rear hub.
At first glance, it may seem that replacing a bearing or the hub itself on a VAZ 2108 is a troublesome task, but this is not so. if you follow the procedure, everything can be done within a few hours. At the same time, you will save a decent amount. The only thing you need to remember is that you are repairing your car, so you can’t work carelessly. By taking the work seriously and carefully, you can install a new bearing or hub no worse than at a branded service station.
Replacing the front wheel bearing of a VAZ 2109, VAZ 21099 with your own hands
We will show you how to replace the front wheel bearing on VAZ 2109, VAZ 21099, VAZ 21088 cars with your own hands. We will show a method applicable in “field” conditions when there is no press and there is no need to carry out a wheel alignment in the future.
Using a large 30 socket, we tear off the hub nut:
We dismantle the wheel. We recently had a wheel alignment done on this car, everything is fine with it, so as not to have to pay money for this procedure again, we will remove the fist along with the strut. Unscrew the two caliper mounting bolts:
We remove it and put it on some kind of stand so that it does not hang on the brake hose under load. Using pliers, unscrew the steering tip and unscrew it:
We pry it out using a universal puller:
Unscrew the two ball joint bolts:
Open the hood and unscrew the 3 bolts securing the strut:
Remove the stand assembly. Unscrew the brake disc mounts:
We press out the old hub, attach one part of the stand to a wooden stump, place a mandrel of suitable size and strike it from the back side:
We dismantle the old retaining rings, this can be done conveniently with round pliers:
From the front and back. Place the mandrel again and press out the bearing:
Use a flat-head screwdriver to clean the grooves for the retaining rings. We install one retaining ring. Lubricate the seat and the wheel bearing housing itself. Press in using a copper spacer:
Attention! If you have a press or at least a vice in the garage, then it is better to use them, it will be much more reliable. We show how you can do it yourself with a minimal set of tools.
Install the second retaining ring in place. We still have a clip left on the hub; we can make a cut with a grinder and then knock it off with a chisel. But this method is not the most humane; very often it leaves marks on the hub. Therefore, we remove the clip using a small mounting tool, apply it and hit it with a hammer:
Here, too, it is important not to damage the wheel bearing seat; if you take a thick chisel, rivet one of the parts, and then the race will become distorted. We lubricate the hub and wheel bearing with lithol and press it in the same way:
After this, we perform the assembly in reverse order.
How to change a part on a VAZ 2109 using method No. 3 without removing the rack and without using a puller
The rotating mechanism assembled with the hub is dismantled. Then the hub itself is knocked out of the axle (possibly with a removable device or a press). It will be necessary to do a wheel alignment.
Execution order:
- After dismantling the caliper, unscrew the two bolts securing the strut.
- Just as described above, we dismantle the rotating mechanism from the ball joints and remove the CV joint. Then, on the table, unscrew the drum from the hub (or do this in advance).
- Remove the protective cover.
- We free the fist from unnecessary elements and clamp it in a vice.
- We knock out the hub, and then the old wheel bearing, or use a vice, press or puller.
- We install the new product, clamp the structure in a vice without distortions, as shown in the photo, and press it into place.
The process is shown in more detail in the video:
Replacing the front wheel bearing of a VAZ
Replacing a wheel bearing on a VAZ 2109 (video)
Malfunction of the front hub of a VAZ 2109 car caused by faulty bearings can lead to quite dire consequences.
Without a properly functioning hub, the wheels stop rotating at the required speed. This leads to damage to the braking system, and then the entire car breaks down.
If any malfunctions are found, they should be corrected immediately.
Instructions for removing the hub assembly from the rear axle
- We turn off the engine, put the car in gear, and install stops under the front axle.
- We jack up the wheel we need.
- We tear off the mounting bolts and remove the removed wheel.
- Now we have access to the brake drum. Using a “12” wrench, unscrew the pin guides and remove it. The brake drum may be firmly in place. Then WD-40 universal lubricant will come to the rescue. And if the knot is stuck too tightly, you can remove it with a hammer or mallet, gently tapping it around the perimeter.
- Unscrew the hub nut.
- We remove the hub using a special two-jaw puller. If you don’t have one, you can simply screw the wheel to the axle and then quickly pull it off.
NOTE:
As a result of manipulation, the ball bearing should easily come off the axle. But it happens that only the outer ring comes off, while the inner ring of the bearing remains in place. In this case, the brake pads will need to be dismantled, and the remaining part must be removed from the seat using a chisel.
Causes and symptoms of hub wear
You will have to replace the front wheel bearing if you notice several signs of wear.
Sign
Your actions
This may manifest itself as wheel swaying. Play can be caused by loss of efficiency of both the hub itself and its bearing.
When driving, you may hear strange, extraneous sounds coming from the wheels. As the speed increases, the hum only increases, but after that, when the speed decreases, the noise remains at the same level. If the hum comes from one side, then the hub and bearing should be replaced only on that side. If on both sides, then replace both
Fast bearing heating
A rather dangerous diagnosis that leads to overheating of the calipers. As a result, they also fail. Plus, the brake fluid begins to boil faster, which leads to brake failure. Therefore, the problem should be corrected immediately
Checking the bearing for play
Diagnostics of the play will allow you to determine whether it is necessary to remove and replace the wheel bearing, or you can correct the condition of the unit and calmly continue to operate your VAZ 2109 for some time.
Checking for play
Checking the front wheel bearing play is a simple task that even a beginner can handle. It’s not worth going to a service station and spending money.
By following the instructions, you can easily determine the backlash.
- Raise the vehicle high enough so that the wheels are off the ground. You'll need a good jack.
- If there is an inspection hole, then you can do without a jack.
- Bleed the wheel. It is important to hold the wheel on both sides and clamp it as firmly as possible. You need to swing away from yourself in the same direction.
- If a slight play is felt, try tightening the bearing nut more firmly. Sometimes, while driving on bad roads, it loses its grip, hence the backlash.
- If tightening the nut does not help, you will have to replace the hub or bearing.
- It would be a good idea to check for play by swinging the wheel in different directions, pressing the wheel towards you with one hand, and shaking it away from you with the other.
- If such a swing shows that there is play, the culprit is no longer the bearing and hub, but the steering tips. They need to be replaced.
- Replacing the upper ball joint will be necessary if you pull the wheel with emphasis on its upper part and detect play.
- Pull the lower part already. Play indicates the need to replace the lower support.
What Causes Rear Hub Damage?
Replacing the rear wheel hub of a VAZ 2109
Often hubs stop functioning normally if:
- There is some play in the hub bearings, albeit small. That is, they wobble slightly. At the same time, you need to ensure that this backlash does not develop into “Mega backlash”.
Note: If the bearings wobble too much, they can damage other parts located in the vicinity.
- A hum is heard when the bearings operate. Usually, as speed increases, it becomes even more pronounced. After that, when the speed decreases, it does not become any less quiet. Both bearings need to be replaced at once.
Replacing the rear wheel hub on a VAZ 2109
Note: That is, if the hum is heard on only one side, then only one bearing is damaged. But most likely the second one doesn’t have much time left either. And, in addition, buying two bearings in a set will be much cheaper than buying them separately.
- Bearings overheat. This is due to the fact that they begin to spin much faster than usual. This may cause the brake fluid to boil too quickly. Therefore, the braking system will “close up”.
- The wheel bearing is falling apart. Perhaps it is only in the early stages of destruction. It needs to be replaced urgently, as a faulty bearing can cause serious damage.
- The steering tip does not work well.
- There are shortcomings in the operation of the upper or lower ball joint.
- The wheel bearing nut is not tightened properly. Such an oversight can cause backlash. In this case, you can get by by simply screwing in this nut all the way. That is, you should not change the hub or its bearing.
Bearing selection
To replace a wheel bearing, you will need to know about its parameters, dimensions, and characteristics specific to the VAZ 2109.
For the “nine”, a double-row angular contact roller bearing with tapered rollers is used. Axial clearances are pre-adjusted and filled with lubricant. Closed bearing type.
Based on the table, you can find the optimal bearing for the front hub of your car.
Parameter
Required indicator
Limit speed
TABLE - DIMENSIONS OF HUB BALL BEARING 6-256706AC17
| Parameter | Unit | Value according to GOST (TU) |
| Hole diameter | mm | 30 |
| Outside diameter | mm | 60 |
| Width | mm | 37 |
| Dynamic load capacity | kH | 30,1 |
| Static load capacity | kH | 25,9 |
| Speed | rpm | 6500 |
| Axial clearance | mm | 0,06-0,09 |
| Steel type | – | SHH-15 |
| Hardness of rings and balls | H.R.C. | 61-65 |
| Type of lubricant | – | Litol-24 (S17) |
| Torque | H*M | 220 |
| Ring roughness | Ra | 0.32 |
| Weight | G. | 435 |
Useful videos and repair tips
Below are several videos that will help you understand the process of replacing the rear wheel bearing of a VAZ 2108.
Replacement
Having selected the set of front wheel bearings required for replacement, you can get to work.
For repairs, in addition to the standard set of tools, you will need special bearing mandrels. If they are not available, you can use a pipe of suitable diameter.
Dismantling works
By following the instructions and relying on video lessons, you can replace the front wheel bearing with your own hands.
- Loosen the tension of the wheel bolts, remove the decorative plastic plug from the hub bearing and loosen the fastening nut.
- Using a socket and lever, loosen the bearing mounting nut.
- Raise the car with a jack, and then remove the wheels from the part of the front of the VAZ 2109 where you plan to replace the bearing.
- Remove anything that might prevent you from removing the hub. These objects include the brake disc, fastening to the steering knuckle, ball joint, steering knuckle mounting bolts, and front strut fasteners. Dismantle it all and move on.
- Completely unscrew the front hub nut, remove it and remove the thrust washer.
- It is necessary to remove the hubs from the front strut bracket and remove it.
- The hub has been dismantled, so you can press the damaged bearing out of it and put a serviceable unit in its place.
- Place the hub in a vise or in any other way convenient for you.
- Using a drift that fits the diameter, press the hub out of the inner race of the bearing.
- In some cases, the outer part of the inner ring may remain on the hub. In such a situation, you cannot do without a puller. In general, it is better to work with a special tool. It will probably be found among your friends or neighbors in the garage.
- Using the same drift, you need to remove the bearing from the steering knuckle. To do this work, you will have to remove the retaining rings in advance. They can be removed with any available tool, such as an awl. Although there are special clamps for such purposes.
Accuracy is paramount
- That's it, you managed to remove the hub bearing.
- Carefully treat all dismantled parts using clean kerosene. Follow fire safety regulations.
- Assess the condition of the hub itself. If there are signs of damage, defects, or chips on it, it should be replaced with a new one.
- The new bearing is installed in place using a vice or press. In this case, force must be applied to the outer rings.
- Using a tool such as a hammer to drive in a bearing is strictly prohibited, as this will lead to destruction of the new part.
- After installing the front wheel bearing, perform the reassembly procedure
- Don't forget to change the hub nut.
- Once the assembly is fully assembled and the vehicle is lowered to the ground, only then should the mounting nuts be fully tightened.
Repairing the front hub when the bearing wears out or breaks is not as difficult as it might seem at first glance. Our instructions, supplemented by video tutorials, will help you complete the process yourself from start to finish.
Replacing rear hubs
VAZ 2109 rear hub and its repair
To make a quick and high-quality replacement of the rear hubs, you must:
- Raise the car on a jack.
- Unscrew the wheel nut. A 30mm socket is useful for this.
- Remove the wheel itself. To make this process easier for yourself, you just need to pull it forward and lightly push it out from behind with your other hand.
- Remove the brake caliper.
- By removing the brake drum, you will have access to the hub. In some cases, it sticks to the hub, so it must be pressed to get it out. Therefore, many people remove the hub along with the drum or disc (if the brakes are disc), and after that they buy both a new disc and a new hub.
- Unscrew the hub nut. It is secured with three bolts. Since the bolts are too close and there is already very little free space, it will be very difficult to turn the head.
Note: in order for an overtightened bolt to “give”, it should be slightly heated. Hot iron is much easier to control, although you need to be careful not to get burned, because it heats up to high temperatures very quickly.
- Use a screwdriver to push out the hub from the reverse side.
- Clean the seat from dust and dirt. Lubricate it thoroughly with degreaser.
- If the new hub was purchased without an oil seal (and they are usually sold that way), then the seal can be removed from the old one and installed on the new one. Before installation, the oil seal must be lubricated with a special liquid.
Note: if necessary, you can drip sealant under the oil seal several times to make it fit better.
- Put the hub in place. Lightly tighten the hub nut so that the hub does not fall out.
- Press it in.
- Tighten all the necessary screws on the reverse side.
Self-replacement of the front wheel bearing in a VAZ 21099
There are no small things in a car. If any part fails, it can end in both minor and major troubles. For example, the front wheel bearing. If you do not pay attention to the problems that have arisen with it in time, you can expect very dangerous somersaults on one of your trips out on the road.
The reason for this will be the blocking of the wheel in which this same bearing is faulty. In this case, the car may skid sharply to the side. To prevent the apocalyptic scenario from becoming a reality, you just need to pull yourself together and perform such a simple action as replacing the front wheel bearing on a VAZ 21099.
REPLACEMENT USING A PULLER AND PRESS
The repair process can be significantly simplified by using a special press. It allows you to carefully press out the part and install it back as efficiently as possible.
- We fix the part in a press vice;
- Using a rod, press out the ball bearing;
- Pressing is carried out in the reverse order. For convenience and safety, it is advisable to press press through the removed part.
NOTE:
The advantage of this method is that the pressure increases gradually and the part itself does not experience shock loads, as when working with a hammer. If you have the opportunity, use this method as it is the safest and most convenient. The press is often available at a service station or can be found in your neighbor's garage. And if desired, such a device can be made independently.
An alternative for a press is to have a special tool in the form of a puller. The tool will help save time when working. With its help, you can quickly replace the rear wheel bearing of a VAZ 2108, and its price remains reasonable. So, the cost fluctuates between 1500-700 rubles, depending on the country of manufacture and brand.
- Install the hub in a vice;
- We rest the puller ring against the ball bearing;
- We screw a bolt onto the stem from the reverse side;
- We perform smooth pressing;
The advantages of this approach are obvious - you can install the part yourself or dismantle it, eliminating the possibility of misalignment.
ASSEMBLY AND INSTALLATION OF THE UNIT
After pressing in the new element, you can begin assembling the entire assembly. The whole process is carried out in reverse order:
- Reinstall the retaining ring;
- We mount the hub assembly directly onto the axle;
- Tighten the lock nut;
- We put the brake drum on the guide pins and tighten them;
- We mount the wheel on its seat;
NOTE:
It is important to understand that the work must be carried out using a torque wrench, since any bolt has its own tightening torques. And before leaving on public roads, it is necessary to check the serviceability and functionality of the entire system.
In what cases is replacement required?
Given that the service life of the hub bearing on the VAZ 21099 is designed for several years, the need to replace it may arise much earlier than expected. The reason for this may be driving on bad roads, sharp turns at high speed, or dirt and moisture getting into the mechanism. And, of course, the greater the mileage of the car, the higher the percentage of probability of bearing failure.
When a bearing fails, the following signs of its malfunction are observed:
- whining sound when turning a wheel;
- when driving on a straight road, a crunching sound is heard from the side of the wheel and in the passenger compartment;
- There is a vibration in the steering wheel. Usually this indicates a pre-failure condition of the bearing as a result of its severe wear;
- while driving, you feel that the wheel is moving to the side;
- When you rock the wheel with your hands, clicks will be heard.
The need for a new bearing exists when play and extraneous noise appear. If the bearing is installed incorrectly, it will be sufficient to dismantle it and reinstall it in the correct position.
Tools and materials for work:
- Wheel chocks;
- Socket head for nine, thirteen, fifteen, nineteen, thirty;
- Power wrench;
- Jack;
- Wheel bolt wrench;
- Car stand;
- Nineteen spanner;
- Penetrating lubricant;
- Ratchet driver;
- Kardanchik;
- Extension;
- Pliers;
- Vise;
- Torque wrench;
- Extensions for dismantling and installing bearings;
- Hammer;
- Deep head for seven;
- Slotted screwdriver;
- Rubber hammer;
- Bulgarian;
- Chisel;
- Circlip pliers;
- Lithium grease.
What tools will you need for the job?
When replacing a bearing, the following tools are used:
- Bent type socket wrench, or extended head or socket wrench. Using one of these tools, the nut on the wheel hub will be unscrewed.
- Punch or thin chisel. They will come in handy if you need to bend the edge of the hub nut.
- Two-legged puller - in order to remove the inner bearing race from the wheel axle.
- Three-legged puller. The hub is removed from the wheel axle using a puller.
- Key according to the type of pin. To remove the pins holding the brake drum.
- A 13-14 wrench for unscrewing the nut on the parking brake.
- Puller-pliers. Assistant in reinstalling the retaining ring.
Additionally, you may need a hammer and a container for parts.
Method No. 1 - replacement without removing the strut and without further collapse
Only the wheel, disc, caliper and hub are removed. The replacement itself is carried out directly on the car, without removing the strut. In addition to the list of replacement tools, you will definitely need a universal wheel bearing puller.
Execution order:
- First, unscrew the bolts on the brake drum.
- Remove the drum, then unscrew the two bolts securing the ball joints.
- Now we remove the CV joint shaft from the front hub with the steering knuckle; hand effort is enough.
- For ease of replacement operations, it is recommended to disconnect the steering tip from the rack.
- The next step is to remove the front hub from the fist. Use a chisel and knock it out as shown in the photo.
- Another option for dismantling the VAZ 2107 hub is to use a brake drum, bolt it to the hub, as shown in the photo, then pull out the hub with some effort.
- After dismantling the front hub, we move it to the side.
- We remove the retaining ring from the knuckle, in which the outer part of the old wheel bearing remains.
- Now you will need such a universal puller. Show the photo to the store to purchase.
- We install the device into the fist according to the diagram.
- We mount the puller on the steering knuckle as follows.
- We tighten the bolt of the removable device and begin the pressing process.
- Gradually the part will come out of the axle, now we move on to the hub.
- Remove the protective casing, then pull the inner race off the hub.
- If you have a universal device, put it on as shown in the photo.
- The ring is compressed from the hub as follows.
- Let's move on to installing the new product. First, we clean the inner surface of the fist, be sure to lubricate it with grease.
- We install the puller with a new front wheel bearing similar to points 9-10.
- We place the part in the fist evenly and without distortions, and only then tighten the device and press it into place.
- Now we put on the hub, if necessary, press it in. Further assembly is done in reverse order. We start with the hub nut, tighten it with a torque wrench with a force of 20 N*M.
Watch the video for more details:
How to change a wheel bearing
Changing the front wheel bearing yourself is not difficult. You just need to strictly follow a specific plan of action. The malfunction is easy to fix if you know how to do it correctly.
Replacing the front wheel bearing is easy to do yourself. The sequence of actions will be as follows:
- Secure the vehicle using wheel chocks.
- Loosen the handbrake tightening nut.
The following are the steps to resolve the issue of how to remove the wheel bearing on a VAZ 21099 with a puller.
- Remove the protective cap from the hub.
- Remove the dent on the hub nut.
- Unscrew the nut.
- Remove the wheel.
- Remove the brake drum and hub.
- Remove the bearing from the hub, having first removed the retainer.
- Replace the bearing.
All actions must be carried out carefully so as not to damage any car mechanisms. If everything is done correctly, then further operation of the car will not create any problems. And, most importantly, next time a similar problem will be solved as easily as possible.
Do-it-yourself universal wheel bearing puller
Buying a puller is not always justified, since it is not used so often when operating and repairing a car, so if you want, you can make the tool yourself.
Homemade tools also have advantages:
- Proven material.
- Possibility to make it to your own size.
- The cost is lower than that of a purchased device.
- Possibility of finishing or alteration.
Homemade three-grip tool
This type of tool is the most difficult to manufacture, since the parts have a unique shape and require precise dimensions to mate them.
Required tools and materials:
- Grinder with cutting disc for metal;
- Sheet 1 m2 10-20 mm thick;
- Hairpin M18x1.5x 400 mm;
- Two nuts M18x1.5 height 20 mm;
- Pipe section outer diameter 89 mm, wall thickness 7 mm;
- M10 bolts for hanging the legs in the eyes;
- Welding machine.
The legs are cut from a sheet of 10-20 mm, L = 200-220 mm, the cross is made from an M18x1.5 nut, or cut out of a solid sheet with a grinder. Mark the contours of the crosspiece, cut it out, drill a hole in the center, then use an M18x1.5 tap to cut the thread.
Second option: weld a nut to the sheet instead of threading it. Holes are made in the eyes for M8 or M10 bolts.
Video: “Making three grippers”
Cup puller
The main part of the tool: M18 pin, cup and replaceable disks. A threaded bolt and nut can be picked up in a store, but the remaining parts will have to be ordered from a turner based on a sketch or drawing.
Important points
- The method proposed above for replacing a wheel bearing is considered the easiest, but it has its drawbacks. The main disadvantage is that when removing the knuckles, the alignment of the car's wheels will inevitably be disrupted. In order to avoid camber violations, before removing the steering knuckle, you should put a couple of marks (this can be done with a chisel, for example). The first mark shows what position the adjusting bolt was in the rack. The second mark shows what position the steering knuckle was in. Of course, these marks will not allow you to achieve an accurate initial camber of the wheels, but the deviation from the original camber when using them will be minimal.
- New wheel bearings almost never fit into place the first time, even with the use of a puller and a vice, so they will have to be “re-fitted” by hand, that is, driven into the fist. To do this, you will need to cut a steel pipe (and the diameter of the pipe must exactly match the diameter of the outer ring of the bearing). The attachment is installed on the ring, after which it should be carefully struck with a hammer. In this case, the fist must lie on a flat, hard surface, and the adapter on the bearing must be positioned accurately, without distortions.
- It can be difficult to unscrew the 30mm nut that holds the wheel bearing. That is why it is best to put a long metal tube on the socket wrench and use it as an additional lever.
- It is best to clean the wheel bearing housing from rust using a wire brush. If you don't have a brush, you can use a regular kitchen knife. It is better to lubricate the seat before pressing in a new bearing not with oil, but with grease.
- After installing the bearing, you should check whether it is seated correctly. The easiest way to check: after the wheel is installed, you should jack up the car a little higher and lightly rock the wheel with the new bearing (away and towards you). The wheel should not wobble. If play is felt, it means the bearing is installed poorly. Be sure to spin the wheel as hard as possible and listen to the sound it makes as it rotates. It should be a very quiet, monotonous hum. If you hear some kind of creaking, or worse, clicking, it means the bearing is installed incorrectly.
As can be seen from the article, replacing wheel bearings is a rather labor-intensive task, even taking into account the fact that the article provides the simplest method (an alternative replacement method allows you to do without removing the steering knuckles, but in this case the car owner will definitely need an inspection hole, which is far from available everyone has). In the method proposed above, a hole is not needed, and the main difficulty is not to disturb the camber of the car’s wheels. If the alignment still turns out to be damaged, there is only one way out: go to the nearest car service center and adjust the alignment again.
Why is inaction dangerous?
It is better not to ignore a malfunction of the rear wheel bearing for several reasons:
- firstly, in the presence of noise and hum, driving a car is not nearly as pleasant as it might seem at first glance. To get rid of unnecessary sounds, car enthusiasts are ready to endure any costs;
- secondly, ignoring a bearing failure may lead to the need to replace the entire strut (which, naturally, entails more serious costs);
- thirdly, malfunctions of the chassis system are dangerous due to the unpredictability of the car on the road and an increase in the likelihood of an accident. Therefore, it is highly undesirable to joke with this.