Salute friends, VAG drivers!)
Today we will talk about how you can quite realistically file a VAZ bearing into the rear hub of an Octavia Tour (as well as most of the Oktashka’s brethren - VW, Seat, Audi) and at the same time save a round sum of money for a new bearing with a hub!
Background.
Over the 3 years of using the Octaha, I have already changed more than 5-6 rear bearings, which, as everyone knows, are not dismountable and are quite expensive.
And I had the idea a long time ago that it’s not a matter of overpaying for the hub every time, is it really impossible to come up with something?
I searched the forums, researched drive, club forums, and in all the topics on replacing the rear bearing I heard only one thing: the rear hub is not dismountable - everything is replaced as an assembly! This did not suit me and I started looking for a solution. After analyzing the old bearing, I came to the conclusion that the giblets can be thrown out, the bearing itself can be bored out by a good turner, and a regular bearing can be pressed into it, just like the one in the front. Having studied the dimensions of the old bearing, I came to the conclusion that the rear wheel bearings on the VAZ 2108 have the same inner diameter and the outer diameter was suitable for the fit.
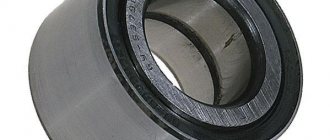
The wheel bearing ensures uniform rotation of the wheel around its own axis. Of all the elements of the car's chassis, it is the first to meet and distribute shock loads, so the main requirements for this part are strength and durability.
In this article we will talk about what a rear wheel bearing is on a VAZ-2108. We will look at the design of this device, its dimensions, and also understand the process of replacing it.
Design Features
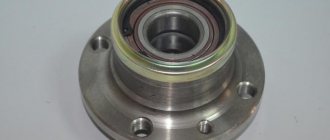
The rear hubs of the V8 are equipped with sealed angular contact ball bearings. Each of them has two rows of balls. This makes the structure as resistant to loads as possible, and also allows them to be distributed with the greatest efficiency.
The rear wheel bearing of the VAZ-2108 is made of heavy-duty steel. Its service life, declared by the manufacturer, is 90-120 thousand kilometers. By the way, these are not empty statements. Oddly enough, VAZ wheel bearings actually last a very long time and, if used correctly, can last twice as long as the stated mileage.
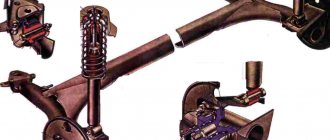
Diagnosis of a knock that occurs in the front suspension of a VAZ 2112 car
The VAZ 2112 car is equipped with a telescopic, independent front suspension with coil springs (see We do our own replacement of the front springs of the VAZ 2110), with hydraulic shock absorbers on the struts. In order to determine if there is a knock in the front suspension on a VAZ 2112, it is necessary to perform the following work:
- Make a trip by car, which will make it possible to identify the presence of a defect and determine the mode of its manifestation.
- Determine the tightening torque of the nuts that secure: the upper support of the strut to the body, the upper support of the strut to its rod.
- Make an exit by car.
- If the defect is not eliminated, you need to check the play of the ball joint on the front suspension.
- If necessary, adjust the gap between the steering rack and the stop.
- Departure by car again.
- The defect has not been eliminated, so the play of the bearing, which is located in the upper support and in the bearing of this strut support itself, is checked.
- If deviations are detected, the front wheel bearing of the VAZ 2112 or other damaged part is replaced.
- Check out the car, the knocking noise remains.
- The telescopic stand is being replaced. Depending on the malfunction, left or right.
- After all operations on the VAZ 2112, knocking in the front suspension will be eliminated, which is checked when driving the car.
How to replace the front wheel bearing on a VAZ 2112 car
The double-row ball bearing installed in the hub does not require adjustment or lubrication during operation. Pressing out the hub leads to destruction of the bearing, so only when replacing the bearing can the hub be pressed out of the steering knuckle.
Tip: when pressing in the hub bearing, you need to take a mandrel from a set of the appropriate size. If they are missing, you can use the old bearing rings.
So:
- On a VAZ 2112, replacing the front wheel bearing begins with removing the protective cap.
- The hub nut is loosened. The hub nut and the bolts that secure the wheel to the car are loosened.
Tip: The nut is tightened with a large torque, so it is better to use a lever when unscrewing it, for example, a piece of pipe.
- The wheel and brake disc are removed.
- The nuts holding the bolts fastening to the steering knuckle stand are loosened.
- Unscrew the two bolts that secure the ball joint to the steering knuckle.
- Unscrew the nuts and remove the bolts holding the steering knuckle of the strut.
- The hub nut is unscrewed and the thrust washer is removed.
- The steering knuckle is removed from the strut bracket, as shown in the photo.
The fist is pulled out of the stand bracket
The hub located in the inner ring of the bearing is pressed out using a drift.
Tip: A puller is used to compress the outer part of the ring located inside the bearing that remains on the bearing. Two special recesses on the hub serve for ease of dismantling.
- The retaining rings are removed from both sides of the steering knuckle.
- The bearing is pressed out of the steering knuckle, for which you need to use a mandrel.
- The outer retaining ring is installed.
Installing the Outer Retaining Ring
Replacing the front wheel bearing of a VAZ 2112 is carried out by pressing it in with a press or in a vice using a new bearing mandrel
The operation must be carried out very carefully, otherwise the bearing may collapse. Installing the inner retaining ring
The hub is pressed into the inner ring of the bearing.
Replacing the front wheel bearing on a VAZ 2112
The steering knuckle is mounted back to its removal.
Tip: When assembling the unit, you need to take a new hub nut.
- The hub nut is tightened and secured in two places, and the wheel mounting bolts are tightened.
- A protective cap is installed.
You can watch the video to see how to properly replace the front wheel bearings on a VAZ 2112. Timely replacement of the VAZ 2112 front wheel bearing will increase the reliability of the vehicle and the period between major repairs of the front suspension, and will reduce the cost of repair work.
Main characteristics and varieties
The rear wheel bearing on the VAZ-2108 is produced under catalog number 256706. It has the following technical characteristics:
- weight, g – 400;
- number of balls, pcs. – 28;
- ball diameter, mm – 9.525;
- static load capacity, KN – 25.9;
- dynamic load capacity, KN – 30.1;
- rated rotation speed, rpm – 6500.
The VAZ-2108 rear wheel bearing number may be different. If a store offers you a product marked 537906, don’t be surprised. This is a high-load bearing. Some of its characteristics differ from the characteristics of the standard spare part:
- weight, g – 511;
- static load capacity, KN – 90.1;
- dynamic load capacity, KN – 64.8;
- rated rotation speed, rpm – 5000.
As you can see, the reinforced rear hub bearing on the VAZ-2108 has increased resistance to loads. But at the same time, its rotation frequency should not exceed 5 thousand rpm. Such products, when properly used, can “walk” freely up to two hundred thousand kilometers.
TABLE - DIMENSIONS OF HUB BALL BEARING 6-256706AC17
| Parameter | Unit | Value according to GOST (TU) |
| Hole diameter | mm | 30 |
| Outside diameter | mm | 60 |
| Width | mm | 37 |
| Dynamic load capacity | kH | 30,1 |
| Static load capacity | kH | 25,9 |
| Speed | rpm | 6500 |
| Axial clearance | mm | 0,06-0,09 |
| Steel type | – | SHH-15 |
| Hardness of rings and balls | H.R.C. | 61-65 |
| Type of lubricant | – | Litol-24 (S17) |
| Torque | H*M | 220 |
| Ring roughness | Ra | 0.32 |
| Weight | G. | 435 |
Useful videos and repair tips
Below are several videos that will help you understand the process of replacing the rear wheel bearing of a VAZ 2108.
Rear wheel bearing VAZ-2108: dimensions
As for the size of the wheel bearing, they are the same for both modifications:
- outer diameter, mm – 60;
- internal diameter, mm – 30;
- width, mm – 37.
If you are offered a rear wheel bearing for a VAZ-2108, the dimensions of which do not correspond to those specified, it is better to refuse this purchase. All the above parameters are provided for by GOST 520-2002. Foreign analogues of spare parts are manufactured in accordance with the requirements of ISO 15:1998 and have the same dimensions.
How to understand that it is time to change the wheel bearing
A failed VAZ-2108 rear wheel bearing may indicate a malfunction:
- the appearance of a characteristic hum from the wheel;
- uneven rotation of the wheel;
- backlash formation.
If you notice that there is a hum coming from one or both rear wheels, rush to diagnose the wheel bearings. You can do this right in your garage. Simply jack up the rear wheel and turn it by hand. It should rotate easily and evenly without making any sounds. Next, grab it with both hands and try to shake it from side to side in a horizontal direction. If the wheel rotates unevenly and you feel play when it becomes loose, get ready for repairs.
Kinds
The following types of hubs exist:
- driving unsteered wheels;
This type is suitable for rear-wheel drive cars and is installed on the rear wheels.
- driven uncontrolled;
You might be interested in this About rims on Hyundai cars
Designed for the rear wheels of front-wheel drive vehicles.
- leading managed;
Used in the front wheels of front-wheel drive cars.
- slave managed;
This type is needed for the front wheels of rear-wheel drive cars.
Features of choice
When buying a rear wheel bearing for a VAZ-2108, pay attention to the manufacturer. Currently, more or less high-quality domestic parts are produced by the following enterprises:
- SPZ (Saratov Bearing Plant);
- SPZ-4 (Samara);
- VBF (GPZ-23, Vologda);
- GPZ-20 (Kursk).
It is believed that the best domestic manufacturer of bearings is the Saratov plant. His products are very reliable, but not very expensive. Thus, a rear wheel bearing for a VAZ-2108 manufactured by SPZ costs between 400-450 rubles.
VBF products are also highly reliable and are slightly cheaper. Bearings SPZ-4 and GPZ-20 are designed for those who are used to saving on spare parts. Their cost is even less, but the quality leaves much to be desired.
There are also imported analogues on sale. They are, of course, expensive, but their quality is beyond doubt. For example, a SKF VAZ 2108 rear wheel bearing, produced in Sweden, costs about 900 rubles. The Japanese equivalent, NSK, will cost about the same.
How to recognize malfunctions
There are many signs that help identify a breakdown:
- uneven wear of tires;
- increased vibration;
- the appearance of extraneous noise;
- overheating of the disk (this means that the bearing is not working properly);
- the car deviates to the side from a straight path and the body sways (these signs are explained by the fact that a working wheel ensures smooth movement, and when a breakdown occurs, imbalance occurs).
Important!
The most characteristic “pattern” is the sound in the rear chassis.
The easiest way
If all of the above is not picked up by the hearing and vestibular apparatus, then there is an optimal method. You need to push the tire with your foot to identify any play.
Note!
This method is very effective in the initial stages, when the symptoms are least pronounced.
What tools will you need?
Before you begin repair work, make sure you have the necessary tools and supplies:
- wheel chocks;
- jack;
- wheel bolt wrench;
- chisel (core);
- some object to fix the position of the car body when jacking up (a stump, several bricks, etc.);
- hammer;
- spacer made of wood (block);
- head at “30” with an extended handle;
- key to "7";
- vice;
- a piece of pipe for the outer diameter of the bearing;
- long nose pliers;
- special puller for the hub;
- special pliers for retaining rings;
- anti-rust liquid.
If you decide to change the rear wheel bearing on a VAZ-2108, also replace the hub nut. At least that's what the car manufacturer recommends. The fact is that the nut has a special edge that bends during installation and gets knocked down during disassembly.
Diagnostics, signs of malfunction, causes of failure
With proper operation, the ball bearing itself can last a really long time - about 100,000 kilometers. However, there are a number of reasons why a part may become unusable much earlier. Among them:
- frequent driving at high speed on bad roads;
- improper installation without lubrication (resulting in overheating and increased wear);
- prolonged exposure to an aggressive environment (water, dirt, other abrasives or liquids that get inside);
It is easy to understand that the ball bearing has failed - a distinct noise or buzz appears in the area of the rear wheels. If you ignore the problem, vibrations will appear on the body, and in critical cases, a grinding sound in the rear, indicating that the assembly has simply fallen apart. It is simply unacceptable to wait any longer - the wheel may simply become blocked while driving, so it is necessary to immediately replace it.
Changing the rear wheel bearing with your own hands
Replacement of the VAZ-2108 rear wheel bearing is carried out in the following order:
- We install the car on a flat surface, fix the front wheels by placing wheel chocks under them.
- Remove the cap covering the hub nut.
- Using a chisel (core), we bend the bent edge of the hub nut so that it does not interfere with its unscrewing.
- Using a 30mm socket with an extended handle, unscrew the nut. If it does not give in, treat the threaded connection with anti-rust liquid.
- After unscrewing the nuts, unscrew (not completely) the wheel mounting bolts.
- We lift the body with a jack, fix its position with stumps (bricks), and unscrew the wheel bolts. We dismantle the wheel.
- Using a key set to “7”, unscrew the guide bolts on the drum (2 pcs.).
- We remove the drum. If it is not removable, we treat the place where it fits onto the hub protrusion with a rust-fighting liquid, and then knock it down using a hammer and a wooden spacer.
- Now completely unscrew the hub nut.
- Using a special puller, we dismantle the hub, grasping it with “paws” and rotating the nut. If you do not have such a device, take the removed wheel and screw it to the hub with the back side. Use the wheel as a lever.
- Remove the hub from the axle.
- Using long-nose pliers or special pliers, remove the bearing retaining ring.
- We place the hub in a vice and, using a hammer and a piece of pipe, carefully knock out the bearing.
- When the bearing is knocked out, lubricate the inner surface of the hub with grease.
- We install the new bearing without removing the hub from the vice.
- We place a wooden spacer on top of the bearing and, hitting it with a hammer, hammer the part into the hub until it stops.
- We put the locking ring in place.
- We put the hub with the new bearing on the axle. If she sits down tightly, we help her sit down using a hammer and a spacer.
- Screw on the new hub nut. We tighten it until it stops. The hub should still move inward.
- Install the brake drum and secure it with guide bolts.
- We mount the wheel.
- Remove the jack and tighten the hub nut completely. If you have a torque wrench, observe the tightening torque (186.3-225.6 Nm).
- We bend the edge of the nut, fixing its position.
- We put a cap on the nut.
- We jack up the body, check how the wheel rotates and whether there is any play. It is also recommended to check the operation of the parking brake.
Important points
The wheel nut on the VAZ 2109 is tightened very tightly, and in addition, it is often covered with rust. It may take a huge amount of effort to move it. In such a situation, WD-40 liquid can help. If you don’t have this liquid on hand, you can generously pour oil on the nut and wait 10 minutes. Not every car owner has a wheel bearing puller at hand. In this case, to remove the bearing, you can use a hammer and a piece of steel pipe of suitable diameter (about 4.5 cm). The main thing is not to damage the inner surface of the hub with the pipe.
If scratches and gouges remain there after pressing out, the new bearing will quickly fail. When reassembling the hub, special attention should be paid to tightening the hub nut. If it is loosely tightened, play will occur, which will again lead to bearing wear.
Therefore, with a 30 socket head, you should use the longest wrench so that the force when tightening the hub nut is maximum.
Replacing wheel bearings is a procedure that every owner of a “nine” will sooner or later encounter. The only question is whether he will be ready for this. If the driver prefers to repair his car himself, then it makes sense to purchase a puller for hubs and bearings in the store. This simple tool will greatly facilitate the work and also save the car owner a lot of time and nerves.
Copywriter with five years of experience.
How to check a wheel bearing
If the rear wheel bearing of a VAZ-2108 breaks down, you will hear a characteristic howl coming from the trunk. Try to listen to which direction the sound is coming from. This will allow you to reduce the time spent searching for a faulty bearing. To make a diagnosis, you need to lift the wheel and then rotate it by hand.
If the bearing is in good condition, there will be no noise. The wheel should rotate without jamming. But if the bearing is faulty, then a strong noise will appear, as well as a metallic sound, as if the balls inside the bearing are rolling. The louder the noise, the greater the wear on the wheel bearing. It is advisable to replace both sides at once, this will improve the efficiency of the repair.
What tools will you need?
Before replacing the rear wheel bearing of a VAZ-2108, you will need the following tool:
- A 30" head and a knob, as well as a piece of pipe. You can even use a spanner wrench, but it must be strongly curved to make it easier to install into the hub hole on the nut.
- Punch or thin chisel. It is advisable to sharpen the chisel in advance. This tool is needed to straighten a jammed edge on a nut.
- It is advisable to have three-legged and two-legged pullers. The first is necessary to dismantle the wheel hub, and the second to remove the inner race of the bearing.
- Pliers for removing and installing retaining rings.
- It is advisable to have a puller on hand to remove and install the bearing into the hub.
- You will also need any type of keys for “12”, “13”, “14”.
- You can't do without a hammer and wooden spacers.
Be sure to buy a good bearing, it is advisable to also buy a nut. It is not recommended to use the old one. You can purchase an assembled VAZ-2108 rear hub, this will greatly facilitate repairs, but will hit your wallet hard.
Replacing the front bearing
Replacing the rear wheel bearing of VAZ 21099
Remove the caliper and place it so that it does not hang on the hose.
Remove the cotter pin from the tie rod nut. This is best done with pliers.
Spray with penetrating lubricant and unscrew the two bolts securing the ball to the steering knuckle. Nineteen head bolts.
Move your fist to the side and remove the drive shaft.
Unscrew the three bolts securing the upper support and remove the shock absorber along with the knuckle.
Unscrew the two studs and remove the brake disc. Faces on heels under the head at nine.
Using pliers, remove the retaining rings at the top and bottom.
Using a sizing extension, knock the bearing out of the knuckle.
The procedure for replacing the front wheel bearing of VAZ 2108 , 2109, 21099 is clearly shown in this
Bearing Specifications
The product catalog number is 256706, it has the following characteristics:
- The diameter of the inner race is 30 mm.
- The diameter of the outer ring is 60 mm.
- Weight – 400 gr.
- Bearing width – 37 mm.
- Inside there are 28 balls with a diameter of 9.525 mm.
- Dynamic load capacity of at least 30.1 kN.
- Static load capacity 25.9 kN.
- The bearing operates normally at 6500 rpm.
There are only four manufacturers of these products in Russia:
- JSC SPZ (Saratov). Produces the highest quality and durable bearings. The cost is quite low.
- GPZ-23 (Vologda). It produces very good elements, which are slightly inferior to those from Saratov (denoted by the abbreviation VBF).
- Samara SPZ-4. The quality of the products does not differ, but the cost is very low.
- GPZ-20 in Kursk. The plant was engaged in the production of high-quality products; currently only copies of previous years of production can be found on the shelves.
Preparation for repair
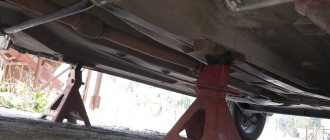
All work must be carried out on an inspection pit or overpass. But if you do not have such amenities, you will have to hang the rear of the car so that it is above the ground. The procedure for carrying out preparatory work:
- Place the car on a level surface.
- Place blocks under the front wheels.
- Turn on first speed.
- Loosen the nut that tightens the handbrake actuator (optional).
Removing the hub
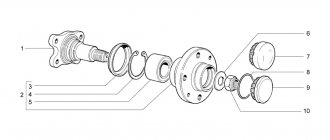
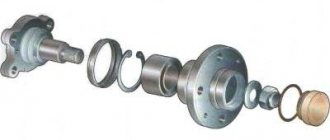
To remove the rear wheel hub of a VAZ-2108, you will need to perform a few simple manipulations:
- Completely unscrew the wheel bolts.
- Remove the wheel.
- Unscrew the nut that is located on the hub.
- Using a 12mm wrench, unscrew the studs that secure the brake drum to the wheel hub.
- Place these pins in adjacent holes and tighten them evenly. This way you will be able to move the brake drum from its place. If this does not help, you need to carefully knock the drum out of its place using a hammer and a wooden spacer.
- Use long bolts; they need to be screwed into two opposite holes on the hub. It is necessary to tighten them until the hub begins to move out of its place. You can also use a three-jaw puller for this purpose. The last resort is to install the back of the wheel and pull it with your hands.
- Sometimes the inner race of the bearing remains on the axle. It needs to be removed. To do this, first, using a chisel, you need to slightly move this ring on the axis, and then install a puller with two legs. After dismantling, be sure to check that there is no damage to the axle. Otherwise, clean the metal with a fine file.
At this point, dismantling the hub is completed, it is in your hands, and you can replace the bearing. The dimensions of the rear hub of the VAZ-2108 are the same as those of similar models that were produced under the names “Samara” and “Samara-2”.
Let's summarize
As can be seen from the above, the process of replacing wheel bearings on VAZ 2108, 2109, 21099 is not complicated. At service stations they charge 1000-1500 rubles for replacement work on the front axle, and 600-1000 rubles on the rear axle. To save this money, you need to work according to the instructions presented above and have the listed set of tools.
The process of replacing the rear wheel bearing of VAZ 2108 , 2109, 21099 is clearly shown in this video:
Installing and replacing the wheel bearing
Before installing the ball bearings, clean the inner seating surface of the hub from dirt and rust.
During the pressing process, it is important to maintain a smooth force and ensure that there are no distortions
READ Timing Belt Replacement Nexia 8 Valve
It is not recommended to insert and remove the bearing using the impact method, since there are many non-impact, safe methods. 2. When pressing, the mandrel must rest strictly against the outer part of the holder.
- After pressing, install the locking ring.
- After we insert the ring, do not forget to put the casing on, this is done with a hammer through the spacer.
- The bearing has been replaced. We begin assembly, put the hub in place, tighten it to a torque of 19-23 kgf/m. Be sure to lock the shoulder of the locknut.
- Install the brake drum and then the wheel.
- Further assembly of the unit is performed using reverse technology. Replacement is complete.
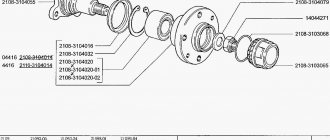
How to remove a bearing
The most interesting thing is yet to come - you need to remove the bearing from the hub. To do this, follow these steps:
- Use pliers to remove the retaining rings. If you don’t have such a tool, you can use a thin screwdriver or an awl.
- It is advisable to use a special puller to remove the bearing. It is installed on the element over its entire area; when the nut is tightened, the bearing is evenly squeezed out. But if you don’t have such a tool, you can use the outer race from an old bearing. Applying blows evenly, remove the element from the seat.
The dimensions of the rear wheel bearing of the VAZ-2108 are slightly smaller than those of classic series cars. But this does not mean that they are very weak. If the bearing is installed correctly, it will last a long time.
Bolt pattern - dimensions
This wheel parameter for VAZ cars is marked with the following combination – 4×98. As mentioned before, this is a standard value for all models of domestic manufacturers.
It is deciphered quite simply. So:
- the first number (4) only indicates the number of fasteners provided to secure the disk;
- the second (98) means the gap between the holes (or rather their centers) in millimeters.
Many have noticed that the corresponding markings on foreign vehicles begin with the number 5. As you might guess - this should be understood this way - the disc is attached directly to the hub with exactly the same number of bolts.
They use tires of the following marking – 175/70 R13.
When planning to purchase third-party wheels for your car, it is important to know which ones are suitable for your model. In particular:
- It is best to choose those that have the following dimensions - 5.5 by 13.5 inches;
- 5.5 by 14 is also not bad;
- It will be possible to install 6 to 14.
In theory, it is possible to attach even larger ones, but usually this requires certain changes to the design of the vehicle itself.
In addition to the previously mentioned number of attachment points and the distance between them, designated as PCD, there are also other dimensions:
- the diameter of the central hole (DIA) of the nine is 58.1 millimeters;
- offset (ET) is indicated as 40.
Second way
To carry out this work, it is necessary to carefully dismantle the steering knuckle and completely remove the hub.
Moving to the workbench, we replace the wheel bearing.
To do this, dismantle the retaining ring and knock the bearing out of its seat, or press it out.
Next, we perform the installation in reverse order, having previously cleaned the surface of the hub.
Advice! Before you begin removing the alignment bolts, mark their position with a marker or chalk. In this case, the marks should indicate the current position of the bolt on the rack and the previous location of the knuckles. Thanks to such marks, during assembly it will be much easier to navigate the position of these bolts. Although it will not be possible to return to the previous state, it will still be possible to minimize it.
Assembly and installation of the unit
After pressing in the new element, you can begin assembling the entire assembly. The whole process is carried out in reverse order:
- Reinstall the retaining ring;
- We mount the hub assembly directly onto the axle;
- Tighten the lock nut;
- We put the brake drum on the guide pins and tighten them;
- We mount the wheel on its seat;
It is important to understand that the work must be carried out using a torque wrench, since any bolt has its own tightening torques. And before leaving on public roads, it is necessary to check the serviceability and functionality of the entire system
Installing a new bearing
Before installing a new element, it is necessary to inspect the entire internal surface. There should be no nicks or damage on it. To make installation a little easier, you can place the new bearing in the freezer for several hours and warm up the hub. But please note that it should not be heated to very high temperatures.
Otherwise, when installing a new bearing, its seals will melt, which will significantly reduce the life of the element. The bearing must be pressed in using a puller or using a clip from an old element. Be sure to secure the position of the bearing with the circlips, making sure they fit into their grooves.
Replacement
Having selected the set of front wheel bearings required for replacement, you can get to work.
For repairs, in addition to the standard set of tools, you will need special bearing mandrels. If they are not available, you can use a pipe of suitable diameter.
By following the instructions and relying on video lessons, you can replace the front wheel bearing with your own hands.
- Loosen the tension of the wheel bolts, remove the decorative plastic plug from the hub bearing and loosen the fastening nut.
- Using a socket and lever, loosen the bearing mounting nut.
- Raise the car with a jack, and then remove the wheels from the part of the front of the VAZ 2109 where you plan to replace the bearing.
- Remove anything that might prevent you from removing the hub. These objects include the brake disc, fastening to the steering knuckle, ball joint, steering knuckle mounting bolts, and front strut fasteners. Dismantle it all and move on.
- Completely unscrew the front hub nut, remove it and remove the thrust washer.
- It is necessary to remove the hubs from the front strut bracket and remove it.
- The hub has been dismantled, so you can press the damaged bearing out of it and put a serviceable unit in its place.
- Place the hub in a vise or in any other way convenient for you.
- Using a drift that fits the diameter, press the hub out of the inner race of the bearing.
- In some cases, the outer part of the inner ring may remain on the hub. In such a situation, you cannot do without a puller. In general, it is better to work with a special tool. It will probably be found among your friends or neighbors in the garage.
- Using the same drift, you need to remove the bearing from the steering knuckle. To do this work, you will have to remove the retaining rings in advance. They can be removed with any available tool, such as an awl. Although there are special clamps for such purposes.
- That's it, you managed to remove the hub bearing.
- Carefully treat all dismantled parts using clean kerosene. Follow fire safety regulations.
- Assess the condition of the hub itself. If there are signs of damage, defects, or chips on it, it should be replaced with a new one.
- The new bearing is installed in place using a vice or press. In this case, force must be applied to the outer rings.
- Using a tool such as a hammer to drive in a bearing is strictly prohibited, as this will lead to destruction of the new part.
- After installing the front wheel bearing, perform the reassembly procedure
- Don't forget to change the hub nut.
- Once the assembly is fully assembled and the vehicle is lowered to the ground, only then should the mounting nuts be fully tightened.
Repairing the front hub when the bearing wears out or breaks is not as difficult as it might seem at first glance. Our instructions, supplemented by video tutorials, will help you complete the process yourself from start to finish.