Wheels are the main element of a car's chassis. Without wheels, no vehicle can move, and therefore the reliability of their fastening must be at the highest level. In this article we will discuss such an important topic as replacing the front and rear wheel studs. It is these elements that secure the wheel and are responsible for the safety of the vehicle.
Extended wheel studs for UAZ
Stud CRP(UAZ)+The diameter of the spline part is 16.7mm. Diameter, thread pitch 14x1.5, thread length 70 mm. Mounted under spacers 40 mm thick.
Hairpin CRP(UAZ)+30. The diameter of the spline part is 16.7 mm. Thread 14x1.5, length of threaded part 60 mm. Fits under 30mm thick spacers.
Hairpin CRP(UAZ)+20. The diameter of the spline part is 16.7 mm. Thread 14x1.5, thread 50 mm. Used to install a 20 mm spacer.
Stud CRP(UAZ). Thread diameter 16.7mm. Thread 14x1.5, thread length 30 mm. Compatible with the installation of a standard wheel.
This is interesting: Removing and installing the front seat of a Chevrolet Niva
Solution to this problem
If this type of breakdown occurs, the front wheel stud must be replaced.
Depending on the make of your vehicle, the replacement process can take place either on the removed hub or directly on the car. This is due to the design features of the machine. But, as a rule, repairs can be made without removing the hub. Almost every motorist can install the stud on his own. It is enough to have the necessary tools and a little experience in repair work.
But what if the hairpin breaks off on the road? In this case, it is almost impossible to eliminate this malfunction. Due to the fact that the wheel is attached to the hub with a certain number of studs (from four to six, with the exception of “OKA” - three), you can get home or to the service station with the remaining ones. In this case, you first need to check the degree of tightening of the wheel nuts and move very carefully, avoiding large bumps, and not picking up high speed. Replacing the front wheel hub stud is not a very labor-intensive process, but it does require certain skills and patience.
How to dismantle an unusable part
Below are ways to solve this problem using the example of several “popular” car brands, both domestic and imported. In principle, repair work is not particularly different in its technology, but there are still some differences associated with the structure of the car.
In this case, the object of repair will be a Toyota Corolla.
Replacement process
- The car is raised using a jack; it is advisable to use special spacers for fixation. After this, the wheel is removed, the brake caliper is disconnected and the disc is unscrewed. It is necessary to disconnect the hub and disc.
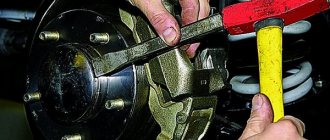
- Using a hammer, you need to knock the old pin out of its place. It will not be possible to remove it completely, because it will cling to the side of the steering knuckle. In order not to remove the hub and remove the part, you can use a file or cut it with a grinder. The head is ground off with a file, then the remaining part is removed through the collar.
- After these operations, the old pin is completely removed. Now you can start installing the new one. Before this, it is advisable to grind off the edge of the head and then install it in the hole on the hub. To do this, you can use a spacer to fix it until it stops.
- Replacing the rear wheel stud of a Chevrolet Niva is practically no different from previous work. The only difference is that there is no need to use a grinder or file to install the stud. When replacing, the old one is knocked out of the hub and then removed from its seat. After replacement, you need to press it in and reassemble the mechanism in the reverse order.
Repair process on VAZs
Replacing the front wheel stud (Niva as well) is carried out in almost the same way as on the previous car.
The car is jacked up, the wheel, caliper and brake guard are removed. Next, the pin-bolt is knocked out with a hammer, having previously aligned it with the cutout for dismantling. To prevent the wheel hub from turning, you need to engage first gear. The seat is cleaned of dirt and rust and then a new bolt is installed into it. There are longitudinal slots on the body of the stud and in its seat.
Article: 21210-3103039-, additional articles: 2121-3103039
Order code: 009085
- Buy with this product
- show more
Thread diameter – M12*1.25 L (length) – 38 Strength class -8.8 Note: D=22; b=19; HR15N 81 knurled straight
Information used: JSC "AVTONORMAL"
- Passenger cars / VAZ / VAZ-2120 “Nadezhda”1 drawing
- » href=»/catalog/vaz-3/legkovye_avtomobili-30/vaz_2120__nadejda_-245/kolesa-135/#part56900″>BoltWheels / Wheels
- Passenger cars / VAZ / VAZ-21311 drawing
- » href=»/catalog/vaz-3/legkovye_avtomobili-30/vaz_2131-73/kolesa-213/#part64935″>BoltWheels / Wheels
- Passenger cars / VAZ / VAZ-212131 drawing
- » href=»/catalog/vaz-3/legkovye_avtomobili-30/vaz_21213-731/kolesa-166/#part2011098″>BoltWheels / Wheels
- Passenger cars / Chevrolet / Chevrolet Niva 1.71 drawing
- » href=»/catalog/chevrolet-125/legkovye_avtomobili-30/chevrolet_niva_1_7-1233/povorotnye_kulaki_i_stupicy-183/#part2974878″>Front wheel mounting bolt Rear suspension / Steering knuckles and hubs
- Passenger cars / VAZ / Lada 4×4 Urban1 drawing
- » href=»/catalog/vaz-3/legkovye_avtomobili-30/lada_4x4_urban-1885/d400__povorotnye_kulaki_i_stupicy-175/#part4208097″>BoltWheels / D400. Steering knuckles and hubs
- Passenger cars / VAZ / VAZ-21211 drawing
- » href=»/catalog/vaz-3/legkovye_avtomobili-30/vaz_2121-13/kolesa-125/#part60059″>BoltWheels / Wheels
- Passenger cars / VAZ / VAZ-21231 drawing
- » href=»/catalog/vaz-3/legkovye_avtomobili-30/vaz_2123-315/povorotnye_kulaki_i_stupicy-182/#part978767″>Bolt Front axle / Steering knuckles and hubs
- Passenger cars / VAZ / VAZ-21213-214i1 drawing
- » href=»/catalog/vaz-3/legkovye_avtomobili-30/vaz_21213_214i-1240/povorotnye_kulaki_i_stupicy-216/#part2990389″>BoltSuspension / Steering knuckles and hubs
- Passenger cars / VAZ / LADA 4×4 M1 drawing
- » href=»/catalog/vaz-3/legkovye_avtomobili-30/lada_4x4_m-1456/povorotnye_kulaki_i_stupicy-181/#part3241802″>BoltSuspension / Steering knuckles and hubs
- Passenger cars / VAZ / LADA 4×41 drawing
- » href=»/catalog/vaz-3/legkovye_avtomobili-30/lada_4x4-1887/d400__povorotnye_kulaki_i_stupicy-202/#part4215528″>BoltWheels / D400. Steering knuckles and hubs
There are no reviews for this product yet.
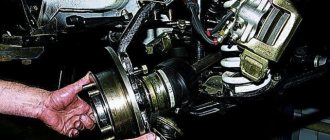
Wheels on a car are the main mechanisms for moving a vehicle. They consist of a rubber tire that fits onto a steel (or other types) disc. Inside the structure there is an air cushion, due to which you feel comfortable when moving. Often, when driving off-road in a Niva Chevrolet, problems arise with these devices. The most common problem is a puncture, which requires immediate attention. There are also problems with broken wheel studs that occur during slipping on a hard surface. This article is devoted to the topic of Chevrolet Niva car wheels, or rather, their replacement to eliminate various malfunctions. Therefore, we will consider how to replace the wheel, studs, drive and hub bearing of a Chevrolet Niva SUV.
Pros and cons of secret fasteners
To prevent your Chevrolet Niva from being “taken off” the next night after installing new tires, it is recommended to install 1 secret nut on each wheel. No matter how new technologies develop, more reliable means of stingray theft have not yet been invented. Hence the first and main advantage of the secret: such fasteners will help protect much more expensive property from thieves than it is worth.
Modern secrets are no match for the first ones that appeared in distant Soviet times. They are structurally more perfect and differ in aesthetics, which is important. The part is an elongated nut with an adapter for an individual key. If you choose closed-type decorative fasteners of the same length for it, then the wheel as a whole will look quite aesthetically pleasing.
The secret mount is very useful for the spare wheel of the Chevrolet Niva, which is screwed to the bracket on the rear door with ordinary nuts, and therefore most vulnerable to thieves. To unscrew secrets, the following types of keys are made:
To prevent the nut from being grabbed by a gas wrench or other similar tools, the lock on top is equipped with a rotating bushing (shell), and the place for the wrench is located in a recess. Cheap products and fakes may not have a shell, so you cannot buy such nuts. The disadvantages of secrets are:
- The tightening torque is weak, so the remaining nuts must be held securely;
- any tricky fastener can be unscrewed if the thief has the time and opportunity to do so;
- the need to always have the key with you and not forget it under any circumstances.
The last drawback is a real scourge of forgetful drivers. If the ramp of exits 2 is punctured: go get the key or call a tow truck, otherwise the wheel cannot be removed.
This is interesting: Removing and installing an additional resistor for the Chevrolet Niva heater fan
About the wheel mounting design
The fact that the wheel nuts are a special product is evidenced by a non-standard metric thread with a diameter of 12 mm with a pitch of 1.25 mm. Standard coils of the same diameter have a different pitch, 1.75 mm. That is, the wheel threads are made smaller in order to increase the reliability of the connection and implement the “self-tightening” effect due to constant rotation. Larger coils will not work here.
The factory nuts are sized so that when the thick stamped steel wheel is tightened, they will fit completely onto the stud. In this case, the element is equipped with a cone at the end, adjacent to the mating part on the disk. Due to the cone-shaped connection, 2 problems are solved:
- self-centering of the hole in the disk opposite the stud when the nuts are evenly tightened;
- more reliable connection of the wheel plane with the hub.
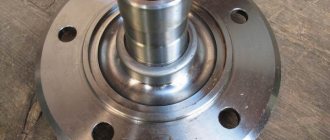
The pin, which carries the load of the entire fastening, is pressed into the hub on splines with an interference fit, and it is sometimes very difficult to knock it out. This is another reason to take the selection of parts for this unit seriously. All nuts available for sale for Niva can be divided into 2 types:
- Open, the pin passes through them when twisted. The car is equipped with such parts at the manufacturer.
- Closed, with a blind hole. Installed on Chevrolet Niva, but the size is also suitable for VAZ-21213.
Factory elements are manufactured with a size for a 19 mm wheel wrench. Various parts found in stores can be made with a 21 mm turnkey, and reach a height of 30 mm or more. The standard length of the open VAZ-2121 nut, made of uncoated carbon steel, is 17 mm. The new decorative parts have a nickel plated finish and a different protruding head shape.
Dimensions of standard wheels
A peculiarity of domestic car models, including the Chevrolet Niva, is the lack of individual wheels for a specific year of manufacture of the car. Common wheel sizes for Niva Chevrolet:
- rim width 8 inches;
- rim diameter 15 inches;
- offset ET40 – distance between the plane of fastening and symmetry.
Failure to comply with these parameters may result in:
- rapid wear of mechanical parts and components of the vehicle chassis;
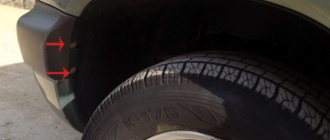
- Excessive load on the wheel arches of a car and their breakdown, for example, the use of wheels with a dimension greater than R16 and a high rubber profile, will negatively affect the condition of the fender liner. Its surface will be erased. On the Internet you can see a large number of photos devoted to this topic.
Another important parameter is the bolt pattern or drilling of the disk. It is designated by the Latin letters PCD. For Niva Chevrolet it is installed by the manufacturer with dimensions 5x139.7. The number 5 means that the disk is fixed to the hub with five bolts, which are located on a circle, and the distance between adjacent fastening bolts corresponds to 139.7 mm.
The center hole (DIA) of the rim is 98.5mm. Therefore, when choosing a wheel, you need to pay special attention to this parameter, since a discrepancy from the standard even by 1 mm will certainly affect the quality of the disk fastening to the hub. After some time, due to a loose fit, the hub will simply wear off.
And the last no less important parameter is the ET offset, which should not exceed a value of 40. Otherwise, this will lead to failure of the internal bearing. The most acceptable offset for the Niva Chevrolet is ET35.
A special feature of wheel nuts is their special thread, which differs from standard ones. For Niva Chevrolet, M12x1.25mm nuts are provided. Due to the slight discrepancy with the standard pitch (1.75), a self-tightening effect appears when the wheel rotates.
Also interesting: Non-adjustable wheel bearings for the field
Therefore, a larger thread pitch will not work. Factory original nuts are made using a special technique. When screwed onto the studs, they come out on the other side, and the internal cavity has the shape of a cone. It was the use of cone nuts that made it possible to achieve a certain result:
- the hole is centered;
- The wheel rim fits tightly to the hub.
Nuts on a Niva car are:
- Open – with a through hole.
- Closed – eliminate the possibility of the studs passing through the internal cavity of the nut.
For Niva Chevrolet, closed type fasteners are used. They are tightened with a regular 19 mm wheel wrench. Standard products are chrome plated and made of steel with carbon components.
Some car owners strive to install beautiful wheels of a larger size on their car than those supplied by the manufacturer. The Nyva Chevrolet body allows this to be done thanks to the design of the car's wheel arches. Wheel sizes that do not require modifications to the body are considered 215/75 with a minimum offset of 35.
If the driver has installed a tire with a profile over 215mm, then the arches will have to be trimmed a little, and the ET offset should exceed 58mm. The most optimal reach size is 40-45. Therefore, when planning the installation of new wheels and tires, you need to carefully study this issue. To do this, special websites are offered to help the car enthusiast, where on videos and photos you can see in detail the entire procedure from choosing a wheel to replacing it.
Properly selected wheels and tires are the key to stable vehicle performance on the road.
Tired of paying fines? There is an exit!
Forget about fines from cameras! An absolutely legal new product - Traffic Police Camera Jammer, hides your license plates from the cameras that are installed in all cities.
More details at the link.
- Absolutely legal (Article 12.2);
- Hides from photo and video recording;
- Suitable for all cars;
- Works through the cigarette lighter connector;
- Does not cause interference to radios and cell phones.
And also interesting: Do-it-yourself Niva suspension lift. How to lift the front and rear suspension of a Niva car?
What kind of disks can be installed?
The manufacturer recommends installing R16 standard wheels. It is allowed to mount smaller wheels R15 on the car. It’s easier to choose tires for this size; there are plenty to choose from compared to 16-inch wheels.
The depth of the body arch of the Chevrolet Niva allows the driver to install 17-inch cast wheels on the car. Correct installation of wider wheels will allow you to:
- improve directional stability and vehicle control;
- reduce braking distance in case of unexpected braking;
- increase the vehicle's maneuverability in off-road conditions.
It is worth noting the negative aspects of such a replacement:
- the likelihood of damage to the integrity of the disc increases when the tire is damaged, for example, from a side impact;
- the smoothness of the ride decreases, the movement on it becomes harsher, and vibration increases.
Read news about the new Niva
- Quantity of oils and fuel liquids VAZ 4×4 2121 Niva
- Black Niva Urban (Panther color)
- How to bleed brakes on a Chevrolet Niva correctly
- Ignition relay Niva Chevrolet where is it located
- Tire size for the field, all-season tires for the field 4×4, mud tires, the best winter tires for r16 wheels
- Tire size for the field, all-season tires for the field 4×4, mud tires, the best winter tires for r16 wheels
- Cooling fan Niva Chevrolet
- How to check a car's paintwork with a thickness gauge when buying a car second-hand
In what cases is the stud replaced?
Despite all the advantages of this element, it has a number of disadvantages. Unlike bolts, studs are prone to fracture. This often happens when a car starts to slip on a relatively hard surface.
Another case of replacing a stud is the same thread failure. If the thread is damaged, it will be impossible to screw the fastening nut onto it and then the reliability of the wheel installation will not be one hundred percent guaranteed.
Both cases involve loosening of the wheel. If the manufacturer provides for the use of 5 studs on a wheel, then this number must be observed in any case. If the number of studs is smaller, or for some reason one of the studs is not tightened with a nut, the wheel will rotate unevenly. This phenomenon is called imbalance. Improper wheel balancing leads to the following malfunctions: violation of suspension adjustments, followed by accelerated wear of the rubber, and damage to the brake discs, which reduces the braking efficiency of the car. That is why it is necessary to replace the stud in a timely manner and prevent further damage.
Methods for securing car wheels
There are two ways to fasten wheels, but they all require the same arrangement of certain fasteners. The first method involves the use of internal threads in the wheel hub. The wheels are suspended on guides and then tightened using bolts that are screwed into the hub.
The second mounting method involves the use of special wheel studs, which eliminate the need for guides for the wheel hub. These studs themselves act as guides and have external threads. Thus, the wheel is secured not with bolts, but with nuts.
The advantage of studs is that, unlike threaded holes, they can be easily replaced. It happens that car service workers tighten the wheel too tightly that the thread in the hole breaks off and then the driver will have to change the entire hub or just the bearing. In the case of studs, they can be replaced if damaged, thereby saving on replacing the hub.
How to change the rear wheel stud of a Niva Chevrolet
To change the rear wheel stud on a Niva Chevrolet, just loosen the wheel nuts and lift the wheel with a jack. After this, the nuts are completely unscrewed and the wheel is removed.
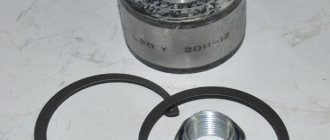
Next comes the most difficult part - removing the brake drum. The drum is a part of the brake system designed to provide wheel braking. Inside the drum there is a rear wheel hub, near which brake pads are mounted, which stop the drum as it rotates, thereby stopping the wheel. As a rule, after frequent and long braking, the drum sticks quite strongly to the wells, and removing it becomes quite a problematic task. Many people use percussion instruments for this operation, but they do not always lead to a positive result, and in some cases cause damage to the drum. To do this correctly, you need to use a mallet. The blows must be applied along the entire circumference of the drum from the back side of the hub. If you do everything correctly, the drum should come off after a few revolutions. Do not forget to first unscrew the guides using an 8 wrench.
Another way to remove the drum involves using a less safe but effective solution. To do this, the car engine starts, the drum spins up in gear and brakes sharply. At this point it should come off the blocks easily. It is very important that the differential is not locked when performing such an operation, otherwise the vehicle will start to move and cause injury or additional damage.
The last method for removing the drum is the factory one. To do this, the guides are unscrewed and screwed into two other holes. You need to tighten it with the same force. Thus, they will squeeze out the drum and help you remove it without any problems.
After removing the drum, you need to remove the old pin. The fastening of the studs is carried out using pressing, so now we simply cannot do without a hammer. To make the task easier. Take the wheel nut and screw it onto the end of the stud. Now give the nut a few blows to dislodge the stud from the mount. The main problem that may arise is that the head of the stud will rest against the wheel hub. In this case, the head can be ground off, thereby shortening it. Another way to remove a stud is to saw off the head using a grinder. Since the old pin will no longer be needed, this is the fastest and most effective dismantling method.
Now grind off the head of the new stud in the same way and insert it into the hole in the hub. Place a pry bar on top and use a hammer to drive the pin into the hole in the hub. Once it is inside, you can reassemble in the reverse order.
How to replace a broken hub stud?
At the tire shop, the thread of the hub bolt to which the wheel is attached was stripped. The question is, how to properly remove the old bolt in order to install a new one? The Legion-Data book says that you need to use a special tool, two bolts and a screwdriver. How to use them. Simply knocking out a bolt could probably be dangerous; you could damage the hub. I'm waiting for answers, thanks in advance!
what's the problem? In my opinion, the main problem is to find this stud =))) and as for changing it, I wouldn’t say it will take a long time.
It’s not a problem to find, I’ve already ordered it from the online store, 80 RUR/piece. The question is how to properly pull out the old one so as not to damage the hub.
The leggo is removed. You unscrew 2 nuts and completely remove the brake pads in the place with the caliper, there is an iron casing at the bottom and there is no casing on the right, you move the required pin into this hole and hit it lightly with a hammer and that’s it. We take the stud and insert it towards us from the reverse side, screw the nut onto this stud until the end, unscrew the nut, move the pads apart, install and tighten 2 caliper nuts and that’s it. We put on the wheel.
the mechanism is terribly simple, you give a fuck to the service and you leave with the pin in place
Lada cars have bolts, not studs. I once tore off 2 bolts, gave the blank to the turner and he regrinded 4 holes for me between the old holes
Thanks everyone for the answers, I changed this pin today. I had to hit it pretty hard with a hammer to knock it out. brake pads/calipers, etc. No need to remove, just removed the wheel and drum. the new pin fits like original
Applicability
| Brand | Model | Name according to auto catalog | Drawing |
| VAZ | VAZ-2120 “Nadezhda” | Bolt | Chassis / Wheels |
| VAZ | VAZ-2121 | Bolt | Chassis / Wheels |
| VAZ | VAZ-2131 | Bolt | Chassis / Wheels |
| VAZ | VAZ-2123 | Bolt | Chassis / Front axle |
| VAZ | VAZ-2131 | Bolt | Chassis / Wheels |
| VAZ | VAZ-21213 | Bolt | Chassis / Wheels |
| Chevrolet | Chevrolet Niva 1.7 | Front wheel bolt | Chassis / Rear suspension |
| VAZ | VAZ-21213-214i | Bolt | Chassis / Suspension |
| VAZ | LADA 4×4 M | Bolt | Chassis / Suspension |
| VAZ | Lada 4×4 Urban | Bolt | Chassis / Wheels |
Where else is the spare part used?
The parts data presented on this page is for informational purposes only.
Download price lists
This section is not under development
autodelo. info
autodelo. info Passenger Motorcycles Trucks and Commercial Engines
- For novice drivers
- Code of Administrative Offenses
- Region codes
- Legal issues
- Insurance
- Adviсe
- News
- Test Drive
- Interesting
- Online services
Sorry…
To main
- about the project
- Rules
- Contacts
“Car catalog and all the news from the world of car lovers”
Catalog
ALFA ROMEO AUTO UNION AUDI AUSTIN BEDFORD BMW CHRYSLER CITROËN DAF DAIHATSU DAIMLER DODGE FIAT FORD GMC HONDA INNOCENTI ISUZU IVECO JAGUAR LADA (VAZ) LANCIA MAN MAZDA MERCEDES-BENZ MG MITSUBISHI MORRIS NISSAN NSU OPEL PEUGEOT PORSCHE RENAULT ROVER SA AB SEAT SKODA SUBARU SUZUKI TALBOT TOYOTA TRIUMPH VAUXHALL VOLVO VOLKSWAGEN ZASTAVA AVIA BARKAS BORGWARD CHEVROLET DACIA EBRO GAZ SANTANA SSANGYONG STEYR TATA PIAGGIO HYUNDAI KIA DAEWOO WARTBURG TRABANT AC RENAULT TRUCKS FERRARI LAMBORGHINI ROLLS-ROYCE MASERATI RELIANT PONTIAC FSO FORD USA PROTON BUGATTI AUTOBIANCHI HOLDEN LOTUS MORGAN FORD OTOSAN ALPINE GLAS MOSKVICH BENTLEY BUICK CADILLAC GEO LEXUS MEGA PLYMOUTH PREMIER TVR ALPINA ASIA MOTORS ASTON MARTIN JEEP WESTFIELD SMART ZAZ OLDSMOBILE LINCOLN MAHINDRA ARO LDV AIXAM BERTONE BITTER BRISTOL CALLAWAY CARBODIES CATERHAM CHECKER DALLAS DE LOREAN DE TOMASO GINETTA HINDUSTAN HOBBYCAR ACURA HUMMER INDIGO IRMSCHER ISDERA JENSEN LIGIER MARCOS MCLAREN METROCAB MIDDLEBRIDGE MINELLI MINI INFINITI OLTCIT OSCA PANOZ PANTHER PAYKAN PERODUA RANGER RAYTON FISSORE BOND AUSTIN-HEALEY RILEY WOLSELEY SAO SHELBY SIPANI SPECTRE STANDARD TOFAS UAZ UMM VECTOR WIESMANN YULON PUCH LAND ROVER MAYBACH ASHOK LEYLAND ASKAM (FARGO/DESOTO) AMC LANDWIND (JMC) GEELY SUN BEAM SPYKER KTM HILLMAN YUGO DONGFENG ( DFAC) EUNOS FORD ASIA / OCEANIA FOTON GREAT WALL MITSUOKA PININFARINA LTI IRAN KHODRO (IKCO) FPV MAXUS (SAIC MOTOR) TESLA TAZZARI ARTEGA THINK NOBLE FISKER KING LONG ABARTH MIA DS (CAPSA) STREETSCOOTER RUF MICROCAR DFSK DS ZENOS CARS IZH
autodelo. info
autodelo. info Passenger Motorcycles Trucks and Commercial Engines
- Traffic rules
- Code of Administrative Offenses
- Region codes
- Legal issues
- Adviсe
- News
- Reviews
- Interesting
- Online services
Bolt pattern tables
To ensure that the car owner does not have to take measurements and do unnecessary work, special tables have been created that already contain data for a specific car.
The disadvantage of doing your own calculation is that you can make a mistake in taking measurements. A difference of a few millimeters after inserting data into the formula can end up producing completely different values.
Due to the fact that various manufacturers create all sorts of variations in the diameter dimensions for bolts, in which the values can be close, you may not be able to make the right choice. For example, instead of 139.7, get close to 140. This means that the wheel is guaranteed not to install, despite the difference of only 0.3 millimeters.
You might be interested in Alloy black car wheels
The tables are designed to make life easier for car owners due to the fact that they contain ready-made and accurate data.
Why change the mount?
There are several reasons why Niva car owners change their wheel nuts to new ones:
- the old ones are worn out, their edges are licked or the threads are torn off;
- Alloy wheels must be installed on the car, and the standard mount does not fit them;
- the owner just wants to decorate the wheels of his car without resorting to installing decorative plastic caps, which are constantly lost.
Old nuts that are worn or mechanically damaged do need to be replaced, especially when they have poor threads or missing edges. It is difficult to tighten such a part with a torque of 10-11 kgf/m to securely fasten the wheel. It’s better to install a new set; it’s pointless to change 1-2 fasteners. The main thing is that the threaded part of the stud remains normal.
Alloy wheels, although thicker than stamped steel ones, can theoretically be fastened with factory nuts. Another thing is that such details will ruin the entire appearance of the new wheels, so in such a situation it is better to install elements that are in harmony with the wheel. There is another point: in some models of alloy wheels, samples are made in the form of a hemisphere, rather than a cone. Then the standard fasteners will definitely not fit; you need to purchase nuts with a spherical end that fit into the mating part of the rim.
In addition to improving the appearance of the car, there is another reason that forces you to change 1 out of 5 nuts to a special one that can only be turned with an exclusive key. The reason lies in the high cost of car tires and storing the car itself in the open air in the yard, as often happens in cities. To prevent tires from being stolen at night, one clever security nut is installed on the car.
Typical causes of a broken hub stud
Fastenings are most often torn off on the front wheels. This occurs due to overheating of the brake system due to wear of the pads: during braking, heat is transferred to cold parts, the nuts stick to the studs. When removed, the bolt breaks or the threads are stripped. In any case, the part is no longer usable and the broken hub stud needs to be replaced. On the rear wheels, the braking process is not so intense, so breakdowns are much less common.
Another common reason for replacing a hub stud is careless wheel removal. Often, inexperienced tire service workers make mistakes by unscrewing the nuts too sharply on a wheel that has not cooled down. If you have a similar problem, contact the Technika service station! We accept by appointment, as well as on a first-come, first-served basis when urgent repairs are needed.
Work order
Replacing a hub stud with a broken thread or a crease is the same:
Removing a broken wheel stud in our car service center is carried out without removing the hub and bearing. This eliminates the risk of damage to expensive spare parts.
The work takes on average 30-40 minutes. At this time, we invite you to visit the relaxation area, where you can drink aromatic coffee, charge your mobile devices, or just relax in a comfortable soft chair! Pre-registration for the service is available online or by phone.
Stud repair
Often, motorists do not recommend repairing bolts. Firstly, this is not always possible to do (broken and distorted). Secondly, the safety of driving a vehicle is reduced. But they can still be restored.
In order not to encounter such a problem as breaking and replacing the front wheel stud, it is necessary to monitor the degree of tightening of the nuts. When released, the disc hits the studs. This leads to their breakage and wear of the threads. Before removing the wheel from the car, you need to thoroughly clean the bolts of dirt so that it does not get on the threads of the threaded connection. The same operation should be carried out before screwing on the nut.
Additionally, be sure to check the tightness of the nuts and bolts after visiting a tire shop. There is a high probability that in a hurry the service worker may not reach the wheel and this will lead to damage to the studs at best.
Wheels on a car are the main mechanisms for moving a vehicle. They consist of a rubber tire that fits onto a steel (or other types) disc. Inside the structure there is an air cushion, due to which you feel comfortable when moving. Often, when driving off-road in a Niva Chevrolet, problems arise with these devices. The most common problem is a puncture, which requires immediate attention. There are also problems with broken wheel studs that occur during slipping on a hard surface. This article is devoted to the topic of Chevrolet Niva car wheels, or rather, their replacement to eliminate various malfunctions. Therefore, we will consider how to replace the wheel, studs, drive and hub bearing of a Chevrolet Niva SUV.
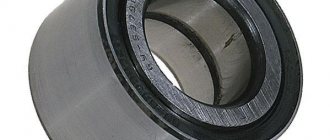
Replacing the rear wheel bearing
As a rule, unlike the front one, replacing the rear wheel bearing is not done often. Its service life is much longer - about 100 thousand kilometers, but due to the deplorable condition of the roads, it can be significantly reduced.
A faulty rear hub bearing makes itself felt by wheel play, which is easily detected by the appearance of a knocking or squeaking sound in the rear chassis. Most often, replacing the rear wheel bearing will be the only solution, because it cannot be adjusted. The rear bearing is replaced using the same technology as the front one - in a good car service it can be done quickly and easily.
Changing the wheel
It is necessary to change the wheel in the following cases:
- tire damage;
- disk damage;
- when the tire wears out;
- when upgrading a car.
The replacement process is as follows:
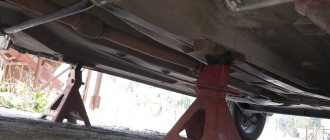
- The Shevik is placed on a hard surface and the handbrake is applied.
Do not forget about supports or shoes, they prevent the raised car from rolling off the jack.
It is also important to tighten the nuts evenly. This will reduce the risk of the wheel skewing and unscrewing spontaneously. The final tightening of the nuts is carried out after removing the jack.
Preparing for work
- To successfully complete the replacement work, you need a garage or box, preferably closed, and in winter also heated. No, of course, our craftsmen can perform the procedure simply on the asphalt in the yard. But it’s better to choose more comfortable conditions;
- Also, it would be a good idea to thoroughly wash the dirt from underneath the car if it is stuck and dry (at least do this with the wheel on which you are going to change this spare part);