The upholstery in your car will tighten over time, even if you use cleaning products. The door panels, headliner and seat upholstery are combed out, become tarnished, greasy and simply have holes in them or are simply burned with a cigarette. Therefore, often dry cleaning is also powerless.
And here we are faced with a choice. Either install covers or replace the upholstery. Each of these options has its pros and cons.
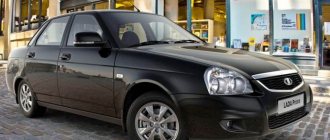
In this case, such a problem concerns the Lada Priora car. If you like to take care of your car, then this instruction will be useful for car owners. Since it will be clearly shown how to reupholster the old rear seat with new upholstery. The instructions will have the most detailed explanation of how to disassemble and reassemble, as well as what you need to pay attention to and where to start when replacing the seat upholstery with your own hands.
The easiest way to update a seat is to cover it with new covers. But this will not solve the issue of cleanliness, because all the dirt that the upholstery has absorbed remains there, so the dust and unpleasant smell will not go away. The main advantage is how well they fit and perfectly follow all the curves of the foam casting. Covers will hide dirty upholstery, but with new upholstery you'll feel like you're in a new car.
Pay attention to what kind of seats you have. The fact is that at first they installed foam molding of the tenth family on the Priora, and accordingly the upholstery was different. Check this question with the seller before buying a new one!
TOP 3 armrests for Lada Priora: comparison of prices and characteristics
An armrest is a special part of a car seat on which you can rest your arms while driving. It helps relieve stress on the arm muscles during a trip and thus avoid premature driver fatigue.
Armrests for Lada Priora are manufactured by Alamar. There are also Chinese-made armrests for this car model.
Armrests Alamar
Alamar produces budget options for armrests for Lada Priora, which, despite fairly low prices, are of fairly high quality. Alamar armrests are equipped with a removable zippered cover, which is available in black and gray, matte or metallic. These armrests are only suitable for cars that do not have height adjustment!
Price: from 1200 rubles
Universal armrests
Recently, so-called “universal” armrests, supposedly suitable for any car model, regardless of the brand, have begun to gain popularity. But, in fact, with such armrests there are more problems than any positive aspects. Often, a motorist who has purchased such a “universal” armrest will have to independently adjust it to the console: file it, twist it and bring it to perfection in every possible way. It is very difficult to do this without skill, so we strongly do not recommend that you purchase this kind of armrests.
Price: from 899 rubles
Chinese armrests
Chinese armrests attract car owners because they are much cheaper than “branded” ones, and in addition they have a fairly wide range of models. But, nevertheless, you should be careful when choosing them.
Firstly, you need to pay attention to the indication of the car model for which this armrest is manufactured on the packaging of the armrest itself. The model may not be specified or specified incorrectly
Secondly, you should carefully look for the indication of the name of the armrest manufacturer.
Price: from 700 rubles
We recommend Alamar armrests as an ideal option for Lada Priora. But, if you want to buy something cheaper, then armrests from China are quite good.
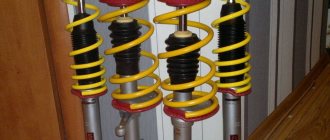
Modified shock absorbers
As a rule, the factory shock absorber does not have any effect on the ground clearance. But if you are working with an already worn-out unit, then while driving it may be subject to swinging in the forward direction, which greatly increases the possibility of damage not only to the bumper, but also to the components and parts of the Lada located under the bottom of the car.
In order to qualitatively increase the ground clearance on a Priora (this rule is also relevant for any other car), you should use only original shock absorbers, which will differ from the factory ones in a number of characteristics. So, for example, the length of the rod, the length of the spring will be increased and the quality of the spring stiffness will greatly increase. The latter is achieved by adjusting the shock absorbers - thickening the coils.
It should be noted that increasing the parameters of the shock absorber is a rather expensive way to change the ground clearance. That is why it is rarely used. However, the possibilities for working with shock absorbers are very large, since you can use not only Lada components, but also components of other cars. In addition, there are special offers from manufacturers of units that allow you to increase ground clearance.
How high the ground clearance of the Lada Priora is will depend on what kind of spring is installed on it. Since the body will be mounted on it, not only the ground clearance, but also the quality of the suspension as a whole will depend on the stiffness of the spring and the distance from its lower point to the upper one.
There are not too many options for which springs to attach to the car we are interested in. There are 2 classes in total: A and B, of which the earlier version is considered the most stringent. There are also some types of springs that are installed on the car during factory assembly. By qualitatively changing them, we can also increase ground clearance.
But do not forget that the desire to obtain excessive spring stiffness can lead to unintended consequences. So, for example, you can make the car bounce when encountering bumps and speed bumps. Spring stiffness is very useful when the machine is heavy or heavily overloaded. However, going light will degrade the performance of the suspension and prevent it from operating smoothly.
The vehicle's ground clearance is a parameter that does not happen much on our roads. Although, if you look from the other side, it is not uncommon to come across a car on the street with a lowered suspension.
Most often they decide to increase clearance due to the following cases:
- A loaded car hits the fender liners with its rear wheels or the mudguards on the ground, so they want to lift the rear of the car.
- It touches the bottom or crankcase protection on uneven roads, so they want to raise the front of the car.
In some cases, they decide to raise the rear and front suspension at the same time. It is no secret to many that after such actions some troubles may arise, wear of some components may increase, and the characteristics of the car may change. Let's try to find the answer to the question: how to increase ground clearance without negative consequences.
Stories from our readers
“Fucking basin. "
Hi all! My name is Mikhail, now I’ll tell you a story about how I managed to exchange my two-wheeler for a 2010 Camry. It all started with the fact that I began to be wildly irritated by the breakdowns of the two-wheeler, it seemed like nothing serious was broken, but damn it, there were so many little things that really started to irritate me. This is where the idea arose that it was time to change the car to a foreign car. The choice fell on the melting Camry of the tenth years.
Yes, I had matured morally, but financially I just couldn’t handle it. I’ll say right away that I am against loans and taking a car, especially not a new one, on credit is unreasonable. My salary is 24k a month, so collecting 600-700 thousand is almost impossible for me. I started looking for different ways to make money on the Internet. You can’t imagine how many scams there are, what I haven’t tried: sports betting, network marketing, and even the volcano casino, where I successfully lost about 10 thousand ((The only direction in which it seemed to me that I could make money was currency trading on the stock exchange, they call it Forex. But when I started delving into it, I realized that it was very difficult for me. I continued to dig further and came across binary options. The essence is the same as in Forex, but it’s much easier to understand. I started reading forums, studying trading strategies. I tried it on a demo account, then opened a real account. To be honest, I didn’t manage to start earning money right away, until I understood all the mechanics of options, I lost about 3,000 rubles, but as it turned out, it was a precious experience. Now I earn 5-7 thousand rubles a day. I managed to get the car buy after half a year, but in my opinion this is a good result, and it’s not about the car, my life has changed, I naturally quit my job, I have more free time for myself and my family. You’ll laugh, but I work directly on the phone)) If If you want to change your life like me, then here’s what I advise you to do right now: 1. Register on the site 2. Practice on a Demo account (it’s free). 3. As soon as you get something on the Demo account, top up your REAL ACCOUNT and go to REAL MONEY! I also advise you to download the application to your phone, it’s much more convenient to work from your phone. Download here.
Replacement of Prior seat upholstery
The front ones are easy to remove, you just need to remove the seat completely and then disassemble it
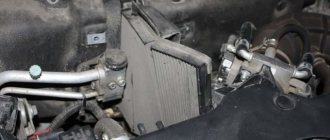
The car stood for 4 months undergoing repairs and smelled terribly of fumes + the original seat trims were dirty on me
The front ones are easy to remove, you just need to remove the seat completely and then disassemble it
The car stood for 4 months undergoing repairs and smelled terribly of fumes + the original seat trims were dirty on me
It's quite easy to take off and put on (the tool is a screwdriver and pliers.) I know - I remodeled the seats in the SVS Omega, but you'll spend a lot of time!
Better take it to the nearest car wash and have the interior dry-cleaned. It will be fast, high quality and without losing the car for 3 days. (I counted this with washing.)
If it gets really dirty, you can buy new casing. https://tuningsvs.ru/product_1869.html Personally, due to back problems, I purchased an anatomical kit. I went through it alone in 2 weekends.
I’ve never done dry cleaning at a car wash and I don’t know what it is. Will the seats really be clean, odorless and dry?
Match shooter
I filmed it twice. Once to repair the frame (after an accident), another time to wash the covers. It doesn’t seem difficult, but somehow I’m no longer eager to repeat it. The seat, yes, needs to be pulled out of the cabin. When you take out an iron rod from a plastic thing (I don’t know what they are called) you can see in the picture
Be careful, the plastic hook where the twig is fixed breaks very easily, the book also warns about this, I broke one.
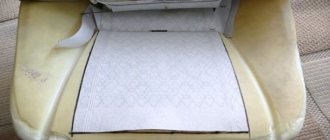
In general, the most difficult thing to remove, and especially to put back on, is the cover from the seat. It has two iron knitting needles that pull the cover onto the foam rubber, so it will be difficult to put them back. It's easier with the back.
How to tighten a car armrest with your own hands (using the Priora as an example)?
Everyone knows that the original interior trim, as a rule, does not last very long. Most often, the armrests “suffer” because they are almost constantly exposed to impact, and not just static. That is why armrest repair is one of the first types of minor tuning that many car owners think about. Of course, any car owner can contact the service center, and they will quickly, but costly, help him deal with this problem. However, you can try to save money and retighten it yourself. Let's look at how to reupholster a car's armrest using the Priora as an example.
How to remove the back sofa
Removing the rear row of seats is done occasionally - only for cleaning or upholstery with new covers. Nevertheless, also read the instructions for removing the rear sofa and keep it in your head “just in case.”
- Unclip the seat cushions on both sides (they are angular) and pull them out of the passenger compartment.
- Find the locking strap above one of the backrests and pull it up. Do the same with the other back.
- Unscrew the bolts securing the armrest and remove it;
- Unscrew the bolts securing the hinges to the body.
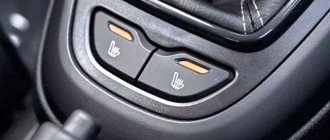
The restyled and pre-restyled Priora, in the opinion of many car reviewers, are practically no different. But, if you dig deeper, you can find one huge difference even in heating kits. In the kit for the pre-restyling version, the switch operates exclusively in 2 modes: ON/OFF. And in the converted version, the entire set is designed so that the heating works in 4 modes: OFF, small, medium, high.
In other words, the kit for the converted version adds something that not all foreign cars have: the ability to change the degree and temperature of the seat heating. On the Priora, which was produced from 2007 to 2012, the heating elements were immediately turned up to maximum.
The standard set for Priora Restyling is also suitable for owners of the first model, because the design has not changed at all. The heating elements themselves will fit perfectly on the seats, and the wiring will be connected the same way – “according to the standard”.
You cannot compromise on comfort in a car, otherwise any winter trip will become true torture. If the stove will not heat the air while the engine is warming up, then you can find other options to warm up. To do this, you will have to spend half a day, but the efforts of this day will “pay off” when it is minus 25 outside.
Where to buy armrests for Lada Priora?
You can buy high-quality armrests for the Lada Priora car in our company! Here you will find any armrests for this car model at the best prices! We cooperate directly with armrest manufacturers, so we can vouch for the quality of the products we sell. In addition, we deliver goods to all regions of the Russian Federation. In addition, if you suddenly have any problems choosing an armrest, call us! We will be happy to help you choose the right and suitable armrest, as well as answer any questions you have about installing it.
Types, design and features of VAZ armrests
All armrests used in Volzhsky Automobile Plant cars are divided into three large groups according to their purpose and installation location:
- Standard door armrests;
- Additional armrests;
- Central (console) armrests.
Interior door handles with armrests for VAZ cars
VAZ front door with integrated armrest Standard armrests are mounted on the inside of all side doors, serving as a support point for the driver's (left hand) elbow and passengers. VAZ cars of various models use several design types of door armrests:
- Armrests combined with door handles into one removable structure;
- Armrests without handles, integrated into the plastic door trim;
- Armrests with and without handles, made in the form of a removable part of the door trim.
Parts of the first type were used only on early car models - VAZ-2101, 2102, 2103 and 2106. This armrest is a solid plastic part of a curved shape, the horizontal part acts as a support for the elbow, and the inclined part serves as a door handle. The surface of the part is textured (imitates leather), and a decorative insert-molding is provided on the horizontal part. The armrest is mounted using three screws; the mounting holes can be closed with decorative plugs.
Interior
The updated Lada Priora 2013 2 received the greatest number of changes inside. The most important update to the Priora 2 interior was the upholstery material (soft-look), which to the touch resembles rubberized plastic, often used in new mobile phones and is immediately visually similar to leather.
In addition, the new 2013 Priors are distinguished by improved sound insulation and sizing, providing 71 decibels of volume at a speed of 100 km/h, which is exactly in line with competitors of European cars. Maybe this is why the old glass control panel was left on the old door panels with new upholstery, which constantly cracks while driving.
And so, the updated Lada Priora 2013 received two elongated by 40 mm. front seats with new headrests and almost sporty lateral support. They are attached to a new mechanism with an increase of 20 mm. longitudinal adjustment, in the hope of getting rid of previous unwanted feedback.
In addition, Priora 2 2013 sports a new instrument panel, seemingly optimized for understanding by lateral (peripheral) vision, plus a completely new center console with a 7-inch screen, USB socket, navigation (GPS/GLONASS) and wireless data transfer function (Bluetooth). The new Lada Kalina 2nd generation received a similar one.
An eyeglass case appeared on the ceiling, other visors with flush stamping and a retouched armrest below, because the previous one was immediately removed due to the complete lack of ergonomics. In the hands of the driver of the Lada Priora 2 2013 there will be a steering wheel similar to the Grant model, but with a plastic black or white spacer, and next to it is a new audio control unit and three wheels from the air conditioning system. The previous ones quickly failed. The metal tip erased the teeth of the plate.
Do-it-yourself armrest reupholstery for a Priora car
There is no need to throw away the old box - re-upholstering the soft backing under the elbow is easier than re-upholstering the steering wheel. Fabrics wear out over time and need to be replaced on time. The new covering of the elbow box on a car can be completely different - eco-leather, fabric, genuine leather. Before covering the substrate, prepare:
- textile;
- glue “Moment” (it works great);
- hair dryer;
- clips, clothespins;
- knife.
First you need to remove the box assembly. The new reupholstery can be made on top of the standard fabric or under it. Do the work like this:
- Measure the required length for the covering, leaving a gap of two centimeters.
- Fill the working surface with glue - this is necessary so that the new fabric does not crawl over the lid, and also wrinkles do not collect on it.
- Push the ends of the fabric under the plastic frame and secure them with clothespins. You can put old plastic cards under the clothespins so that the iron parts of the clips do not leave their mark on the sheathing. You can also use other methods of fixing the tissue.
- Wait 15 minutes. Warm the surface with a hairdryer and work for 4-5 minutes.
- Set the finished covered box aside for 10-15 minutes.
- Remove the clamps. Check your work. Install in place of the old backing, a part with a new covering for the lid.
Selection of material for reupholstery
Before you start reupholstering, you should decide on the material in which you will “dress” your armrest.
There are not many options on the market today. The best, of course, is leather. The armrest will look good in appearance. And in terms of wear resistance, it is much superior to other types of material. However, to cover the armrest with leather, you will have to tinker more. Moreover, it is not cheap.
You can also take a good leather substitute. Outwardly, it will not be much different from leather, but it has several disadvantages, including a tendency to damage and wear, and an unpleasant odor. In addition, leatherette is more elastic. This makes the re-upholstery process somewhat easier, but during operation this factor has a negative effect.
There is also Alcantara - a fiber material that is quite thin. It is durable, soft and silky. Has dirt-repellent properties.
When choosing a material, before purchasing it is worth checking its uniformity and at least externally looking at its quality
Also pay attention to the fact that it is in harmony with the interior color
Installing the armrest of a Lada Priora car
In order to disassemble this part of the car seat, repair it a little, and redo the upholstery, you will need to get a repair kit for a soft pad under the elbow. It costs only 100 rubles, and the kit itself includes the following elements:
- Holder. Catalog number 2170-5109552.
- Retainer (finger). Catalog number 2170-5109548.
- Holder spring. Catalog number 2170-5109554.
To work you will need a “10” head and a knob. Next, in order to remove the part on the car, follow these steps:
- Fold back the lid together with the box.
- The plug on the bottom needs to be pryed off. Here, unscrew the two mounting bolts with a ratchet.
- Remove the box with the lid.
- Place the new element in reverse order.
Usefulness lies in decorative and direct purpose
First, the plug covers a fairly large space from the seat to the floor, thereby eliminating a large open space, which does not look very beautiful and laconic, because in general there are no obvious open spaces in the car interior that look like a flaw. Also, these plugs, as a rule, have the same texture and color as the lower part of the seat, so they look like a single unit.
The second purpose is functional. The bottom line is that, although not often, it has happened to all of us when an object falls out of our hand and falls in a simple way under the seat. Accordingly, in order to get it, we turn into a snake, because there is no other name for the bend in which we try to contrive and get the fallen object. In addition, moisture and dirt fly under the “open seat”, which comes from the street when the door is opened, and in winter it is also snow, which then melts and water seeps through the floor covering to the metal, causing its slow corrosion.
Thus, from a seemingly simple detail, so many unpleasant problems arise. However, recently such plugs have begun to be produced for domestic cars. The first “testers” were Priora models. Car owners are happy, and those who do not have plugs as standard purchase them with great popularity. Therefore, the result suggests itself.
Installation of the plugs is quite simple with minimal effort. There is no need to remove the seats. The main mounting point is the connecting bolt between the seat and the backrest - it is this that secures the plug. Next, it is installed in shape and fits tightly to the shape of the seat itself, without interfering with its movement (closer or further from the steering wheel). The plug also contains additional holes for fastening along the perimeter of the edge of the seat. However, there are no such holes in the seat itself, so you will have to make them yourself - this is at the request of each car owner.
Seat covers for Lada Priora in LADA TUNING Shop ★ Low prices ★ Call: 8-919-819-40-37 We guarantee delivery within the Russian Federation and high quality of goods
Seat covers for Lada Priora - cover the seat slides with a cavity and do not interfere with the movement of the seat
Material: ABS – Plastic. embossed surface – “Shagreen”
Set: 2 pcs (left and right)
Easy fastening: attached to the bolt of the seat back (the seat back must be folded forward) and in front of the seat with a self-tapping screw to the seat frame.
Delivery by mail: YES possible.
Delivery by post by cash on delivery: YES possible.
Delivery by transport company: YES possible.
The latest restyling of the Lada Priora brought many changes, one of them is a plastic cladding that is screwed to the front of the front seat cushions. With such an overlay, the car interior looks more aesthetically pleasing and modern. We are studying the question of how to install such a cladding on the seats of the Lada Priora before restyling.
You will need: buy seat trim (catalog number: 2170-6810066), a “10” wrench, a piece of plastic, clamps, glue, a file.
How to remove the armrest on a Volkswagen Polo, Ford Focus 2 and Lada Priora
Every motorist knows how tired his hands get when driving long and grueling distances. Almost all modern cars are equipped with an armrest - a special support for the elbows. This is a stationary part in the car that requires replacement over time.
The armrest is replaced with a new copy not only because of its mechanical damage or wear, but also replacement of the component for comfortable movement may be required with the purchase of other seat covers and during the reupholstery of the interior. Next, using the example of cars popular among domestic drivers, we will consider the detailed process of dismantling the armrest.
What tool will you need?
There is no single scheme for attaching and removing the elbow support. Most modern cars have different designs of seats and central tunnels. All this complicates the work of installing a new instance. But, if you arm yourself with all the necessary tools and detailed instructions, then all the work can be done quickly and efficiently.
List of required tools:
- Flat blade screwdriver;
- Ten socket head;
- TORX T20 – T30.
In some situations, a more extensive list will be needed, but this is the necessary minimum that every driver who wants to do all the work on his car without significant time investment should have.
Article on the topic: Do-it-yourself repair of the VAZ 2110-2112 fuse box
Removing the armrest on a Volkswagen Polo
In order to remove the armrest in a Volkswagen Polo, you need to do the following work:
- Remove the rear cup holder.
- Unscrew nut 1 and remove the device.
The rear cup holder can be removed after a few simple steps:
- The first step is to remove screw 1 from the open cup holder.
- The lower part 2 of the stand is removed.
- The upper part of the stand is removed.
Removing the armrest on a Volkswagen Polo is quite simple; you just need to arm yourself with the necessary set of screwdrivers and sockets. All the work will take a few minutes for experienced motorists, but beginners will have to spend a little more time.
We dismantle the armrest on a Ford Focus 2
Removing the armrest on a Ford Focus 2 is a more difficult process than on a Volkswagen Polo, but not much.
Dismantling sequence:
- First you need to unscrew the two screws marked in red in the photo.
- The rear part of the tunnel must be picked up and pulled towards you to release the fastenings (four pistons, marked in red in the photo).
- Then you need to unscrew the four screws (marked in green in the photo).
An additional armrest is obtained as follows:
- The rear roof screws are released - 3 pcs.
- The cover is removed and the armrest is pulled all the way forward until it is completely free.
- If the armrest is held and does not release, pull out the hooks of the two holders.
At this point, the dismantling of the support on the Ford Focus 2 can be considered complete.
Removing the armrest using the example of Lada Priora
Removing the armrest on a Lada Priora is as easy as shelling pears. Domestic cars are not equipped with serious on-board electronics, so novice car owners have nothing to fear if the need arises to remove the auxiliary support. The main thing is to take your time and follow the order of actions:
- The lid rises to the top position.
- The plugs are removed.
- Unscrew the screws marked with red arrows - 6 pcs.
- The upper part of the support is detached.
- If there is a need to disassemble the device, use pliers to release the two side rivets.
Article on the topic: Preferential car loans 2022 - list of cars
The presented instructions for removing the armrest will help you deal with any difficulties that arise when dismantling the elbow rest. If the design of the central tunnel of your car is slightly different, then to solve this problem you can always resort to the operating instructions, which should also include a special diagram. If for some reason there are no instructions and it is not possible to remove the auxiliary device yourself, then it is best to entrust all the work to qualified service center employees.
How to remove the rear seats in a Priora
You will need
- - wrench 10;
- - Phillips screwdriver.
Instructions
Open the back door of the car. Feel under the seat for the small airbag lock handle. Press the handle while controlling the applied force. Finding a replacement for a broken one will be quite difficult.
Gently lift the edge of the pillow to remove it. Go around the other side of the car and do the same operation so that both ends of the cushion come out of the grooves
Lift and remove the seat cushions from the passenger compartment. The left rear seat cushion of the Priora is slightly larger than the right one - because of this, it comes out a little more difficult.
Locate the fastener strap on the back of the seat. Pull it up. In a car with high mileage and sometimes even a new one, the locking mechanism can jam.
If this problem persists after several attempts to remove the rear seats, you will need to lubricate the mechanism with lithol. In addition, it happens that the strap cannot be detected due to the fact that the interior seats have been reupholstered.
At the same time, the locking strap remained inside, behind the cover on the rear seat.
Pull up slightly to remove the rear seatback. Pull out the second one in the same way. Remove the armrest screw attached to the hinge. After this, remove the hinge screw attached to the body. Release the loop and carefully inspect the cushion retainer. If it is faulty, disconnect it too and subsequently replace it with a new one.
note
Helpful advice
Everyday use of a car brings dirt into the interior. Be prepared to wear gloves to avoid getting your hands dirty and resulting in a dirty back seat.
Drivers who occasionally transport large cargo in their cars often try to increase the interior space by removing the seats of both the second and first rows. Sometimes seat dismantling is performed for other reasons. In any case, it will be useful for every motorist to know how to remove the seats themselves if the need arises.
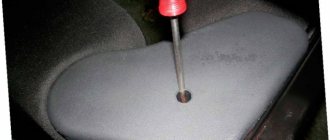
To dismantle the seats, you will need the simplest tools - a wrench, a socket wrench and 2 screwdrivers - a Phillips and a slotted one. You will spend no more than 15-20 minutes of your personal time dismantling one seat. To remove the first row seats, you need to open the cover (the easiest way to do this is to use a flat-head screwdriver, prying the cover from above). Under the cover you will see a bolt that needs to be unscrewed and removed. Each seat is secured with four of these bolts, so after doing this operation four times, you will disconnect the seat from the base and be able to remove it. In some cars, the second row seats are slightly more difficult to remove than the first row seats. But they can also be dismantled without much difficulty. First you need to unscrew the screws that hold the decorative plastic trims and remove the decor
After this, the rear part of the pad must be bent back, slightly moved to the left, and then pushed forward and removed in one motion. Perform all movements carefully and carefully so as not to damage the plastic parts of the seats. By performing this simple operation several times in a row, you will be able to perform it automatically in the future. When removing decorative parts, help yourself with a flat-head screwdriver, but never use excessive force.
After removing the pads, unscrew the seat clamps and remove them.
Manufacturers (analogues of armrests) and prices
There are some good suggestions that can be used to replace these stock seat parts. There are copies with any coating - even eco-leather and any design. Among them:
- Varta – 1500 rubles. The base is wood, the covering is eco-leather. With a gray stripe in the middle, which is emphasized by black stripes on the sides.
- Azard bar10013 – 1500 – 1,700 rubles. The covering is strictly black, made of eco-leather.
- Autochecly models RR-01 - RR-05, RR-20, RR-26. Made of eco-leather, the central insert of the backing can be made in several colors. Cost – 2,200 – 2,400 rubles.
https://youtube.com/watch?v=FiANYBM43kk
Installing the armrest of a Lada Priora car
In order to disassemble this part of the car seat, repair it a little, and redo the upholstery, you will need to get a repair kit for a soft pad under the elbow. It costs only 100 rubles, and the kit itself includes the following elements:
- Holder. Catalog number 2170-5109552.
- Retainer (finger). Catalog number 2170-5109548.
- Holder spring. Catalog number 2170-5109554.
To work you will need a “10” head and a knob. Next, in order to remove the part on the car, follow these steps:
- Fold back the lid together with the box.
- The plug on the bottom needs to be pryed off. Here, unscrew the two mounting bolts with a ratchet.
- Remove the box with the lid.
- Place the new element in reverse order.
Removing the floor tunnel lining
We carry out the work by removing the cigarette lighter, parking brake lever and trunk lock control button. We tilt both front seats back (see “Removing the front seat”). For clarity, the work is shown with the driver's seat removed. Using a 10mm socket, unscrew the nut securing the air duct to the legs of the passengers in the rear seat...
...and remove it. Similarly, remove the air duct on the right side.
Raising the armrest, we pry up the decorative trim of the armrest hinge...
...and remove it. We pry up, overcoming the resistance of the latches, a container for storing small items...
...and take it out of the tunnel lining.
Using a 10mm socket, unscrew the two bolts securing the armrest hinge and remove the armrest.
Using a Phillips screwdriver, unscrew the four screws securing the floor tunnel lining.
Through the opening in the lining, pressing the lock with your hand, remove the wiring block from the trunk lock control button.
Using a high 10mm head, unscrew the two nuts securing the tunnel lining. We install both front seats in their places and move them as far forward as possible along the slide.
Using a Phillips screwdriver, unscrew the self-tapping screw securing the tunnel lining to the base on the left and similarly on the right.
Use a slotted screwdriver to remove the plastic plug at the bottom of the cup holder.
Using a Phillips screwdriver, unscrew the screw fastening the tunnel lining.
Using a Phillips screwdriver, unscrew the two self-tapping screws securing the floor tunnel lining on the left and similarly on the right.
Use a slotted screwdriver to pry up and remove the plug in the niche of the parking brake drive lever.
Use a Phillips screwdriver to unscrew the screw fastening the side panel of the tunnel lining...
...and remove it. We remove the right shield in the same way.
Using a Phillips screwdriver, unscrew the self-tapping screw securing the front part of the tunnel lining. Similarly, unscrew the self-tapping screw on the right side.
Overcoming the resistance of the clamps, we remove the frame for fastening the gear lever cover... ...and leave the frame with the cover on the lever.
Using a Phillips screwdriver, unscrew the two screws securing the tunnel lining to the instrument panel console.
We lift up the tunnel lining...
...and by pressing the latch, disconnect the wiring block from the cigarette lighter. Remove the floor tunnel lining. We install the tunnel lining in the reverse order.
Removing the interior trim of the Priora
Any parts of the car interior, in particular the ceiling, can be modified, for example, installing sound insulation. The ceiling can also be improved and re-stretched. Of course, the first step in any type of tuning is dismantling the product. How to remove the trim from the roof of a Lada Priora car yourself?
To carry out the operation of removing the car upholstery, you need a Phillips and flat-head screwdriver, as well as gloves, which must be clean, since the upholstery of the VAZ 2107 (Lada Priora) is very soiled and easy to get dirty. By the way, if you have your upholstery changed at a service station, but you need a car urgently, we recommend using the Kyiv car rental SVcar service. We assure you that you will be satisfied!
The procedure for removing the headliner:
- You need to open the glasses case and unscrew two bolts.
- The lampshade snaps off and is removed.
- It is necessary to disconnect all wiring harnesses from the lampshade.
- The plastic cover located near the interior mirror is removed, and the latches are snapped off with a flat screwdriver.
- Two bolts are unscrewed, the mirror and plastic box are removed.
- The side trims of the windshield pillars located on the driver's side are removed. To do this, you need to pry them off and snap off three clips.
- The pillar trim on the passenger side is removed in the same way.
- The pillar trim in the center (near the seat belts) on both the driver and passenger sides is removable.
- The plugs are removed and the bolts holding the upper handles are unscrewed.
- The three plugs near the rear window also need to be removed.
- The rear strut covers do not need to be removed; instead, it is recommended to snap off their upper part.
- If there is a central lamp used for interior lighting, it must also be removed.
How to remove the headliner of a Lada Priora?
After carrying out all the above work, only the seals hold the casing in place. Using a flat-head screwdriver, the headliner is removed from under the seals. As soon as the front part of the ceiling is on the seats, the trim needs to be moved forward, then the rear part of the trim is brought out from under the rear pillars.
In order to remove the trim from a VAZ 2170 (sedan), you need to lower its left edge between the door and the seats, and then pull it out through the rear door. This must be done very carefully so as not to break the upholstery.
If the car is a VAZ 2171 (station wagon) or VAZ 2172 (hatchback), then in this case the headliner can be pulled out through the trunk. The roof sheathing is installed in the reverse order of the above.
Found a mistake? Select the text with the mouse and press Ctrl+EnterVIP is a type of tuning that over time has become a car culture. The emergence of the VIP style is closely related to the emergence of the JDM scene.
During the operation of any car, the lamps in the headlights must be replaced, because they cannot work forever. Reupholstering the car ceiling with your own hands This article will help you learn more about how you can reupholster the car ceiling yourself at home. Attaching the inner door panel: Fig.
1Service life of the main muffler, which is used in the exhaust system of the Lada Priora (hereinafter referred to as pShow more
Removing the floor tunnel lining
We carry out the work by removing the cigarette lighter, parking brake lever and trunk lock control button. We tilt both front seats back (see “Removing the front seat”). For clarity, the work is shown with the driver's seat removed.
Using a 10mm socket, unscrew the nut securing the air duct to the legs of the passengers in the rear seat...
...and remove it. Similarly, remove the air duct on the right side.
Raising the armrest, we pry up the decorative trim of the armrest hinge...
...and remove it. We pry up, overcoming the resistance of the latches, a container for storing small items...
...and take it out of the tunnel lining.
Using a 10mm socket, unscrew the two bolts securing the armrest hinge and remove the armrest.
Using a Phillips screwdriver, unscrew the four screws securing the floor tunnel lining.
Through the opening in the lining, pressing the lock with your hand, remove the wiring block from the trunk lock control button.
Using a high 10mm head, unscrew the two nuts securing the tunnel lining. We install both front seats in their places and move them as far forward as possible along the slide.
Using a Phillips screwdriver, unscrew the self-tapping screw securing the tunnel lining to the base on the left and similarly on the right.
Use a slotted screwdriver to remove the plastic plug at the bottom of the cup holder.
Using a Phillips screwdriver, unscrew the screw fastening the tunnel lining.
Using a Phillips screwdriver, unscrew the two self-tapping screws securing the floor tunnel lining on the left and similarly on the right.
Use a slotted screwdriver to pry up and remove the plug in the niche of the parking brake drive lever.
Use a Phillips screwdriver to unscrew the screw fastening the side panel of the tunnel lining...
...and remove it. We remove the right shield in the same way.
Using a Phillips screwdriver, unscrew the self-tapping screw securing the front part of the tunnel lining. Similarly, unscrew the self-tapping screw on the right side.
Overcoming the resistance of the clamps, we remove the frame for fastening the gear lever cover... ...and leave the frame with the cover on the lever.
Using a Phillips screwdriver, unscrew the two screws securing the tunnel lining to the instrument panel console.
We lift up the tunnel lining...
...and by pressing the latch, disconnect the wiring block from the cigarette lighter. Remove the floor tunnel lining. We install the tunnel lining in the reverse order.
How to remove the front seats
Instructions for dismantling the front seats will be needed not only for installing heating. The front seats in the Priora are installed simply, and to install and disassemble them you will need several tools and strength. By the way, on the Priora 2 seats in the “Lux” configuration have become softer and more comfortable, but the adjustment is still the same - you cannot adjust the height.
There are not many instructions on how to remove the front seat, everything is simple:
First you will have to move the seats all the way back and remove the torsion bars. You will need a size 8 wrench (for five bolts securing the slide) and a size 13 wrench (for four bolts on the bracket fastenings). First you need to unscrew the bolts on the bracket, then tilt the back of the chair back as far as possible and unscrew the two bolts on the slide. After this, tilt the backrest as far forward as possible and unscrew two more bolts. The seat can be removed from the passenger compartment.
Instructions: how to remove the armrest on a Priora - replacement, reupholstery, price
The upholstery in your car will tighten over time, even if you use cleaning products. The door panels, headliner and seat upholstery are combed out, become tarnished, greasy and simply have holes in them or are simply burned with a cigarette. Therefore, often dry cleaning is also powerless.
And here we are faced with a choice. Either install covers or replace the upholstery. Each of these options has its pros and cons.
In this case, such a problem concerns the Lada Priora car. If you like to take care of your car, then this instruction will be useful for car owners. Since it will be clearly shown how to reupholster an old rear seat with new upholstery
The instructions will have the most detailed explanation of how to disassemble and reassemble, as well as what you need to pay attention to and where to start when replacing the seat upholstery with your own hands.
The easiest way to update a seat is to cover it with new covers. But this will not solve the issue of cleanliness, because all the dirt that the upholstery has absorbed remains there, so the dust and unpleasant smell will not go away. The main advantage is how well they fit and perfectly follow all the curves of the foam casting. Covers will hide dirty upholstery, but with new upholstery you'll feel like you're in a new car.
Pay attention to what kind of seats you have. The fact is that at first the Priors were equipped with foam molding of the tenth family, and accordingly the upholstery was different
Check this question with the seller before buying a new one!
What is an armrest for?
In short, the armrest is needed for convenience. Experienced car enthusiasts know how exhausting long drives can be. The position of the hands while riding also plays an important role in this. They can't be on the steering wheel all the time. Sooner or later a moment will arise when you want to lower your hand and relax. This is where the armrest comes in handy.
DIY car armrest
The muscles of the forearm and shoulder will be able to relax. The load on the spine and neck will also be reduced, since the person will have the opportunity to give the body a more comfortable position and relax, leaning back in the chair
As a result, the driver gets less tired, which is especially important on a long trip.
In addition, the armrest can have a number of other functions:
- it can be equipped with a built-in drawer where you can place all sorts of small things, from a lighter to sunglasses;
- it may have a recess in it, in which it is convenient to place a bottle of water;
- additional buttons for controlling various electrical devices of the machine can be located here;
- If necessary, a good armrest can be removed by sliding it back into the space between the seats.
How to remove the glove compartment cover of a Priora
- Lada Priora: How to remove the glove compartment
- How to remove the glove compartment on a PRIOR
- Removing and installing the glove compartment of the Lada Priora (LADA PRIORA)
- Repair (glove compartment) of the glove box - LADA GRANTA
- Priora, review of improvements to the armrest and glove compartment
- Eliminating rattling glove compartment of Lada Priora (LADA PRIORA)
- LADA PRIORA DIARY 9 ENTRY (eliminating glove box rattling)
- Knock in the right corner of the Priora panel (VAZ-217030)
- Removing the glove compartment of the Lada Vesta. glove compartment trim
- How to remove the center console on a Priora
conclusions
Reupholstering the Priora armrest is a somewhat labor-intensive and painstaking process. However, almost anyone can do this on their own with minimal investment of time and money. And you will get much more pleasure from tuning yourself than by doing reupholstery “with someone else’s hands.”
Hi all . How to remove the trim from the armrest cover.
Priora - analogues of heated seats. Installation of standard seat heating on LADA Priora
The set of standard seat heating for Priora should include:
- Heating elements (4 in total, two for each seat);
- Block for the control unit with wires;
- Priora seat heating unit.
With all this, the article number for heated seats for LADA Priora must certainly contain the numbers 2170 - this, as any Priora owner understands, is the model number. It is worth distinguishing the standard heating set for Priora 2 by catalog number - they are different in comparison with the set for Priora 1. It is better to outline the entire installation of heated seats on a Priora using a detailed step-by-step method, which has been tested by time and by other car owners:
- We remove the front seats. Remove the factory covers from the seats, which are secured with an iron spoke and 3 plastic latches. You can disassemble the seats without dismantling them, removing only the covers, but then the process will be a little more complicated - it will be awkward to deal with the wiring and laying out the heating parts;
- We attach heating elements to the seats - one on the lower part, the second on the backs, in the lumbar area. Some people recommend strengthening it with double-sided tape, but over time it can come off. It would be safer to sew the heating element to the pillow so that it does not move out of its place;
- Pull the wires from the heating parts through the hole in the mount under the cushion (run the wires from the lumbar heating parts to the place where the seat upholstery is attached). The piece of wire that passes through the hole can be protected from chafing using some kind of plastic tube. The power plugs for all 4 parts are out, all that remains is to connect them;
- Disassemble the central tunnel. Buttons for heated seats will be in place of the plug near the handbrake;
- The wiring is connected strictly according to the seat heating connection diagram. Before doing this, it is recommended to disconnect the battery from the network. We install a terminal block to the heating control unit. The dark-colored (-) wire is attached under the bolt near the handbrake. A gray-red wire (for aesthetes, it is responsible for illuminating the buttons) is connected to the lighting of the cigarette lighter rim. A reddish 12V wire is pulled to the mounting block. You can't do without a fuse. Then everything goes strictly “by the numbers”. Connect pin 87 to the reddish wire, pin 86 to the black wire. Connect the blue-black 12 V wire to pin 85, the pink wire to pin 30. You can connect to the mounting block through cut-in clamps so that the wires are held tighter;
- Assemble the tunnel back, install covers on the seats.
READ Kia Sportage 1 Heater Doesn't Heat Poorly
The standard seat heating on Priora is guaranteed to last for several seasons if it is connected correctly. And if the heating does not work immediately after installation, it means the wiring connection was incorrect.
Product delivery options
Note! Below are the shipping methods available specifically for this product. Payment options may vary depending on the delivery method.
Detailed information can be found on the “Delivery and Payment” page.
Parcel by Russian Post
Available payment methods:
- Cash on delivery (payment upon receipt)
- Using cards Sberbank, VTB, Post Bank, Tinkoff
- Yandex money
- QIWI
- ROBOKASSA
Shipping throughout Russia. Delivery time is from 5 to 12 days.
Parcel by Russian Post 1st class
Available payment methods:
- Cash on delivery (payment upon receipt)
- Using cards Sberbank, VTB, Post Bank, Tinkoff
- Yandex money
- QIWI
- ROBOKASSA
Shipping throughout Russia. Delivery time is from 2 to 5 days. More expensive than regular delivery by Russian Post, approximately 50%. Parcel weight up to 2.5 kg
Express Parcel EMS
Available payment methods:
- Cash on delivery (payment upon receipt)
- Using cards Sberbank, VTB, Post Bank, Tinkoff
- Yandex money
- QIWI
- ROBOKASSA
Shipping throughout Russia. Delivery time is from 3 to 7 days. More expensive than regular delivery by Russian Post, approximately 100%.
Transport companies
Available payment methods:
- Using cards Sberbank, VTB, Post Bank, Tinkoff
- Yandex money
- QIWI
- ROBOKASSA
Delivery is possible to any locality where there is a representative office of the transport company. Delivery time is from 2 to 10 days. Sending large parcels is approximately 50% more profitable than by Russian Post.
Courier delivery in Togliatti
Available payment methods:
- Cash upon receipt
- Using cards Sberbank, VTB, Post Bank, Tinkoff
- Yandex money
- QIWI
- ROBOKASSA
Source
Instructions: how to remove the armrest on a Priora - replacement, reupholstery, price
The armrest on the Priora is a thing - I’ll say even more, now I can’t drive cars that don’t have it. But it is covered with fabric, which quickly gets rubbed off with oily dirt, and at the car wash they charge a separate fee for cleaning off this dirt. Sometimes you want to remove the armrest and cover it with leather. On a Priora you can disassemble it in a couple of movements. Read the article to the end and you will find out how to do this. By the way, below there is a video about how to disassemble the armrest in a Priora car. Okay, these are the lyrics, let's move on. The exterior of the Lada Priora, especially the 2nd version of the car, has at least some style and ergonomics, it has an armrest - hurray. All buttons in the car interior that perform primary tasks are located as close as possible to the driver. Everything, from buttons to seats, should be done so that a person is comfortable, and fatigue while driving is very far away - Lada is moving towards this.
By the way, the armrest for the Priora can be purchased additionally - even if you bought the car on the secondary market, it can be made as comfortable as it should be
The armrest will fit like a native one on Priora 1, 2, it doesn’t matter - there is already space between the seats. The price of the part, especially the factory one, for the pre-restyling version of the car and for Priora 2 is from 1000 rubles
The driver's position is such that while driving, especially while stuck in traffic, it is easy to get tired of the monotony. After a few hours, the search begins for places where you can put your hands, because they get a little numb. The armrests of the Lada Priora are positioned so that you can rest your elbow on it without pulling your shoulders up or down.
Lada Priora Sedan › Logbook › Entry No. 46. Seat trim/seat trim. Part 2
It is necessary to remove the stock plastic cover, as it will get in the way. Trying on...(((((
There is one support point, but you will have to bore the hole to an oval so that the seat back adjustment knobs will fit in. Look further.
Here the face stretches out, frowns, and takes on a puzzled and upset look. And there’s nowhere to attach it! There is a lot of unnecessary things that get in the way, there is a corner that will have to be smoothed out... there are a lot of questions and a lot of bad emotions. Where to go?
I was pleased with the lever handle on the driver's side, although there is no need to saw here. We grind out the oval along the intended contour.
We saw off the fastening of the cladding, which is visible in photo No. 4. I didn’t want to fasten it with screws to... to... and God knows what! My fastening option is for a plastic wiring tie. I found a piece of plastic in the garage, cut it to the size I needed, and drilled a hole (this is where the tie strap will go through).
We sand comparable surfaces and degrease them with alcohol. Using a silicone soldering iron, apply silicone and press firmly.
The result exceeded all my expectations! It holds tightly, in my opinion reliably, but time will tell.
The driver's side is ready. The passenger side remains. Here the beginning of our work is the same as on the driver’s side: we grind out an oval, saw off both front fasteners, since they rest against the seat trim and do not allow our trim to fit tightly, glue the same fastener to the silicone under the plastic tie strap. But there is a nuance . It is necessary to raz...sorry, bore/cut out any hole for the handle of the seat lever.
During installation, it will become clear why I tore up our cladding so much (it’s a pity that I had to do this to the part, but it wouldn’t work any other way).
Now the installation process: I'll start from the driver's side:
It was secured to the tie strap surprisingly firmly. The screed tightens the cladding, and the angle that is visible in photo No. 4 is smoothed out. The lining is pulled close to the seat. Durable and surprisingly tough. The cladding does not move.
The lining was specially attached higher from the floor so that the rug could be pulled out without effort.
Now the passenger side:
The facing has no angle, it is smoothed. The height from the floor is maintained according to the driver's side.
That's why there was such a huge hole and the part was cut down like that. Let me clarify: unlike the driver’s side, on the passenger seat the lever handle is turned toward the trim, and not away from it. And the handle rests against the lining. And with its lower end, the lining rests against the floor tunnel, against the carpet, against the rug, it bends, tucks in... it behaves ugly. They cut it. Now the rug can be pulled out.
The review is completed, which I would like to note:1 The installation/adjustment process took me 5-6 hours (well, I’m such a scrupulous person, I like everything to be done efficiently and conscientiously)2 Getting the rugs became more difficult and inconvenient.3 If anything then you drop it under the seat, you can only get it from the rear passenger seat (fumble with your hand while standing doggy style in the back seat)4 Spend money on buying more expensive linings, only to end up cutting them off like God a turtle... well, I don’t know5 I had a fire extinguisher installed under the driver’s seat — (Entry No. 38. Attaching the fire extinguisher OP-2 under the driver’s seat.) I had to move it to the trunk.6 For those who like storing any useful (nonsense) luggage under the driver’s seat, this is a taboo.7 This is purely my opinion - I was disappointed/upset because - for damaging the goods.
So tnank you. Click like or subscribe to my car. Bye!
source