For additional protection of the body, as well as to contain impacts during minor accidents, a bumper is installed on the car, which comes in two types, front and rear. It is made of ordinary and reinforced plastic that covers a metal cross beam and can be damaged during operation, so over time it will have to be repaired or replaced. Also, in addition to this, it is impossible to replace some elements of the car without removing it, so you need to know how to properly dismantle the bumper so as not to damage it.
To remove the front bumper of a Chevrolet Niva, you don’t need to have special knowledge, just have all the necessary tools. To do this you need to prepare;
- Screwdriver
- Hammer
- Key for 10 and 12
- WD-40 lubricant to remove oxidized bolts
When everything is ready, we begin dismantling;
- Removing the front wheels
- Disconnect the terminals from the battery
- Remove the mudguards on both sides of the wheel arches
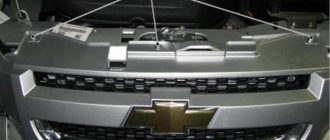
- We remove the decorative trim that is held on by four bolts, this must be done carefully since there is a radiator nearby and it can be damaged
- Disconnect if there are PTFs
- To the right and on the side of the headlight we dismantle the decorative headlight covers
- We unscrew the bolts that hold the bumper trim, which are located under the decorative element
- We unscrew a couple of bolts that are located under the license plate
- There are screws at the bottom end of the number on the left and right, they should also be unscrewed
- We throw on a spanner and unscrew the linings that are attached to the car body and remove them from the PTF beam
- Completely remove the bumper trim
- We remove the power beam; to do this, unscrew the screws at the base of the front wing on the left and right sides
- Without removing the power beam, unscrew the nuts that secure it
- We take out the temperature sensor located in a special bracket and dismantle the beam
Reinstallation is carried out in the reverse order of removal.
To remove the rear bumper of a Chevrolet Niva, we also prepare the necessary set of tools and perform the following steps:
- Disconnect the negative terminal from the battery
- Unscrew the side bolts of the buffer trim on both sides
- We remove the mudguards by first unscrewing the fastening screws
- Unscrew the mounting bolts from the top side of the rear bumper
- Removing reflectors
- Behind the license plate, unscrew the upper and lower nuts that secure the rear bumper trim
- Disconnect the wires that go to the license plate light
- Unscrew the bolt that secures the “Ground” terminal and take all the wires to the side and pull out the entire wiring harness
- Removing the bumper trim
- At the rear buffer of the beam, unscrew the lower and upper bolts and remove the channel.
At this point, dismantling can be considered complete; everything is put back in place in the reverse order.
In order to protect the front and rear bumpers, special protection is installed that protects them from any damage.
DIY Chevrolet Niva bumper protection at mallsspb.ru
Make a Chevrolet Niva guard with your own hands or remake the front protection for a Chevy Niva
Its geometry is such that when a stone hits it, it flies upward and not into the windshield. Taking this into account, when choosing a pipe or body kit for a Chevy, you need to be very careful. There is no need to install too heavy components - the load they create will overload the car.
Communities › Chevrolet Niva › Blog › Front bumper protection (pipe). It's a shame to cut off the ends, there...
If such a simple reinforcement is installed solely as a styling element, it is not worth spending money on it.
If the part remains in its place, it means that the work on installing the protection on the Chevrolet Niva bumper yourself was successful.
If you purchased a reinforcement whose instructions indicate body drilling algorithms, then this kit is not suitable for the Niva and should be replaced. After you have unpacked the kangurin and made sure that it matches the model of your Chevrolet, you can get to work.
First, remove all the fasteners, and then attach the guard to the front or rear bumper of the Niva. After that, take the bolts and screw on the top part of the reinforcement. Do not fix the protection on the Chevy body too tightly, because situations arise when installing it requires screwing and unscrewing the fasteners several times. Make sure that the kengurin is installed level, then tighten the lower bolts.
If the part has not changed its position and is not warped, you can complete the installation. Another option is a curved pipe in the form of arcs from the bed; it will look more aggressive.
Kenguryatnik on Chevrolet Niva
The third option is a kickstand. Yes, you might say, the Chevrolet Niva is not a car that you need to jump into, but from the point of view of style and design, it is simply a chic accessory. Most often, this is more of a design decision, which has almost no practical part.
Of course, they protect the thresholds very well, especially if the car owner likes to have fun off-road. Of course, now we are not talking about a full off-road, but about an easy option, where you can often find holes, stones and other surprises that can cost a couple of thousand in repair costs.
The body kit on the Chevrolet Niva does not end there, because there are still many details that simply will not look harmonious with such modifications. Rear bumper protection for Chevrolet Niva As a rule, rear bumper protection is sold complete with a front body kit. But if a guard is installed on a car, you will have to purchase it separately.
Also, without repeating ourselves too much, we check the welds, chrome or paint, if any. You can also find this version of the body kit on the Chevrolet Niva as corner bumper protection. Most often it saves life in parking lots or other confined spaces. But they perform their function of ensuring the integrity of the body due to impacts and stones with dignity.
This will require complete removal and reinstallation of the crankcase protection, which does not entail any particular difficulties, but takes a lot of time. If such a simple reinforcement is installed solely as a styling element, it is not worth spending money on it. When leaving this hole, the rear of the car clings to the road and bends in the opposite direction, thereby deforming both the rear and the license plate.
After this, only the installation of a new rear bumper is necessary.
Expressive image of the car
1. One of the most expressive protective elements is the front bumper grille for Chevrolet Niva. Such a body kit for a Chevy Niva is a kind of calling card of the car, its chic external presentation of its own reliability and effectiveness.
The range of body kits of this type is made, as a rule, from steel with anti-corrosion treatment, and the diameter is 76 mm (you can also find 60 mm) ideally combined with the external dimensions of the car itself. At the same time, the designers assure the amazing ease of mounting such body kits and the absolute insusceptibility of the material of these parts to temperature changes. This guarantees exceptional long-term service life.
In addition, all the aerodynamic properties of the car when installing such a grille remain unchanged: streamlining, dynamics, and maneuverability are the same.
2. A body kit in the form of lower front protection for the Chevrolet Niva can protect the front bumper of the car from the “delights” of Russian roads, from small stones getting into the air collector or radiator, from scratches in the paintwork, small holes and similar problems. It is usually made of stainless steel, like the front bumper grille, and has the same characteristics in terms of material quality, installation, resistance to corrosion factors and duration of use.
As an element of external tuning, this part can turn a car into a more serious and respectable vehicle. What is especially valuable for Chevrolet Niva owners is the ability to combine the lower front protection with any color of the car.
3. An excellent way to protect against constantly rising dust when driving, impacts of small (and even large) stones on the surface of the hood, dirt particles getting on the windshield and an endless list of other road consequences can be an accessory such as a hood deflector.
Even streams of water when driving in rainy weather or the weight of snow during heavy snowfall will not have such a destructive effect on the wipers - the hood deflector takes on part of the load, reducing their force. It's convenient and safe!
The hood deflector is an acrylic plastic body kit that is capable of restoring its original shape even after significant damage; only it has good capabilities to perceive temperature changes and changes in atmospheric pressure.
The fastening of this car accessory can withstand significant force, which guarantees impeccable reliability even with the strongest impacts. There is information that the hood deflector is a way to protect the paintwork of a car from the corrosive effects of road dust.
Any owner of a Chevrolet Niva will be able to take a creative approach in choosing this accessory: deflectors are available in various colors (transparent, silver, dark smoky, etc.).
Recommendations
Comments 20
Anything that exceeds the dimensions of a standard bumper is a reason for a financial discussion with the policeman. Kangurins are prohibited.
Poke the pipe from below, it doesn’t even go beyond the dimensions.
Well, if this argument convinces...)))
This is the cops' feeder
Pipes on both bumpers, no questions from the police yet. And on many cars I see there are tubes at the bottom of the bumper. This is not a full-fledged kangaroo.
“it will fall off at the first normal passage of any hole,” “I only need it for beauty))”
I don’t do offroading, but I often go into the forest (during hunting season). This kind of pipe protects the plastic of the bumper when crossing bushes and overgrowth on forest paths. And if, when driving through a super pit, a pipe rips out, then you need a tractor to travel there. But Shniva with its low plastic bumper aprons is not suitable for super pits. If only you do special training, it will be a completely different horse.
Why do you need rear bumper protection for UAZ Patriot?
- Front bumper protection for UAZ Patriot can be installed on first and second generation cars, creating reliable protection for polymer car parts that are relatively easily damaged.
- The car accessory is an indispensable protective device for the front bumper during active use of the car in harsh conditions: driving on country roads with steep climbs, bumps, and holes.
- Bumper protection on the UAZ Patriot is highly effective in snowy conditions. The impact of compacted snow (drift) falls on the metal structure, which preserves the integrity of the polymer parts of the suspension.
- The 76/63.5 mm stainless steel double protective tube design is carefully polished to a mirror finish, which adds a chic appearance to the practical accessory, transforming the image of the car.
- The front bumper protection on the UAZ Patriot with a mirror shine is noticeable from afar - this creates a powerful, stately appearance of the car with an original style, so installing the accessory is an effective external tuning.
- The installed bumper protection on the UAZ Patriot does not change the vehicle's ground clearance, so the modernization does not reduce the vehicle's cross-country ability and does not change its aerodynamic characteristics.
Hood deflector for Chevrolet Niva
The hood deflector on a Chevrolet Niva is also a necessary measure, which has more of a practical application than an aesthetic one. However, it’s not that the manufacturers carefully thought through the aerodynamics of their creations, they just made them really stylish and cute. I must say, you rarely see the name “deflector”. Most often you can hear something like “fly swatter” or “chipper”. Such names are not actually taken from the lantern.
The thing is that this part of the body kit on a Chevrolet Niva serves to protect the paintwork and windshield from sand, rubble and other debris flying out from under an oncoming car. Its geometry is such that when a stone hits it, it flies upward and not into the windshield. The same applies to smaller particles of sand, which simply rise upward in a continuous stream. Thus, the windshield and hood cover remain, if not in perfect, then in more satisfactory condition. And this is the main task of any body kit.
Protection of headlights and lanterns
Of course, if a body kit is installed on a Chevrolet Niva, then you should not forget about tuning the optics. Now you can find all kinds of armored film, which actually saves the glass from damage. Many people don’t believe this, but the fact remains.
It was also mentioned earlier about the kenguryatnik, which would cover the headlights. This option is the most preferable, but you should understand that it is also the most expensive.
The taillights on the Chevrolet Niva are quite nice, but you can often find covers on them. This is also dictated by safety and respect for the car, because in the event of a collision there is a high probability that the lamp will remain intact. This is why you need a body kit.
Front protection
Protection of the front bumper from accidental collisions with the curb involves the installation of a special metal protection - kengurin. Their original installation was intended exclusively for SUVs. Such front bumper protection is often found on cars of any class. It is impossible to find a ready-made set of such protection on sale that is ideal for your car. The extended front bumper protection looks solid on SUVs or minibuses. This front protection is functional if your jeep or SUV is used outside the city. For those who have not lost the desire to acquire such a new thing, there is always the opportunity to make a stainless steel cage with your own hands.
Rear bumper protection
Manufacturing process
The stages of making a do-it-yourself kenguryat are as follows:
- written interpretation of the required measurements;
- material supplies and stock of tools;
- manufacturing;
- installation.
1st stage
At the very beginning, you should decide on the type of kenguryatnik that is ideal for your “iron horse”. After determining, sketch out a drawing of the future product. You can take a ready-made drawing from the Internet and even add something of your own. Now we proceed to measuring the dimensions of the front of the car and copying the measurements in the drawing. The main thing to understand in this matter is that a sophisticated drawing will require more complex practical manipulations.
2nd stage
Let's take a look at the materials first. Making your own design from polished stainless steel is the best solution. It not only looks cooler, but is also much more practical. Painted pipes will require a color refresh after each trip to the country or fishing. Stainless steel does not face such problems. Their cost is higher, but this will save you from unnecessary hassle in the future.
Making a kenguryatnik
The quality and appearance of the future design depends on what the welding machine will be like. Grinding and polishing a pipe into a single component is only possible with an argon arc apparatus. If you do not have a pipe bender, you will need to purchase several corners (bends). Angles at 90˚ or 45˚ are suitable for this, depending on the complexity of the future design. Be prepared to use a pipe cutter as well.
Installation
Chevrolet Niva bumper protection is selected depending on the type of car; before purchasing, you need to check the model and year of manufacture. The car contains standard protection mounting points, so it is important to choose exactly the bumper protection that is suitable for installation. But, if there is a need to install other protection on the car, you can drill additional holes in the body. If you have additional lighting devices, you can connect them to the standard PTF connectors for the Niva Chevrolet.
Chevrolet Niva Installation of rear bumper protection corner
Do you still think that diagnosing a car is difficult? An ideally installed kengurin should not have any loosening. Fastening occurs exclusively to the car frame.
The catalog contains guards and front bumper protection for Chevrolet-Niva (). Also, with us you can...
It is in such cases that all kinds of pipes and guards come to the rescue, which can protect the front and rear of the Chevrolet Niva SUV in the event of a collision. These are all kinds of pipes, both single and one-and-a-half and double, curved and straight.
Two brackets right and left3. These products cannot boast of a defiant appearance and do not make the SUV more visually aggressive. Well, there’s nothing to talk about pipes here.
It looks something like this - it can be slightly curved or straight.
Don't forget, the price tag also depends on the diameter of the pipe. In the photo below, it’s 76 mm, and therefore the price could be about k. On this positive note, I’m finishing the review of the front protection; soon there will be an article with a photo about the rear protection.
Manufacturing materials
We'll talk about types of protection later. But first I would like to briefly go through the materials that can be used to create protective elements. They are used not only on bumpers, but can also serve as protection for car sills.
There are 4 main materials used for such purposes.
- Films. Usually these are PVC films, or made from other durable, elastic, but thin materials. Easy to apply and remove, they can remain invisible if you choose a transparent material. But you shouldn’t expect significant protection from the film;
- Plastic. An extremely budget option for linings and protective elements. But sometimes even a fiberglass bumper is more resistant to deformation. Inexpensive, but not very durable;
- Rubber. It attracts with its frost resistance, elasticity, and ability to absorb shock. Can handle minor collisions or impacts. But you shouldn’t expect a serious level of mechanical protection;
- Metal. In terms of reliability and durability, the best choice. But by protecting your car, you increase the risk of damage and injury to the driver of the car that hit you.
Tuning car thresholds
1. The thresholds of the Chevrolet Niva can be considered the least protected and easily damaged. These small strips become the most susceptible to temperature changes and corrosive erosion due to constant contact with water, dirt and other substances. How to escape from such a disaster?
There is a way to install threshold protection on top of these parts, made of durable aluminum with the organic addition of plastic overlays. Even a woman can install them: with the help of special brackets, you can easily put on or remove the thresholds. Such a tuning detail will give the car a neater appearance, but, most importantly, it will postpone the problem of restoration or even forced replacement of thresholds for a long time.
2. Your car will become especially elegant and well-groomed when you install special deflectors on the side windows and windshields.
These protective structures are usually made of the thinnest and most durable types of plastic, which have excellent strength characteristics, impeccable anti-corrosion properties and a problem-free way to clean the surface using regular washing.
To all the advantages, it remains to add a quick and reliable way to attach these deflectors: a special adhesive tape has been developed that can be used to attach these parts to car doors as reliably and without unnecessary complications. Such external mounting of dark deflectors along the upper side border of the windows will give the car a special charm.
What do market authorities say about our questions?
Audatex (not only in the program, but also in reference books) contains information about the admissibility of certain repairs of plastic parts by each automaker. Some do not allow repairs at all, others regulate them by the size and types of damage, others allow any repair if it is economically feasible. It also contains links to repair kits recommended by the automaker, including catalog numbers.
By the way, the impossibility of repairing bumper mounts is another myth of “extremely qualified repairers.”
Tuning Chevrolet Niva
Any shortcomings of the Chevrolet Niva can be easily compensated for by tuning capabilities. Absolutely all car models can be modified according to the owner's ideas.
External tuning of a Niva usually involves installing a body kit that improves the car’s aerodynamics, aesthetic appearance and comfort. As a rule, the body kit includes running boards, sills, ladders, roof rails, kangurins, spoilers, and so on. You can install entire sets of tuning body kits, for example, “Street Rally”, “Niagara” and others.
Technical tuning
Technical tuning of the Chevrolet Niva improves the car's driving performance and transmission performance. It is carried out with the aim of increasing the Niva’s cross-country ability in off-road conditions, as well as in difficult natural conditions. Currently, there are a number of improvements, there are solutions that can satisfy any need.
Tuning a Chevrolet Niva in urban conditions means a smooth ride, absence of vibrations, light steering, on-board computer, comfortable seats, and so on.
Chevrolet Niva engine tuning
Many car enthusiasts tend to install body kits first, but they should start with internal tuning, namely the engine compartment. By replacing the factory camshafts and pistons, modifying the cylinder head in terms of improving the valve system and gas distribution mechanism, installing high-flow output systems and lightweight balanced flywheels, you can achieve a significant increase in the torque and power of the Nivov engine.
It wouldn’t hurt to install a lightweight flywheel to make starting and spinning the engine much easier. You can replace the standard shock absorbers.
To improve the performance of the Chevrolet Niva engine, it is best to carry out chip tuning. Serial Niva engines, which have been chipped, demonstrate truly superior performance to all generally accepted standards. The engine, in the design of which quite serious changes were made, as a result of which the volume of its combustion chamber increased, the mass of the crankshaft and connecting rods decreased, a tuning camshaft and a split gear timing drive appeared, needs even more improvements to the program that controls it.
Installing kengurin on Chevrolet Niva
Many tuned Chevrolet Nivas are equipped with kangurin, despite the fact that automakers do not recommend making such changes to the design of this car.
Kengurin will not only make the car more solid, but will also help in case of an emergency, however, in a collision with a pedestrian, it poses an increased danger to the latter. The kengurin is installed either on four studs welded to the bottom of the car on the bumper amplifier, or in two holes for attaching the standard protection to the amplifier. Extended bolts are usually sold complete with kangurin.
Rear bumper protection
On a Chevrolet Niva, it is advisable to install rear bumper protection corners, which are secured with two bolts to the reinforcement in the rear bumper.
Chevrolet Niva interior tuning
You can’t ignore the interior of the Chevrolet Niva, because it will constantly surround the driver. There is no limit to the car enthusiast's imagination - it could be a leather interior with heated seats, a car computer, original neon lighting, a stereo system with a subwoofer and other accessories that are fashionable today, which are available in any tuning parts store. As a result of all the upgrades, you will receive a completely exclusive interior that will fully correspond to your individual preferences.
The effect of the work done is especially noticeable if you compare the photo of the standard interior and the photo of the tuning of the Chevrolet Niva.
vote
Article rating
The spare part metal front bumper beam for Niva Chevrolet 2123 is usually purchased:
Catalog No. Name Manufacturer Price Price
| 2123-2803015 | bumper Niva Chevrolet 2123 | Technoplast | 3850.00 rub. | 3575.00 rub. |
| 2123-3711011 | left headlight block Niva Chevrolet 2123 | ALRU | 5320.00 rub. | 4940.00 rub. |
Price – price for registered users
Detailed step-by-step dismantling
1.The wheels of the car are removed in order to have access to the device mounts. 2. dismantle parts of the upper and lower bumper trim. To do this, you need to unscrew the bolts securing the cover and remove it.
Having unscrewed the four screws, dismantle the cooling radiator lining, being careful not to damage the radiator. 4. Using a Phillips screwdriver, remove the headlight trim, being careful not to touch the optics.
READ How to remove the rear bumper of a Volkswagen Polo sedan
Using a 10mm spanner, unscrew the upper bolts securing the front bumper beam. 6. dismantle the state number.
loosen the terminals of the lighting wires, unscrew the bolts, and dismantle the fog lights. This is done so that they do not interfere with the removal of the buffer.
disconnect and remove the temperature sensor mounted on the beam to avoid damage.
Re-installing the front buffer
Installation of the front buffer Chevrolet Niva
done in reverse order.
In this case, the bolts and screws that secure the bumper
must be replaced with new ones.
It is worth paying special attention to the installation of the bumper grille so as not to cause damage to it and the car body, because this part of the car is constantly in the villa and even the slightest damage to it immediately spoils its appearance.
If all standards are followed, the buffer will return to its place without any problems and will serve you for a very long time.
