Which low panel or high panel is more suitable for the VAZ 2109?
Despite the fact that the VAZ-2108/2109 is already more than thirty years old, these cars can easily be found on our roads. And you can’t call them bad - they’re completely normal cars. As long as these cars have existed, there has been controversy surrounding their dashboards.
The fact is that there is a “low” panel and a “high” one. The low panel was on the first 08/09, and later, a high panel appeared, which replaced the low one, from about 1997.
And each option has its supporters. Some people remove the low panel and install a high one, while others bought a nine after 1997 and are looking for a Soviet low panel to replace the high one with.
“It’s a matter of taste,” you say, and I agree with that. Really, whatever you like. But low and high panels have their own objective pros and cons.
Many people don't like the look of a low panel, but these people either leave the low one or install it instead of the high one. Why is that? I was not interested in this topic at all because I was a passenger on a nine with both a high panel and a low one... in my opinion, both rattle. But I wanted to figure out where such disputes come from.
Low panel
The main advantage of a low panel is that the stove heats much better with it, and this is true. In 08/09 with a low panel it is really warm, which certainly cannot be said about a high panel. The ventilation itself is clever and the airflow is correct.
The low panel is stronger and less creaky. This is recognized by the owners of both low and high panels. As I wrote above, I was a passenger on nines with both panels, and so, although both creak, the low one is much less. There's just nothing particularly creaky there.
With a low panel, the interior appears visually larger. And this is also true. The low panel has plenty of room to put something on it. And if you don’t like it, you can buy a panel overlay and make a tall one from a low one.
But the most important disadvantage is that the low panel does not have a tachometer. But firstly, it is quite possible to do without it, and secondly, no one bothers you to install a separate tachometer.
High panel
One of the objective advantages is the presence of a tachometer. Also, on the high panel there is illumination of the glove compartment and buttons. There are places for additional buttons. It also looks more modern. But the main thing is that many people simply like it.
The stove is cooler on a high panel. This is due to the ventilation design itself. Due to the fact that there are more parts on a high panel, it creaks more, but this can be solved by gluing it with sound-insulating materials.
Well, in general, if you change the panel, you can install it from a VAZ-2114. It fits in size because it is the same 08/09. Relatively not creaky, with normal airflow and a modern look. True, it is more difficult to redo the wiring there.
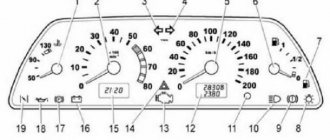
Today, VAZ 2109 cars that can be found on domestic roads, no matter whether they have carburetors or injectors, are equipped with three types of electronic devices. It can be a low panel, a high panel or a Europanel. Let's consider the description of each type separately.
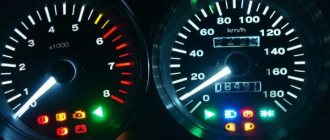
Instrument cluster “Low” panel
Low version of the control panel
Let's start with the low option. A detailed explanation of the scheme is given in the table.
| Icon | Purpose |
| 32 | Indicates which turn signal is on. The indicator stops working after the steering wheel is turned. |
| 33 | A light lamp that turns on when the low beam is activated. |
| 34 | Lights up when the PTF - fog lights are turned on. |
| 35 | Lamp for turning on high beam headlights. |
| 36 | Notifies the driver that the rear window heating system is operating. |
| 37 | A signal alerting the motorist to the need to stop and repair a fault. |
| 38 | Speedometer. |
| 39 | A counter that records the daily mileage of a vehicle. |
| 40 | A sensor that notifies the driver about the temperature of the antifreeze in the cooling system. |
| 41 | A sensor that records the voltage level in the vehicle's on-board network. |
| 42 | An icon that lights up when the engine fluid pressure in the system is too low. |
| 43 | hazard warning lamp. |
| 44 | The diode lights up if the brake system is in emergency condition. |
| 45 | Icon for turning on the carburetor choke or choke. |
| 46 | Engaging the handbrake. |
| 47 | This element appears when the car battery is low charged. |
| 48 | Vehicle mileage counter. |
| 49 | An ecometer whose needle rises when you press the gas pedal. |
| 50 | A line that is not recommended to be crossed - the light starts to light when the gasoline level is critically low. |
| 51 | Sensor for measuring fuel level in the tank. |
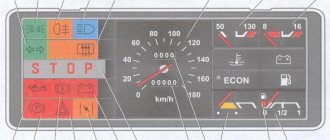
Instrument cluster “High” panel
Instrument cluster on high panel
Below is a high-type VAZ 2109 instrument panel with electronic backlight. Relevant for both injectors and carburetors. You will find a decoding of the circuit and combinations according to the instructions below.
| Icon | Designation |
| 42 | Speedometer, which displays the speed of the car. |
| 43 | An odometer that records the mileage of a vehicle. |
| 44 | Sensor for measuring fuel level in the tank. |
| 45 | A signal alerting the motorist to the need to stop and repair a fault. |
| 46 | Test lamp. |
| 47 | A signal alerting the motorist to the need to stop and repair a fault. |
| 48 | Lamp warning the driver about a malfunction in the operation of the signal lights. |
| 49 | A sensor that notifies the driver of a lack of antifreeze in the cooling system. |
| 50 | An indicator indicating wear of the brake pads on the front wheels. |
| 51 | The light comes on to warn the motorist about the lack of fluid in the windshield and rear window washer reservoir. |
| 52 | Indicator of lack of engine fluid pressure in the crankcase. |
| 53 | The regulator measures the antifreeze temperature level in the cooling system and displays this data on an electronic panel with backlight. |
| 54 | This icon on the high combination of the dashboard is a tachometer, demonstrating the level of engine speed of the car. |
| 55 | Additional socket. |
| 56 | A button designed to reset the daily mileage. |
| 57 | A lamp that lights up when the car's headlights are turned on. |
| 58 | Daily mileage recording sensor. |
| 59 | A diode lamp that turns on when the side lights are activated. |
| 60 | A sensor that warns the driver about an open door. |
| 61 | A lamp warning the driver that he is driving without fastened seat belts. |
| 62 | A diode indicating that the left turn signal is on. |
| 63 | This element of the combination of an electronic panel with backlight indicates the charge level in the system. |
| 64 | A diode indicating that the right turn signal is on. |
| 65 | The lamp turns on when the engine fluid pressure in the system is insufficient. |
| 66 | The diode turns on if the fuel level in the tank is critical. |
| 67 | The choke switch lamp is found only in carburetor cars. |
| 68 | This element is activated when it is necessary to diagnose the car’s engine. |
| 69 | Handbrake light. |
Instrument cluster "Europanel"
Variant of the control panel on the VAZ europanel
Now let's move on to considering the combination of an electronic instrument panel of the Europanel type with backlight. It should be immediately noted that the description of the components below is almost identical to the low-type electronic panel.
| Icon | Purpose |
| 42 | Indicates which turn signal is on. The indicator stops working after the steering wheel is turned in the required direction. |
| 43 | The Europanel light lamp activates when the side lights are turned on. |
| 44 | Lights up when the rear PTF - fog lights are turned on. |
| 45 | Lamp for activating high beam lights. |
| 46 | This circuit element notifies the motorist about the operation of the rear window heating system. |
| 47 | A signal alerting the motorist to the need to stop and repair a fault. |
| 48 | Speedometer, which displays the speed of the vehicle while driving. |
| 49 | A counter that records the daily mileage of a vehicle. |
| 50 | This circuit component is designed to notify the car owner about the level of antifreeze temperature in the cooling system. |
| 51 | A circuit sensor that records the voltage level in the vehicle’s on-board network. |
| 52 | An icon that lights up when the engine fluid pressure in the system is too low. |
| 53 | Hazard warning light. |
| 54 | The diode lights up if the brake system is in an emergency condition and attention needs to be paid to its diagnostics. |
| 55 | Icon for turning on the choke of a carburetor engine. |
| 56 | Engaging the handbrake. |
| 57 | This element in the diagram lights up when the car’s battery charge is too low. To avoid problems starting the engine, it is better to recharge the battery. |
| 58 | Meter of the vehicle's total mileage in kilometers. |
| 59 | An ecometer whose needle rises when you press the gas pedal. The ecometer allows you to slightly save fuel on the vehicle. |
| 60 | A line on the diagram that is not recommended to be crossed. The diode lamp is activated when the level of gasoline in the tank is critically low. To avoid stopping on the road, you should add fuel. |
| 61 | Sensor for measuring fuel level in the tank. |
How to remove the high type panel
If your VAZ-2109 has a high panel model installed, then you need to act differently:
- First remove the steering wheel to gain access to the instrument panel.
- If you have a carburetor engine, pull out the choke and remove the handle from it.
- Now you need to remove the decorative trim; it is held on by two screws.
- Remove the ashtray and cigarette lighter.
- Pull the fan control handle towards you.
- Use a screwdriver to pry off the decorative control knobs for the interior heater drive.
- Be careful when removing the power wire connectors that go to the heater switch and to the heating control light.
- Remove the handles for the headlight hydraulic adjustment and the instrument panel lighting control.
- Use a socket to turn these adjusters and gently push them inward.
- Remove the air deflectors for the left and right side windows, and also remove the fasteners that were located under them.
- Pry the headlight switch with a screwdriver and pull it out to the length of the wires, disconnect it from the power supply. Place the block back behind the plastic part.
- Remove the stereo or standard radio, and then unscrew the center mount of the decor.
- Along the edges of the decorative trim there are latches that will need to be pressed in order to remove the decorative part of the torpedo by moving upwards.
- Disconnect power from the cigarette lighter, backlights, and hazard warning lights.
- Remove the decorative trims and speakers, disconnecting them from the wiring. After this, turn off the power to the heated rear window and fog lamp switches.
- Unscrew the fasteners and remove the instrument panel, remove the central screw on the speedometer and disconnect it from the cables. De-energize the shield.
- Turn off the power and remove the ignition switch, disconnect the choke control rod from the power supply.
- Disconnect the illumination lamp of the compartment for personal belongings from the power supply. Unscrew the remaining fasteners on the left and right and remove the panel.
Possible faults
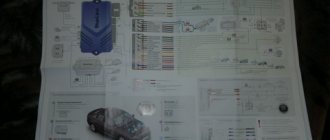
What malfunctions are typical for the dashboards of VAZ cars? Check out the main list after watching a video about connecting the shield from a VAZ 2110 to a “nine” (the author of the video is Garage BFS).
- The speedometer does not work. There may be several reasons for this - a broken cable, its incorrect installation or wear of the socket. You should try disconnecting the cable and reconnecting it.
- The odometer, which records the mileage of the vehicle, does not work. This problem is usually resolved by replacing the device.
- One or another indicator does not light up. Perhaps the sensor itself has failed or the light bulb has burned out.
- The instrument panel backlight does not work. This is usually due to burnt out bulbs or bad contacts. There may also be problems in the electrical circuit, but this happens rarely.
- The coolant or oil level sensor is giving incorrect information. For example, the driver is warned about a lack of engine fluid level or boiling refrigerant in the expansion tank, but in fact, with these parameters everything is normal. The problem is usually solved by replacing the sensors.
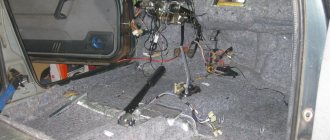
Removal and installation, disassembly and assembly of the instrument panel VAZ 2108, VAZ 2109, VAZ 21099, Lada Samara
Disconnect the wire from the “–” terminal of the battery. Set the wheels to the straight ahead position.
Disconnect the rod from the carburetor choke lever and the speedometer cable from the gearbox.
Ignition switch trim.
1.
Remove the decorative steering wheel trim.
2.
Unscrew the steering wheel nut so that the end of the nut is flush with the end of the steering column shaft.
3.
Use sharp blows to knock the steering wheel off the steering shaft splines.
4.
Finally unscrew the nut and remove the steering wheel.
5.
Unscrew the six screws securing the lower steering column casing of the VAZ 21099.
6.
Remove the lower steering column cover and ignition switch trim.
7.
Remove the upper steering column cowl.
8.
Loosen the bolt securing the base of the steering column switches.
9.
Remove the base from the shaft and disconnect the two blocks with wires from the horn contacts.
10.
Disconnect the connector with wires from the windshield wiper and washer switch lever.
11.
Disconnect the block with wires from the lever of the direction indicator and headlight switch of the VAZ 2109.
12.
Pull the carburetor choke handle towards you until a draft appears, and remove the handle from it.
13.
Remove the two screws securing the instrument panel console trim.
14.
Remove the trim from the console.
15.
Remove the cigarette lighter socket from the socket.
16.
Remove the ashtray from its slot by pressing the cigarette extinguisher plate.
17.
Remove the heater fan switch handle.
18.
Remove the three heater control knobs by prying them up with a screwdriver.
19.
Disconnect the wiring harness from the heater fan switch under the heater control panel.
20.
Disconnect the two wires from the contacts of the backlight lamp of the VAZ 2108 heater control panel.
21.
Remove the headlight hydraulic adjustment handle by pulling it towards you.
22.
Remove the instrument cluster light switch handle.
23.
Unscrew the nut securing the instrument cluster lighting switch.
24.
Unscrew the nut securing the headlight hydraulic corrector.
25.
Push the instrument cluster lighting switch and the headlight hydraulic corrector inside the panel.
26.
Remove the side nozzles on both sides of the instrument panel using a screwdriver.
27.
Unscrew one screw securing the trim on both sides of the Lada Samara instrument panel.
28.
Use a screwdriver to pry the exterior lighting switch out of the panel.
29.
Disconnect the block with wires from the exterior lighting switch. Push the block inside the instrument panel of VAZ 2109, VAZ 21099, VAZ 2108, Lada Samara.
30.
Using a screwdriver, use a screwdriver to remove the radio socket. If a Lada Samara, VAZ 21099, VAZ 2109, VAZ 2108 car has radio equipment installed, first remove it.
31.
Remove the screw securing the instrument panel trim.
32.
Insert two screwdrivers to pry open the plastic tabs.
33.
Lift up the instrument panel trim.
34.
Disconnect the block with wires from the cigarette lighter block.
35.
Disconnect the block with wires from the cigarette lighter illumination block.
36.
Disconnect the block with wires from the hazard warning light switch illumination lamp.
37.
Disconnect the block with wires from the hazard warning switch and finally remove the instrument panel trim of the Lada Satellite.
38.
Gently press down and remove the speaker trim on the left side of the instrument panel. Be careful - the latches break off easily.
39.
Disconnect the block with wires from the heated tailgate glass switch.
40.
Remove the block from the rear fog lamp switch.
41.
Remove the two screws securing the instrument cluster.
42.
Remove the instrument cluster from the panel, unscrew the fastening nut and disconnect the cable from the speedometer.
Disconnect the connectors from the additional equipment wires, if installed on your vehicle.
43.
Disconnect the red block with wires from the instrument cluster.
44.
Disconnect the block with wires from the on-board control system.
45.
Disconnect the white block with wires from the instrument cluster.
46.
Disconnect the ignition switch block with wires from the ignition relay.
47.
Disconnect the ground wire of the ignition relay.
48.
Disconnect the block with the wires of the air damper opening warning lamp.
49.
Unscrew one screw of the lower fastening of the instrument panel on both sides.
50.
Disconnect the connector with the glove box illumination lamp wires.
51.
Unscrew the two fastening screws and lower the heater control panel down.
52.
Remove the two screws securing the air damper guide rod to the instrument panel.
53.
Remove two screws from the upper mounting of the instrument panel on both sides.
54.
Use a screwdriver and remove one plug from both sides of the instrument panel. Remove one instrument panel side mounting screw on both sides of the panel.
55.
Unscrew the screw of the central fastening of the instrument panel.
56.
Remove the instrument panel of VAZ 2108, VAZ 2109, VAZ 21099.
Reinstall the panel in reverse order. After installation, check the operation of switches and devices to ensure they are connected correctly.
Installation and repair instructions
If you are faced with the problem of a failure of the dashboard of a VAZ 2109 vehicle, then the best option would be to replace the dashboard yourself. To properly replace, you will need instructions for dismantling and installing the shield, which are given below. To perform these steps, you only need screwdrivers - flat-head and Phillips-head. The instructions are given on the example of a low panel, but in general they are identical for other versions of instrument panels. Don't forget to disconnect the battery!
Unscrew the screws of the shield visor. Disconnect the speedometer cable. Disconnect the ecometer hose.
- First of all, you need to de-energize the system; to do this, disconnect the terminals from the battery.
- Using a Phillips screwdriver, unscrew the plastic trim around the steering wheel. You don’t have to remove it, but it is advisable to do so for greater convenience.
- You can also disconnect the steering column switches by simply unplugging the wiring harness.
- Using a Phillips screwdriver, unscrew the two small screws securing the dashboard visor and remove this element.
- After these steps, you can compress the springs and remove the electronic panel from the center console.
- The next step is to disconnect the speedometer cable. It is necessary to be very careful when dismantling so as not to damage the cable, especially if it is old. Otherwise, it will need to be replaced.
- Next, turn off the white outlet and remove the econometer hose.
- Then you should disconnect the cable for resetting the car’s daily mileage data from the speedometer.
- The final step will be to disconnect the red connector and dismantle the shield itself. A new panel is replaced and installed, after which further assembly is carried out in the reverse order.
As you can see, the procedure for replacing the instrument panel is not particularly complicated - just do everything in accordance with the instructions and there will be no problems in the further operation of the device.
Dismantling
There may be several reasons for dismantling the low panel of the VAZ 2109:
- Body repair;
- Repair of panel components;
- Car noise insulation;
- The desire to replace the old torpedo with a new one, etc.
We offer you a step-by-step guide that will allow you to remove the low type of panel installed on the VAZ 2109 without outside help.
Dismantling process
- Remove the stove control knobs. A total of three.
- Remove the heater fan switch knob. To do this you need to pull it towards you.
- Unscrew the 2 fasteners of the dashboard trims on both sides of the console. The cover needs to be pulled towards you.
- Disconnect the wiring block from the rear fog light switch.
- Disconnect a couple of power connectors and one power wire from the rear window defroster switch.
- Disconnect the wiring block from the hazard warning light switch.
- Remove the wiring harness from the exterior light switch.
- Disconnect the power supply for the cigarette lighter illumination.
- Disconnect the cigarette lighter wiring harness and remove the panel trim.
- Remove the 4 heater control panel fasteners.
- Unscrew the 2 fasteners of the instrument panel visor.
- Remove the instrument cluster visor itself.
- The spring clamps must be compressed.
- Remove the instrument cluster housing from the panel.
- Unscrew the speedometer mounting nut, and then disconnect the speedometer cable.
- Disconnect the block with wires (it is white) from the instrument panel.
- Remove the hose from the econometer fitting, and then remove the cotter pin.
- Disconnect the cable from the speedometer that resets the odometer for the day.
- You now need to disconnect the red block from the instrument cluster.
- Remove the instrument panel light switch handle and the headlight hydraulic adjustment handle. They need to be pulled towards you.
- Unscrew the mounting nut of the instrument backlight switch.
- Unscrew the fastening nut of the headlight hydraulic corrector socket.
- Remove the steering wheel and its paddle shifters.
- Insert the key into the ignition and turn it to position 1. This will disable the anti-theft device. Only after this can you turn off the power supply to the ignition switch.
- Unscrew the 2 mounting bolts and 2 nuts of the steering column tube.
- Remove this pipe, taking the ignition switch along with it.
- Pull the choke handle towards you (we are talking about carburetor suction). There should be a craving. After this, the handle is removed from the rod.
- Unscrew the 2 choke guide rod fasteners holding it to the instrument panel.
- Remove the mounting screw on the left side of the dashboard.
- Unscrew the fasteners for the lower panel fixation on the left.
- Similarly, remove the fasteners from the side and bottom on the right side of the dashboard.
- Unscrew the panel fastening screw, which is located inside the glove compartment.
- There remains one fastener on both sides of the panel, which must be unscrewed in order to eventually remove the tidy.
Numerous fasteners
The low panel is assembled in the reverse order unless it is planned to replace it with a more modern one or with a modified design. Then the assembly depends specifically on the panel that you have chosen for your VAZ 2109.
Do not forget that assembly is no more difficult or easier than dismantling. Therefore, you should not relax after completing only half the task.