Often the owner of a “ten” wants to make some changes to his car. Moreover, both the exterior and the interior of the iron horse become the object of attention. If we talk about interior tuning, then first of all there is a desire to update the instrument panel. The stock one, especially the old one, looks quite dull, so the desire to change it is quite understandable.
What instruments and devices are located on the panel?
The VAZ 2110 panel contains the following devices and instruments:
- Diffuser for blowing glass of the front door.
- Side openings for the interior ventilation and heating system.
- Board cover.
- Clock or (optional) trip computer panel VAZ 2110
- On-board control system display unit.
Explanation of symbols on the display unit of the on-board control system:Low oil level indicator in the engine crankcase.
Flashes orange when the oil level in the engine crankcase has dropped to the “MIN” mark on the indicator. Before adding oil, check whether there is an oil leak due to loss of tightness of the lubrication system. If there is a conflict between the readings of the BSK and the engine oil level indicator, you must use the data from the latter.
- Left front door ajar controller.
Lights up red when the left front door is not closed. - Indicator for left front right door not closed.
Lights up red when the right front door is open. - Controller for malfunction of brake lamps and clearance lamps.
Flashes orange when one of the brake or parking light bulbs is faulty. - Front wheel brake lining wear indicator.
Glows orange when the thickness of the pads has decreased to 1.5 mm. - Checking for unfastened driver seat belts (optional).
Flashes red when the driver's seat belts are not fastened. - Right rear door open indicator.
Lights up red when the right rear door is open. - Left rear door open controller.
Flashes red when the left rear door is not closed. - Low coolant level in the expansion tank.
It glows orange when the antifreeze level in the expansion tank has dropped below the permissible limit. Before adding tasol to the expansion tank, check to see if antifreeze has leaked due to loss of integrity of the cooling system. In the optional configuration, vehicles are equipped with an expansion tank without a neck for mounting an antifreeze level sensor. - Controller for insufficient washer fluid level in the tank.
Flashes orange when there is less than 1 liter of washer fluid left in the tank.
Installation of radio equipment is provided, corresponding in size and method of fastening to international standards (ISO 7736, DIN 75500). Installation of radio equipment must be carried out on PCCC certified by the manufacturer with the necessary mark in the service book.
To use, push the handle of the moving part until it locks. After approximately 20 - 27 seconds, the moving part will return to its original state, the cigarette lighter is ready for use.
Mounted in optional configuration.
Control units for exterior mirrors, electric windows and heated front seats are provided for optional vehicle configurations.
- 1 — lever position indicator.
The indicator lights up in orange when lever 2 is moved to the right “R” or to the left “L”.
In the extreme positions of the lever, the electric drive of the right or left exterior mirror is energized.
By successively pressing the key in the direction of the arrows, adjust the exterior mirrors to a position that is convenient for you.
Not available in variant version.
Not available in variant version.
Lights up in orange when the front seat heating is activated.
The seat heating is activated by pressing the upper arm of the button. The thermostat automatically maintains the temperature of the backrest and seat cushion heating elements in the range from plus 25 to 31oC. By pressing the lower arm of the key or turning off the ignition, the heating is turned off. The key is illuminated if the dimensions are turned on.
In the optional configuration of the VAZ 2110 panel, the exterior mirror control unit is mounted on the car, shown below in the figure:
Vertical and horizontal adjustment of mirrors is performed by sequentially tilting key 2 in the directions indicated by the arrows.
The selection of an adjustable mirror is performed by rotating key 2 around its axis by 90o and is determined by the direction of mark 1. Since the key has 2 positions, when the ignition is connected, the electric drive of one of the mirrors is constantly energized.
Moving the lever up activates the brake pads of the rear wheels. To return the lever to its original state, you need to press the button at the end of the lever handle. In extreme cases, the parking brake can be used while driving to slow down the car or used in conjunction with the service brakes.
There is a speed shift diagram on the lever handle.
Mounted in optional configuration.
The ignition key has the following positions:
- 0 – “off”.
Everything is turned off, the key is given. When the key is removed, the mechanism of the mechanical anti-theft device is activated, which acts on the steering shaft. To lock the steering shaft, turn the steering wheel to the right or left until it clicks. To disable the anti-theft device, insert the key into the ignition and, turning the steering wheel slightly left and right, move the key to position I.
The ignition is on, the key is not given.
The starter is disabled, the key is not given. The key state is not fixed: when released, the key will return to position “I”. The ignition switch has a lock that prevents the starter from connecting when the engine is running. To restart the engine after an unsuccessful attempt, move the key from position “I” to position “0” and then reconnect the starter.
In optional ignition switch configurations, the angle of rotation of the key from position “0” (parking) to position II (starter) can be 90o or 135o. To avoid draining the battery, do not leave the key in the ignition /
To adjust the steering wheel to a comfortable position, lower the lever down and, after the necessary adjustment, tighten the knob, raising it to its original state.
In the optional configuration, when the airbag is installed on the car, the sound signal is used by pressing on the moving part of the airbag module without using impact forces.
To open the lock, press the button.
The device will allow you to adjust, by rotating the handle, the angle of the headlight beam depending on the load of the car so that when the headlights are low-illuminated, drivers of oncoming cars are not dazzled.
The switch has the following positions:
- I - turns disabled; low beam headlights are connected when the headlights are connected with the headlight switch;
II — left turns are connected (not fixed state);
When you press the button to the first fixed state, the dimensions are switched on, and to the second fixed state, the low-beam headlights are additionally switched on when the ignition is connected. The symbols on the button light up when the instrument lighting is connected.
Mounted on a car instead of a plug if it is equipped with fog lights. The fog lights are turned on and off by pressing the button while the parking lights are connected. The symbols on the button are illuminated if the instrument lighting is connected.
The light turns green when the front fog lights are connected.
Flashes orange when the rear fog lights are connected.
The fog light bulbs in the rear lamps are connected and disconnected by pressing the button. The symbols on the button are illuminated when the instrument lighting is connected. In the optional configuration, the fog lights in the rear lights turn off themselves when the car's ignition is turned off. To reconnect when the headlights are connected, you need to press the button again.
Lights up in orange when the rear window heating is activated.
By rotating the handle, the brightness of instrument illumination and symbol illumination is adjusted when external lighting is connected.
It is mounted on cars equipped with an electronic anti-theft system and is designed to read codes from coded keys.
The switch lever for the wipers and glass washer has the following positions:
- I — windshield wipers are off;
II - intermittent mode of operation of the windshield wipers is activated (not a fixed state);
When you press the button, all direction indicators and corresponding warning lights on the instrument panel flash. The emergency lights are turned on by pressing the button again. The symbol on the button lights up when the instrument lighting is connected.
Bottom part
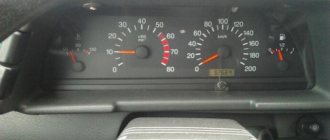
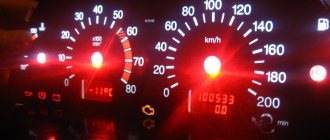
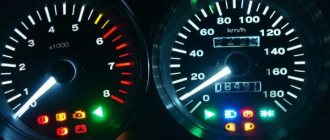
Let's look at the indicators at the bottom of the control panel. If they don’t light up, it means the machine is working normally, and when any of them lights up, this indicates a malfunction in certain components. Most often, this is a signal that repairs are needed, and the sooner the better. From left to right:
- The indicator on the far left at the bottom is the air damper light (if you have a carburetor engine);
- Icon in the form of an oil can. If this light comes on, it means there is insufficient oil pressure in the engine. An alarming signal. You need to stop, find the reason;
- A round icon with the letter P inside on the control panel indicates that you have the parking brake on, which, as you know, should be turned off when moving away;
- Indicator of a fault related to the generator or battery (a symbolic image of the battery is shown on the indicator). Perhaps the battery is not charging from the generator, there is an open circuit, or the generator belt is loose or broken. In any case, your intervention and repairs are needed, otherwise troubles cannot be avoided;
- If the engine is running and the Check Engine indicator is on on the control panel, this is the most unpleasant thing for the driver, since it indicates serious malfunctions in the engine. In general, when this indicator lights up, it is recommended to stop driving and turn off the engine. Most likely it needs repairs;
- Typically there is a red triangle above the Check Engine. It lights up when the “hazard light” is on - an emergency signal sign;
- The headlight light indicates that the high beam is on. Designed to control headlights: when an oncoming car appears, do not forget to switch to low beam;
- A very important indication icon on the front panel (in a red circle) is a signal that there is not enough brake fluid. Perhaps it is leaking somewhere, which it is advisable to find out as soon as possible and, if necessary, carry out urgent repairs and replenish the level;
- The icon of a burning light is a control for turning on the dimensions;
- In addition to the indicated lights, the front control panel has time indicators (and a button for setting hours and minutes) as well as a display that shows the total and daily mileage. On the new panel, this display may be narrow.
Decoding of car error codes is presented in this material:
Details of the VAZ 2110 panel
| Position number in the picture of the VAZ 2110 panel | Explanation of position | Catalog part number |
| 1 | lock washer 5 | 00001-0025981-71 |
| 2 | bracket | 00001-0041897-76 |
| 3 | overlay of the old instrument panel VAZ 2110 | 21100-5325180-00 |
| 4 | left plug | 21100-5325135-00 |
| 5 | old VAZ 2110 dashboard assembly | 21100-5325010-03, 21100-5325010-09, 21100-5325010-14, 21100-5325010-19, 21100-5325010-27, 21100-5325010-28, 21100-5325010-29, 21100-5325010-33, 21100-5325010-34, 21100-5325010-70, 21100-5325010-90 |
| 6 | lock | 21100-5325332-00, 21100-5325332-01 |
| 7 | Screw 3.6x12.7 self-tapping | 00001-0076691-01 |
| 8 | spring | 21100-5325338-00 |
| 9 | panel of the old instrument panel VAZ 2110 | 21100-5325124-00 |
| 10 | Screw 4.3x15.9 self-tapping | 00001-0076702-01 |
| 11 | lock washer 5 | 00001-0025991-71 |
| 12 | retainer | 21100-5325324-00 |
| 13 | spring nut | 21010-8109137-00 |
| 14 | panel cover for mounting block | 21100-5325322-00 |
| 15 | Self-tapping screw 4.3x6.4 | 00001-0076699-01 |
| 16 | bracket | 21100-5303086-00 |
| 17 | Screw 4.9x19 self-tapping | 00001-0076713-07 |
| 18 | VAZ 2110 panel cover right | 21100-5325134-00 |
| 19 | plate | 21100-5325083-00 |
| 20 | Hairpin M6x45 | 00001-0035418-11, 21100-5325396-00 |
| 21 | M6 nut with serrated shoulder | 00001-0038321-01 |
| 22 | Screw 4.9x31.8 self-tapping | 00001-0076716-07 |
| 23 | box for small items | 21080-5326016-00 |
| 24 | console trim | 21100-5326014-00 |
| 25 | tire | 21100-5326022-00 |
| 26 | Screw M5x30 | 00001-0032748-01 |
| 27 | M5 nut with serrated shoulder | 00001-0038318-01 |
| 28 | Nut M6 low | 00001-0007259-11 |
| 29 | Lock washer 6 | 00001-0026053-71 |
| 30 | Self-tapping screw 4.3x9.5 | |
| 31 | lock washer 4 | 00001-0076700-07 |
| 32 | spring | 21100-5325346-00 |
General information about the car
The VAZ-2110 is a passenger front-wheel drive vehicle in which the power unit is located in a transverse position. The car is designed for use on roads “equipped” with hard surfaces. The car body is all-metal, four-door, monocoque, sedan type. In order to transport long and bulky cargo, the seats located in the rear of the cabin can be folded.
Thus, the volume of the trunk increases. The engines - carburetor or with different fuel injection systems - consist of four cylinders. Volume - 1.5 l. The model has significantly improved handling characteristics when compared with rear-wheel drive VAZs, thanks to its front-wheel drive layout.
This is especially noticeable on unsafe, slippery roads or when taking difficult turns. It is possible to have a car with electrically heated seats, practical electric windows, a modern on-board computer, a useful catalytic converter for gases that have “worked out their purpose” in the exhaust system, as well as electric external mirrors that provide a rear view.
The car can also be secured with an airbag, air conditioning, anti-lock brakes, and lighting using a sunroof.
Panel light bulbs VAZ 2110
Let's look at what light bulbs are installed in the VAZ 2110 panel :
- Panel glove compartment light bulb:
- Designation according to GOST - AS12-5-1;
- Designation according to EEC - C5W;
- Power - 5 W;
- Type of light bulb -
- Illumination bulbs for the instrument cluster of the VAZ 2110:
- Designation according to GOST - A12-1.2;
- EEC designation - W1.2W;
- Power - 1/2 W;
- Type of light bulb -
- Indicator lights for instrument cluster 2110:
- Designation according to GOST - A12-1.2;
- EEC designation - W1.2W;
- Power - 1.2 W;
- Type of light bulb -
- Cigarette lighter light bulb located on the instrument panel:
- Designation according to GOST - AMN12-3-1;
- Designation according to EEC - T3W;
- Power - 3.0 W;
- Type of light bulb -
- Illumination lamp for the heater control unit located on the panel of the VAZ 2110:
- Designation according to GOST - A12-1.2;
- EEC designation - W1.2W;
- Power - 1.2 W;
- Type of light bulb -
- Illumination lamp for the ventilation and heating system damper control lever on panel 2110:
- Designation according to GOST - A12-1.2;
- EEC designation - W1.2W;
- Power - 1.2 W;
- Type of light bulb -
- Illumination lamp for a clock mounted on a panel of a VAZ 2110:
- Designation according to GOST - A12-1.2;
- EEC designation - W1.2W;
- Power - 1.2 W;
- Type of light bulb -
- Symbol lighting bulbs on switches located on panel 2110:
- Designation according to GOST - A12-1.2;
- EEC designation - W1.2W;
- Power - 1.2 W;
- Type of light bulb -
Removal and modification guide
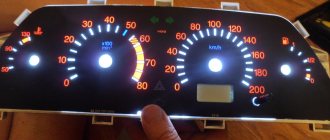
If indicators appear while driving, this does not always indicate a malfunction of the components. Perhaps the problem is simply a malfunction of the sensor responsible for the operation of the unit. Or the problem may be a broken wiring or bad connector contacts. Therefore, there is no need to panic right away. The video below shows the result of tuning the “tens” control panel. The author of the video, proVAZ-2110, planned to make the tuning in such a way that the color of the speedometer and other sensors would be white, but he did not take into account that the plastic on the dashboard was originally yellow. Accordingly, the author of the video was not pleased with the end result.
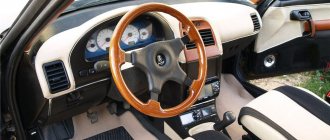
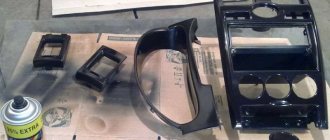
Often, car enthusiasts decide to tune their dashboard to improve the appearance of the car's interior. To do this, you can simply remove the panel trim and simply remove the regular bulbs. By installing LEDs instead. Such a control panel will enhance the brightness of the indicators. If necessary, you can install a more modern europanel, which will transform the interior of the “tens”. If you just want to tune the control panel, you can install a new trim on it.
To do this you will need:
- First, turn off the power to the vehicle's on-board network. To do this, disconnect the negative cable from the battery.
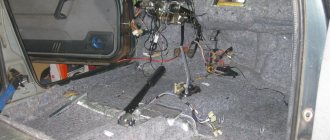
- Next, the instrument panel is dismantled; for this, all the necessary bolts are unscrewed.
- The next step is to remove the control panel fastenings to the trim. Having done this, you can remove the control panel itself from the socket. After these steps, you can dismantle the glass mask.
- Then all the pads that lead to the panel are turned off.
- Now a new overlay is being installed on the instrument panel of the VAZ 2110. If necessary, install LEDs instead of conventional light bulbs. Further assembly is carried out in reverse order.
You should always be careful when working with electricity. If you damage even one wire when removing or installing the dashboard, this can lead to dire consequences, including non-functioning devices on the dashboard. For example, owners of “ten” cars are often faced with the problem of the speedometer not working, which is usually associated with the wiring. Therefore, always be careful when working with the dashboard. In addition, after disassembling the instrument panel, or rather removing the arrows, there is a possibility of displaying distorted readings.
Loading …