For this I needed: A star screwdriver, a flat screwdriver, a utility knife, scissors, adhesive tape, a wet wipe, No. 240 sandpaper, a table lamp, shopping bags.
1)
Remove the instrument panel from the car
2)
Unscrew all the fastening screws, disassemble the instrument panel
3)
Remove the instrument arrows.
We place a business card or credit card under the arrow (so as not to scratch the instrument panel), and, using a knife to hook it under the base of the arrow, we snap it out of the axis 4)
Remove the instrument panel trim.
But the overlay is located on a plexiglass base. Therefore, we separate the overlay from the plexiglass base 5)
I decided to change the instrument panel backlight from green to white.
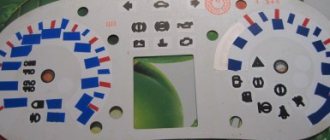
Using the blade of a knife, carefully remove the green coating from the back of the pad... I got bored and ended up using #240 sandpaper. 6)
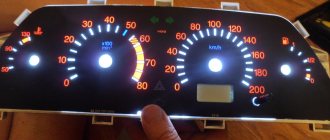
You can see the difference between the green and white backlighting of the instrument panel, some of the symbols have already been cleared of green coating
7)
The Priora instrument panel has been completely cleared of green coating
. To change the backlighting of individual elements, a plastic bag with colored inscriptions and drawings is useful. Cut out the required one from the plastic bag a colored piece...which we glue onto the instrument panel trim on the back side
9)
In the same way we make yellow on the speedometer and blue on the temperature scale
10)
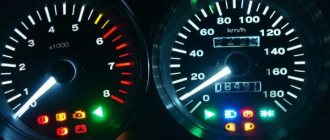
As for the backlight, with standard bulbs you won’t get uniform illumination of the instrument panel.
Therefore, it was decided to install diode lamps temporarily, and later I will make a tape. 11)
Next, we disassemble the display, remove the green filter, and put it back together.
Now the display will also glow not green, but white. If you want to backlight the display in a different color, you can install a light filter of any color 12)
I threw off the option with original lamps and diodes.
THERE ARE DESCRIPTIONS UNDER THE PHOTOS. xshpinatx
Lada Priora, in comparison with other models of the AvtoVAZ concern, is distinguished by a more attractive and high-quality dashboard, finished with good “Soft Look” plastic and a good instrument cluster. However, the owners of these cars are seeking to change some elements of the dashboard and make the interior brighter and more stylish.
Do-it-yourself technical tuning of the Lada Priora car interior and photos of implemented options
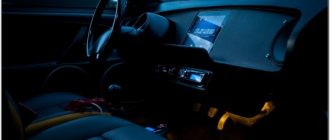
A large field for experiments in the field of individual auto tuning is provided by RGB strips complete with drivers. The bright footlights for the front passenger and driver look good. Due to the control driver, the lighting intensity and color are adjusted. Is there any rational grain in this revision? Without fanaticism, such illumination will help you get out in the dark, but otherwise...
Audio tuning VAZ-2170
The standard VAZ audio system, as our audiophiles assure, does not meet high sound standards. Seriously, this is the case, and it would be nice to increase the diameter and install branded speakers by 16 cm. In some photos of tuning the interior of a Priora car with your own hands, you can see that the seat for the speakers in the doors will have to be cut. It is imperative to perform noise and vibration insulation of the door walls to avoid resonance phenomena in the future.
In addition to wideband speakers, experts also recommend installing tweeters. They are located on the dashboard or at the top of the door card. Broadband speakers are also installed for rear passengers, and to emphasize low frequencies, space for a subwoofer can be arranged in the luggage compartment.
Other technical options
If you are going to start upgrading your audio system, then it is advisable to turn your attention to some kind of full-fledged multimedia center with monitor outputs. This will already be a guarantee of high-quality playback of music tracks.
To all that has been said, it’s a good idea to add a good monitor that will not let you get bored in traffic jams and will allow you to relax in the parking lot during long trips. It wouldn't hurt to take a closer look at the range of on-board computers for Lada Priora.
Description of the dashboard
The dashboard contains the following elements:
- Unit for controlling instrument lighting and external lighting.
- Horn switch.
- Switch for turn signals and headlights.
- Instrument cluster for Lada Priora.
- Lever for glass washer and wiper.
There is also an ignition switch on the instrument panel, which is combined with an anti-theft device. On the Lada Priora it has three positions. In addition, the instrument panel contains buttons and mechanisms such as a heated switch on the rear window, a clock, an alarm switch, a glove box lid, a tape recorder socket, an ashtray, a fan control unit, etc.
Tuning for the dashboard (dashboard) can be done with your own hands if you want to change the lighting for the instruments. In this case, the panel must be removed. The answer to the question: “How to remove the panel?” quite simple - using a screwdriver. Then we unscrew the fastening screws, disassemble the panel, remove the hands (you can use a knife, placing a piece of cardboard on the dial), and separate the cover from the plexiglass.
Replacing the dashboard backlight is done by scraping off (with a knife) the coating on the gasket numbers. If you want to leave them white (brighter), then you can put all the elements back together. However, many drivers want to make the instrument panel more informative. To do this, take a not very thick plastic bag with colored designs, from which parts of a certain color are cut out and glued to the back of the instrument panel. This way you can highlight, for example, areas of high speed on the speedometer, or “cold” areas on the temperature scale.
Decor of plastic components
The sedan is equipped with a lot of plastic parts in the interior; fortunately, many of them have light colors and can be easily repainted. The process of painting plastic from an aerosol can requires not only a respirator and gloves, but also a degreasing liquid and a primer. During operation, it is important to prevent the formation of drips.
Another way to improve the appearance of plastic elements is to cover them with carbon film. According to many car enthusiasts, this material is durable and looks impressive. The blanks are cut with a margin of 20-25 mm at the edges, after which the film is glued to a degreased surface. Edges and curves are blow-dried to prevent kinks and kinks.
If you know how to disassemble the panel, you can completely change the backlight
Tuning the instrument panel on a Lada Priora car usually does not end there, because car enthusiasts want to get more uniform lighting, which requires replacing the light bulbs. To do this, pieces of LED strip are glued around the perimeter of the panel, which need to be connected using thin wires and connected to the contacts of the standard backlight (plus to plus, minus to minus).
Panel diagram
Replacing light bulbs is often accompanied by replacing the green filter in the display; for this purpose, you need to disassemble it and install a filter of a different color or leave the backlight on white.
Tuning of devices on Priora can be effectively complemented by a new way of illuminating the arrows. For this, red CMD diodes are used, three each for the tachometer and speedometer and two each for the engine temperature and fuel level scales. They need to be melted into the plexiglass from the instrument panel (you can use a soldering iron) under the base of the arrows, and resistances must be soldered on the reverse side (130 Ohms for three CMDs and 300 Ohms for two CMDs).
Tuning the center console often comes down to the fact that the driver seeks to eliminate unpleasant creaking. To do this, you need to remove the console lining, cover the edges of the lining, the place of contact with the panel, and the edges of the lining of the area under and above the stove control with madeline or polyurethane foam insulation. It will not be superfluous to tape the pocket, because it will become a little heavier and will not rattle.
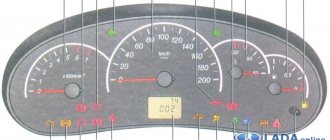
Instrument cluster VAZ-2170
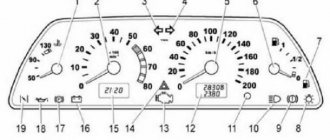
Placement of devices
The instrument panel of the Lada Priora consists of the following parts.
- Tachometer. The crankshaft speed is shown here. The red zone is a threshold that is not recommended to be crossed when revving the engine. Maximum 6 thousand revolutions per minute.
- Left turn indicator. When a left turn is engaged, a green light comes on and flashes continuously. Accompanied by sound confirmation.
- The speedometer is an indicator of the speed of the car.
- Right turn indicator.
- An arrow that shows the temperature of the cooling liquid. If the indicator needle reaches the red zone at a temperature of more than 115°C, the buzzer will signal this for 5 seconds. until the liquid temperature drops to 110°C. If you cannot lower the temperature of the fluid within 10-15 seconds, you need to quickly turn off the engine to prevent it from overheating. The reason why the coolant boiled must be identified.
- Arrow to indicate fuel level. When the red zone is reached, the red indicator lights up to indicate the fuel reserve. This means that there is no more than 5 liters of fuel left. It is not recommended to use fuel completely, as debris that collects at the very bottom of the gasoline tank can clog the fuel system. Then it will have to be repaired.
- Fuel reserve indicator. It looks like a drawing of a column for refueling. Lights up orange and indicates that you need to refuel. The buzzer sounds two times with a 0.25 second interval.
- A button that resets the daily mileage readings and switches indicator modes. If you press it, the mileage will return to zero.
- Emergency crew. If pressed, the light will flash red. The side lights of the car start blinking, indicating a breakdown.
- Electronic power steering indicator. It lights up orange when the ignition is on and goes out when the engine starts.
- High beam indicator. If you turn on the high beam headlights at night, it lights up blue.
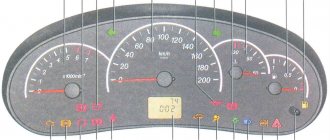
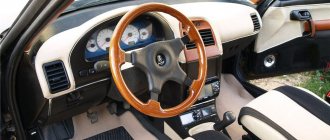
Appearance of a standard torpedo
- Parking brake indicator. When the brake is applied, it lights up red.
- Indicator of switched on external lighting. If you turn on the low beam or side lights, it lights up green.
- Airbag indicator. Orange color when the ignition is on for 3 to 4 seconds.
- Emergency oil pressure indicator. Lights up red when the ignition is on. When the engine starts, it goes out. It is imperative to monitor the operation of this indicator when you turn on the ignition. If the indicator does not light up, it means that it is broken or there are problems with the sensor. When the engine is running, the buzzer sounds for 5 seconds. when the indicator lights up. This indicates that the oil pressure is lower than required. You need to turn off the engine and fix the problem. If the oil pressure level is insufficient, the engine cannot be operated. It may fail.
- Immobilization system indicator. Lights up orange. Shows the position of the immobilizer and the order of security of the car.
- LCD computer indicator. The top row is the total mileage or per day. Middle row - all trip computer functions.
- Seat belt unfastened indicator. Lights up red. The buzzer beeps intermittently.
- Battery discharge indicator. Lights up red when the ignition is turned on and goes off when the engine is running. It is necessary to strictly monitor the operation of this sensor. If it does not light up when the ignition is on, there may be a breakdown in the battery charging system or the sensor itself may be damaged. If it lights up when the engine is running, it means the battery charge is low. Perhaps the timing belt is loose or broken, the alternator brushes are worn out, or the alternator itself has broken down.
- Emergency brake sensor. Lights up red when the ignition is on. After the engine starts, it stops lighting. If this does not happen, the vehicle cannot be operated.
Location of all sensors on the panel
- Indicator of failure of the electronic brake force distribution.
- Front passenger airbag deactivated indicator.
- ABS failure indicator.
- Engine sensor. When the ignition is turned on, it lights up orange. Goes off when the engine starts running. If it lights up when the engine is running, a malfunction has occurred. The damage needs to be repaired.
Types of lamps installed on a car dashboard
The Priora can be equipped with light bulbs equipped with a VDO socket, or the most common car lamps. Before buying failed components, you need to find out what cartridge they are equipped with. To do this, it is enough to remove the shield so that you can carefully inspect the type of cartridge used. It is worth noting that the lamps used in the sockets will visually look the same, however, if the analyzed element has so-called mustaches, then removal and installation of a new one is carried out according to the following scheme:
- before removing the lamp, you need to unsolder the “whiskers” from the socket;
- remove each lamp one by one from its “socket”;
- install a new one in place of the failed one, making sure to solder the “whiskers” to the cartridge.
You can choose an easier way to replace lamps if you buy new elements equipped with a suitable socket.
And even buy an option in which soldering of the “whiskers” is not provided, which in the future, if the lamp fails again, will make replacement much easier.
Many car owners opt for LED lamps, as they are able to illuminate the dashboard much brighter. You can use LED elements for replacement, but when installing them, according to experts in their field, you must observe the polarity, otherwise they simply will not light up.
Strengthening the panel structure and illuminating it
Do-it-yourself tuning of the instrument panel can also be done to increase the reliability of the frame plastic structure. Over time, the plastic frame may begin to creak or create a rather unpleasant noise to the ear. This is a huge distraction when driving, so it's worth getting rid of this problem as quickly as possible.
You will need to dismantle the console, and then apply a thin layer of material - polyurethane or Madeleine - around the perimeter of the inner case. This is done for improved joining of parts. The layer must be applied so that the console can then be installed back. In addition, you can decorate the outside of the console with a ready-made LED strip. You can't go wrong with the color here. Bright yellows and reds are very distracting, so choose softer colors. Bluish, blue or white colors are perfect for this finish. Apply a luminous tape around the panel, secure it with glue and you're done - the panel will stand out against the background of the interior.
The Lada Priora does not particularly favor interior tuning, since it has quite decent equipment. But if you want to update the appearance of the interior and dashboard, the only thing you can do yourself is change the color of the gauges and add lights on the sides of them. Other manipulations with the panel, such as adding sensors or replacing them, are not required. In addition, the panel itself should only be replaced with an imported version (if you can find the same one), since this is the best option among all VAZs.
Possible faults
What instrument panel malfunctions may Lad Prior car owners encounter:
- The speedometer or tachometer needle does not work; when the speed increases, the needles continue to lie in place. In this case, first of all, it is necessary to check the signal that comes from the speedometer regulator; perhaps there is a break somewhere in the circuit or the sensor itself has failed. There is a possibility that the sensor will have to be replaced.
- The daily mileage or fuel level sensor does not work. Yes, these components are different, but they are both closely related to the speedometer, so follow all the instructions above. Checking the signal from the sensor will be relevant if power is supplied to the panel. It would also be a good idea to check fuses F10 and F20; they may need to be replaced.
- The device generally does not work correctly, the sensors show incorrect data. The problem may be with the processor itself or with a short in the circuit; this needs to be checked by an electrician. There is a possibility that the cause of the problem is a bad mass.
- Coolant temperature sensor. Check your contacts.