Description, designation, sketches and dimensions of bearings
Designation VAZ/GPZ
Sketch and dimensions, mm
Installation location on vehicle
Number
in
Transmission input shaft (support in rear crankshaft flange)
Steering linkage pendulum arm
Included in clutch kit depending on manufacturer
Transmission intermediate shaft (front support)
The problem with standard Niva wheel bearings (VAZ 2121, 2131) is that they need to be constantly adjusted during vehicle operation. If this is not done in time, they will fail, creating a howl or hum when moving. You can save yourself from such problems by installing non-adjustable hubs or double-row bearings.
What is a non-adjustable bearing and why is it installed on a Chevrolet Niva?
The problem with standard wheel bearings is that they need to be constantly adjusted during vehicle operation.
If this is not done in time, they will fail, creating a howl or hum when moving. You can save yourself from such problems by installing non-adjustable hubs or double-row bearings. On sale you can find reinforced, non-adjustable hubs with double-row bearings. According to the manufacturer, this modernized unit has the following advantages:
- there is no need to adjust (the bearing tightening is precisely set during its production);
- no need for regular lubrication;
- eliminates rotation of bearings on the hub;
- eliminates wear of bearing seats on the steering knuckle and hub;
- a ball bearing reduces friction in the hub assembly;
- The service life of the hub is increased due to thickening
A good way to strengthen the suspension is to install non-adjustable double-row wheel roller bearings on the Niva instead of the standard ones. But there is one nuance - such products have a different outer diameter; there are 2 ways to solve this problem:
- 1) Boring the “native” fists for a double-row p/w;
- 2) Insert a set of spacers and fix both roller bearings, making them non-adjustable;
- 3) Buy and supply a ready-made kit.
For options 1 and 3, a SKF bearing marked SKF IVECO BTH-1024 C is suitable. For the second option, you need to purchase a special set of bushings, the installation of which is described in the video below.
Bearing selection by manufacturer
Experienced car mechanics know that it is better to choose a bearing that is completely identical to what was before. It would be good if it was an item with the original box and logo. Such parts often correspond to their counterparts that were originally supplied to the assembly line. The price of the bearing is not always affordable, because they are produced in a limited batch for a batch of cars.
But there are other bearing models whose characteristics are in no way inferior to the original ones. And the cost of non-original bearings is lower only due to the use of a different brand. Here are just a few bearing suppliers that have become popular in today's automotive market.
- SNR – French company;
- SKF is one of the largest manufacturers in the world;
- FAG is a German manufacturer, one of the largest companies;
- NSK - from Japan;
- NTN is another representative of the Land of the Rising Sun.
Manufacturers from Japan often deliver their parts directly to the assembly line. Therefore, practically nothing is known about them on the regular spare parts market. You can ignore the country of origin in the case of the companies mentioned above. It often lists one of many offices and branches around the world.
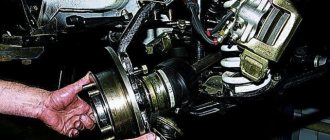
Pressing out and dismantling old bearings
The removed assembly and steering knuckle do not require further disassembly. The only thing you need to do is remove the old oil seal using a regular flathead screwdriver, holding the hub assembly in a vice. It is not recommended to use them in the future; new ones are installed, just like the bearing.
Inside the fist, there are two tapered angular contact roller bearings. They are installed at random and form a hub unit.
- To begin dismantling, it is enough to separate the brake disc mounts from the wheel turning mechanism.
- Don't forget to remove the seals.
- The small race of the inner bearing can be removed without any problems by hand.
- Next, at the same time, using the adapter, you need to knock out the outer roller bearing race from the pipe, as shown in the photo below.
- After separation, one ring with a separator remains on the hub, and the second remains inside the knuckle. The old clip is pulled off with a special puller equipped with grips.
- The second part of the part is knocked out of the trunnion through a spacer made of soft metal in the form of a rod or carefully with a screwdriver.
- The attachment is placed against the clip and light blows are applied, moving it in a circle.
- After this, the old grease should be carefully removed from the cavity.
Generator bearing: replacement recommendations
The following recommendations are given for replacing the Niva Chevrolet generator bearing:
- The first step is to remove the generator itself. First, the generator mounts are loosened, then the adjustment bolt is released. The next steps are to remove the belt and disconnect the ground from the battery. We are talking about the negative terminal. It is also necessary to disconnect the wires from the generator itself. The structure is removed through the lower part. Why does the mount itself unscrew?
- After this, the master begins to disassemble the generator. The first step is to remove the pulley. The owner will need a screwdriver to lock the rotor. The main thing is a careful approach to work. The pulley is unscrewed with the appropriate key. You will need to pull back the latches to remove the cover. The part is pulled towards itself. All connections with bolts are additionally processed. Then it will be easier to unscrew them.
- The next steps are to unscrew the screws and remove the voltage regulator unit. You also need to get rid of brushes for a while. The generator cover is disconnected from the starter, otherwise it will not be possible to gain access to the bearings themselves. The main thing is not to damage the winding during such work.
- After complete disassembly of the generator, access to the bearings becomes available. It remains to check the parts for any defects that have appeared, including cracks and chips. Do the parts rotate easily? Is there any play between them? The seats may suffer from wear, so they also need to be inspected.
- Next, you need to knock the bearing out of its seat. To do this, tap the surface with a small hammer. The blows must be strong, but careful, otherwise the result will not be achieved. A piece of pipe of the appropriate size will make an excellent stand. Removing the rear bearings is impossible unless a special puller is used.
- The properties of old and new parts must remain similar. The same attachment is used when pressing into the body. The anchor is where the rear bearing is installed.
- When reassembling, proceed in reverse order.
Below watch a video on how to disassemble and repair a Niva generator.
Advantages of iveco non-adjustable bearings
The new modification of 2123 hubs for the installation of non-adjustable bearings is gaining popularity - it is convenient and practical, and if you have certain skills, you can do all the work yourself.
Also interesting: Where is the paint number on a Chevrolet Niva?
The advantages of installing Iveco parts are obvious:
- long service life - about 100 thousand kilometers;
- the units can withstand high loads, which are three times higher than those of factory bearings;
- You can install wheels with a large offset on the car;
- the bearing does not need adjustment and does not require maintenance during the entire period of operation;
- you can do the alteration yourself.
If you decide to remake, immediately check the brake disc, CV joints and side seals of the front gearbox. When replacing them, you will have to disassemble the hubs again and press in bearings, which will become unusable.
Purpose of the bearing
This part is located in the rear axle of the Niva Chevrolet, closer to the outside of the car. Like any bearing, its main function is to smooth out the rotation coming from the rear axle. The axle shaft extends from the gearbox, where it is driven by gears, and ends at a flange on which the brake drums and wheel are located. In order for it to rotate smoothly inside the structure, a ball bearing is installed on it.
It is mounted in a special seat on the bridge, where an increased load on the axle shaft is provided. To prevent its movement inside the bridge, a special locking sleeve is used, which ensures double fixation of this element. An additionally installed oil seal ensures the tightness of the entire structure.
It is important to remember that if the seal is damaged, lubricant leaks, which leads to increased friction inside the bearing and rapid failure. Therefore, if damage is detected, the oil seal must be replaced.
These elements are among the most exposed to loads and therefore require periodic inspection and replacement.
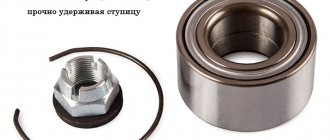
How to choose a replacement part and bearing number
Once you are convinced that the bearings need to be repaired, you should select a hub bearing in the retail chain based on three main criteria (by default, single-row tapered roller bearings are installed - the new kit must have a nut):
- Chevrolet Niva front hub part number: 2007108 (catalog number - 2121-3103020-10, bearing according to GOST - 2007108, foreign equivalent according to ISO - 32008).
- You need to buy two roller bearings in the kit.
- Dimensions of the Chevrolet Niva front hub bearings: height – 19 mm, internal diameter – 40 mm, external diameter – 68 mm.
- The cost of a new set of parts for the hub, including double-row bearings, as well as suitable manufacturers, are presented in the table below.
Bearing device.
Like most parts in a car, a bearing has several indicators based on which you can select the necessary part:
- number
- internal and external dimensions
- height
Knowing these parameters, you can select a replacement element that will be suitable for a given car and perform its functions correctly.
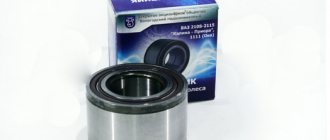
The number is the value in the catalog - 21212403080. In most cases, this data is enough to purchase a bearing model for a Chevrolet Niva in a store. If the required element is not available, you can find analogues, knowing the technical characteristics:
- internal diameter 40mm
- outer diameter 80mm
- height (meaning product thickness) 23mm
How to change a wheel bearing in a field
The steps to replace the front bearing after removing the nut can be divided into 4 stages:
- Removing and disconnecting the steering knuckle and brake drum along with the hinges, from the strut and CV joint.
- Pressing out old parts.
- Pressing in new wheel bearings (two for each wheel).
- We put the unit back together and tighten the nut and adjust the gap.
For repairs, you will need a standard set of plumbing tools. We also recommend that you familiarize yourself with the structure of the node.
Required set of tools for work:
- A 30mm socket wrench to loosen the nut;
- Screwdriver to unscrew the brake caliper;
- Set of sockets and ratchet;
- Round nose pliers;
- Hammer;
- Mandrel or pipe for pressing;
- Puller with claws (if possible);
- Puller with claws;
- Jack and vice;
- Torque wrench to properly tighten the hub nut.
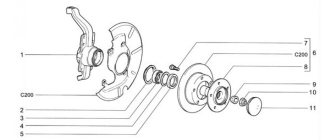
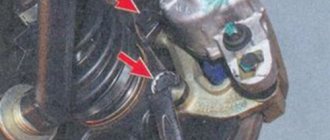
We place the car on a flat surface, engage first gear, remove the handbrake, and put chocks under the wheels. This completes the preparation. Also, before repairing, it is necessary to study the location of the elements of the car’s chassis according to the diagram: (pay attention to the steering knuckle - position 27, bearing - position 9).
Articles of foreign spare parts for Chevrolet Niva
Front brake pads:
TRW-GDB265M (Very high quality, excellent braking does not creak) FERODO-FDB195 ((sometimes you have to sharpen them) Take only red Premier series, never green FSL. Bosch-0986466601 (No information on quality) LADA-21213501090 (Original part number of front brake pads)
Rear drum brake pads
TRW-GS8164(GS8222) quality! ATE - 03.0137-0232.2 LADA - 21013502090 (Original catalog number of rear brake pads)
Front brake discs
Brembo - 08393910 TRW - DF1725 ATE-24011201301 Lada - 21213501070 (Original catalog number of front brake discs)
Rear brake drums
ATE – 24022500041 Cast Iron Drums
ATE — 24.2120-0803.3 — Main brake cylinder ATE — 24.3220-1102.3 — rear brake cylinder
WEEN - 182-0114 Thermostat 80c HEPU - P620 - pump Expansion tank from Volkswagen VAG - 1K0121407A - tank VAG - 3B0121321 - cover 2123-1307011-20 - pump with enlarged impeller(RU) Suspension
KAYABA 344441 — Front gas shock absorber KAYABA 344442 — Rear gas shock absorber Lemforder — 35043 01 — ball joint Lesjofors — 40 142 17 Front suspension spring Kilen — 11917 Front suspension spring SKF — VKBA1324 — lower gear set. SKF (2 oil seals + 2 bearings + nut) for standard hubs Optimal - 681923 Wheel bearings for non-adjustable hubs (IVECO) FAG - 713690830 Wheel bearings for non-adjustable hubs (IVECO) SNR - R14013 Wheel bearings for non-adjustable hubs (IVECO)
MAHLE/KNECHT — LX220 air filter MAHLE/KNECHT MAHLE/KNECHT — OC384 oil filter MAHLE MAHLE/KNECHT — KL83 fuel filter MAHLE Mann W 914/2 — oil filter (short)
Contitech 5PK1885 - poly-V-belt (generator and other units) Contitech 4PK810 - poly-V-belt for air conditioning compressor Ina 531 0760 10 - generator belt tensioner roller (also known as bypass roller, air conditioning compressor belt tensioner roller)
Bosch F 000 ZS0 211 — ignition coil 0242232505 — Bosch spark plug
Source
How to check the front wheel wheel bearing on a Chevy Niva
The failure of the unit is indicated by the appearance of a low hum from one of the wheels. The sound does not disappear when cornering and intensifies as the vehicle speed increases.
If you notice this, you should immediately carry out a diagnosis, since if the wheel bearing seizes while driving, the consequences and costs can be very high.
The upcoming replacement of the Niva Chevrolet front wheel bearing is determined as follows:
- the front wheel of the car is suspended with a jack;
- rotate it by hand and check the play.
Signs of bearing wear:
- Extraneous noise and metallic knocking.
- Noticeable play is checked by rocking the wheel perpendicular to its axis.
- Vibration in the cabin when driving.
Before carrying out repairs, for clarity, watch the video of checking the front hub of a Chevrolet Niva:
Video: “Checking the front wheel bearing”
Video: “Signs of a bearing failure”
Final recommendations for choosing bearings
It is recommended to select new Chevrolet Niva bearings based on future operating conditions. The original will be the best choice for those who spend most of their time in urban environments. If the conditions are extreme and involve the creation of additional loads, it is recommended to give preference to increased strength characteristics.
1600-2500 rubles – the cost of work to replace bearings, if the owner turns to service station specialists.
1200-2000 rubles will have to be paid for similar work carried out on the rear axle.
You can choose an option that suits your needs and current budget. The cost of materials can reach several thousand rubles, and a cheaper option is unlikely to be found.
Doing the work yourself is not so difficult - all you need is to have instructions and videos at hand. After replacing the Niva Chevrolet bearings, it is enough to drive a certain distance and see if there are any extraneous sounds.
The Chevrolet Niva belongs to the class of SUVs with all-wheel drive. This is realized through the installation of a rear axle, through which torque is transmitted to the rear wheels. For this, a system of gears and axle shafts is used, which are located in the bridge. One of the elements that is subject to excessive load, and therefore the one that most quickly fails, is the rear axle bearing. Therefore, it is necessary to diagnose its condition in a timely manner and, if necessary, replace it. You can find out how to do this by reading this article.
Installation
When the turning work is completed, we begin assembling the unit. Everything is simpler here - no adjustment is required, and the locknut is tightened “from the heart.” There is no need to worry about over-tightening the hub; it is almost impossible.
Stages of work:
- place the steering knuckle on a flat, hard surface;
- install the support washer and, using a head or steel pipe, carefully press the bearing into place;
- install the second support washer, then use the same tools to carefully hammer in the oil seal;
- repeat these works on the opposite side of the steering knuckle;
- put the steering knuckle on the hub and tighten the locknut to a torque of about 200 Nm or with moderate force;
- put on the wheel, rotate it and check the functionality of the bearing;
- We fasten the steering rack and ball joints.
During installation, installing an oil seal is not necessary, because the Iveco bearing is a closed type, dust and dirt do not penetrate there. However, to increase the service life of the unit, it is recommended to install at least the cheapest oil seals.
We carry out similar work on the opposite side of the car. After the installation is completed, we go and enjoy - now replacement may be required no earlier than after 100 thousand kilometers, and maybe later. The manufacturer provides the same warranty provided that the installation was carried out correctly.
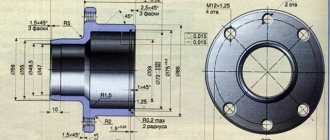
And finally, if you contact a turner, do not forget to take the drawings with you. They are presented below:
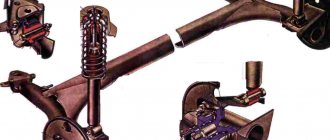
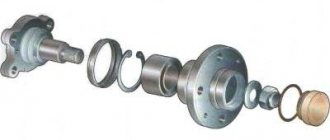
Design Features
The product is a complex-shaped part that rotates on a pair of tapered roller bearings. Their outer diameter is pressed into the steering knuckle. The standard equipment of the Chevrolet Niva includes adjustable hubs. In it, the bearing clearance depends on the position of the adjusting nut.
The latter is equipped with a fixation belt that prevents spontaneous loosening or tightening of the threaded connection. This mechanism requires adjustment during maintenance. An incorrectly adjusted unit wears out quickly:
- Excessive tightening torque makes it difficult for the wheel to rotate, leading to overheating and destruction of the bearings.
- A loose nut causes play and knocking noise in the bearings. Impact loads accelerate wear of the roller metal.
The drive axle shaft transmits torque to the hub due to the presence of splines on the inside of the central hole.
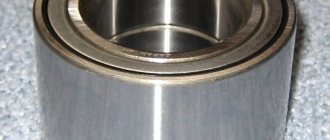
There are 22 of them in the standard design, and 24 in the reinforced design. The second, more durable type of design is equipped with double-row bearings from IVECO trucks. Reinforced hubs are used on VAZ 2121, 2123, 2131, 21213 and 21214.
Some owners re-equip their cars by equipping them with hub units themselves. This avoids damage in the form of broken splines. However, this modification is fraught with drawbacks. The strength of the standard hub is lower than that of the transfer mechanism parts. Therefore, it serves as a kind of “fuse” against overload.
The mounting design for the rear wheels of the Chevrolet Niva is radically different from the front. No hubs are used here. The wheel is attached to the flange of the axle shaft, which rotates in a special bearing.
Torque is transmitted from the rear axle gearbox to the wheels through a spline connection. However, in this case, the splines are cut not in the hub, but in the gears of the gearbox.
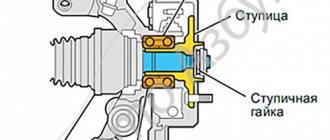
The hub on a car is the element that connects the wheel and the drive shaft. It has two bearings, which reduce the friction force when rotating on the shaft.
Diagram of hub assembly.
This gap may increase over time and due to wear and tear of parts. In this case, the wheels begin to vibrate on the axles, which is the cause of premature tire wear. To correct the situation, the wheel bearings should be changed in a timely manner.
Hub assembly on steering knuckle
Reworking the hub and installing a non-adjustable bearing
Such a hub, for an adjustable bearing, can be made from a standard part. It is necessary to bore the hole to the size of the bearing 50 microns (0.05 mm) for interference, and press it into the resulting mounting hole.
- According to the instructions provided, we dismantle the old parts.
- We grind the hub to the required diameter ourselves or order it from a turner in your city.
- We press in a new double-row ball bearing, for example SKF IVECO BTH-1024 C.
- Install the retaining ring.
- We install a spacer (washer) of about 3.5 mm and a seal (the size of the washer is determined using additional measurements).
- The process is complex, so it is recommended to watch it in video format.
Video: “Installing a non-adjustable bearing”
Video: “Installing reinforced bearings”
Car "Niva"
“Niva” is perhaps one of the most popular SUVs, not only in Russia, but also abroad. Since the late seventies, this car began to be produced. The very first model was named VAZ-2121.
Also interesting: Purpose, diagram, design of the unequal angular velocity joint
It was almost impossible for an ordinary resident of the Soviet Union to get this car: almost eighty percent went for export, and the remaining twenty were released one by one. At the price at that time, this model was second only to the Volga, that is, the car that was used by the state apparatus as the main car.
In the mid-eighties, Niva cars with Soviet racers inside took all three prizes at the Australian rally raid. Sales of the car soared: in Australia itself - twofold, in Europe - fourfold or more, depending on the country.
Indeed, this was a new word in the annals of the development of light SUVs, and it was written precisely by Soviet designers.
Table - recommended manufacturers, numbers and articles of wheel bearings
| N p/p | Manufacturer | Catalog number | Price for 2022, rub. | Additional Information | |
| Dimensions (mm) and parameters | Applicability | ||||
| Standard sets of two bearings | |||||
| 1 | Volzhsky standard, Russia | 2007108 | 200 | Inner diameter - 40 mm; Outer diameter - 68 mm; Width -19 mm; Weight - 0.278 kg; Number of rollers in the bearing - 21 pcs.; Roller dimensions - 7/11x19 mm; Dynamic load capacity - 40 kN; Static load capacity - 52 kN; The maximum rated speed is 7000 rpm. | Chevrolet NIVA trim levels L, LC, LE, GL, GLC. In that case Restyling 2022. |
| 2 | VPZ, Russia | 32008 | 200 | ||
| 3 | SKF, Sweden | 32008X/QSKF | 770 | ||
| 4 | KOYO, Japan | 32008JR | 880 | ||
| Double row bearings (for reinforcement) | |||||
| 1 | OPTIMAL, Germany | 681 923 | 2200 | Inner diameter - 40 mm; Outer diameter - 73 mm; Width - 55 mm; Number of raceways - 2 pcs.; Seal - Yes. | Likewise |
| 2 | RUVILLE, Germany | 4013 | 2480 | ||
| 3 | SKF, Sweden | BTH-1024 C VKBA 3551 | 2300 | ||
Also interesting: Where is the paint number on a Chevrolet Niva
? Parts of satisfactory quality last about 20 thousand km, mileage with high-quality products exceeds 30 thousand km. The most popular products from the Volzhsky and Samara plants are labeled SPZ-GROUP. The average price of a wheel bearing is 1000 rubles.
[Info] Catalog numbers of spare parts
List of catalog numbers of imported analogues of spare parts for Niva and their derivatives
Consumables
1) Timing belt repair kit INA -
530 0441 10
(Chevrolet Niva FAM1) 2) Timing belt guide roller SKF -
VKM 25158
(Chevrolet Niva FAM1) 3) Timing belt bypass roller INA -
532 0478 10
(Chevrolet Niva FAM1) 4) Belt tensioner roller nya Timing INA -
531 0518 30
(Chevrolet Niva FAM1) 5) Timing belt Dayco -
94787
(Chevrolet Niva FAM1) 6) Oil pan drain plug Febi -
04572
(Chevrolet Niva FAM1) 7) Opel engine oil filter -
06 50 401
(Chevrolet Niva FAM1) Contitech alternator poly-V-belt -
5PK1885
9) Contitech air conditioning compressor poly-V-belt -
4PK810
10) Ina generator belt tensioner roller -
531 0760 10
Engine
1) Valve cover gasket (cork) Victor Reinz -
701295700
Transmission
1) External CV joint 22 splines SKF -
VKJA 5722
2) Clutch (Chevrolet Niva) SACHS -
3000 951 003
3) Cardans (Chevrolet Niva) Tirsan - RS.88615.01.02 4) Front left drive assembly 24 splines Trialli -
AR731
5) Front right drive assembly 24 splines Trialli -
AR730
Bearings
1) Non-adjustable hub bearing (Iveco) SKF -
VKBA3551
2) Wheel bearing set SKF -
VKBA1324
(Kit includes 2 bearings 2 oil seals 1 nut)
Oil seals
1) Internal oil seal (for some knuckles with Iveco bearing) Nissan -
40227-50Y11
2) Axle shaft oil seal (omnidirectional) Corteco -
12015250B
Suspension
1) Front suspension springs (Chevrolet Niva) Kilen -
11919
(Reinforced series) 2) Rear suspension springs (Chevrolet Niva) Kilen -
51912
(Reinforced series) 3) Front suspension shock absorber (Chevrolet Niva) KYB Excel-G -
344441
(Gas filling -oil) 4) Rear suspension shock absorber (Chevrolet Niva) KYB Excel-G -
344442
(Gas-oil filling)
Brake system
1) Front pads Textar -
2066001
2) Rear pads Textar -
91029100
3) Front left brake cylinder Pilenga -
CC-P 2121
4) Front right brake cylinder Pilenga -
CC-P 2122
5) Rear brake cylinder TRW -
BWF 144
6) Pads front TRW -
GDB265M
7) Front pads FERODO -
FDB195 Rear pads TRW -
GS8164
9) Rear pads ATE -
03.0137-0232.2
10) Brake disc TRW -
DF1725
11) Brake disc ATE -
24011201301
12) Brake disc Brembo -
08 393910
13) Brake drums (cast iron) ATE -
24022500041
14) Brake drums (cast iron) Pilenga -
6223
15) Main brake cylinder ATE -
24.2120-0803.3
16) Rear brake cylinder ATE -
24.3220-1102.3
Cooling systems
1) Thermostat with gasket Quinton Hazell -
QTH600K
(Chevrolet Niva FAM1) 2) Pump (large metal impeller) Hepu -
P 620
3) Thermostat (80 degrees) WEEN -
182-0114
4) Tank (for replacing the standard one with ShNG) VAG -
1K0121407A
(Tuning) 5) VAG tank cap -
3B0121321
(Tuning)
Electrics
1) Door end switch GM
96235956
2) Generator 120A for the poly V-belt KZATE -
7712370101
3) Terminals for the door connector of the Chevy Niva Delphi -
12147299
and
12147302
Body
1) Windshield with full heating KMK GLASS -
VAZT0114
Bearings SKF, SNR, INA/FAG for 5speed gearbox and transfer case: Transfer case: Drive shaft bearing (front): VAZ number: 2101-1701033; SKF number: 615722 INA/FAG number: 511242B SNR number - absent Drive shaft bearing (rear): VAZ number: 2101-1701190; SKF number: 6306 N, (6306NR) INA/FAG number: 6306N SNR number: 6306N
Front axle differential bearing (24 splines) 2007807 6U-2007807AE 6U2007807AE 2123-2303036 LM78349 LM78310A 21232303036 LM78349 LM78310A
Rear axle differential bearings (and front axle with 22 splines): 7707 VAZ number: 2121-1802208; SKF number:6305 INA/FAG number: 6305 SNR number: 6305
Front axle drive shaft bearing (front support): VAZ number: 2121-1802168; SKF number: 6209 N, (6209 NR) INA/FAG number: 6209N SNR number: 6209N Rear axle drive shaft bearing (rear support): VAZ number: 2121-1802169; SKF number: 6209, (6209Z) INA/FAG number: 6209 SNR number: 6209
Industrial roller bearing shaft (front support): VAZ number: 2121-1802092; SKF number: NSF2207, NJ 2207 ECP number INA/FAG: NJ2207ETVP2 SNR number: NJ2207EG15 Ind. ball bearing shaft (rear support): VAZ number: 2101-1701190; SKF number: 6306N, (6306NR) INA/FAG number: 6306 SNR number: 6306N
5-speed gearbox: Input shaft: in gearbox: VAZ number: 2107-1701033; SKF number: 615722 INA/FAG number: 511242B SNR number: - absent in the crankshaft shank: VAZ number: 2101-1701031; SKF number: 62202, 62202-2RS1 INA/FAG number: 62202EE SNR number: 62202-2RSR
Secondary shaft: front support: VAZ number: 2101-1701108; SKF number: AR-491298 A INA/FAG number: - missing SNR number: - missing middle support: VAZ number: 2107-1701190; SKF number: 6306 N, 6306 NR INA/FAG number: 6306N SNR number: 6306N rear support (on the shank): VAZ number: 2107-1701073; SKF number: 613441 INA/FAG number: 512676 SNR number: - none
Intermediate shaft: front: VAZ number: 2101-1701068; SKF number: 616073 INA/FAG number: - missing SNR number: - missing rear: VAZ number: 2107-1701073; SKF number: 613441 INA/FAG number: 512676 SNR number: - none
5th gear industrial shaft: VAZ number: 2108-1701031; SKF number: NJ 205 ECP INA/FAG number: NJ205ETVP2 SNR number: NJ205EG15 *The letter N means there is a groove for the circlip; Letter Z - closed.*
Source
Installing new bearings in the steering knuckle
Manufacturers do not lubricate their bearings and rings very generously, so you will have to add the missing amount of grease yourself. Litol-24 in an amount of 40 g is suitable, apply lubricant to the separator and rollers before replacing the Niva front hub.
- We insert a new outer race of the inner and outer roller bearing into the prepared hole of the steering knuckle. We press the clips on both sides, in the same way as they were installed at the factory.
- Next, apply lubricant to the raceways and spread it in an even layer.
- We insert the inner race and close it with an oil seal. Lightly press the boot with a mandrel of the required size. We do the same on the other side, install the clip and boot.
- Now we insert the hub into the steering knuckle, namely into the holes of the installed roller bearings.
- The hub must be inserted smoothly and without distortion. In some cases, depending on the actual mounting diameters, pressing through a press will be required. In this case, a spacer was used.
Read news about the new Niva
- We change the cylinder head gasket on a Niva Chevrolet with our own hands "
- Rear bumpers Niva Chevrolet - manufacturing
- Chevrolet Niva engine and its volume
- The advantage of a loan secured by a vehicle title at Autopawnshop 38
- Vehicle categories in technical regulations (M1, M2, M3, N) in 2022
- Lada Niva Travel 2022 prices, models, configurations, photos, new body, video
- AVTOVAZ increased prices for LADA Niva for the second time in 2022 » Lada.Online - all the most interesting and useful about LADA cars
- Chevrolet Niva 2019-2020: characteristics, price, photo and video review
We identify a malfunction on the VAZ 2123
Every driver must understand that a completely destroyed unit will lead to disconnection of the hub. If this happens at speed, the consequences can be disastrous. That is why it is important to recognize the first signs of a malfunction and carry out repair work in a timely manner.
And also interesting: what to choose UAZ or Niva
The bearing life can be about hundreds of thousands of kilometers, since all elements are made of durable hardened steel. However, in practice, the node fails much earlier. There are several main causes of failure.
- The manufacturer supplies non-adjustable bearings with a sufficient amount of lubricant, which cannot be said about adjustable ones. It is the lack of lubrication that can cause the unit to quickly fail.
- The oil seal, on the one hand, retains the lubricant, and on the other hand, prevents the penetration of foreign bodies into the separator. Even a small grain of sand can lead to accelerated wear of moving parts.
- The presence of lubricant does not guarantee long-term operation, since everything depends on its quality.
- Prolonged absence of work to adjust the gap will lead to increasing play and subsequent wear.
- Features of the operation of the Chevrolet Niva imply disabling the differential lock when driving at high speed. If you do not follow this recommendation, the bearings will fail.
The first sign of a malfunction is extraneous noise when the car is moving. Over time, it intensifies, but it is difficult to guess from which side the bearing comes under suspicion. On a free and fairly wide road, you will have to make maneuvers by slightly turning the steering wheel left and right. If the sound gets louder when you turn right, the first thing you should do is check the left unit and vice versa. Finally, you can verify the malfunction by hanging the wheel. It is rocked in a plane perpendicular to the axis, checking for play.
You should also determine if there is any grinding, crunching or noise when the wheel rotates. These symptoms indicate the need to replace the bearing.
As garage mechanics say, “The knock will always come out.” You should not wait for this, otherwise you will have to call a tow truck or repair the unit in the field. In fact, it is easy to diagnose the problem yourself. The first sign of bearing failure is increased noise, unpleasant metallic sounds from the hub, and increased heating of the metal at the place where it is installed.
The following steps will help you accurately determine the source of the noise:
- hang out the rear wheel by jacking up the car;
- We begin to turn the wheel with our hands (the gearbox is in the neutral position) - extraneous noise is unacceptable, rotation should be easy without biting;
- pull the wheel towards you, play in the axial direction of more than 1 mm indicates wear of the bearing race and its imminent failure;
- An oil leak from under the rubber seal of the axle shaft also serves as a basis for removing and disassembling the unit with subsequent troubleshooting.
You should not delay repairs if at least one of these signs appears. The savings in this case are questionable, and a bearing that fails in motion can result in expensive repairs with the replacement of the entire axle shaft assembly.
And if you buy
Of course, you don’t have to worry, don’t look for parts from Moskvich, but just go to the store and buy what you need to install non-adjustable hubs on the Niva.
This hub assembly, if purchased, should consist of knuckles with pressed bearings, hubs and anthers - there should be two of each item. You need to know how many splines the hub on your car has, so that you don’t make a mistake when buying new ones. Specifically for the Niva, there are kits that come with twenty-two and twenty-four splines.
It is best, of course, to install non-adjustable hubs on the Niva at any service center. But if you have enough knowledge and experience, the driver can handle it himself. It is advisable to use new nuts and studs when installing new parts. And also - lubricate all elements of the mechanism to prevent them from souring. Before you install the caliper, it is better to clean it, because it affects the movement of your car's pads.
What may put you off from this option is the price. For a hub assembly, it is very high, even in car markets, where prices are always slightly lower than in stores, for example, in AvtoVAZ stores, where they also have parts for the Niva Chevrolet car. A non-adjustable front hub costs about three thousand rubles and more.
First changes and Lada 4x4
Since the mid-nineties, or more precisely since 1995, changes began to be made to the design of the car. Firstly, if previously the car had a 1.6-liter 4-cylinder 73-horsepower gasoline engine, now the volume has been increased to 1.7. The manual transmission now had five steps instead of the previous four.
In 2006, “Niva” was officially renamed “Lada” 4x4, and models exported were called “Lada Taiga” 4x4 - this is what the car is now called in European countries. Externally and internally, the car has changed, if at all, only slightly: new mirrors have appeared - larger ones, the indicators and instruments on the panel have been changed.
Preparation and disassembly
To do this, wheel chocks are installed under the front wheels. The work is carried out in the following order: The car is raised on a jack. Supports are placed under the thresholds in case of problems with the jack; ordinary blocks or several wheels folded in a stack will do; Before removing the brake drum, make sure the wheel is completely released.
In this case, the handbrake lever must be lowered, the wheel rotates freely; The decorative cap is removed. To do this, disconnect it by prying up the fasteners with a screwdriver; The gap between the flange and the drum is moistened with penetrating lubricant liquid wrench, WD; The brake drum is secured with two screws, they must be unscrewed.
But sometimes you have to shoot him down.
To do this, it is necessary to strike the rim of the drum with a hammer from the back side. Just do this through a block, otherwise you can damage the drum; The screws holding the axle shaft and the drum casing are unscrewed; The bridge rises slightly; The shock absorber bracket should be removed from the axle bearing plate; The axle shaft is removed; for this you will need a special puller.
If it is not there, then you can do without it.
How to install a new oil seal
When the axle shaft is removed from the car, the nearby metal shield used to mount the pads will be essentially loose. It will only be held in place by a thin copper tube filled with brake fluid. To prevent the latter from breaking, the shield must be temporarily secured with a pair of previously unscrewed bolts.
Removing and installing the oil seal is done as follows:
- remove the gasket from the bridge flange (do not tear it, although it is thick, it is still rubber);
- remove the damaged oil seal - pick it up with a flat screwdriver;
- thoroughly clean the area where it previously stood with a cotton, lint-free cloth;
- Before installation, the new seal must be wiped with oil (necessarily with transmission oil);
- place the element in the socket and make sure there is no distortion;
- Press it in with a piece of pipe so that the rubber is not damaged - place the old oil seal on top of it.
Now it is important to thoroughly clean all removed elements from dirt and oil. It is absolutely unacceptable to leave traces of grease on brake parts:
- drum;
- cylinder;
- pads;
- shield
If only the oil seal was changed on the Chevrolet, then it is advisable to inspect the axle bearing as well. The part is checked for wear, lack of play and presence of grease on the rollers. If an element breaks soon, then it:
- rotates tightly;
- makes noise;
- rattles when shaken.
Please note that you cannot replace the bearing yourself. This operation will be performed for you at a car service center.
You can only check if there is lubricant inside
To do this, carefully lift the plastic plug covering the rollers and look inside. In the absence or its obvious insufficiency, ordinary Litol is laid
The plastic ring is then placed in place.
Now you can assemble the knot. Follow all steps described in the instructions in reverse order.
Finally, be sure to check how much oil is left in the gearbox of your Chevrolet. To do this, lower the car onto its wheels and make sure it is level. Then:
- find the neck plug on the casing;
- turn it inside out;
- take a look inside.
If there is not enough lubricant, add it using a hose and funnel. It is better to do the work with a partner - one will add oil, and the other will monitor its level.
Symptoms of a problem
Bearing wear manifests itself as the following symptoms:
- Vibration of the front wheels, which can be reflected in the steering wheel or felt in the cabin.
- Knocking or crackling sounds in the front of the car when driving;
- Heating of the front wheels in the axle area.
If such manifestations occur, you need to check the condition of the wheel bearings. To do this, jack up the car and rock the wheel in different directions. Play and knocking in the bearing area indicates the need for replacement and adjustment. The malfunction may also manifest itself in the form of noise when the wheel rotates.
Separately, it is worth mentioning two problems that arise during the operation of the Chevrolet Niva:
1. The hubs get hot. It is important to understand that when braking, the kinetic energy of the car is converted into thermal energy. As a result, the brake discs and the hubs on which they are attached become very hot. Heating of the part during movement, and not during braking, indicates wear of the bearing or its incorrect adjustment.
The second option is typical for adjustable hubs. The adjusting nut must be tightened with a force of 2 kgf*m. If you tighten it further, the tapered bearings will be too tight.
Their rotation will be difficult. Prolonged operation of the machine in this condition leads to bearing failure and wheel jamming.
2. The adjusting nut is unscrewed while moving. Sometimes this happens literally after 20-50 kilometers. The phenomenon is observed in three cases: the master forgot to tighten the nut, there was a misalignment between the bearing races, or play appeared in the coupling of the CV joint with the hub.