Instructions and manual for Mystery MCD-795 MPU in Russian
20 pages of detailed instructions and user manuals
A radio that surprised me
Video review of the Mystery MAR-818U car radio
Repair of radio socket Mystery mcd-775mpu
Radio Mystery MCD-598MPUC
How to find the wire pinout and connect the MYSTERY MCD-664MPU car radio without a chip
Instant repair of car radio Mystery mar-818u
MYSTERY car radio repair No sound
Car radio Mystery MCD-989BC unpacking, installation and review
Review of the Mystery MDD-6270NV car radio
- Specifications
- Functions
- Advantages and disadvantages
- Installation and connection
- Manual
- Instructions for flashing radio firmware
The Mystery MDD-6270NV car radio is a multimedia combine that can replace several devices ✔. The equipment runs under the Windows CE operating system and is equipped with a touch display with increased dimensions. The design of the product includes a navigation unit and a receiver and decoder for a television signal.
Instruction Manual mcd-795mpu
- Image
- Text
Thank you for purchasing this audio receiver.
The system of this player allows you to reproduce clear, noise-free sound at high volume levels.
Our company hopes that you will be able to use all the capabilities of our products at a safe playback volume level.
Setting a safe volume level:
When listening to audio programs at high volume for a long time, the driver may be distracted from driving. In addition, high volume is harmful to the hearing organs. The receiver remembers the current volume level when turned off and sets it the next time it is turned on.
First, set the audio volume to the lowest level, then slowly increase the volume until the current volume level is acceptable and clear to you. Turn off the receiver at low volume.
About the Operation Manual
This player has many advanced features that provide superior player performance. All functions are easy to operate, but some of them require additional explanations for operation. This Operation Guide will help you become familiar with the functions of this machine.
Please read this instruction manual before using the device. In the instruction manual
Note:
1. This unit supports the following audio disc formats: CD, CD-R and CD-R/W. But depending on the conditions and the CD-R/W disc recording program, some CD-R and CD-R/W discs cannot be played back on this unit.
2. Playing a CD, CD-R and CD-R/W disc recorded at too high a speed may cause poor playback quality. The recommended speed for CD-R recording is 24x or less; The recommended speed for CD-R/W recording is 4x or less.
OPERATION MANUAL MCD-795MPU
Precautionary measures …………………………………..
Page 2
- Image
- Text
Precautions………………………………………………………………………………………3
Procedure for installing and removing the player………………………………………………………4
Connections…………………………………………………………………………………6
Control buttons………………………………………………………………………………….7
Basic operations………………………………………………………………………………….9
Radio control……………………………………………………………….. 12
CD player control………………………………………………………………. 13
MP3 player control……………………………………………………………… 14
Remote control …………………………………………………………………………………………………………… 15
Disk information ……………………………………………………………………………… 16
Possible problems and ways to resolve them……………………………………………………….. 17
Technical specifications……………………………………………………………….. 18
-2-
CONTENT
Peculiarities
The popularity of Mystery car radios among car enthusiasts is largely explained by the company's pricing policy. The manufacturer maintains prices at the same level regardless of exchange rates, so device prices are affordable to a wide range of buyers. The company always monitors the latest trends in the world of electronics, which is reflected in the release of new models.
Mistreri car radios are multifunctional. Despite the large number of models, the company produces high quality devices. The peculiarity of the devices is that they can be connected to standard connectors. Therefore, any car enthusiast can do the installation independently. Car radios are equipped with connectors for connecting various digital devices that can reproduce well-known formats.
The devices are equipped with built-in processors that are responsible for sound quality and frequency. With the help of equalizers, the user has the opportunity to adjust the sound according to his taste. Models are equipped with backlighting with a choice of colors. The built-in GPS navigator makes it possible to save on the purchase of navigation devices.
Types and models
Mystery car radios are in demand in the automotive market. Some models will be discussed below.
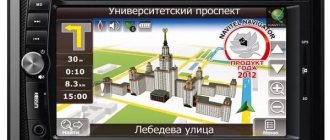
MDD 6270NV
This model is a radio in a stylish case with a touch screen. One of the advantages is simplicity and ease of use. The kit includes a head unit, a powerful antenna, a GPS navigator, and a TV tuner. To make it more convenient for the driver to control the device, control buttons can be installed on the steering wheel.
- support for various devices, which allows you to listen to music from memory cards, play videos from CDs, etc.;
- for connecting devices, the radio is equipped with a USB port;
- An additional video input is provided, which makes it possible to connect a rearview camera;
- affordable price.
MMD 6220S
Externally, the receiver looks attractive, the size is 2 din. The screen is 6.2 inches, with switch buttons on the sides. The volume is changed using a knob, a similar switch for searching by radio frequency. There is a color backlight that can be changed. The choice of colors is quite wide. The appearance can be changed by selecting a picture of the car brand as the screen saver.
The radio is equipped with connectors for a rear view camera, a sambufer, a TV antenna, for reading SD memory cards, as well as a USB port and connector. The controls are simple. The time and date are displayed on the screen. At the bottom there is a button to switch the device to night mode. The device is equipped with an equalizer and a good radio receiver. It is possible to play CDs and DVDs.
MDD 7120S
The Mystery MDD 7120S car radio has a 7-inch diagonal LCD touch screen with high image quality. This model is a universal device capable of reading information in different formats and media (CD/DVD/MP3/USB). On the front panel there is a port for USB and SD cards (video by Serega Soviet).
Advantages of the 7120s model:
- standard 2 din size allows installation on cars manufactured after 2007;
- output power 4x50 W;
- the device is equipped with a built-in TV tuner that supports standards: PAL, SECAM and NTSC;
- You can install controls on the steering wheel
- the radio transmitter operates on VHF, FM and AM waves;
- On the back there is an input for a rearview camera and AV.
The radio comes with a remote control.
MDD 4310S
The model is equipped with a full-color display. Screen size 6.2 inches. Rich colors and high sensitivity allow you to watch movies and videos in good quality. The monitor clearly displays a map of the area. The powerful antenna included in the kit receives high-quality signals regardless of the location of the car.
The radio has the following technical characteristics:
- equipped with a GPS navigator;
- power is 50 W;
- device size - 2 din;
- touch screen size – 6.2 inches;
- supports a wide range of radio frequencies;
- allows you to play audio formats – MP3, WMA;
- It is possible to view video in MPEG4 format.
Reviews
Vitaly, 32 years old, Vologda
I bought a Mystery MDD-6270NV radio in 2016 based on reviews from friends. After a year of operation, problems with performance appeared; the device periodically froze and required an emergency reboot. Later, the navigation module began to work incorrectly, and six months later the display turned off. Contacting the service center did not bring any results; I did not have time to purchase a new device because I sold the car. The new car has a standard navigation system, which I have no intention of replacing with a third-party product.
Denis, 42 years old, Tambov
I have been using the 6270NV radio since the fall of 2022. Registered on the Navitel website, which allows you to download new versions of software and area maps. I listen to the radio, connect external drives with music, but I have never watched a video. Signal reception by the radio is unstable; it is difficult to catch stations outside the city.
Manual
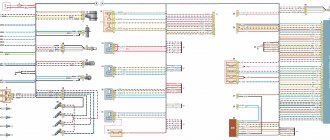
Before installing the radio in the car, you should carefully study the proposed operating manual and adhere to the recommendations specified in it. Connect according to the diagram.
Mystery radio connection diagram
Basic Connection Considerations
Before connecting, you need to disconnect the negative terminal of the battery.
The receiver should be installed away from heat sources, in a place where there is no direct sunlight, dust, dirt and large vibrations.
For connection, you should use special automotive cables and wires with the appropriate cross-section to avoid voltage drop.
The installation process involves the following steps:
- Using special keys, you need to remove the radio from the installation frame.
- Then the frame in which the device will be installed must be inserted into its regular place on the dashboard. The frame should be installed without any force to avoid damaging it. After installation, the frame must be secured.
- At the next stage, you need to connect the antenna and connect all the wires and cables to the connectors according to the connection diagram, which is in the instructions for the Mystery radio.
- Next, the device is inserted into the frame until it stops until the springs fit into the corresponding grooves.
To increase noise immunity, the car radio housing must be connected to a metal part of the body.
After installing the radio, the battery is connected. For some models, power from the cigarette lighter is sufficient, so they can be connected to it.
Setup Basics
The device is controlled and configured using buttons located on the front panel.
They have the following purpose:
- button for removing the muzzle (front panel);
- on/off;
- volume control;
- selection of operating mode;
- move to next track;
- removing the disc;
- selecting a radio station;
- buttons for turning on various playback modes;
- go to the previous track;
- selection of frequency range;
- instant sound on/off;
- system initialization (data reset).
The front panel has connectors for connecting external devices, SD memory cards, and USB.
Similar control buttons are located on the remote control that comes with the device. The purpose of the control buttons is described in detail in the car radio manual. It also describes how to correctly perform general settings, as well as set up the radio, sound, time and date, image, steering, etc.
Precautionary measures
Page 3
- Image
- Text
Precautionary measures
Before using the device, please read this manual carefully. Please keep the instruction manual for future reference.
— Install the receiver in such a way
so that it does not interfere with driving.
— Before the final installation of the
Believe, connect it first according to the temporary circuit and make sure that the unit and audio system work properly.
— When installing, use only the original
gynal components included in the kit. The use of other components may result in malfunction.
— Consult your dealer,
if installation requires drilling holes or making other changes to the vehicle.
— Install the receiver in such a way
so that it does not interfere with the driver or injure the passenger in the event of a sudden stop.
— Angle of inclination of the front side of the receiver
ra should not exceed 30
0
.
— Do not install the receiver in places where
exposure to direct sunlight or hot air from the stove, as well as in dusty and dirty places and places with strong vibration.
- Do not disassemble, remodel or
repair the device yourself. This can cause serious damage and voids the warranty for free repair of the device. Repairs should only be carried out by specialized authorized service centers.
— Do not expose the device to
sudden change in temperature. This may cause condensation to form inside the device and cause damage to the device. If condensation occurs, be sure to allow the device to dry off any moisture before using it.
-3-
PRECAUTIONARY MEASURES
Pros and cons of devices
The main advantages of Mystery car radios:
- convenience and ease of connection;
- connector for connecting a rear view camera;
- GPS navigator;
- powerful antenna;
- wide frequency range;
- presence of an equalizer;
- high-quality sound;
- backlight
Disadvantages apply to specific models.
You can name some of them:
- not all buttons are activated;
- limited equalizer capabilities;
- inconvenient player interface;
- poor sound quality;
- few settings.
Each model has its own advantages and disadvantages.
Price issue
And now we offer a brief overview of Mystery radio models
Radio Mystery MCD
The Mystery MCD radio is affordable and easy to use. MCD is an affordable radio. The low cost includes the following component MCDs: MP3, CD, USB receiver with a removable panel. One of the key components of the MCD radio is safety.
She will be able to provide you with good music. The simple display, easy to use, of the MCD radio will not distract you from driving, and distraction from driving leads to an accident. MCD radio is suitable for those who have children. Children will not be able to click anything on you there. Comfortable, simple and lightweight.
Mystery MDD radio tape recorder
The Mystery MDD radio is well equipped and multi-functional. Turns on instantly. MDD has the necessary features. MDD is easy to use. Easy to connect. Repairs can be carried out either in special salons or by replacing parts yourself. Product warranty is one year. MDD includes: MP3, DVD, CD, TV, equalizer, digital tuner, amplifier. The instructions for it contain a complete description of the device, characteristics and operating questions. You can easily connect the MDD, just as in the diagram and according to the described sub-points.
This model has good strength and stability. Of course, this does not mean that you should try to ruin it with all your might and test all its power, but still, a large number of buyers were able to appreciate the durability of this radio.
Radio Mystery MMD 6220s 2
The MMD 6220s 2 is the epitome of quality and value. Many have already appreciated the advantages of the MMD 6220s 2. A striking characteristic of the radio is its excellent rear view camera. You can change the backlighting of the keys.
It should also be noted that the sound quality of the MMD 6220s 2 is good. You can select the logo of your machine.
Mystery MMD 6220s 2 radios are in great demand among motorists. A large number of reviews help other car enthusiasts understand possible problems. The company regularly tests devices and works to eliminate shortcomings and defects.
MMD 6220s 2 has a lot of positive reviews. The control and settings of the radio can be of your choice. However, if you decide to buy such a powerful device, then it will become an excellent friend for you, who will read files from memory cards and play videos for you. A good interface will serve you for a long time.
MMD 6220s 2 is an excellent model for those who love value for money.
The Mystery MMD 6220s 2 radio will be your excellent companion. With this device, you will not only listen to your favorite MP3 music on a memory card, but you can also take your old favorite discs with you on the road (just check that they are in good working order). The radio will be an excellent guide for you, and if desired, it can play a movie for passengers. Well-received radio waves will keep you on top of world news and no matter what the road is, you will be aware of all events.
Comfortable and easy-to-use Mystery radios will satisfy the most varied tastes of car enthusiasts. From simple ones with basic functions to the most powerful modern products. The remote control allows you to easily control the device from a distance. So, we can safely say that this thing can become a necessary item in your car.
Instructions on how to set up a radio on a radio from various manufacturers
You can use a radio to pass the time on the road. Typically, drivers prefer to listen to music that is unobtrusive, so that it plays in the background and does not interfere with steering. An autoradio is most suitable for this, which first needs to be configured. But many people don’t know how to properly set up the radio on their car stereo.
Setting up the radio
Basically, setting up the radio consists of several simple steps. The broadcast range is selected and radio channels are searched and stored in the tuner’s memory. The search for radio stations occurs either automatically or manually. In the first case, radio channels are stored in descending order of broadcast quality.
Let's take a closer look at how to configure the radio on common car radios.
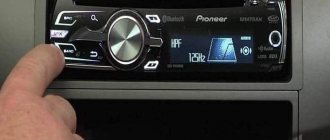
Pioneer
If you are wondering how to set up the radio on your Pioneer radio, don’t worry, setup is very easy. When automatically setting up the Pioneer, press FUNC, followed by BSM. To start searching for radio channels, press the right or up button; after finishing, the music of the first radio station found will turn on.
For manual installation in BAND mode, long press >>|. A search will be launched for any first station within this radius. After which the device will stop scanning and start playing the found station. Then you will need to save it; to do this, hold the key with the desired number for a long time. If you do not need the found station, you need to press the right key and hold it. Scanning will continue until a new station is found.
With this function, you can store up to 6 stations in the first bank. After this manipulation, press the BAND button and get into the second bank, it is shown on the display as F2. In the second bank, you can similarly store up to 6 stations in memory, and there is also a third bank. Most often there are three banks, but there are more. As a result, if you have three banks, you will have 18 stations active and saved. Now you know how to set up the radio on your Pioneer radio.
Setting up the radio in the Sony radio will also not be a problem. Searching for stations is usually carried out in two common ways: manually or automatically. Automatic memorization of radio stations:
- Turn on the radio. Long press the Source button and wait until TUNER appears on the display.
- The range is changed by pressing the Mode button. If you press the joystick, a menu of options will appear.
- Rotate the joystick until the VTM option appears. Radio channels are assigned to numbered keys as standard.
To manually scan and save you need:
- Turn on the radio and start searching for stations.
- Once the desired radio station has been found, you need to press the number key from 1 to 6, after which the name “Mem” will appear. Note: when saving a radio station on a digital number that already has a radio station, the previous one is automatically erased.
Thus, you can set up a radio in a Sony radio in 5-10 minutes.
Supra
After pressing the MODE button, select the Radio function, then RADIO and the saved band with the broadcast frequency will be displayed on the screen. Pressing BND selects the desired broadcast band.
Next, you need to press the key with numbers from 1 to 6 to use the already saved radio station in the radio.
Press and hold the >>|| button.
Then click the button >>|| to select the desired station. If these keys are not pressed for up to ten seconds, everything will return to its original operating mode.
Automatic tuning and scanning of selected radio stations
Search for existing radio stations in memory:
Briefly press the AS/PS key to start searching for saved radio channels. Any station can be listened to for about a couple of seconds. To automatically save radio channels, hold down the AS/PS key. The receiver will tune in to six optimal stations, which are the most powerful in this broadcast range. This option can be used in any wavelength range. Once the automatic saving of stations is completed, the receiver will stop scanning them.
To tune into a specific radio station, press the >>|| button, this will scan and select radio channels with the best reception signal. By pressing the >>|| button, you can manually select the station you want. Hold down the key numbered 1 to 6 for about a couple of seconds to memorize the channel under the desired key.
When tuning stations, it is possible to leave 30 FM radio channels and 15 AM channels in the tuner.
Installing stations manually:
- Select a broadcast band by pressing the TUNER BAND key.
- Click on button 4 to set the station.
- Hold down the key with any selected number on the panel to memorize the station in the radio's memory. The selected number will start blinking, after which you will see the station stored under the selected number. For example: To tune to station number 14, press the +10 key, followed by the 4 key for approximately three seconds or more.
- To store other radio stations in the device’s memory, you need to repeat steps one through three. And to change the settings of the entire station, you need to repeat the entire process from the beginning.
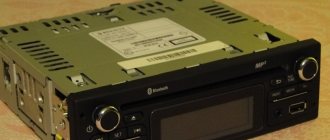
MYSTERY MCD-598MPUC operating instructions online - page 15
The MYSTERY MCD-598MPUC manual for the CD/MP3 receiver contains pages in Russian.
File size: 941.21 kB. Consists of 23 pages.
You can download a pdf file of this manual: Download PDF
LOUD OFF/ON:
Turn on/off tone compensation.
DEMO:
Turn on/off the demonstration mode of variable illumination of control elements when the radio is turned on.
AEM:
When you turn on this mode and connect any audio source to the additional audio input on the front panel, the radio will automatically switch to the AUX operating mode when a signal appears on the additional audio input. For example, when connected to the audio input of a navigation device and the radio is in RADIO mode, the radio information will be muted and information from the navigation device will be heard; When the information from the navigation device is completed, the unit will return to RADIO operating mode.
BEEP:
Turn on/off the sound indication of button presses.
SEEK 1
— Accelerated search for the nearest radio station by briefly pressing the O/P buttons.
SEEK 2
— Manual search for the nearest radio station by briefly pressing the O/P buttons. For faster searching, press and hold the O/P buttons.
STEREO/MONO:
Select STEREO or MONO mode.
LOCAL/DX:
During auto tuning, the device can tune either only to stations with a strong signal, or to all stations in the range without exception. LOCAL mode allows you to receive only stations with a strong signal. DX mode allows you to receive all stations on the current band. When you turn on the radio, the DX mode is automatically activated.
VOL LAST/ADJ -
Selecting the volume level when turned on (fixed selected level - ADJ or level equal to the level when turned off - LAST)
AREA USA/EUR
: Select radio reception area
signal (USA, Europe) and scanning step.
Instant mute
To instantly mute the sound, press the MUTE button (4). To return to normal mode, press this button again.
Operating mode
To select the operating mode of the device, press the MODE button (5). Modes change in the following sequence:
CD/MP3 (if the disc is installed
Memory Card (if
memory card is inserted into the player)
USB (if a USB device is connected
Setting variable display backlight and controls
Repeatedly press the DISP button to select one of the following preset display backlight colors and controls:
PURPLE (purple) – WHITE (white)
— BLUE (blue) — GREEN (green) — RED
(red) - ORANGE (orange)
Press and hold the DISP button to enter manual mode for adjusting the display backlight and controls.
Turn the SEL button to set the mode to AUTO OFF and briefly press the SEL button again. (In AUTO ON mode, the control illumination changes sequentially between preset colors.)
The setting is carried out in accordance with the RGB color model, according to which any color is synthesized from RED (red) - GREEN (green) and BLUE (blue) colors.
To select any color, set the corresponding value of red, green and blue colors by turning the SEL button and confirm the selection by pressing the SEL button.
Functional
U Mystery is a receiver that allows you to listen to music recorded in MP3 format. The car radio is equipped with a built-in radio tuner that reproduces sound in the AM/FM/VHF range. Features such as a digital encoder for volume control are also noted.
The following functions stand out:
- muting the sound;
- possibility of repeated or random playback;
- tone compensation, which allows you to achieve harmonious sound even when listening at low volumes.
Additional options include displaying file names in Russian - this makes it easier for many users to understand them.
Are you a car driver?! Then you can take this simple test and find out. Go to test »
Specifications
A car radio can be called not just a practical, but also a stylish device. The design has been carefully thought out to ensure maximum user comfort.
The front panel is removable. This is done for security purposes, so even when the driver has to leave the vehicle, he does not have to worry about equipment theft. On the front panel there is an AUX output and a USB port, which allows you to listen to files from a flash drive.
The model is equipped with built-in amplifiers (4*50 W). This allows you to achieve powerful and clear sound. The driver can also use the 2 RCA preamplifier outputs to connect an additional stereo component, for example, an amplifier for the rear speakers.
The device is compact, its size complies with accepted standards: width - 17.8 cm, height - 5 cm, and installation depth - 16.0 cm.
The car radio is designed for an operating voltage of 11-14 V. The frequency range of the VHF tuner is 65-108 MHz, for a medium-wave receiver it is 522-1620 kHz. This model has 30 built-in memory cells for radio stations.
Installation
Before installing the radio, you need to check the electrical wiring and make sure that the vehicle systems are working correctly.
Although you can set up the receiver yourself, it is better to first consult with a specialist. Changes may need to be made (for example, additional holes need to be made). In addition, in order to install everything correctly, you should use the parts included in the package.
The radio must be installed so that it does not interfere with the driver while driving, and in the event of an emergency stop, does not injure the passenger.
The receiver frame is inserted into the corresponding compartment on the car dashboard. There are special “tongues” for installation. They do not all fit the compartment in size, so the user’s task is to select the necessary elements. It is convenient to bend them using a small screwdriver.
First, connect the receiver and only then mount its front panel.
Connection diagram
Before starting installation work, you should review the user manual. There should be a wiring diagram for the car radio. But even with the most careful study, many questions may arise.
If all the work related to the connection has already been completed in the car, that is, the wires have been installed, all that remains is to connect the radio as shown in the figure in the instructions. In this case, you can handle the task yourself.
If there is no power wire output, it is better to seek help from specialists. This is especially true in cases where the device socket and the existing connector do not match. Then you need to either look for a suitable conductor, or twist the wires in a special way, so that during the work the risk of errors increases.
Independent connection, even in a simple case, requires knowledge of symbols.
For example, the positive terminal of the battery is marked as “VAT” and is always yellow. The red tint is at a similar terminal of the ignition switch, designated as “ACC”. Negative - black wire. Speaker wires have gray, white, and purple shades.
Connection diagram
The connection diagram of the Mystery 818 device is based on an ISO connector, which includes switching points:
- front and rear speakers;
- positive constant signal from the battery;
- antennas;
- negative nutrition;
- positive pulse given when the ignition is turned on.
On the back of the radio, used as a radiator to cool the built-in amplifier, there are 2 linear inputs. The plugs are made of red and white plastic and are used to connect the right and left speakers, respectively. Additionally there is an antenna input.
Setup and operation
When the radio is connected, further setup or operation is not difficult. To turn the device on or off, use the “PWR” button. In order to adjust the sound volume, a rotary control is provided. You need to be careful - it has no travel limiters.
All control buttons are located on the front panel of the radio. For example, you can adjust the equalizer using the “DSP” function. The “SEL” button is needed to adjust the tone of low and high frequencies. It also sets the playback mode - stereo or mono. To select a wave range, press “BND”, and to search for radio stations, press “AMS”.
The “RESET” button allows you to reset the current settings. It is also used to initialize the device after the connection is completed. It is also pressed when the system reboots.
All the necessary information is presented in the user manual, and until the motorist remembers in practice the operation of all the buttons, he will have to look at the instructions often.
You can view information regarding the current status of the device on the LCD display. For example, it displays the radio station that the user is currently listening to, or the name of the song being played. The LED indicator only lights up when the front panel is removed.
Procedure for installing and removing the receiver
Page 5
- Image
- Text
-5-
Installing and removing the front panel
Install the right edge of the front panel into the receiver, and then press the left edge until the panel clicks into place in the receiver. Make sure the panel is installed correctly. Otherwise, some buttons will not work and the display will not work properly.
To remove the front panel, press the button (2) in the upper left corner, then pull the panel to the left and remove it.
PROCEDURE FOR INSTALLING AND REMOVING THE RECEIVER