Pioneer car radio operating instructions by model:
- AVH-160DVD
- AVH-1400DVD
- AVH-2400BT
- AVH-3500DVD
- AVH-A100
- AVH-A101
- AVH-A200BT
- AVH-P3100DVD
- AVH-P3400DVD
- AVH-X1500DVD
- AVH-X2500BT
- AVH-X4500DVD
- AVH-X8500BT
- AVIC-HRZ008
- AVIC-MRZ02
- AVIC-MRZ05
- DEH-1400UB
- DEH-1400UBB
- DEH-1410UB
- DEH-1420UB
- DEH-1500UB
- DEH-1500UBA
- DEH-1500UBB
- DEH-1500UBG
- DEH-1600UBG
- DEH-2320UB
- DEH-2400UB
- DEH-3300UB
- DEH-4000UB
- DEH-4250SD
- DEH-5000UB
- DEH-5450SD
- DEH-6010MP
- DEH-6300SD
- DEH-80PRS
- DEH-8400BT
- DEH-P3600MP
- DEH-P4550
- DEH-P5000UB
- DEH-P6000UB
- DEH-P88RS
- DEH-S100UBG
- DEH-S5000BT
- DEH-X3600UI
- FH-X360UB
- FH-X380UB
- FH-X730BT
- MVH-09UBG
- MVH-1400UB
- MVH-150UB
- MVH-150UBG
- MVH-160UI
- MVH-180UB
- MVH-180UBG
- MVH-190UB
- MVH-190UBG
- MVH-190UI
- MVH-280FD
- MVH-29BT
- MVH-570AV
- MVH-A200VBT
- MVH-AV190
- MVH-AV290BT
- MVH-S100UB
- MVH-S100UBA
- MVH-S100UBG
- MVH-S100UBW
- MVH-S100UI
- MVH-X460UI
- MVH-X580BT
How to install a Pioneer radio
Detailed instructions for using and setting up the Tomahawk 9010 key fob
So, the choice fell in favor of the Pioneer car radio. It is worth noting that such audio systems have gained enviable popularity among our compatriots, largely due to their good technical performance and ease of installation.
The presented radio tape recorder meets all the requirements and standards for modern audio systems.
Let us consider in more detail all the features of self-installation of a radio in a car.
Wire marking
In order to simplify the installation of any electrical equipment, the insulation of the wires is painted in a certain color. Thus, each color corresponds to specific functional features of underwater pipelines.
When connecting the radio, you must first of all follow the connection diagram included in the kit.
In addition, the Pioneer radio usually includes 2 contact plugs, commonly referred to as “chips”. Each chip contains 4 pairs of contacts.
One of the chips is designed to supply power, the other is used to connect the speaker system. If the so-called “trick” is missing, do not despair. It can always be purchased at any auto store.
Before you begin directly connecting the radio to the car network, you need to understand the purpose of each wire.
For the most part, the color range of the underwater lines of the radio is limited to the following colors:
- red;
- blue;
- yellow;
- black;
- violet;
- white;
- green.
The red wire is usually referred to as the power line that supplies voltage to the radio when the ignition is on.
The blue insulation indicates the positive terminal going to the receiver antenna.
The yellow terminal is the power terminal, supplying voltage directly from the battery through the fuse.
Black color indicates a mass hatch.
All other wires, depending on the type of radio, are responsible for powering the speakers. Purple, white, black and green are all feed lines.
A similar color of wires with a black stripe indicates that this wire is negative.
Connection diagram
Connecting the radio yourself should not cause serious difficulties. It is enough to be guided by the diagram presented below and adhere to a number of instructions and recommendations.
Despite the ease of installation, so-called emergency situations often arise when it is not possible to understand the location of the corresponding contacts on the radio plug.
In such cases, it would be most advisable to refer to the visual diagram of the Pioneer plug, where all contacts are sequentially indicated. Each digital pin designation on the diagram corresponds to the color shade of a specific wire.
It is important to remember that when fixing the wires, care must be taken to ensure they are properly insulated. Adjacent wires must not touch each other with conductive surfaces
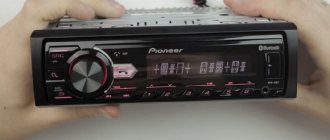
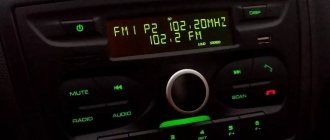
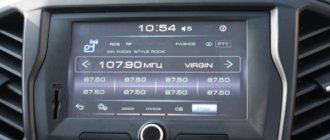
Pioneer DEN MVH-150UB
Basically, connecting the Pioneer DEN tape recorder is similar to the standard algorithm. MVH-150UB is a device adapted to any car that has a landing pocket.
Pioneer DEN has the same settings. The only difference here is in appearance - in the shade of the backlight. You can see the difference in the photo. Settings are saved even if the battery is disconnected. There is a connector for connecting a regular phone or Android.
Radio tape recorder Pioneer 150UBEvery car radio comes with instructions. In it you will find detailed information, photos and a diagram without mistakenly connecting the sound system. And with the right approach, connecting the car radio can be easily done independently.
Also included are two steel plates with eyelets. These are special devices that make it possible to remove the tape recorder from your pocket if necessary. The plates are mounted to the sides of the tape recorder. The lugs are bent with a screwdriver and the panel is closed.
How to setup
Operation and setup of the pioneer car radio (pioneer) mvh-280fd
The Pioneer radio settings affect the quality of radio reception and music broadcasts. Changing the operating parameters is done through the menu; the settings are described in the instructions. The list of adjustable parameters depends on the modification of the player and the firmware version written into the control unit.
Disable demo
The microprocessor of the head unit supports a demonstration mode, which consists of broadcasting an information message to the display. To disable the parameter, press the volume control and go to the radio settings, then turn the knob to find the System section. Rotate the potentiometer crown to select the Demo Off parameter, then press the knob to confirm the selection. The user needs to turn the knob briefly again, select the Yes option and press the knob to make the change into memory.
Radio
To properly configure the radio receiver, you must:
- Use the SRS/OFF button to select the radio station reception mode.
- By pressing the BAND button, the user selects the range of received waves. The design of the equipment supports radio stations operating in the ultra-short, medium and long wave range.
- Then we set the frequency of the radio station by pressing the broadcast scan buttons. The user can preset the scanning step from 2 fixed values - 50 or 100 kHz. Additionally, you need to go to the settings menu and enable manual broadcast scanning (MAN parameter in the SEEK section).
- Record a wave into a memory cell by pressing and holding the buttons designated 1-6 (located under the screen or on the sides, depending on the modification).
You can automatically search for radio stations using the BSM parameter, selected through the setup menu. The equipment independently scans the airwaves and writes into memory cells the frequencies of stations with maximum signal strength.
How to set the time
The user can set the clock through the operating menu, which is called up by pressing the volume control. To adjust the clock, use the CLOCK SET section; changing the value of hours or minutes is done by rotating the volume control. The parameter is set during the general setup of the radio in the car, the time value is displayed on the liquid crystal display.
How to change language
To change the language settings on the Pioneer radio, press the rotary encoder to bring up the menu. Then you need to move the cursor to the required section by turning the potentiometer washer to the left or right. After finding the LANGUAGE section, the user clicks on the knob and enters a subsection that includes 3-6 languages (depending on the modification). The owner selects the required value by turning the corrector; the parameter is set by briefly pressing the knob.
How to turn off the backlight
The design of the equipment uses a step dimmer, which allows you to change the intensity of the backlight of the screen and buttons. Settings are made through the ILLUMINATION section; some models support automatic color switching and turning on the key backlight when a phone call arrives.
How to reset settings
Resetting the settings in Pioneer equipment means rebooting the microprocessor while simultaneously resetting the memory. To start cleaning, you need to press the rubber RESET button on the front panel with a toothpick. The settings are reset after disconnecting the battery from the vehicle's on-board network.
Sound settings
In order for the radio to play juicily and reproduce low frequencies well, you need to adjust the equalizer curve and adjust the cutoff of low or high frequencies. The equipment supports adjusting the sound balance between speakers; there is a separate function for dynamic bass boost (BASS BOOST).
The sound quality is affected by the bitrate of audio recordings stored on laser discs or removable storage devices. If the recording quality is low, it is impossible to correct the sound picture using the settings.
Equalizer
Equalizer curves with standard parameters are stored in memory; to select the required value, use the menu (EQ Settings subsection). Radio tape recorders support creating your own sound picture by recording parameters in a separate memory cell.
High and low pass filter subwoofer
Setting up the slice is done through the menu, where you need to find the Crossover parameter. The function is supported only by some equipment; the setting algorithm depends on the modification of the acoustic device. Some models allow you to set individual characteristics for each speaker. The cutting height is selected from the list of suggested values.
Technical features
How to disable demo mode on a pioneer radio
Thanks to the combination of qualities such as compactness and technical equipment, the new Pioneer Mosfet 50wx4 boasts excellent information content. It’s not difficult to understand the functionality; it’s enough to understand the meaning of each key, with the help of which the adjustment is carried out. The inscriptions on the buttons and the device menu itself are not Russified, so they will have to be read in English. However, there should be no difficulties:
- The “Audio” button allows you to switch from the radio station drying mode to music recorded in the device’s memory or on external media;
- “Func” is responsible for accessing the function menu;
- The “Repeat” key, when pressed, replays the song that was played last in the queue;
- The volume button has the classic appearance of a rotating joystick; with its help, the playing track can be made quieter or louder by systematically rotating it down or up, respectively;
The number keys “1”, “2”, “3”, “4”, “5”, “6” are responsible for switching radio frequencies - for each frequency, thanks to the large amount of internal memory of the device, there can be up to six radio stations, and among them Supported formats include both FM and AM. Using these buttons, switching occurs as quickly as possible, without the need to search and configure again;
Of course, there are connectors for all modern media
It is possible to connect headphones and enjoy the music alone - it will be useful when it is extremely important for the driver to concentrate on the road, and the front passenger prefers to ignore these worries
The integrated tuner is responsible for searching for frequencies. The range can be selected by the user independently, through a manual search, or this process can be automated. In most countries of the world, the tuner works very well - it regularly picks up all existing radio stations that are available for listening. The exception is US frequencies.
Other nuances
Installation of the Pioneer Mosfet 50wx4 radio tape recorder occurs in accordance with all standards for connecting such devices; as a rule, it comes with instructions in which this process is described step by step. More details about the installation of this model can be found in the video:
All malfunctions, as a rule, can be resolved either by rebooting the radio, or by returning it to factory settings through several manipulations through the menu. It should be remembered that the settings must be partially or completely reset after disconnecting the entire electrical network of the car from the power source - i.e., after disconnecting the battery.
To prevent breakdowns and malfunctions, you should prevent various liquids and mixtures from coming into contact with the surface of the radio, do not connect devices to it that have computer viruses that can disrupt normal operation, and use it as carefully and carefully as possible.
An article about how to properly configure a Pioneer car radio. Features of setup, step-by-step algorithm. At the end of the article there is an interesting video about setting up radio stations on Pioneer radios.
Possible problems and their solutions
During the operation of the presented car radio, various types of problems may occur. Their appearance is often caused by incorrect connection of underwater leads or a malfunction of third-party devices. In addition, malfunctions of the radio may be associated with power outages.
It is worth noting that in most cases, almost every malfunction has certain symptoms, based on which it is possible to determine its cause. With all this, it is worth noting that in order to eliminate a certain number of malfunctions, the owner will need at least minimal knowledge of electrical engineering and the presence of some measuring instruments.
Let's try to highlight the most common cases of problems.
Doesn't turn on
If, after installing the radio, it refuses to show signs of life, the following diagnostic measures should be carried out:
- make sure that the underwater leads are tightly connected;
- check the availability of power;
- make sure there is mass.
If all of the above measures do not lead to the desired result, there is a need to conduct a comprehensive diagnosis, which involves:
- checking the throttle and fuse L951;
- checking the voltage value of the Q952 stabilizer (operating voltage is 5V);
- checking the presence of a key on transistor Q609;
- checking the serviceability of MK/KK quartz oscillators.
If all of the above steps fail to identify the problem, it is highly likely that the problem lies in the IC601/IC901 microcontroller.
Doesn't turn off
Often, owners of Pioneer radios are faced with the fact that they simply cannot turn off the radio. Solving this problem will not be difficult if you find out some of the features of the devices of the presented type.
The shutdown algorithm looks like this:
- press key 2 and get to the Menu section;
- enable the Sustem tab;
- activate the PW SAVE function;
- turn off the radio by pressing the off button.
After saving the listed settings, to turn off the radio it will be enough to use key 1. When resetting the settings due to disconnecting the battery, etc., the specified algorithm should be repeated.
Tuner adjustment
To make adjustments to the FM path, it is necessary to connect measuring instruments according to Fig. 4.
Table 4
| Adjustable knot | Signal generator frequency, MHz | Signal level, µV | Displayed frequency, MHz | Adjustment element | The device and its indications |
| Tuning voltage (PLL circuit) | — | — | 108,0 (107,9) | L5 | DC Voltmeter - 6V |
| FM detector circuit | 91.8 M* | 1000 | 98,1 | T51 | Zero detector - 0 |
| Input circuit | 98.1 M* | 1,7 | 98,1 | L2 | Millivoltmeter - maximum readings |
| URCH circuit | 98.1 M* | 1,7 | 98,1 | L4 | Millivoltmeter - maximum readings |
| IF circuit | 98.1 M* | 1,7 | 98,1 | T31 | Millivoltmeter - maximum readings |
| Stereo decoder | 98.1 S* | 100 | 98,1 | VR154 | Millivoltmeter - 5 dB separation (stereo) |
| * Modulation: M - mono, modulation frequency - 400 Hz, deviation - 22.5 kHz; S - stereo, modulation frequency - 1 kHz, deviation - 20.25 (±7.5) kHz |
In table 4 shows the main tuner adjustments for models with the ES index.
Note. For radios with the UC index, the PLL is adjusted at a frequency of 107.9 MHz.
Methods for connecting a car radio
For a VAZ 2110 car, in order to reduce the price, connections can be made not to the ignition switch, but to the fifth contact on the BSK block according to the diagram below.
Connecting a car radio in a VAZ 2110 car
But, with this scheme, there are also some disadvantages. For example, power consumption increases when the ignition is on, and for a passenger, if he wants to listen to music, the key must be left in the ignition. You can get away from this by twisting the yellow and red wires together and connecting them to a permanent positive. Then the operation of the Pioneer car radio will not depend on the ignition, but there will be a constant current consumption, which can lead to a discharge of the battery if the car is parked for a long time.
It would be more correct to connect the radio in other ways
An on/off button is inserted into the cut of the red wire and the product is connected through it. In this case, the radio can always work, and if necessary, simply press the off button. supply of current to the device.
The switch button is inserted after ignition between the constant plus. The hazard warning button is used so that you can switch the power mode of the car radio:
- When you press the button, the radio is powered through a constant plus.
- The button is released - power is supplied from the ignition through the plus.
An example of such a connection diagram:
- Car radio illumination wire to the cigarette lighter illumination wire.
- After ignition, a “plus” is inserted from the clock block, this is the orange wire.
- Plus constant from the cigarette lighter or ABK.
- From the cigarette lighter minus ground.
Third option: This is a simple scheme according to which the plus will be supplied and automatically disconnected from the alarm. If there is a two-wire solenoid in the car, with operation for opening and closing, changing the polarity for each operation, it works like this:
- from the solenoid to relay P1, a positive pulse is supplied when the doors are opened, the relay is activated and actually goes into self-retrieving mode, power from the battery is provided through relay P2 and the terminals of its contacts, and the radio is connected to the power supply;
- during closing, with a positive impulse, relay P2 will operate, the power supply circuit of the radio and relay P1 will break, the car radio will turn off, the relay will be de-energized.
The disadvantage of the circuit is the increased power consumption, due to the power supply of the additional relay P1, it always remains on with the radio running. You can see in the video how to take into account all the details and correctly connect the car radio.
After purchasing a car or a new audio system, you need to configure the head unit. The sound will depend on the quality of the actions performed. For the Pioneer Mosfet 50Wx4 radio, the instructions describe in detail the procedure for making the necessary adjustments. Thanks to the fact that the device is equipped with a touch screen, this is easy to do. A few taps on the screen are enough.
Manual
The kit includes instructions for using the Pioneer MOSFET 50Wx4 radio. The guide contains 5 main points:
- Before starting operation.
- Device management.
- Adjusting audio parameters.
- Initial settings.
- Other functions.
Each item describes in detail the purpose of the device controls, setting sound quality, working with the tuner and external devices.
Settings
When setting up the Pioneer radio, all actions are performed using a special MULTI-CONTROL joystick. The manual contains detailed instructions for adjusting various parameters.
To call up the main menu, press MULTI-CONTROL. Turn the joystick to select AUDIO, press to select. To go to the previous menu, press, and to the main menu, press and hold the DISP/BACK/SCRL button. The BAND/ESC button will return to the original screen.
In the same way, select: FADER/BALANCE (balance adjustment), PRESET EQUALIZER (calling a graphic equalizer), EQ SETTING 1 (adjusting a graphic equalizer), EQ SETTING 2 (fine-tuning an equalizer), LOUDNESS (loudness compensation), SW SETTING 1 (turn on/ subwoofer off), SW SETTING 2 (subwoofer setting), HIGH PASS FILTER (high pass filter), BASS BOOST (low frequency amplifier), SRC LV ADJUST (adjusting the input signal level). Using the HIGH PASS FILTER and BASS BOOST menus, we remove sound distortion.
The equalizer is used to adjust sound correction. Moreover, the device already has 5 presets: powerful, natural, smooth, superbass. There is also a CUSTOM setting - this is an adjustable curve that we create ourselves. If you adjust the equalizer curve, it will be saved in memory in CUSTOM.
Loudness compensation compensates for insufficient sound pressure in the lower and upper audio frequency ranges at low volumes. Using MULTI-CONTROL select LOUDNESS.
How to turn off
To turn off the Pioneer radio, you need to press and hold the OFF button until the device turns off.
At the beginning of our article, it makes sense to immediately note that the following method for setting up a radio is designed for an entry-level user, and there is nothing overly complicated in it. Note also that the quality of the reproduced sound usually depends only 33% on the composition and quality of the equipment components. Another third depends on the correct installation of the equipment, and the remaining 33% depends on the correct setup of the audio system.
In this article we will look at how to set up a Pioneer radio. Adjustment recommendations are discussed using the example of the Pioneer DEH-1900UB model from the 2022 line. They can also be used to adjust other modern Pioneer car radios, since they all have the same menu. The exception is processor devices, the configuration of which is somewhat more complicated.
Functions
- Advanced Remote Control App (Pioneer ARC). The app turns your compatible iPhone or Android smartphone into a powerful touchscreen remote control that lets you easily control and customize your compatible Pioneer car stereo's features.
- Compatible with Android. Connect and play music on your device without any apps
- USB input. Connect any device with a USB interface cable to charge your device or enjoy clear, crisp audio.
- 5-band Graphical EQ. Adjust the audio output to adjust playback to suit your preferences.
- FLAC. Ability to play FLAC lossless digital audio files in the car using a dedicated CD-quality output without the need for conversion.
How to set up a Pioneer radio in a car? Achieving good sound"
How to set up a Pioneer radio in a car? Achieving good sound
In principle, the correct setting will allow you to enjoy music in its most optimal sound. This will require a little digging into the settings, but it's worth it.
How to set up a Pioneer radio in a car?
The answer to this question may depend on the model of the device. All radio options with a digital designation of “1” or “2” are budget-friendly and have rather meager settings. In this article we will look at models starting from 3100. These radios have quite extensive settings, which allows you to configure them as accurately as possible, in accordance with your ideas about music.
The setup work is divided into several different points. It is advisable to go through all the settings, but it all depends on the additional equipment that is in your car. To configure the radio, turn on the volume “30”, this allows you to make the best quality sound adjustment by ear. Often, the speakers begin to wheeze, but don’t be alarmed, this will go away after the setup. When tuning by ear, it is recommended to focus on your feelings, because the perception of sound is different for all people. The work is done using a joystick; it can tilt up, down, to the side, and also retract.
The settings are made in the following order:
Switch to “AUDIO” mode
, by rotating the handle we find the balance and fader. This looks like Balanse/Fader. After which, we press the joystick and see: BAL 0, Fad 0. In some cases, the numbers may differ, which means that someone dug into the settings. We translate the “fader” indicator to +15. The signals are transmitted specifically to the front speakers. We return to the main menu;
Setting up the slice
. We are looking for the front amplifier filter settings. This is done by turning the joystick. Find “HIGH PASS FILTER”. After pressing the joystick, you will see HPF OFF. This means that the full spectrum of sound is concentrated on the front speakers. This is the source of distortion, especially on small speakers. We press the joystick and see HPF 50, this is the designation of the lower frequency threshold. Not every amplifier is designed for this. Therefore, we increase the level to 100-150, the smaller the speaker diameter, the higher the threshold should be. We exit the settings and determine the purity of the sound by ear. If you don’t like it, you can go back to the settings and change the indicators;
Next, go to the “advanced settings” panel. To do this, turn off the radio, and then press the power key. This will take you to the additional menu. Turn the joystick and see what functions are there. Usually there is a language setting, a step of searching for radio stations. Find the SW Control function. We recess the control knob and switch the function to SW mode. So the rear speakers will work in subwoofer mode;
We go to the regular menu and find the Setting 1 mode. On the left there is the SW symbol, and on the right there are 3 operating modes. Choose the most suitable one from your point of view;
Finding Setting 2 mode
. Here you will see SW 60 Hz 0. First you need to set the frequency, it is recommended to set it to 50 Hz. Next we adjust the sound power. Here you can select a range from -6 to +6. At the same time, we focus on the characteristics of the speakers and our perception of sound. Experiment with sound;
Setting up loudness compensation
. To do this, look for Loudness in the menu and enter this menu. Here it is best to choose the high (HIGT) level. This way, the tone compensation will be audible even at average sound levels.
Source
Video: “deep” settings menu + disabling DEMO mode + disabling time
Turn off the demo
To disable the demo mode, turn off the car radio, and then turn it on again by long pressing the SRC button (maybe the SOURCE button), after which we get to the start settings menu, where using the joystick or the right-left buttons we find the DEMO ON sub-item, and then change it parameter to OFF.
How to adjust the bass
To adjust the bass level, you need to switch the rear speakers to subwoofer mode, which is described in detail in subparagraph 1. Also, to obtain richer bass, correct adjustment of low frequencies through the equalizer, as well as activation of the BASS BOOST function, which is disabled by default, can help. To do this, turn off and then turn on the radio using the SRC (SOURCE) button, and go to the preset menu, where we look for the BASS BOOST sub-item, after which we activate it.
Depending on the Pioneer audio recorder used in the car, there may be other parameters, which you can familiarize yourself with by carefully reading the instructions for the device, which is included in the kit or can be downloaded via the Internet.
External ports
- In addition to the radio, the radio can play music from external devices or CDs (older versions).
- To be able to connect external devices, you will need the same “System” menu described earlier in setting the time.
- Go to the menu as described above.
- Scrolling through the menu, select the AUX, USB or Bluetooth option (if this feature is supported).
- Use the arrows on the sides (or tilt the handle itself) to switch the position. There are two options available - enabled (On) or disabled (Off).
- Choose to enable the desired port.
- Press the joystick once to confirm.
- In the same way as in setting the time, exit the menu.
- Further connection depends on the models of the radio and the connected device.
Bluetooth connection
It should be remembered that for the connection via Bluetooth to work correctly, like most other devices that support this function, pairing will be required. The PIN code is entered on the radio and repeated on the device (sometimes, especially if the device has already been connected via Bluetooth, you will only need to enter it on the radio).
To enter the pin code on the radio, take the following steps:
- They turn it off.
- Hold down the power key and go to the initial menu.
- Rotate the joystick to find the PIN CODE INPUT function (will appear if BT is enabled).
- Move the joystick up and down to enter the code. If you need to move between symbols, do it by swinging the handle left and right.
- Confirm by pressing the knob once.
- Exit the menu.
Now you can activate the mode on the device and try to find the radio. Those who like to assign clear names to devices can use the above method, but they must select EDIT DEVICE NAME rather than PIN CODE INPUT. The remaining steps are identical.
Important. Confirmation must be pressed once
Clicking on the same menu again will reset the code and require you to enter it again.
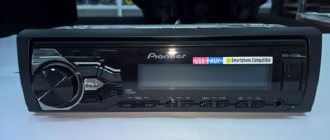
In the radio, the photo of which is presented below, the 3.5 AUX jack socket is located to the right of the radio control buttons, and the USB is behind a plug with the USB brand logo.
Radio "Pioneer" without CD, but with USB and AUX support
What can be improved
Speaking of settings, it is worth clarifying that Pioneer regards the concept of a radio tape recorder not just as a device for listening to radio or recordings. In this device you can see the date, time and much more if they are configured. Information can be presented in several languages - either Japanese (since the brand is Japanese in origin), or, more often, English.
Whether there will be Russian on the menu depends on many factors, but even the English menu is easier to understand than the Japanese one. Some additional features, such as USB ports, will also need to be enabled through the menu. Not to mention the above problem of connecting specific speakers.