COMMENTARE • 24
My question is, I found an antenna under the carpet and a plug on the roof, do I need to buy an antenna for the roof or a radio and will it work like that?
@Viktor T thanks understood
Everyone needs an antenna. Apparently, the other end of the wire hangs under the float and is screwed to the antenna.
Hey, do you know the copy yourself? Only stupid people consider themselves smart.
Salnikov Dmitry at least have many years of experience in installing speaker systems. And there is no point in releasing idle aggression here.
What song is playing at 4:41?
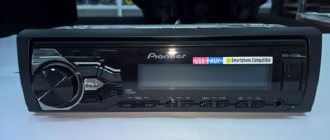
Viktor T I have this situation, I have a Pioner MVH-08UB radio and there is no such double chip on the wires for those in the car. This feature is for sale.
like purely Cobain
The battery will gobble up. And in a year you will throw it away
You don’t need to tell me about problems with the battery, I’ve been in car audio for years and I know what’s what, and there’s no need to make hasty conclusions without knowing the essence. These stories about the radio sucking out the battery are complete nonsense, which has been peddled by oldfags since the days of cassette tape recorders.
Victor, tell me where the wires go to the rear speakers, I want to put them on a shelf. Is it really in the rear doors, the stock radio is like Kalina 11194?
+Denis Gorbunov yes, the wires do not go to the shelf. I laid new wires, pulled from the radio. I disconnected the rear doors and connected the shelf instead.
Audio preparation in the “Norma” package
In this configuration, the option may be called differently:
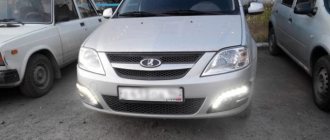
- Audio system (FM, USB, SD card, Bluetooth, Handsfree), 4 speakers, external antenna
- Audio preparation (cable, external antenna, 4 speakers)
In other words, the “Norma” package is further divided into a number of design options. Four speakers will be installed in the front and rear doors in any case, but the radio will only be available in some versions of this configuration.
The standard speakers for Lada Kalina 2 have a catalog number: front - 2170-7901020 and rear - 2170-7901030. See also the review of the Lada Kalina 2 “Norma” radio.
How to connect a rear view camera
The standard multimedia system, when reverse gear is engaged, supplies a camera supply voltage of 6.2 V to pin C7 (mini-ISO connector). And the Mekede radio on Android only receives 12 volts to pin 6 (section K) and does not supply the power supply voltage for the camera. To connect a 6V camera, you will have to make a voltage level converter using a 7805C stabilizer and two 1N4148 diodes. As a result, a voltage of 6.6 V is formed at the output of the converter. You can also get by with one 6 V stabilizer 7806 (KR142EN5B) without using two additional diodes.
The process of controlling the Android radio using the buttons on the steering wheel is shown in the video:
Let us remind you that we previously published a review of alternative 2DIN radios for Lada Vesta.
Keywords: Lada Vesta steering wheel | cassette player Lada Vesta
Audio preparation in the “Lux” package
The maximum configuration of Lada Kalina 2 has the option “Multimedia system (7″ display with TouchScreen, FM, USB, SD card, Bluetooth, Handsfree), 4 speakers, external antenna.” Nothing is required from the owner, everything is already there. See also the review of the Lada Kalina 2 Lux radio.
Let’s add that owners of Lada Kalina 2 “Lux” cars can flash MMS.
Installing a radio in Kalina: stages, features - watch the video
Cars 07-07-2015 14:55
Technical characteristics of the standard radio in the Luxury "Kalina" configuration:
- 2DIN touch screen;
- presence of stereo radio;
- ability to play multimedia files;
- synchronization with a cell phone;
- work with bluetooth.
devices Development – WindowsCE 6.0. RAM – 128 MB. fifth generation central processor chip. These characteristics may not please fans of AvtoVAZ products, but now the radio has become much nicer in the car.
ride Kalina: the technical characteristics of the “Normal” configuration “differ” from the “luxury” one in the absence of a touch screen, bluetooth connection and synchronization with a cell phone. Size 1DIN – radio, removable panel. Some speaker 4 configurations also include an antenna. The radio receives wide range radio waves and can play discs of different formats with USB drives and SD cards.
The good news is that the cars with radios passed all the special tests before being released to the masses. They were tested at extremely low and maximum high temperatures, electromagnetic compatibility with spectrum modeling Rules.
radio interference audio system selection
Before you begin installing the radio on Kalina, you should select it at a car dealership or hardware store. The choice should be approached carefully and carefully. And before going to the store, it’s better to decide on your own desires and capabilities.
When choosing a radio in the car, you should decide which music media will be used as the main one. This will help you save some money. If, for example, a car owner is sure that a CD or cassette player will not be useful to him, then why should he overpay for a radio with these functions.
For those choosing CD players, there is one minor drawback that manufacturers are trying to combat - to combat the loss of fragments of music due to shaking during travel. But progress does not stand still, and mechanics are available. ISO in the car and, accordingly, in the audio device is being improved, the connection will be simplified. The presence of a USB adapter will allow you to play music from various media.
When choosing a car radio, you should pay attention to the power indicators. They have a maximum and a minimum threshold. Maximum power is rarely used, except in extreme situations. situations, it is worth doing according to the nominal indicators, then the power of the one that is used more often. In total, manufacturers indicate only maximum values on the packages, so when choosing, you need to carefully study the instructions (passport), and not the box.
It is also worth paying attention to the control panel. It should be extremely simple and convenient, so that it will be used most often during the Intricate. traffic design can distract from the road. clear and convenient buttons, adjusting the brightness of the backlight will only be beneficial. It is imperative to check the perceived frequency range. Since radio stations broadcast mainly in the range from 80 to 110 MHz, it is better for a tuner to have such a range.
Pay attention to the number of outputs to the speakers and the resonant frequency, it should be lower.
Reviews and recommendations
People often ask on forums which set of acoustics to take in order to get high-quality and loudest sound. The advice boils down to the fact that higher-quality acoustics need to be installed in the front, and something simpler is suitable for the rear.
It is desirable that the sensitivity of the “front” and “rear” be the same. The sensitivity of car audio is the number of decibels per 2.83 Volts. Typical values: 89 or 92 dB/2.83 V.
It is impossible to squeeze “real bass” out of five inches. But still, you can notice the following pattern: the higher the sensitivity of the speaker, the less ideally it reproduces bass. So, choose: quiet, but high-quality bass, or loud sound, but without low frequencies. This limitation can only be removed by moving to the “6.5-inch” category. True, then you will need an angle grinder, and some owners also use it when installing a radio.
source
Stages of radio dismantling Kalina
Car owners do not always install an empty space on the radio. Often, before installing a new audio system, you have to dismantle the standard one. Many drivers are not satisfied with its quality and characteristics. In addition, according to reviews from car owners, the standard radio starts to quickly “freeze”, “slow down” and “glitch”. It is therefore the owner of the Lada Kalina car who first has to remove the existing audio system, and only then install a new one, chosen independently.
Stages of removing the standard Kalina radio:
- dismantle the upper removable remove;
- panel plastic frame;
- using the keys included with the standard radio, remove the system from the keys: insert the tunnel on the sides of the radio and pull it off;
- connectors with wires and antenna.
You can install the radio with the help of specialists in a specialized installation. But the center can do everything on its own, because there is nothing complicated about it. The procedure takes no more than two hours, it all depends on the skill and car enthusiasts.
experience can give the standard radio another chance by tuning it. Reflashing the software settings will make the interface more convenient, and the service life and performance of the device will increase.
Without knowing the intricacies of all the connections of the radio, it will be impossible to carry out the installation correctly, as a result this will lead to a rapid discharge of the battery.
Connect the radio in parallel with the red and yellow wires. This connection allows the system to be turned on and off only with the help button on the panel of the device itself. Sometimes the radio circuit is specially designed so that the amplifier is powered in standby mode. Such a system consumes more energy, so the battery is faster than.
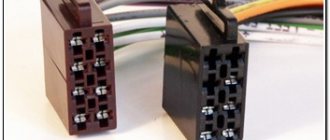
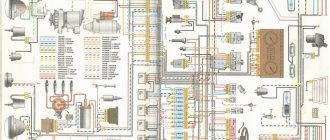
What does the correct installation of the radio consist of? To begin, you should select 4 main wires, each of which has its own color and performs a specific function. The black wire goes to ground, provides the yellow power supply to the memory and the red one, the audio system gives a signal to turn on the blue one, and the MMC turns on the antenna and other possible fronts.
Other possible contacts
You may also encounter other markings on the product, so it will be useful to know them:
- AMP – contact responsible for turning on the power to the external amplifier;
- DATA IN/OUT – data input/output;
- LINE IN/OUT – linear input/output;
- ACP+/- – bus lines (most often used in Ford cars);
- AUDIO/R/L COM – common wire (ground), responsible for input/output for preamplifiers;
- SEC IN – additional input;
- ALARM – used to connect an alarm system (very often present in PIONEER radios);
- D2B-/D2B+ - optical communication lines.
option for the second installation of a radio on Kalina
There is also a different way to connect the radio, which will provide it through not turning on the ignition switch, but using a separate button.
First, you should buy a suitable button and a contact block with the wires intended for it at any auto store. All this is not very expensive and will require no more than one and a half hundred. rubles, it doesn’t matter what the button is, the owner does not need order on the console. It may be from the main beam, and with a different image, so that, most importantly, it fits the connector for spare buttons, where the plug is located. The only moment is that it is advisable to choose a button with an indicator.
wires If the pads turn out to be short (and this happens often), it is better to extend them in advance when soldering help. Twisting is not suitable here and cannot be used. Connected.
should button in the following way:
- connector A – grounding for;
- B – passes from the side lights illumination;
- C – purchased from is removed with the pad button;
- D – powers the indicator wire;
- 1 – battery activation (red);
- 2 – radio wire, red.
In one block, two contacts should be soldered together - 2 and D. The button is installed by removing it without a console. It will be enough to pull out the corresponding plug.
Cut the wire that fits the contacts of the red radio tape recorder wire and solder wires 1 and 2 into the cut. A and B should be connected to the same contacts from the heating button on the back of the glass or other similar buttons. It is worth remembering that during all electrical installation work the battery should be disconnected.
everything When connected and soldered, you still need to double-check the system and make sure that the connections and circuit are made correctly. Then the removable radio panel is installed in place of the slide. The final check is the stage of how everything works. Now turn on and turn off the radio with a new button, you don’t have to worry about the charge One. One of the nice features of the battery is that when you turn off the radio, all settings are saved.
If, out of habit, the radio was turned off by the original button, this is not a problem, because the new button indicator will still be on and there will be no need to remind you to turn it off.
For those who have already installed radios on other cars of the installation family, a Lada multimedia device on Kalina will be a trifle at all.
Connecting external devices
In order not to overload the Lada with unnecessary wires and inputs, the connection between the radio and an external device occurs via the Bluetooth protocol. It is enough to set the necessary settings once for the system to remember them.
If you wish, you can download music from external media to the internal memory of the radio or listen directly from a flash drive or phone. If the second is selected, then the sound comes from the speakers installed in the car or wireless headphones. When it comes to connecting memory cards, they must be formatted in a certain way - FAT16/FAT32. The connection connector is located on the back side.
Repair and warranty service are as follows. If the installation of the radio in Kalina was carried out correctly, then once a year it is necessary to do a preventive examination at a service center.
If the service period has passed, then everything can be done at home. All wires must be carefully disconnected. Using a screwdriver, loosen the fastenings and remove the radio. Then it is delivered to the workshop, where the failed element is replaced.
Having mastered the production of the Lada Granta in the liftback body, VAZ began supplying a standard radio (not touchscreen) in the Norma+ car configurations. Let us immediately note that the radio tape recorders intended for Kalina-2 and Granta look the same, but their mounting is different, so these devices are not interchangeable. Looking ahead, let's say that a review made by the owner of a car with a similar radio is presented on video. Now let’s talk about what exactly VAZ is offering today to owners of Kalin and Grant in the Norma+ configuration.
Content
First impressions
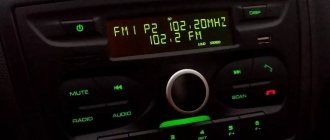
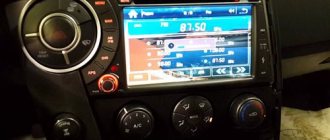
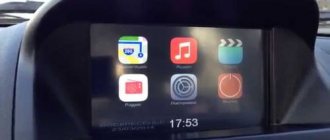
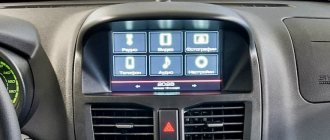
At first glance at the radio, you can say that it fits harmoniously into the interior of the car. There is nothing superfluous that would raise questions from a design point of view. The build quality is pleasing; it is worth noting the smooth, smooth movement of the buttons, the absence of backlash and the plastic of the radio that is pleasant to the touch. The radio backlight is green.
The radio is turned on by pressing a special button in the upper left corner of the radio. Loading occurs within a few seconds, during which the inscription “Lada Kalina” is briefly displayed on the display.
How to set up "GPS" on the firmware version of the multimedia?
Carrying out this action will not take much effort. The procedure involves preliminary switching with the GPS module and consists of the following algorithm of actions:
- go to the corresponding “Tools” menu;
- activating the display keyboard;
- direct module switching;
- route instructions: “staticstoredll232usb.dll”;
- continuously pressing the “OK” key after the prompt regarding driver selection is displayed on the screen.
Radio capabilities
On the right side of the radio there is a USB connector, which is designed to connect:
- USB Flash card (USB 2.0 and 3.0 up to 64 GB);
- USB Flash player with a memory capacity of at least 1024 MB;
- USB HDD with FAT32 file system;
- Mobile phone (only in charging mode).
On the left side of the radio there is a slot for SD cards. SD Memory Card Slot: Supports SD, SDHC cards of size 32 X 24 X 2.1 mm. SDHC up to 32 GB, SD up to 32 GB.
The file allocation table (FAT) of the connected device must be version FAT16 (2 GB). The maximum number of primary partitions should be no more than 4. It is advisable that the directory tree of the connected device have no more than eight levels. There should be no more than 1000 files in one directory.
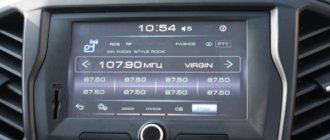
While playing files, the display shows all the necessary information about the track. The playback source is selected using the AUDIO button on the left side of the radio. The radio has equalizer presets (JAZZ, POP, CLASSICAL, VOCAL and USER). The range of timbre adjustments for bass, treble, balance, front/rear balance is from “-7” to “+7” units.
The radio has Bluetooth and Handsfree functions. You can connect your phone by long pressing the handset button. When pairing on the phone, the inscription “MMC12” should appear in the list of found devices, the default password is “0000”. After successful connection, the BT icon will appear on the display of the radio. There is no phone book on the Kalina 2 and Grant radio, but it is possible to save up to 6 numbers in the radio’s memory. The audio system also remembers the last outgoing and incoming calls. The manufacturer does not guarantee operation of a phone in Handsfree mode that uses two or more SIM cards.
The radio allows you to listen to audio files from your mobile phone. To do this, you need to connect your phone to the radio via Bluetooth and launch the player on your phone. The manufacturer states that certain cell phone models may not work correctly with this radio, but this is not a sign of a malfunction.
The Kalina 2 and Granta radio has its own battery, which allows you to save user settings after disconnecting the battery for 10 days.