If you have been told that the standard player installed in your Lada Kalina Sport needs firmware, do not be alarmed. And feverishly go over in your memory which of your friends knows how to operate a sewing machine or remember the address of a nearby studio. This of course applies to older people. Modern youth know very well that changing the current operating control system installed in a computerized device, in order to improve the quality of already installed options and connect new ones, is called firmware.
Firmware in iPhone style
Types and features of software changes
Based on their types, operating systems that control the computer brain of any device can be divided into two groups:
- Standard (stock) software made for a specific type of device by a company that develops computer programs. And installed at the factory by the car radio manufacturer under a license agreement.
- Custom or, more simply put, homemade. Made by a programmer independent of large companies/
Based on the opinion of people involved in the development and implementation of computer innovations, any program contains at least one error. It is precisely for this reason that during the operation of electronic equipment the need for its improvement arises. Which entails the emergence of new versions - firmware, standard operating system.
Before continuing on the topic - firmware for the standard radio of the Lada Kalina 2, I would like to warn owners of any brand of car about the consequences of the decision to reinstall the standard software.
Independent changes in the technical device and OS of the car radio automatically deprive you of the right to warranty service provided by the manufacturer when purchasing their equipment!
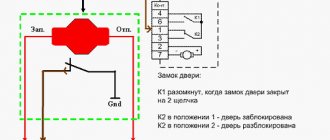
Two configurations and two schemes
In the “Norma” version, if it has a central locking system, you can use two control wires. Ground is supplied to one of them if the locks need to be opened, and to the second one if the locks need to be closed. The period of connection to ground should take 0.7 seconds, and most alarms have such a setting.
If we talk about the “Lux” configuration, the control wires will not help us here. The relay contacts built into the alarm will have to be connected to the breaks in the power cords. Despite all the complexity, there were no complaints about this scheme, and we will consider it right now.
The “luxury” option is the most complex
First you need to make sure that the central locking system in the car is really connected according to the “Lux” scheme. The control button located on the door must be trigger (non-latching). If you have exactly this type of car, you will have to tinker. It will be necessary to extend 4 power cables to the signaling unit. These cords, in turn, must go from the break point of the two standard wires (yellow-white and yellow-black). Find them in the bundle under the threshold.
Any alarm system is supplied with two relays, one of which is activated for closing, the second for unlocking the locks. Power cables drawn from the break points are connected to the relay contacts.
The part of the yellow-white wire that goes to the actuators is connected to the common contact. Another relay contact (normally closed) is connected to the second half of the cable. They connect to the yellow-black wire in a similar way, but here an opening relay is used, not a locking one. Each of the normally open contacts receives power.
Any power wiring is supplied with power through a fuse.
In our case, the rating “15 Amperes” is used. Immediately before installation, you need to call the pair of wires that are directed to the actuators. The probe should show a value of 1.2 - 1.3 Ohms. And of course, when performing installation work, you first need to remove the negative terminal from the battery. Be careful!
Connection option for “Norma”
Let's say there is a switch in the driver's door, but it has two fixed positions. Then it will be easy to connect the alarm. You will need to make not 4, but 2 taps, and not from the power cords, but from two signal cords. There is no need to make breaks, just make a T-shaped connection. The diagram here looks standard:
You can complete the installation without breaking the wires at all.
In the circuit discussed above, there is no fuse. We connected to the signal wiring, not the power wiring, and theoretically we can not be afraid of any short circuits. Still, it is better to insulate the free terminals on the signaling. The same applies to all connection points.
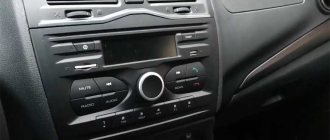
Standard sound reproduction equipment of Lada Kalina 2
As for the standard equipment of the Lada Kalina 2, the situation here is not clear-cut. Due to the fact that the manufacturer installs different types of audio systems on different models (Sport, Luxury).
It could be:
- Player with push-button control (no touch screen control).
- Double-din radio with touch controls.
- Multimedia system (MMS) with a full set of all options and functionality that meets the highest, modern requirements.
Since we are interested in the firmware of the Kalina 2 standard radio with the ability to use the navigation system, in the future we will only talk about the MMC Lada Kalina Sport.
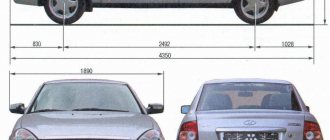
Installing a radio in a Lada Granta with your own hands. Advice from the experts
Since the beginning of 2011, all Lada Granta models have been manufactured with audio preparation: factory radios and receivers. The quality of reception and sound is not always at the highest level due to its cheapness and simplicity. When purchasing a Lada Grant from the showroom, the owner receives audio preparation, acoustic wires, and installed electrical wiring.
The door panels have already prepared openings for installing speakers. True, few people use the standard seat, as they prefer the rear shelf to improve the sound.
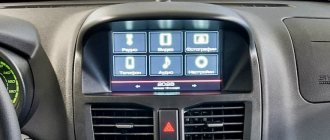
Description and characteristics of the Kalina 2 multimedia head unit
To list all the capabilities of the multimedia system that is installed in the Kalina 2 car, you will need a separate article. So we will name only the main functions of this device.
The ability to use a GPS navigation system and create a travel route based on traffic jam data received in real time from the Internet.
Displays images from rearview cameras and information from parking sensors.
High-quality audio and video files from storage media of any type. Including a television signal.
4G mobile internet connection.
All technical characteristics, as well as the design of the MMC Lada Kalina 2, fully comply with the requirements for equipment of this class.
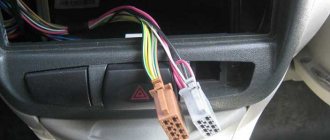
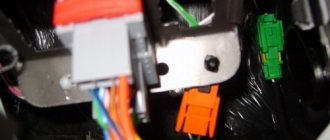
How to connect a Lada Granta head unit with a 1-DIN connector
- We carry out the work inside the car, having previously disconnected the terminals from the battery in order to prevent a short circuit in the circuit;
- We remove the plastic partition - pocket. It covers the hole, preventing objects from falling inside the torpedo. We use a flat-head screwdriver to unscrew the bolts;
- Two ISO plugs are visible behind the partition body. These types of wire terminals are manufactured in accordance with international automotive standards. More than 98% of all automakers use the standard when equipping technical equipment;
- We remove the metal frame - the block - from the body of the audio unit and place it in the cavity of the torpedo.
- We first connect the blocks with wires. Fitting into the connectors is accompanied by a characteristic click;
- We insert the module into the metal frame.
Note to the driver. Incorrect terminal connections result in a short circuit. To ensure the safety of the connection process, the connectors have guides that allow you to install the block in only one position.
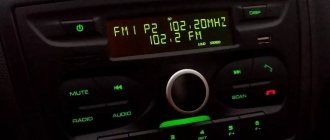
Firmware for radio Kalina 2 Lux
Despite all its advantages, Kalina's MMC car also has some disadvantages. However, getting rid of them is not very difficult. You can fix and improve the quality of standard equipment and additionally connected devices (navigation, rear view cameras, etc.) by flashing the OS.
Firmware for radio Lada Kalina 2.
To do this, you will need a five (5) GB SD card edited in FAT. In the future, if necessary, the exFAT format can be used. The sequence of operations performed is as follows:
- Copy the desired firmware version to the flash card. The average size of a version is about four Gigabytes in FAT.
- Transfer the files from the “FirmWare” folder to the root folder of the SD card.
- Remove the flash drive from the USB.
- We install it (SD card) into the USB connector of the car player.
- Reboot the GU by long pressing (at least 15 seconds) the power button. As a result, a reinstallation will occur and the MMS will automatically install itself into the desktop menu mode.
- Without turning off the player, we adjust the screen (by pressing the “Recalibrate” sensor). At the end of the countdown, click on the display.
- We reboot the radio again, but with the flash card inserted. As a result, the updated menu is loaded.
Sometimes, after finishing the firmware, the “Lada” logo may freeze on the screen. Which indicates problems with the flash drive. There's nothing wrong with that. Just reformat the card again (replace with another) and flash the car radio according to the announced scheme.
Where to download a free update for your car radio
The manufacturer of Kalina installs one of two versions of the operating system on the car radio. 32nd or 35th. You can change them to the hybrid version 38 by registering and downloading this firmware version for free on the website 4pda, widely known among car enthusiasts.
In general world practice, manufacturers, as new operating system updates appear, publish information about them on their official websites.
Unfortunately, AvtoVAZ does not provide such care for the owners of its cars and equipment. Which, in principle, does not cause any surprise among our users of this car brand. In conclusion, video instructions on how to download the radio firmware for Kalina 2.
Why is the standard option not suitable?
The standard instructions contain information about the connectors installed on the rear wall of the radio. The signal connector, which is designated by the letter “C,” contains three groups of contacts. Group “1-6” is just what you need to connect external equipment. Taking the signal from pins 1 and 2, it can be applied to the low-voltage inputs by extending the ground conductor from pin 3. This option is standard.
Wiring out the touch radio connector
However, do not rush to buy a terminal block suitable for the specified connector. We won't need it. According to reviews, the standard connection option has disadvantages:
- Any external device (amplifier), along with the useful signal, receives high-frequency interference. We are talking about using connector C;
- It would seem that HF interference is not dangerous for a subwoofer. However, by connecting its inputs to pins 2/3, you can observe the following effect: when you start the motor, a hum comes from the speaker.
These defects are irreparable. However, no one bothers you to use high-voltage outputs (connector B). But since the subwoofer is equipped with a low-voltage input, matching will be required. Looking ahead, let's say: a transformer is supposed to be used.
There really can be no complaints about the quality of the products produced. If you connect the radio outside the car body, these defects are absent.
Rules for choosing an audio system
Before you begin installing the radio on Kalina, you should select it at a car dealership or hardware store. The choice should be approached carefully and carefully. And before going to the store, it is better to decide on your desires and capabilities.
When choosing a radio for your car, you should decide which music media will be used as the main one. This will help you save some money. If, for example, a car owner is sure that he will not need a CD or cassette player, then why should he overpay for a radio with these functions.
For those choosing CD players, there is one minor drawback that manufacturers are trying to combat - the loss of music fragments due to shaking during a trip. But progress does not stand still, and the mechanics are improving. The presence of ISO in the car and, accordingly, in the audio device will simplify the connection. The presence of a USB adapter will allow you to play music from various media.
Pioneer model range
When choosing a car radio, you should pay attention to the power ratings. They have a maximum and minimum threshold. Maximum power is rarely used, except in extreme situations. The choice should be made according to the rated power, that is, the one that is used most often. Manufacturers often indicate only maximum values on packages, so when choosing, you need to carefully study the instructions (passport), and not the box.
It is also worth paying attention to the control panel. It should be extremely simple and convenient, since it will most often be used while moving. Intricate designs can distract from the road. Convenient and understandable buttons and adjustable backlight brightness will only be beneficial. It is imperative to check the range of perceived frequencies. Since radio stations mainly broadcast in the range from 80 to 110 MHz, it is better that the tuner also has this range.
Pay attention to the number of outputs to the speakers and the resonant frequency, it should be lower.
Installation and connection
Hyundai car radio connector pinout
Hyundai car radios (see 2 din Hyundai car radios: review and installation) can be installed and connected from scratch with your own hands. This process is creative and does not require any special knowledge. It is enough to use the pinout presented above and some important points that we provide below.
Built-in and stationary
First of all, you need to remember that car radios can be installed differently. Head units can be built-in or stationary. Built-in ones today are most often found with a removable front panel. As for car radios built-in on skids, they are less common.
Technical characteristics of the radio
Kalina's standard audio system
Technical characteristics of the standard radio in the Kalina “Lux” configuration:
- 2DIN touch screen;
- presence of stereophonic radio;
- ability to play multimedia files;
- ability to synchronize with a cell phone;
- work with bluetooth.
Device development - WindowsCE 6.0. RAM - 128 MB. Fifth generation central processing chip. These characteristics cannot but please fans of AvtoVAZ products, because now the car has become much more pleasant to drive.
Radio tape recorder Kalina: technical characteristics in the “Norma” configuration differ from the “luxury” one in the absence of a touch screen, Bluetooth connection and synchronization with a cell phone. The size of the radio is 1DIN, removable panel. Some configurations have 4 speakers and an antenna. The radio receives wide range radio waves, can play discs of different formats, and work with USB drives and SD cards.
It is also good that cars with radios have passed all special tests before being released to the masses. They were tested at extremely low and extremely high temperatures, electromagnetic compatibility was checked with modeling of the radio interference spectrum.
Nuances of installing an audio system
Dismantling of the standard audio system is completed
Without knowing all the intricacies of connecting the radio, it will be impossible to carry out the installation correctly, as a result this will lead to rapid discharge of the battery.
Connect the radio in parallel sequence with the red and yellow wires. This connection allows the system to be turned on and off only using a button on the panel of the device itself. Sometimes the radio circuit is specially designed so that the amplifier is powered in standby mode. Such a system consumes more energy, so the battery drains quickly.
What is the correct installation of a radio? To begin with, you should highlight 4 main wires, each of which has its own color and performs a specific function. The black wire goes to ground, the yellow one provides power to the memory and the audio system itself, the red one provides a signal to turn on the MMC, and the blue one turns on the antenna and other possible devices.
Before connecting, professionals recommend assembling a simple circuit that will allow you to connect the radio through the ignition, due to which the battery will be charged much longer. When working with wires and circuits, you will need to pinout the connector. This will make the circuit easier to work with and understand.
The circuit is assembled in the following order:
- two diodes are soldered onto the board - VD1 and VD2;
- the red wire is soldered to the VD1 anode;
- another red wire is soldered to the cathode of VD1 and VD2;
- both blue wires are connected to the VD2 anode.
The joints can be protected with special cambrics - this will avoid breakdowns.
Before connecting the circuit, you will have to remove the radio and the slide; it is not necessary to remove the console.
All wires must be connected in the correct order:
- wire No. 1 is connected to the contact from the rear window heating button;
- The 2nd wire is connected to the multimedia system;
- wire No. 3 is soldered to blue, which is responsible for turning on the antenna;
- The 4th wire is soldered to the blue antenna wire.
The previously assembled board can be secured inside the torpedo with a fixed tie. When connecting all contacts, only the soldering method, insulated with heat shrink, is used. Screwing of wires is excluded. Before starting work, be sure to disconnect the battery.
With this connection, the radio will turn on only when the ignition is turned on, but if it is turned off, it will continue to work until the driver turns it off. Restarting is possible when the car is started again.