Which radio should I choose?
Most leading masters offer two options for improving the functionality of the car:
- Installing a standard head unit.
— Select one of the available 2 din radio options. It is recommended to entrust the installation of the device to real professionals with many years of experience in this field. Of course, you can try to install it yourself if you have certain knowledge in this area, as well as a set of necessary tools.
The main advantage of the first option is the preservation of the original design of the car interior. The second option opens up wide functionality for the driver. In addition, the 2 din radio is a universal option, therefore it is especially popular among vehicle owners.
Some tips
I recommend taking advantage of the opportunity while everything is sorted and carrying out some simple procedures to improve quality. These tips may seem trivial to you, but they will help extend the life of the new audio system for an extra year or two. First, tin the wires and solder them.
This procedure will prevent the sound from losing quality even during prolonged use. Use female/male connectors. This method will be more effective and easier than soldering. Use heat shrink tubing. They will help maintain the quality of wire connections and extend the time it takes to resolder.
What additional features can I get?
It is necessary to understand that installing 2 din requires a professional approach in order to obtain the most positive end result. In addition, it is difficult to independently understand the wide range of radio tape recorders presented, which are characterized by individual functionality. To choose the best option for your car, you need to consider your own needs and desires. In addition, you can always get advice from real professionals who will help you make the right choice.
The main advantages of installing 2 din:
— Possibility of connecting to the Internet.
— Data transfer using Bluetooth.
— Availability of GPS functions.
— Additional options open up, such as installing a rear view camera, DVR and TV tuner.
— Availability of remote control and touch screen.
— More functionality of the standard radio.
In other words, installing a radio makes driving as comfortable and enjoyable as possible for every VAZ 2114 owner. Moreover, the installation should be entrusted to real professionals with many years of experience in this field.
In conclusion
As you can see, installation of the radio is simple and for the most part requires only your desire
The main thing to note is that with any modernization not intended for the design, it is necessary to take care of the insulation of electrical connections and thermal insulation of coolants (corrugated air ducts)
The torpedo of the fourteenth, like most modern cars, is made of synthetic, flammable materials, so the issue of safety is very relevant. If you are not confident in your abilities, contact a professional workshop, because it is much cheaper than a burnt-out car.
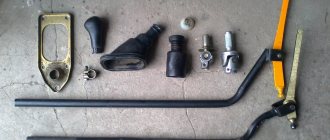
Installing a 2 din radio in a VAZ 2114
It so happened that after the sale of my dad’s car, we were left with a JVC two-din radio with a touch screen and everything was fine. Well, since this is the case, I decided to get confused and shove it into my little car.
It all started with trying on the location of the radio tape recorder
Then I finally decided that I should try to preserve the air ducts (in severe frost they are very cool to warm your hands)))
Then I made the fasteners
I cut a hole in the panel and figured out what it would look like
Foamed and puttied the panel shield
I sprayed it with black paint, again to see what I could see.
Then I puttyed and sanded several more times, painted everything with anti-gravel in several layers and here is the finished result
That's all, the result in my opinion is not bad, my mother and sister liked it (but no one else has seen it yet))))
Hello, dear readers of our site! Today I want to discuss with you such a topic as installing a 2 din radio. This is a fairly common solution among motorists who want to expand the capabilities of their existing audio system.
As practice and reviews from many car owners show, it is not difficult for them to install such equipment with their own hands.
Let me immediately note that the concept of 2 din refers to the standard size of the radio, which is 180 mm or 7 inches in length and 100 mm or 4 inches in height. If the parameters are 180 by 50 mm, then you have a single-dyne system. Don't worry, because putting 1 din instead of 2 din is just as feasible as doing the opposite. You only need a special frame or adapter bracket to install a non-standard radio.
The ignition switch of the VAZ 2109 is faulty.
The most common problem with the ignition lock is its working out and jamming. If these symptoms occur, you should immediately replace the entire ignition switch, because in case of jamming, you can simply burn the starter and then the repair will cost you the cost of the starter. Another common problem is the failure of the contact group. In this case, several devices fail at once. For example, my low beam headlights, heater, cigarette lighter, and rear window heater immediately stopped working. Replacing the contact group with a new one, everything worked immediately.
© 2022 Repair and tuning of domestic cars Joomla! is Free Software released under the GNU General Public License.
Features of Chinese radios
It’s not for nothing that the title of the material includes the concept of a Chinese 2 din radio. Why not? Who is against installing Chinese devices on cars? Write in the comments and justify your decisions.
In general, there is absolutely nothing wrong with a Chinese radio. This can be explained very simply.
Almost all car radios can be considered Chinese. Why? Everything is elementary. Leading manufacturers, including Japanese, European and American brands, prefer to carry out assembly in China. This is due to financial gain. Collecting everything in China, including radios, is very cheap. Hence the conclusion that most of the radios offered on the market are from China. But here it is also important to determine which Chinese product we are talking about.
All car radios can be divided into several categories. Moreover, I advise you to study this issue separately in more detail.
Each category of car radios is sold in Moscow, St. Petersburg, Ufa, Kyiv, Minsk, Volgograd and through online stores. Only their prices are slightly different.
Price is a largely determining factor in choice. When buying a Chinese radio, you actually choose one of 3 options.
- Radio tape recorders manufactured to order from leading manufacturers. These include Sony, Pioneer, Kenwood, etc. There are clear regulations, rules and standards from which the contractor (factory in China) has no right to deviate. This allows you to obtain very high-quality devices at low manufacturing costs for the brand owner;
- Chinese brands. These are well-known companies that offer radios under their own brands on the international market. The quality may be a little lower, but the price is appropriate. In most cases, they copy or make radios as similar as possible to devices from leading radio manufacturers;
- Unknown Chinese brands. These are radio tape recorders with an incomprehensible name and the same origin. If this is your first time hearing about the company and you can’t find anything really about it on the Internet, it’s better not to mess with such a 2 din radio.
The most popular models and their characteristics
Before connecting the car radio to a VAZ-2114 car, study the rating of the best models based on user reviews.
- Sony DSX-A212UI. An inexpensive (up to 3,000 rubles) model with adjustable backlight directly plays tracks from a smartphone. For lovers of rich bass, there is an “EXTRA BASS” key, there is also a USB port for flash cards and mobile phones, and a 10-band tone block that allows you to adjust the pitch and timbre of the sound. Four amplifier channels have 22/50 W of power.
- KENWOOD KMM-304Y. Priced from RUB 6,100. you will get a device with 4x50W at peak power. The radio supports iPhone/iPod and RDS. If desired, you can connect a joystick for control from the steering wheel. The advantages of the device include multi-color adjustable backlight, 11 equalizer programs (tone block).
- Pioneer DEH-S5000BT. For 8,980 rub. The Japanese one offers a car radio with a one-color screen, radio, and playback of tracks using AUX, USB or CD. Device power – 4x50 W. Connecting a car radio in a VAZ-2110 car with your own hands is not difficult - detailed instructions are included. The equipment supports Android and iOS operating systems - you can “talk” with Siri.
- JVC KD-X355. The price of the product on Yandex Market is from 6,100 rubles. For little money you can buy a radio with adjustable backlighting and the ability to charge your phone. The radio supports all modern formats.
- Pioneer SPH-10BT. Install the Smart Sync application on your gadgets (there is a holder for a smartphone) and configure the sound parameters of the car radio you need. The device from the Japanese manufacturer performs voice commands, and it is possible to connect a parking sensor.
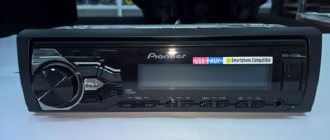
Radio Pioneer DEH-S5000BT
- JVC KW-X830BT. A multifunctional beautiful car radio is available at a price starting from RUB 7,500. To control the system via Bluetooth, download applications for iOS and Android from the AppStore or Play Market. Audio encoding format – FLAC up to 24 bit, 96 kHz. However, the device does not read drives larger than 32 GB.
- Pioneer MVH-S610BT. The amplifier power of the device is 4x50 W, the price is from 7,400 rubles. The receiver screen displays 12 characters. Spotify support provides access to millions of audio files, movies and clips.
- Alpine CDE-W296BT. The manufacturer has retained the ability to listen to tunes from CDs on the device, which will please CD collectors. The radio synchronizes with the smartphone via Bluetooth, but does not read tags in Russian. Price – from 19 thousand rubles.
- KENWOOD DPX-M3100BT. The information on the matrix-character monitor of the car radio is clearly readable even in bright light. You can listen to music in five modes, there is a USB port and AUS, as well as a Bluetooth module - these are the advantages of a car radio for 6,800 rubles.
- Pioneer FH-X730BT. This is a great "pioneer" development that supports Apple. The equipment plays music via Bluetooth, as well as USB, AUX. You can turn on car audio from your smartphone. Price – from 8,100 rubles.
Radio tape recorder KENWOOD DPX-M3100BT
Connection nuances
I think no one will have any problems or difficulties in removing the stock radio. There is an instruction manual and a number of videos online that can help you do the work step by step.
There is no point in describing the removal and installation procedure, since each machine has its own dismantling nuances. But most often 2 din are installed:
- to Granta;
- Ford Focus;
- Lada Kalina 2;
- Kia Rio;
- VAZ 2110;
- Lada Largus;
- Lada Priora;
- Renault Logan;
- Renault Sandero;
- VAZ 21099;
- VAZ 2114;
- Nissan Almera, etc.
If you have a regular radio, you can easily replace it with more functional and multimedia-rich 2-din equipment.
The manual included with your Chinese radio contains clear and detailed operating instructions.
To make it easier for the user to connect, there is also usually markings on the rear panel of the device for the nodes and required connections.
Practice shows that the main difficulties when installing 2 din arise for those who are engaged in such activities for the first time. Moreover, the most difficult thing is to correctly connect the electrical wiring, find the necessary connectors and combine the new radio with the existing contacts. But if you know the pinout and understand where roughly what is inserted, it won’t be difficult to figure out the connection. And the main element in this matter is a connector called ISO.
It is he who is the main character in the issue of installing a Chinese double-din radio on a car.
ISO connector and pinout
How exactly you will install the new radio in the cabin directly depends on the design features of your car. But all machines in this matter are similar in that an ISO connector is required to connect 2 din.
We are talking about 2 plug boxes (A and B). In some cars, the boxes are combined, but are still divided into 2 sections. Moreover, each section has 8 contacts. The first box or section serves as a power connection plug for the equipment (our Chinese radio), and the second box or section B is used for car acoustics.
Let's start with the first section. It has 8 contacts. The pinout here is as follows:
- 1 contact is not used;
- 2 contact is not used;
- 3 like the previous ones;
- 4 yellow cable is the power cable and goes to the battery;
- Pin 5 in the form of a blue wire leads to amplifiers and an external antenna;
- Pin 6 is an orange cable responsible for the backlight;
- Pin 7 is red and goes to the ignition;
- Pin 8 is painted black and this is our mass.
As you can see, everything is quite simple and clear. It is only important to have instructions and a pinout diagram on hand.
There is nothing complicated about the next block or section B, just like in the case of A.
- Pins 1 and 2 in the form of purple and purple-black go to the plus and minus on the right rear column;
- Contacts 3 and 4 are gray and grey-black. This is the plus and minus on the front right speaker, respectively;
- Contacts 5 and 6 are available in white and white-black. Here we are talking about connecting the front left to plus and minus;
- Contacts marked 7 and 8 are made in green and green-black wire colors. Responsible for plus and minus on the rear left speaker.
When you make the connection, be very careful not to mix up the wiring contact groups. Otherwise, you risk not only the sound quality, but also the integrity of the entire car radio. And sometimes even all the electrical equipment in your car.
If you have experience connecting 2 din in your car, be sure to share your secrets and personal observations in the comments. Perhaps you have something to add to this material.
How to connect and install
It is recommended to install and configure any musical device on the VAZ-2114 in accordance with generally accepted rules. Only in this case will the equipment work efficiently and perform all its functions.
- What is the bolt pattern on a VAZ 2114 – wheel sizes, explanation, how to install 4×100 wheels
Connection
To connect a radio to a VAZ-2114, just familiarize yourself with the procedure provided for any similar model (2115, 2109). The only difference will be in the location of one or another wire.
Connect the radio using this method:
- Connect the musical equipment connector to the positive and negative poles of the power source (battery). In this case, the cigarette lighter plug can be used for switching.
- Remove the cables from the speakers and connect them to the corresponding outputs on the device plug.
- As soon as the wiring is connected, all potentially dangerous places are isolated using special tape. You can additionally protect the cable from accidental contact and the negative effects of moisture by using a corrugated tube.
- An antenna is installed on the inside of the windshield or roof of the vehicle.
- The cable running from it to the dashboard is laid under various parts of the car's interior trim.
- The wire is connected to the radio directly or through an adapter.
Scheme
In order to check the correctness of the connection, it is necessary to draw up its diagram. With its help, you can identify mistakes made and correct them as quickly as possible.
The diagram should indicate the location of the following wires:
- Red. It should go from the radio to the ignition switch.
- Yellow. It is connected to the positive terminal of the battery and the corresponding connector on the back panel of the connected device.
- Blue. This cable must be used to connect the speaker system to the antenna.
- Green, purple, gray, white. All these wires should be routed to the two front and rear speakers.
- Black. They connect the radio to the negative pole of the battery.
Installation
Installing a radio on a VAZ-2114 is a difficult task, which is recommended to be performed only after careful preparation. Otherwise, you can easily make a mistake that will not allow the device to function normally.
You can install the radio in the following way:
- Installation on a VAZ-2115 or 2114 begins with removing the dashboard trim.
- After this, disconnect the wire from the negative output of the battery.
- Protective elements are removed from the installed device.
- A mounting clip is installed in the groove and securely fixed.
- At the next stage of work, switching wires and power cables are laid.
- The radio is mounted on a plastic console.
- It is then connected to the vehicle’s on-board network.
- After this, the equipment is mounted in the guide shaft.
- Return the removed decorative panel to its place.
Possibility of installing 2 din in VAZ-2114
The radio for 2114 is an excellent solution for improving the comfort of the car. In this case, it is best to entrust the installation of the device to professionals. Doing this yourself is recommended only for those who have certain skills and knowledge in this area.
The main advantages of installing a 2 din radio in a VAZ 2114 include:
- ability to connect to the Internet;
- possibility of data transmission via bluetooth channel;
- the ability to use GPS functions;
- possibility of installing a rear view camera, TV tuner and DVR;
- more functions of the standard radio.
The 2 din radio is easily installed in the VAZ-2114. To do this, it is enough to have the most minimal skills and knowledge. But if necessary, you can turn to professionals for help.
Main functional features of devices
The main characteristic of DIN 2 universal radios is the presence of a display that can be used for different purposes.
In addition, such systems have the following features:
- Most devices today offer users touch controls. In this case, it all depends on the model, since on sale you can find 2 DIN car radios that are controlled using buttons. However, touch technology has proven to be practical and reliable, which is why it is a hit with many consumers.
- Ability to play files in a wide variety of formats. That is, the radio can be used not only as a music player, but also as a video player, since such systems allow you to work with video files. If necessary, the system can be synchronized with a mobile gadget or tablet, which will allow you to read data from third-party devices. It should also be noted that such systems allow you to read files from different media, in particular, CDs and DVDs, USB drives and SD cards.
- On sale you can find not just music systems, but also radios with navigation. Thanks to the large display, the driver can easily set up and use the system with a GPS navigator. When purchasing such a device, you should focus on the software on which it runs. For example, many users praise devices with the Navitel platform, since the maps in this software are well adapted to domestic roads.
- Built-in Bluetooth adapter. This function is available in every second 2 DIN car radio today. This option allows you to synchronize any mobile gadget that has a Bluetooth option with the head unit. The driver will be able to add contacts from the phone book to the radio, as well as play tracks from portable gadgets. In addition, if the phone is synchronized with the system, the driver will be able to talk on the phone with other subscribers without being distracted from the road.
- Decent sound quality. As practice shows, usually double radios allow you to provide optimal sound quality, of course, if the car has more or less normal acoustics installed (video author - Dmitry Istomin).
Advantages and disadvantages
Let's look at the pros first:
- ease of control and configuration thanks to the large screen;
- affordable price for most devices - you can choose a model according to your capabilities;
- many different functions used to perform certain purposes;
- convenient platform;
- the ability to connect a rear view camera, but it all depends on the model;
- competitive sound quality, especially if the car has normal acoustics;
- Most radios have a TV tuner function, which allows you to watch television programs;
- ability to read information from different media.
But such car radios also have disadvantages, in particular:
- if you prefer a cheap option, you must understand that it will not work as stably as more expensive analogues;
- As practice shows, the TV tuner in most models is very weak;
- Devices running on the Android platform freeze more often than others.
Transition frames for installation
Adapter frame for audio system
Adapter frames are used to install head units in the center console of a car. Modern car manufacturers are doing everything possible to ensure that non-standard radios cannot be installed in their cars. Accordingly, when purchasing a non-standard car radio, the car owner may encounter difficulties in its further installation. It is necessary to take into account that the frames are different, sometimes they can take up a lot of space on the dashboard.
If you install a multimedia system with a transition frame, you will be able to close any gaps that may appear on the center console as a result of installation. The choice of frame is carried out in accordance with the car model, as well as the year of manufacture. If you are the owner of a new car, then it is quite possible that you will not be able to find a frame on sale, since their production begins some time after the car is released (the author of the video is Alexey Vasiliev).
How to install a 2 din radio in a VAZ-2114
First of all, you need to attach the radio frame to the panel and determine the placement location. We choose the place where the radio will be placed and prepare it for future installation. It is necessary to remove the console, pull out the “air ducts” and cut off the partition.
The placement location must be clearly defined. Once you cut out a place for the radio, it will be too late to change it.
To install, you need to cut an opening in the “dashboard”. We attach the radio frame to the panel, having previously calculated the possibility of installing the device taking into account its depth. We secure it with tape or other convenient material and mark the future hole for the radio.
Let's start cutting out the frame. This can be done using a grinder or a grinder. We cut out a hole for the radio. Please note that during installation it is necessary to move the heater controls to the place of the radio. This process requires concentration and accuracy.
We try on the radio so that the dimensions of the device fit the dimensions of the frame. Small flaws can be soldered using the edge melting method using small pieces of plastic. This creates a frame of the desired size.
Damaged parts of the panel will have to be sanded and coated with primer. We sand the dried primer again and varnish the entire panel or only the treated part (depending on the condition), blow it with air and degrease it. For painting, you can use regular spray paint.
It is necessary to unfasten all remaining wires and unscrew the heater control unit from the plastic cross member. Then you should pull out the extension of the central air duct. If the internal piece of the torpedo interferes with installation, you can simply saw it off. Next, we connect all the wires of the new radio to the corresponding wires on the panel.
The 2 din radio in the VAZ-2114 will become a functional and useful device for any car.
Do-it-yourself modification of vases and frets
If you are tempted by the multimedia characteristics of 2DIN devices, then in order for your radio on the VAZ 2114 to become “like native” you will have to worry about modifications.
To do this, you need to acquire the following consumables:
- panel for 2114 (do not spoil the standard one, it may be useful when reselling the car);
- polyurethane foam;
- automotive putties, starting (fiberglass) and finishing;
- epoxy glue (resin);
- primer and paint (the material you will use to cover the panel afterwards);
- sandpaper.
Tools that will be useful:
- jigsaw;
- mounting knife;
- screwdriver;
- automotive spatula;
- brush.
The installation algorithm is as follows:
- We choose a place on the panel for the future radio (remember, the air vents can be moved, and most of the buttons move perfectly within 10 cm).
- We put the slide under the radio and outline the place.
- We cut it out with a jigsaw.
- Now from the scraps we assemble a full-fledged rectangle for fastening the sled. We cut them with a mounting knife and “plant” them with epoxy glue.
- We insert the slides and fix them with screws on four sides (there is a little secret - secure the future radio with a vertical angle offset, then the sun will not blind the screen).
- We select a place for the air ducts and lengthen them, if necessary, using corrugations.
- When the slides are mounted, we blow everything with foam.
- We cut off the foam and cover it with epoxy resin.
- We putty the start, then the finish.
- We prime.
- We paint or cover with self-adhesive.
- We connect the radio in the same way as described above.
We select and install a radio tape recorder on a VAZ 2114
It's no secret that most domestically produced cars are produced by the manufacturer without radios; in the standard place there is a neat plastic plug. And of course, the car enthusiast has a desire to correct this omission of the manufacturer.
Briefly about the history of VAZ
It all started back in 1966, when the ruling, and only at that time, party realized the lack of civilian automotive industry. After collecting and analyzing data, it was decided to build the production and assembly of passenger cars intended for the needs of ordinary citizens; the city of Tolyatti was chosen as the construction site. And already in the winter of 1967, the construction of the plant itself began.
The entire construction was designed for a period of six full years. But according to the customs of that time, everything was completed ahead of schedule - in just over three years. Perhaps we are still reaping the fruits of the plant’s early commissioning to this day. At the end of 1970, the first batch of VAZ 2101 cars was formed and sent, which was almost entirely a FIAT-124 car. In the normal place for the radio there was a simple radio receiver operating in HF/VHF format.
Choosing a car radio for VAZ
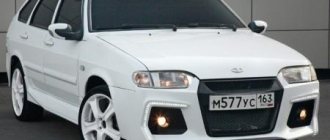
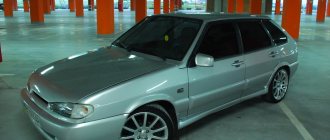
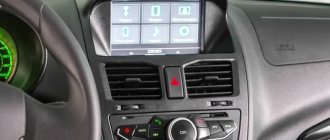
With today's variety of head units and multimedia systems, the choice depends primarily on the owner's wallet. According to many experts, the most successful VAZ model is the VAZ 2114 Samara -2. As you can see in these photos and videos, the radios installed in the seat of the pants fit very well into the interior of the car.
Choosing a car radio for VAZ
With today's variety of head units and multimedia systems, the choice depends primarily on the owner's wallet. According to many experts, the most successful VAZ model is the VAZ 2114 Samara -2. As you can see in these photos and videos, the radios installed in the seat of the pants fit very well into the interior of the car.
Car radio in the car
Nowadays, the most popular radios are those with a 2-din size; if your choice falls on such a car radio, then you will need to cut out a place for it in the dashboard. If the device you have chosen has a size of 1 din, then you will not have to cut anything, since the standard connector for the radio on the VAZ 2114 is exactly 1 din.
Preparing to install the radio
And so it was decided, we install the radio ourselves. What you need for this, first of all, you must obtain installation instructions, purchase all the necessary consumables, and assemble the necessary tools. And when you start, there is no need to rush and take half measures and decisions at random; all this may not come back to haunt you later. If problems arise during installation or when you don’t know what decision to make, you don’t need to rely on luck and ingenuity, you need to contact specialists, of whom there are now a sufficient number.
Features of installing car radios
According to the installation method, modern car radios come in two types: built-in and stationary.
- Built-in car radios are usually equipped with a removable front panel or a special curtain - the devices are simple, but effectively protect the radio from theft.
- Stationary car radios are usually installed by car manufacturers on the assembly line. Their original shape and non-standard sizes save them from theft.
When installing a car radio with your own hands, you need to consider the following features.
Firstly , you need to connect the radio only in accordance with the instructions. Failure to comply with this rule may lead to its failure or even fire. In this case, you should not use installation instructions for other car radios, since even the same manufacturer may have different plugs and wire markings depending on the model.
Most radios have a connection diagram on the top cover, and we will provide a typical connection diagram for a car radio below.
- How much does it cost to install a hydraulic booster on a VAZ 2114
Secondly , you need to remember that the wiring of most domestic cars since Soviet times has been designed for the installation of radios and radios with mechanical settings, which can create additional inconvenience.
For example, in “Zhiguli” or “Samara”, regardless of the position of the key in the ignition switch, voltage is constantly supplied to the power cable of the car radio. But when you turn the key in the lock, the electrical circuit opens for a split second, which is enough to erase all settings from the memory of the radio (if it is not non-volatile).
Installing a radio on a VAZ 2114
You need to know the following if your car is under warranty and you decide to install a radio on it. Then you need to install only radios that have a certificate of conformity. Installation should only be carried out at authorized service centers. And upon completion of the installation, you must make an entry in the “Special Notes” section of your car’s service book. If your car is no longer under warranty, then you can proceed with the installation yourself.
And so we decided to install a 2-din radio tape recorder on a VAZ 2114 car. First, we need to cut out the required hole for the radio tape recorder in the so-called “torpedo”. We need to know that when installing the radio, we will need to move the stove control devices to the place of the radio. And so we cut out the required hole; you can cut it either with an angle grinder using a machine or with a jigsaw. If your hand trembles during the cutting process, then the defects can be corrected by painting, or by soldering plastic to the necessary places.
When installing, you need to know the purpose of the power wires.
- The black wire is always the ground wire.
- Yellow is twelve volt power.
- Blue is the current to the antenna.
- Orange is the backlight of our device.
- Red is power supply at ignition.
So, now we connect the head unit and speakers, as a rule, there are 8 plugs for four speakers, two for each, but sometimes there are 5 plugs, this is for simpler models. Look carefully at the connection diagram of the head unit with the car's power supply; it is always described in detail in the installation and operation manual for the radio. And we connect the wires we need using so-called PPE connectors; these connectors allow us to avoid soldering. As a rule, the wires to the speakers, antenna and amplifier come from the head unit in one stream; it is best to wrap them with electrical tape, for further ease of installation and to avoid unnecessary tension.
After we have connected the head unit, we check the presence of ground using an indicator screwdriver; if there are “sleds”, then we install them first before inserting them into the car’s power supply system. And so we connected all the wires according to the diagram in the installation instructions, once again checked the presence of power and ground, and installed the radio inside the car panel. After we install the cladding, install the front panel of the head unit and turn on the device. If everything is done correctly, the radio will work perfectly.
Problems with the operation of the radio and cigarette lighter
Car enthusiasts often face the problem of cigarette lighter and radio failure. Here are the main reasons for their refusal:
- Short circuit in the circuit.
- The fuse has blown.
- Contacts often oxidize and burn during operation; this needs to be checked.
- The backlight bulb has burned out.
- failure of fuse contact in the block.
Car radio
These are the five main reasons for radio and cigarette lighter failure. In general, the cigarette lighter is not designed to constantly supply power to external devices. And in most cases, when installing with your own hands, the main mistake is the low strength of the contact assembly and the power supply unit itself; often it is simply impossible to tightly link and connect everything. And subsequently, the natural vibrations of the car and the peculiarities of Russian roads worsen the quality of the already unreliable assembly at the contact points, which leads to their burning and short circuit currents. Therefore, when you undertake to install the radio with your own hands, do not skimp on consumables and the necessary tools for high-quality fastening of your device.
Didn't find the information you are looking for? on our forum.
Possible problems
When installing music devices, vehicle owners face various problems. Because of them, the radio for the VAZ-2114 does not turn on or any of the functions do not work.
Most common problems:
- Burnt fuse. This situation occurs due to connecting additional amplifiers or any other equipment to the radio, as well as listening to music at high volume.
- Network short circuit. It appears due to errors made during wiring.
- Oxidized contacts. During operation of the device, moisture may enter its housing. It will damage the contacts and prevent you from using the radio.
A radio is a useful device that should be in every car. Even a novice car owner can connect it on his own. To do this, he will need patience, the correct implementation of all the provided actions and several hours of free time.
It's no secret that most domestically produced cars are produced by the manufacturer without radios; in the standard place there is a neat plastic plug. And of course, the car enthusiast has a desire to correct this omission of the manufacturer.