Hydrocorrector of headlights VAZ 2114
Depending on the load on the vehicle, the headlights can be directed lower or higher. To adjust the light flux, special devices called hydrocorrectors are used. If the car is loaded, it is better to lower the headlights so that the light output is directed towards the road and not up. This way you will provide the necessary illumination of the road surface and prevent the driver from being dazzled by oncoming traffic. With a minimum load of the car, when the rear of the car is raised, the headlights can be raised slightly.
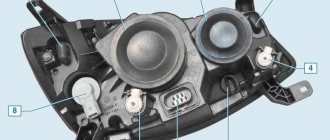
Design of the headlamp on the VAZ-2114
General view of the projector
Almost all motorists use car headlights, but not everyone knows about the features of their design and design. Therefore, it is worth considering this issue in more detail.
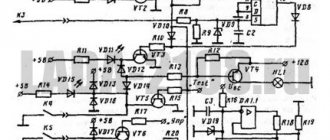
Diagram of the headlight elements of the VAZ-2114 automobile unit:
Scheme of device and connection of the headlight
- Reflector:
- Reflector bottom support.
- Windshield wiper stop;
- Lower reflector support:
- Headlight diffuser.
- lamp flange:
- Dazzling wire;
- Anti-glare screen;
- Anti-glare thread;
- Turn signal lens;
- Lamp AI2-21-3;
- The plug is installed in place of the hydraulic corrector working cylinder;
- Top reflector holder;
- Spring service:
- Lever arm:
- Lever return spring;
- Headlight vertical adjustment screw:
- Happening:
- Sleeve;
- Working cylinder rod:
- Cuff;
- Working cylinder body:
- Headlight cover;
- Lamp AKG12-60 + 55;
- Screen;
- Lamp A12-4:
- Headlight horizontal adjustment screw:
- Headlight mounting bolt;
- Projector housing;
- Hydraulic corrector master cylinder housing;
- Pipes connect the main cylinder to the workers:
- Double piston:
- Drive screw;
- Lever arm;
- Nozzle:
- Lid:
- Headlight unit;
- Mounting block;
- Low beam relay;
- Switch;
- External lighting switch;
- Dazzling light signal;
- Headlight switch;
- High beam relay;
- I. Scheme of operation of the headlight hydraulic corrector:
- Car with driver:
- B - with a driver and cargo in the trunk;
- I. Headlight switching diagram;
- III. View of the headlight connector: low beam connector; v. High beam connector: c Side light connector: d Ground connector
Practical recommendation for replacement
Changing the headlight unit on a VAZ-2114 is quite simple and easy, but the process itself requires certain practical and theoretical skills. Therefore, consider the process of sequential replacement:
- Disconnect the negative terminal of the battery.
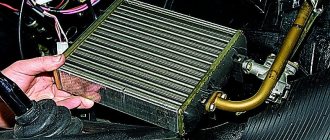
- We dismantle the protective radiator cap.
Remove the plastic protection from the top panel of the radiator
Unscrew the fixing screw. It is best to remove the headlight assembly with turn signal
Unscrew the side support of the headlight unit
We disassemble the headlight
Replacing the headlight
If the condition of the old headlights leaves much to be desired, or you just want to add something new to the appearance of your car, then replacing the headlights with a VAZ 2114 can be an excellent solution.
It is not necessary to do this at a service station. Many car owners do similar things in the garage, without unnecessary help or financial costs. You won’t have to spend a lot of time on this, but very soon your iron horse will acquire new, bright optical instruments.
- First, let's figure out how to remove the headlight on a VAZ 2114. First you need to remove the front grille and also remove the rear trim.
- Now the cover glasses are removed and the VAZ 2114 headlight hydraulic corrector cylinders are removed.
- The windshield wiper reservoir can also be removed so that it does not interfere with the work process.
- Disconnect the terminals from the battery contacts.
- Disconnect the power wires from the headlights.
- Using a regular Phillips screwdriver, the headlight housing is removed. It is held on to the body by a screw.
- From the engine compartment side, unscrew three more nuts that hold the headlight housing.
- Now all the fasteners have been removed, which allows you to simply pull the old headlight towards you and thereby remove it.
- Now unlock the special latches on the headlights and remove the protective glass.
- Installation of the new kit is carried out in reverse order. There shouldn't be any difficulties.
conclusions
Installing and replacing a VAZ-2114 headlight is a fairly simple and straightforward process that any motorist can do with his own hands. So, if a car enthusiast cannot carry out the process with his own hands, then he needs to contact a car service center, where they will always help.
I love these articles, especially the ones that do a detailed analysis that you can do yourself over the weekend))
I'll have something to do this weekend)) I think in a couple of hours I'll replace the headlights with new ones. Lots of shades, especially for a beginner. Thanks for the instructions.
After the introduction of strict rules on xenon, it had to be abandoned. At night I immediately began to feel discomfort. The last straw was visiting the ARMS EXPO exhibition in Nizhny Tagil. Returning at night, I encountered a serious lack of road surface. The headlights shine in spots, there is no wide strip of street lighting, and therefore we had to reduce the speed. When I returned home, I came to the conclusion that something must have changed. I started with the least resistance, with the headlights removed (the farz worked for 4 years, the glass came off). I disassembled the headlight and decided to tear the metal curtain that prevented the light from scattering around the edges.
I was surprised how much the lighthouse light separated from this curtain. I tore off and sealed the headlight glass with transparent sealants, first put the headlight glass on the fasteners (clips).
Malfunctions and repairs
To repair a VAZ headlight, it must be removed.
In the case of rear lights, you should replace standard sockets and chips with high-quality ones, and seal the joints with sealant. This will eliminate problems with contacts and improper operation of modules.
If the front lights of the VAZ do not work, then you need to inspect:
- chips and wiring;
- lamps;
- glass condition.
If problems are detected in the wiring, the faulty parts are replaced. Burnt-out light elements are removed and new ones are installed. If glass is broken, it is not difficult to re-glue it with sealant or remove the defect using special glue.
If after all the work the headlights do not shine well, then the optics need to be replaced with new ones. To do this, you need to decide on the manufacturer and purchase a set of suitable lamps.
Repair of VAZ-2114 headlights
Domestic VAZ cars are especially in demand among Russian consumers. This choice is explained by their relatively low cost and ease of operation. But sooner or later there comes a time when the car as a whole and the VAZ 2114 headlights in particular need repair.
In this situation, there are two options: either visit a service where everything will be done for you for your money, or you can easily do all the steps yourself. For example, how to change this lamp on the presented model with your own hands? At first glance, it seems that this is very difficult and cannot be done alone. But actually it is not.
First you need to choose the place where you will perform this operation. It would be better if it were a flat space. The vehicle must always be left with the parking brake applied during this procedure.
Kinds
If we are talking about the “fourteenth” model, then you should know that today for this car produced by the domestic auto giant AvtoVAZ there are about 20 headlights unique in design and execution, designed specifically for 2114.
But for some reason the Taiwanese manufacturer Pro Sport has gained particular popularity . Two series of its headlights have LED turn signals or reflectors of classic dimensions and shapes. The first option allows you to achieve a certain similarity between the 2114 and the German beauty Audi A5.
Of course, the market offers a much wider range than these two options. Therefore, the first thing you should start with is to decide which bulbs to put in the headlights of your VAZ 2114. These can be regular bulbs, xenon, halogen or even modern LEDs. Although there may be problems with the latter, since now only the most expensive cars have LEDs as the main source of head light.
One way or another, the choice is yours. Think, analyze the market, choose among the available options the one that most attracts you.
How to replace headlights on a VAZ 2114
- First you need to turn off the ignition.
- Then open the hood and remove the battery cover.
- It is important to disconnect the negative terminal so that you do not inadvertently get electrocuted during replacement.
- Next you need to remove the cap covering the radiator.
- We sequentially unscrew the four bolts on which it is secured.
- Next you need to find the Phillips screw under the bumper. It is he who holds the lower edge and the beacon.
- Next you need to find the “radiator” bolt. Attach the headlight to the crossbar in the middle.
- Go ahead. You need to remove the two pins that go to the turn signal.
- The hydraulic corrector is also subject to “disassembly”. The backrest is “equipped” with four bolts.
- The new “light” device is mounted in the reverse order.
Do-it-yourself headlight replacement
Replacing headlights on a VAZ 2114 does not require expensive tools. For this work you will need a set of wrenches and screwdrivers.
For convenience, you should prepare the car and materials:
- Wash the body and engine compartment.
- Buy dry wipes.
- Prepare sandpaper to clean contacts or new chips protected from moisture.
To change the front headlight, you need to follow these steps:
- Disconnect the battery terminal.
- Unscrew the four bolts and remove the plastic in front of the radiator.
- Disable the chips from the optics and turn signal.
- Press out the turn signal angle retaining spring.
- Press the plastic fasteners and pull the corner along the direction of the car.
- Unscrew the screws holding the headlight.
- Turn the adjuster rod counterclockwise and disconnect it.
- To remove the eyelashes under the optics, you need to loosen the screws of the bumper near the lamp, bend the corner and unscrew the fasteners.
There is a method for removing the headlight assembly with the “eyelash”. To do this, you need to additionally unscrew the three screws holding the “eyelash” and pull out the block assembly.
Do-it-yourself dismantling of rear lights:
- Disconnect the battery terminal.
- Open the luggage compartment and free up space from unnecessary parts.
- Bend back the soft covering.
- Disconnect the plugs.
- Unscrew the nuts from the studs.
- Remove the reverse sensor.
- Carefully pull the headlight out.
vaz14001.jpg
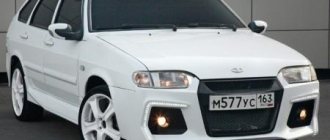
The history of the VAZ 2114 brand “tells us” that the presented model is a copy of the famous “nine”, but a slight inaccuracy is allowed: model 21093 was taken as the basis, which became the most successful modification of the “exclusive” car. Just like the entire Samara 2 series, this model incorporated a number of changes that affected the design of the car and some important components.
This example of the popular “family” has received a more streamlined appearance than model 21093. This design element creates an interesting effect: the main roots of the debut Lada Samara series are barely visible.
Sources of light
It is important to know which light sources are used in the vehicle's optical system. Basic indicators such as luminous intensity, illumination and brightness depend on their type. They are divided into four groups:
- incandescent lamps;
- halogen;
- gas discharge;
- LED
Incandescent bulbs in the main high and low beam headlights are still found in older model cars. Their only advantage is their low price.
Halogen lamps are the most common; about 60% of the optical systems of modern cars are equipped with them. Its illumination is 2 times greater and is about 1600 lumens with the same power as an incandescent lamp (50 watts), and its service life reaches 1000 hours. Disadvantages include high temperature, sensitivity to power surges and the need for special measures during maintenance - the device cannot be touched with bare hands.
Gas discharge lamps are filled with xenon and do not have an incandescent filament. The glow of this inert gas occurs when an electric arc appears between the electrodes. To ignite such a lamp, a voltage of about 15 volts is required, and to maintain normal operation - about 80 volts. Therefore, special electronic equipment is required to ensure the operation of xenon light sources.
Despite this significant drawback, gas-discharge lamps have become widely used in automobile lighting due to their high luminous flux (up to 3200 lumens) with lower power consumption (30-35 watts). At the same time, the service life of a xenon lamp is longer than that of a halogen lamp. Note that a high degree of illumination also has a negative side: a large luminous flux blinds oncoming drivers, therefore the use of gas-discharge lamps is prohibited in lighting devices not adapted for their use. In other words, you cannot install a xenon bulb instead of a halogen bulb if the optical system does not provide for this. Another big drawback is the high price.
Fog lights for VAZ 2114: Installation
Today it is not recommended to drive a car without fog lights. First you need to purchase suitable models of lighting fixtures. Also, if you go through this process yourself, you will need:
- terminals that will have a certain reserve;
- standard Phillips screwdriver;
- pliers;
- key to "ten";
- a piece of steel wire with a diameter of 2-3 mm; length - 1.5 meters;
- also useful, electrical tape
First you need to open the mounting block. Contains relays and fuses. We unscrew the screws, push the case towards ourselves, and then turn it over. You need to find the connector marked Ш1, where the sixth terminal is located. Then open the hood and turn off the washing machine tank. Crimp the two yellow wires with a terminal and insulate them.
We connect the block. Use a wire clamp to hook onto the wiring. Let's fix the tank. Unscrew the screws under the hood holding the plugs. We bend the strands and then fasten them to a hairpin. We perform the same actions with the second beacon.
Using steel wire, you need to pull the wires along the corresponding spar wires, and then pull out the two wires where the car's lights are attached. Then leave no more than 15 centimeters and squeeze out the mass for each of them.
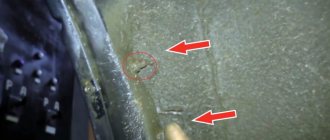
Causes of mechanism malfunction
The cause of product failure may be liquid leakage from the cylinder or tubes, which causes disturbances in the structure of the seals. Poor quality rubber causes loss of working fluid, which leads to jamming of the unit pistons in one position. Accordingly, the angle of illumination of the headlights changes, which is simply impossible to eliminate without replacing the entire mechanism.
If an electronic corrector is installed on the machine, then very often the system sensor begins to act up due to the destruction of the mounting bracket of the unit. Sometimes there may be a problem with the contact connection.
The correct operation of the headlight range control directly depends on the safety of motorists and pedestrians. That's why you need a headlight hydrocorrector, serviceable and fully functional!
How to adjust headlights
The direction of the car's indicator light should always be such that it clearly illuminates the road ahead of the driver. In addition, the low beam should not blind oncoming drivers. The figure shows a diagram of headlight adjustment on a VAZ 2114:
- screw for adjusting the light beam in its vertical plane;
- screw for adjusting the light beam in the horizontal plane;
- self-tapping screws that secure the casing;
- special protective case.
The headlights are adjusted by turning screws 1 and 2. They rotate the optical element in the vertical and horizontal plane, respectively.
Car modifications 2114
VAZ-21140 . Modification with an 8-valve injection engine VAZ-2111, 1.5 liters and 77 horsepower. Serial production from 2003 to 2007
VAZ-21144 . Modification with an 8-valve VAZ-21114 engine, 1.6 liters and 81.6 horsepower. Years of serial production: 2007-2013.
VAZ-211440 . Another modification released in 2007, it was equipped with a VAZ-11183 engine with a volume of 1.6 liters and a power of 82 horsepower. The car was discontinued in 2013.
Improved taillights for the VAZ 2114 are a good addition to your car
To remove the rear “fireflies” of this car, it will be enough to unscrew 4 nuts. However, with threads it is much more difficult to guess. If you need to put on a new "sparkly" copy and want to go through the entire process on your own, mostly to explore the "unknown" so to speak, it's time to find a partner.
In this situation, he will be able to turn on the devices one by one, and you will be able to control the inclusion of light bulbs and connect the wires one by one. Therefore, through trial and error, you can independently upgrade your car, giving it a more modernized look.
It is an indisputable fact that every car owner always wants to somehow highlight his car. Most often, optimization is considered the most common option in this situation. This designation is slightly different from a repair that aims to improve a vehicle to give it a more “exclusive” appearance.
Every detail of the car can be worked out, but many are very interested in tuning VAZ 2114 headlights. This is confirmed by reviews of forums on the Internet, where motorists from different countries, exchanging photos and videos, express their opinions on this interesting question.
The taillights of the VAZ 2114 are often tuned and, I must say, at the end of this process you can get a very beautiful and original copy of the car. Here are the most popular options for tuning a VAZ 2114 with your own hands for rear optics.
- One of the most famous is the “angel eyes” effect. When the light is on, they appear as glowing circles, or perhaps even two circles, which actually highlight the shape of the optics.
- You can replace regular light with xenon. It is forbidden to use it on front lighting fixtures, but xenon can be safely used on rear ones. It should be noted that it looks very impressive.
- The third option is to tone up. It can be used front and back. It should be noted that darkened headlights let in slightly less light, especially noticeable at night. However, you can tint the taillights without consequences. The painting process itself involves the use of paint and a special film. You can also paint some areas of the car's lighting fixtures - everything will look interesting, and most importantly, neither you nor other road users will be in danger
Construction and operation
Xenon and LED equipment is not installed in VAZ from the factory. The optics of the VAZ 2114 are equipped with several modules using a classic halogen lamp for the main light.
The headlight design of the VAZ 2114 is not complicated or modern. To replace the lamps, the optics do not need to be dismantled, and the beam is adjusted using built-in thumbwheels.
The disadvantages of front optics include the appearance of cracks in the glass due to stones or sudden temperature changes during operation.
Headlights
On sale there are lensed headlights for the VAZ 2114 for halogen and xenon. Sports modifications are covered with transparent glass with no reflective lines. The internal reflector of the lens is used to form the daw. In such VAZ optics, two separate lamps are used - for the high beam and low beam.
Factory installed front light design:
- block with reflector for low and high beam;
- separate lamp for side lights;
- turn signal made of transparent orange plastic.
A distinctive feature is a glass shield with special lines that direct a beam of light onto the road surface.
When installing modified flashlights, it is necessary to connect additional power, ignition units and adjust the beam position angle. To turn on the high beam using the standard button in the VAZ interior, you need to correctly identify the contacts and apply them to the module.
The advantages of installing sports optics include an increase in the light spot, while the disadvantages are additional manipulations with the wiring and the low quality of the proposed replacement.
Rear optics
If the standard front optics are reliable and of high quality, then the rear lights of the VAZ 2114 are often capricious and do not work properly.
- poor quality of contacts;
- water getting on the board;
- thin plastic.
The VAZ 2115 also suffers from a similar illness and requires constant attention to the rear blocks.
Due to the poor quality of the contact group, the direction indicator, reverse signal or tail light disappears. When the board gets wet, the optics do not work properly and may blink as a brake light instead of a turn signal. Low-quality plastic bends when heated; due to the gaps formed, the flashlight fogs up and the lamps shine dimmer.