The importance of anti-fog optics cannot be underestimated. Everyone knows that fog lights on Priora allow better illumination of the road surface when driving in fog. Therefore, in order to protect themselves while driving, many car owners decide to install PTF themselves. You can learn about the process of installing and connecting the lights below.
Installation Guide
Before installing and connecting fog lights on Priora 2, weigh your strengths. If installing fog lights on a Priora 2 or restyling may cause difficulties, then it is better to contact an electrician. A specialist, like no one else, knows how to install headlights on a Priora and how to connect fog lights. If you decide to do everything yourself, then first prepare the necessary tool. To do this, you only need a set of keys and screwdrivers, as well as pliers (the author of the video about choosing fog optics for the Priora is the Simple Opinion channel).
Algorithm of actions
To ensure that installing fog lights on a Priora SE or 2 does not cause difficulties, simply follow the instructions:
- First you need to disconnect the battery, remove the negative terminal from it, and then disconnect the front bumper clips. Self-tapping screws for its dismantling are located on the sides, bottom and top. You need to unscrew them and remove the bumper.
- Next, you can move on to the stubs. The plugs are also fixed using self-tapping screws, but to unscrew them it will be more convenient to use a short screwdriver with a Phillips blade.
- Fog lights on Lada Priora 2 are mounted instead of previously removed plugs. To ensure that the lights are securely fixed, they can be secured using the same screws.
- After completing these steps, you need to find the longest cable in the PTF kit. This wire is connected to the left headlight, after which it is routed to the right headlight. And then the wire must be pulled from the battery side into the engine compartment.
- Using an AN 10 wrench, it is necessary to dismantle the expansion tanks in the engine compartment, which will interfere with the process. Having done this, using a 13mm wrench you will need to unscrew the fastenings of the windshield wiper blades. Eventually you will need to gain access to the left edge of the trim, and to do this you will need to remove the guard itself. When these steps are completed, the pipe can be moved to the side, and then loosen the clamp. The upholstery can then be completely removed.
- Your task is to lay and stretch the wires from the lights through the plug into the vehicle interior, and then secure them with a clamp. This clamp should be included in the kit for the PTF Priora 2.
- When the PTFs are installed on the restyled Priora, all elements are assembled in the reverse order. Don't forget to connect the wires to the crankcase protection screws.
Connection diagram
The installed fog optics will need to be connected.
The PTF connection diagram is as follows:
- First of all, in the car interior, under the steering column, you will need to remove the protective cover. To do this, the three latches should be rotated 90 degrees.
- Having done this, under the mounting fuse block you will be able to see a self-tapping screw - you need to unscrew it, after which you will have access to dismantling the block. In any case, the anti-fog optics kit should come with installation instructions and it must contain a connection diagram. Please use this as a guide during installation.
- Next, you can move on to the torpedo. On the center console, you need to remove the plug, as well as the button for activating the rear window heating system. These components are installed near the clock.
- Next, you will need the fog light button that comes with the kit. The blue wire must be connected to the mounting block, and all other wires are connected to the heating button. This can be done using special clamps, which are also included in the kit.
- At the final stage of connection, you will need to install the relay responsible for the operation of the fog lights in the unit. When performing this task, be careful - the wires that come from the engine compartment must be connected to F18 and F17, and the yellow cable should also be connected to the same contacts. The connection procedure is described in more detail in the diagram.
Wiring diagram for fog light control buttons
Standard fog lights on Priora: cost, article number
The automotive company AvtoVAZ connects fog lights to its Lada Priora, if provided for in the package, manufactured by Avtosvet (Kirzhach) and Bosch. They have a difference. The installation depth of Bosch fogs is as much as 40 percent greater than that of similar products produced by the company from Kirzhach. In the “Lux” package, fog lights from Bosch are required, and from “Avtosvet” they are installed as standard. There are 2 options for the kit - for the pre-restyling Priora and for the post-restyling model. What is the difference? The installation point and the shape of the headlights themselves. Among other things, headlights can be purchased separately or as a set.
For Lada Priora:
- The Bosch headlight set has the article number 21700-3743010-54. The cost of the kit varies in the range of 1.6-1.9 thousand Russian. rub. The cost of one headlight will be about 900 rubles.
- A set of fog lights “Avtosvet” costs 700-800 Russian. rub. Article 21700-3743010-52. One headlight will cost the buyer approximately 500 rubles.
For Lada Priora 2:
- A set of Bosch fog lights costs 1-1.2 thousand Russian. rub. Article: 21700-3743010-50. One headlight will cost buyers approximately 600 rubles.
- The set of headlights "Avtosvet" has the article number: 21700-3743010-53. The cost of the kit varies in the range of 800-900 Russian. rub. The cost of one headlight will be about 500 rubles.
Plus, you will need to buy a special set of wires or a so-called installation kit, without which installation of the PTF is impossible. This kit includes a relay and a button. The cost of the set is about 600 Russian. rub.
Basic Setup Aspects
After the fog lights are installed, their luminous flux will need to be properly adjusted so that the operation of the optics is most effective. Adjustment of fog lights should be carried out in conditions that are closest to real ones. Therefore, make sure that there is a spare tire in the trunk, the tank itself is fully filled, and the tire pressure should be the same. In addition, for greater realism, a load weighing about two hundred kilograms can be placed in the car interior.
When all these conditions are met, you can begin adjustment. First of all, the vehicle must be placed on the most level surface, this will allow you to get the most accurate result. If this condition is not met, the adjustment will be incorrect. The setting is done in front of a wall or garage door, this is a prerequisite.
To begin the adjustment, measure the distance from the ground to the middle of the lantern. After this, you should draw a straight line on the wall or garage door that corresponds to the distance measured earlier. Having done this, you will need to draw another stripe - it should be 5 centimeters lower, while the first line can be erased. The anti-fog optics should be adjusted so that the upper limit of illumination is located on the horizontal strip that you draw on the network.
How to install PTF correctly, and why do you need to replace standard lamps?
Fog lights on Priora, as well as on any other car, are installed quite low, at a level of 0.3-0.7 meters from the road level. In this case, a narrow beam of light enters an area free of wet condensation and actually improves visibility.
But located on the roof of the trunk (additional lighting is often installed on jeeps), they are absolutely useless in a curtain of rain, in fog or during a dust storm. Therefore, fog lights used to be placed under the bumper (for old-style metal structures), but today they are placed directly into it (for modern integrated parts).
Fog lamps must comply not only with traffic regulations, but also comply with UNECE standards. The latter suggest that the fog beam on the Priora and any other car must have a special wide-angle light distribution, with a clearly defined upper limit and dispersion of up to 70 degrees horizontally. Only compliance with these parameters gives the required anti-fog effect.
The most common today are fog lights with halogen lamps with a power of 55 watts. They create a luminous flux of 1.1 thousand lumens, which is enough to illuminate a space of 25-30 meters in front of the car.
Replacing conventional incandescent lamps with them is almost always required, because... old-style lamps provide the necessary illumination at a distance of about 8-10 meters, which is clearly not enough for modern driving conditions.
Law and GOST
It is necessary to take into account one of the important points when installing PTF is subsequent adjustment and LAW. According to traffic rules, lighting equipment should not blind cars moving in the opposite direction. To do this, it is imperative to adjust the headlights.
It is prohibited to install lamps not specified by the manufacturer, such as xenon and LED. PTF priors must have H11 type halogen lamps installed.
Why the headlights don't light up - reasons
The most common reason for headlights not working is a burnt out light bulb. Its service life is indicated in hours on the packaging. For a low beam bulb, this limit can be 400 hours of operation. The second extremely possible reason could be a wiring malfunction due to water leakage, or the wire simply frayed. This problem is already more serious, because you will have to fuss with it much longer than with a regular replacement of consumables.
Often, car enthusiasts are too lazy to change light bulbs, driving out onto the road in “one-eyed” cars. This is very unsafe - it is recommended that immediately after a malfunction is noticed, you go for a spare part to replace a new lamp.
Description of the scheme
The relay must be connected according to this diagram. The relay has only 4 contacts, which are assigned numbers: 85, 86, 87 and 30.
Depending on the configuration, the Priora may be equipped with front fog lights. All cars are equipped with rear fog lights. Let's consider connecting the Priora foglights. First of all, I want to note that only the factory connection diagram is considered here. In this case, the front fog lights are turned on only with the side lights turned on. Rear fog lights with low beam headlights on.
Additional mounting block Priora
- F1 (15 A) – main relay and starter interlock circuit fuse;
- F2 (7.5 A) – fuse for the power supply circuit of the ECU (controller);
- F3 (15 A) – Priora fuel pump fuse;
- K1 – main relay;
- K2 is the place where the Priora fuel pump relay is located.
Attention!
The relay and fuse diagram may differ depending on the configuration and production date of the vehicle. Current diagrams of the mounting block are presented in the operating manual for the date of manufacture of the vehicle (download from the official website).
Let us remind you that on our website you can find detailed instructions for repairing the Lada Priora with your own hands.
Basic Setup Aspects
After the fog lights are installed, their luminous flux will need to be properly adjusted so that the operation of the optics is most effective. Adjustment of fog lights should be carried out in conditions that are closest to real ones. Therefore, make sure that there is a spare tire in the trunk, the tank itself is fully filled, and the tire pressure should be the same. In addition, for greater realism, a load weighing about two hundred kilograms can be placed in the car interior.
When all these conditions are met, you can begin adjustment. First of all, the vehicle must be placed on the most level surface, this will allow you to get the most accurate result. If this condition is not met, the adjustment will be incorrect. The setting is done in front of a wall or garage door, this is a prerequisite.
To begin the adjustment, measure the distance from the ground to the middle of the lantern. After this, you should draw a straight line on the wall or garage door that corresponds to the distance measured earlier. Having done this, you will need to draw another stripe - it should be 5 centimeters lower, while the first line can be erased. The anti-fog optics should be adjusted so that the upper limit of illumination is located on the horizontal strip that you draw on the network.
What kind of base is in the Priora fogs ~ AUTOINTERLINE.RU
Societies › Lada Priora Club › Blog › Who installed xenon in fog lights
I'm thinking about installing xenon foglights on my Priorka. In this regard, several questions arose:
1. Who did it, tell me how (links to blog posts are welcome)
2. How much does this business cost?
3. What you need to buy
4. What tasks may arise during operation
5. How difficult is it to do all this and can a new person do it?
Thanks in advance for your help!
Comments 25
you buy h21 xenon in the store. costs about 2 thousand, not bad. take off the bumper. look for a place for the blocks, attach it. insert xenon into the fog lights. connect the wires and enjoy
Is it possible to install it so that the bumper does not need to be removed?
4. What obstacles may arise during operation?
Only one so far, the light bulb is burned out, I can’t buy a new one, I drive like one-eyed)
Replacing the light bulb in the fog light of LADA PRIORA
Hi all! This video will talk about replacing the light bulb in the fog light on a LADA PRIORA
How it was filmed...
Test of LED lamps h21 in PTF. Choose which is brighter LED or Halogen
Buy Led lamps CL6 H8,H9,h21...
There are no problems. You buy fog lights, auto lights are better, Bosch often sweat, they cost me 1700. You buy a set of xenon lights with an H11 base, our set costs 1700-2000. You buy wiring for connecting fog lights for 500 rubles, if you don’t know anything about electrics, then go to an electrician so that he can connect the wiring and remove the button. Install the fog lights yourself, remove the bumper, unscrew the plugs and screw the fog lights in their place. The ignition units can be screwed to the lower headlight mounting brackets. When connecting fogs, do not forget to connect the ground and do not confuse the polarity.
I think the base would be h21, maybe I don’t understand it naturally, but I had one on the Boche.
I think the base would be h21, maybe I don’t understand it naturally, but I had one on the Boche.
listen exactly, confused, N 11, N7 - in my head
There are no problems. You buy fog lights, auto lights are better, Bosch often sweat, they cost me 1700. You buy a set of xenon lights with an H11 base, our set costs 1700-2000. You buy wiring for connecting fog lights for 500 rubles, if you don’t know anything about electrics, then go to an electrician so that he can connect the wiring and remove the button. Install the fog lights yourself, remove the bumper, unscrew the plugs and screw the fog lights in their place. The ignition units can be screwed to the lower headlight mounting brackets. When connecting fogs, do not forget to connect the ground and do not confuse the polarity.
Thanks for the instructions)
I had a problem, the lamps did not fit into the socket, but Ratfil solved the problem. Now on bumps one lamp turns off, my fault is that the block is not fixed, otherwise everything is trivial there))))
There is nothing complicated, the main thing is that the arms grow from a suitable place))
Adjusting the fog lights
When the installation is complete, you are convinced that the fog lights are operational, it’s time to move on to adjusting them:
- We park the car on a flat surface, it is important that there is a wall, a garage door or something like that in front.
- Check to see if the tire pressure is the same.
- We measure the distance from the middle of the headlight to the asphalt (ground).
- Subtract 5 cm from the distance of the headlights to the floor, draw a strip on the wall corresponding to this value.
- We turn on the fog lights and adjust them so that the upper limit of the light flux is on a horizontal line.
Adjusting the luminous flux from PTF
Then the car (Priora se or another modification) is placed on a flat area opposite a steep smooth wall at a distance of five meters, and the fogs are turned on. Next, the distance from the center of the headlights to the ground is measured, and a line is drawn on the wall five centimeters lower than this distance. After this, you need to adjust the light spot so that its upper boundary is at the level of the drawn line.
I have long been interested in the question of how to install non-standard fog lights on a VAZ 2170 yourself. After diagnosing faults, this stage is an integral part of vehicle maintenance to bring it into working condition. At the same time, any motorist can independently replace non-standard fog lights in a VAZ 2170 with his own hands, this is where my video instructions will help you. This topic covers the following points: 1. how to remove non-standard PTFs in a VAZ 2170 yourself, 2. do-it-yourself replacement of non-standard fog lights in a VAZ 2170, and 3. independent installation of non-standard fog lights on a Lada Priora Put the sedan back into place with your own hands. So, before you change non-standard fog lights in a VAZ 2170 yourself, I recommend that you familiarize yourself with this video. If, however, you have questions about how to install non-standard fog lights on a VAZ 2170 yourself, then study it yourself removing non-standard PTF in Lada Priora Sedan with your own hands, and try to reproduce the same steps in reverse order. Good luck with the replacement!
Sources
- https://myautoklass.ru/my-auto/zamena-lampy-protivotumannoj-fary-v-kitajskix-avtomobilyax/
- https://1ladapriora.ru/remont/kak-ustanovit-protivotumanki.html
- https://avtostuk.com/videos/mazda/ustanovka-ne-shtatnih-ptf-na-lada-priora-sedan-vaz-2170.html
Diagram of correct installation of fog lights
On Priora, fog lights are installed according to the same rules as any other car. Installation is carried out at a height of no more than half a meter from the level of the road surface. Low-mounted fog lights are out of the wet condensation zone and can actually significantly improve visibility. If you install PTFs on the roof of the trunk (as jeep owners often do), then they will turn out to be completely useless, especially during fog, rain, or a snow or dust storm. Therefore, the most effective way was and remains to install foglights under the bumper (for outdated metal structures) or directly into it (for new generation metal structures).
The fog lights that you install on your Priora must meet not only all traffic regulations, but also UN standards. The latest changes clearly state that any fogs must distribute light at a wide angle and have a clearly defined upper border. The dispersion index should be seventy degrees horizontally. Only a device with such characteristics will create an anti-fog effect.
Most often, fog lights with a halogen illuminator inside are installed on the Priora. They are enough to ensure that the space thirty meters in front of the car is sufficiently illuminated in any weather.
Choice
In order for the installation of “fog lights” to be as functional and useful as possible, we choose a product from well-known manufacturers. Options are possible here: imported foglights from Asia and Europe or domestically produced samples. Which ones should you prefer?
Experts advise that it is best to use European or domestic products (Asian products do not have international certification, and increased brightness does not provide any advantages, it only creates discomfort for oncoming cars).
You should pay attention to the fastenings and external design. It is best if there is a letter “E” on the diffuser - this indicates that the brightness requirements comply with the European standard
{banner_content}
Connecting Priora foglights
Let's take a closer look at the connection diagram for the Priora fog lights. The fog lights are controlled by the lighting control unit. Specifically, the switches for the front (A5) and rear (A4) fog lights. Upon examination, we can only notice one wire to enable each option. This wire passes through pin 2 to both switches through various resistances because it is a signal wire. It runs from the electrical package control controller to the switch. From the controller side, a stabilized voltage is supplied to this wire. The electrical package control unit controls changes in the amount of current passing through it.
Turn on the rear fog lights.
The rear fog lights of the Priora are turned on as follows. When you press the button on the module (A4), the wire from the electrical package control controller is connected through a negative resistance. In this case, a current of the appropriate magnitude will flow through the circuit, so the controller will receive a signal that this button is pressed. If there is power at pin 14 of block X2 and the low beam headlights are on (see “Prior headlight diagram”), then the processor, through the appropriate key, will supply power to pins 10 and 13 of block X3, to which the rear wiring harness is connected. Voltage will be supplied to the rear fog lamps and to the lighting control module. At the same time, the indicator light on the module will light up.
Turn on the fog lights.
Connecting the Priora fog lights is almost the same. The difference is in the value of resistance, and accordingly in the value of the passing current. Based on the current value, the processor of the lighting control controller determines the position of the front fog lamp button. Therefore, if there is power at pin 12 of the X2 block, the side lights are turned on (see “Prior Dimensions”), power will be supplied to pin 19 of the X2 block.
The green wire with a black stripe will supply voltage to the coil of the K10 electromagnetic relay. The coil armature will be attracted and close the contacts. In this case, fuses F17 and F18 with a nominal value of 10A will receive power, and from them, through the connecting connector of the instrument panel harness and the front harness, the lamps in the fog lights will receive power. In addition, the LED on the lighting control module will receive power from fuse F17, signaling that the headlights are on.
When you press both power buttons simultaneously, the current value will also change. Since in a parallel connection the total resistance is always less than the smaller one. That is, the value of the passing current will be maximum. Connecting Priora foglights according to this scheme makes troubleshooting very difficult, without the presence of diagnostic equipment for the electrical package control controller. If malfunctions occur, it is necessary to check the integrity of fuses, relays, operation of side lights and low beam headlights.
Priora fuse box diagram
| Fuse no. | Current strength, A | "Standard" and "Norm" | “Norma” with air conditioning and “luxury” |
| F1 | 25 | Engine cooling radiator fan | Reserve |
| F2 | 25 | Heated rear window | Mounting block, rear window heating relay (contacts). Electrical package controller, contact “10” of XP2 block. Rear window heating element. |
| F3 | 10 | Right headlight, high beam | Right headlight, high beam lamp. Instrument cluster, headlight high beam indicator. |
| F4 | 10 | Left headlight, high beam | |
| F5 | 10 | Sound signal | Mounting block, horn relay. Sound signal. |
| F6 | 7.5 | Left headlight, low beam | |
| F7 | 7.5 | Right headlight, low beam | |
| F8 | 10 | Alarm signal | Mounting block, alarm relay. Alarm sound. |
| F9 | 25 | Priora heater fuse | Reserve |
| F10 | 7.5/10* | Interior lighting, instrument panels, brake light | Instrument cluster, pin “20”. Brake light switch. Brake light bulbs. Interior lighting unit. Interior lighting. The door sill light on the right front door. Additional brake signal. |
| F11 | 10/20* | Wiper | Mounting block, high speed windshield wiper relay. Switch for cleaners and washers, contact “53a”. Wiper and washer switch, contact “53ah”. Heated rear window switch. Mounting block, rear window heating relay (winding). Windshield wiper motor. Rear window wiper motor (2171,2172). Windshield washer motor. Rear window washer motor (2171,2172). Airbag control unit, pin “25”. |
| F12 | 20/10* | Terminal 15 devices | Instrument cluster, pin “21”. Electrical package controller, contact “9” of block X2. Electromechanical power steering control unit, contact “1” of block X2. Reversing light switch. Reversing lamps. Parking system control unit, contacts “11” and “14”. |
| F13 | 15 | Cigarette lighter fuse Priora | |
| F14 | 5 | Left headlight, parking light, license plate light, trunk light | Side light lamps (left side) Instrument cluster, main light indicator License plate lights Trunk light Electrical package controller, pin “12” of block X2 |
| F15 | 5 | Right headlight, parking light | Side light lamps (right side) Glove compartment lamp |
| F16 | 10 | Terminal 15 ABS | Hydraulic unit, contact "18" |
| F17 | 10 | Left fog lamp | |
| F18 | 10 | Right fog lamp | |
| F19 | 15 | Seat heating | Seat heating switch, contact "1" Front seat heaters |
| F20 | 5/10* | Immobilizer control unit | Recirculation switch (switch on) Mounting block, relay for low beam headlights and parking lights (automatic lighting control system) Heater electric fan relay Automatic lighting control switch Windshield wiper and external lighting control unit, contacts “3”, “11” Automatic climate control system controller installation, pin “1” Automatic window cleaning system sensor (rain sensor), pin “1” |
| F21 | 7.5/5* | Rear fog lights | Light switch, contact "30" Diagnostic block, contact "16" Clock Automatic climate control system controller, contact "14" |
| F22 | -/20* | Reserve | Windshield wiper motor (automatic) Mounting block, windshield wiper relay and windshield wiper high speed relay, (contacts) |
| F23 | -/7.5* | Reserve | Windshield wipers and external lighting control unit, pin “20” |
| F24-F30 | Reserve | ||
| F31 | 30 | Electrical package control unit | Electrical package controller, terminal “2” of block X1 Electrical package controller, terminal “3” of block X1 Driver’s door module, pin “6” Threshold light of the left front door |
| F32 | Reserve | ||
* - for the “Norma” configuration with air conditioning and “luxury”
| Relay | "Norm" | "Norma" with air conditioning | "Lux" |
| K1 | relay for turning on the electric radiator fan of the engine cooling system | Reserve | Relay for turning on the low beam and side lights of the headlights (automatic lighting control system) |
| K2 | rear window heating relay | ||
| K3 | starter activation relay Priora | ||
| K4 | additional relay (ignition relay) | ||
| K5 | space for backup relay | ||
| K6 | windshield washer and wiper relay | ||
| K7 | headlight high beam relay | ||
| K8 | horn relay | ||
| K9 | alarm relay | ||
| K10 | Reserve | Fog light relay | |
| K11 | Reserve | Front seat heating relay | |
| K12 | Reserve | ||
Installation Guide
Before installing and connecting fog lights on Priora 2, weigh your strengths. If installing fog lights on a Priora 2 or restyling may cause difficulties, then it is better to contact an electrician. A specialist, like no one else, knows how to install headlights on a Priora and how to connect fog lights. If you decide to do everything yourself, then first prepare the necessary tool. To do this, you only need a set of keys and screwdrivers, as well as pliers (the author of the video about choosing fog optics for the Priora is the Simple Opinion channel).
Algorithm of actions
To ensure that installing fog lights on a Priora SE or 2 does not cause difficulties, simply follow the instructions:
- First you need to disconnect the battery, remove the negative terminal from it, and then disconnect the front bumper clips. Self-tapping screws for its dismantling are located on the sides, bottom and top. You need to unscrew them and remove the bumper.
- Next, you can move on to the stubs. The plugs are also fixed using self-tapping screws, but to unscrew them it will be more convenient to use a short screwdriver with a Phillips blade.
- Fog lights on Lada Priora 2 are mounted instead of previously removed plugs. To ensure that the lights are securely fixed, they can be secured using the same screws.
- After completing these steps, you need to find the longest cable in the PTF kit. This wire is connected to the left headlight, after which it is routed to the right headlight. And then the wire must be pulled from the battery side into the engine compartment.
- Using an AN 10 wrench, it is necessary to dismantle the expansion tanks in the engine compartment, which will interfere with the process. Having done this, using a 13mm wrench you will need to unscrew the fastenings of the windshield wiper blades. Eventually you will need to gain access to the left edge of the trim, and to do this you will need to remove the guard itself. When these steps are completed, the pipe can be moved to the side, and then loosen the clamp. The upholstery can then be completely removed.
- Your task is to lay and stretch the wires from the lights through the plug into the vehicle interior, and then secure them with a clamp. This clamp should be included in the kit for the PTF Priora 2.
- When the PTFs are installed on the restyled Priora, all elements are assembled in the reverse order. Don't forget to connect the wires to the crankcase protection screws.
1. Open the hood and disconnect the battery, then unscrew the bumper fasteners and remove it.
2. Then remove the plastic plugs, and instead install fog lights and connect them.
Connection diagram
The installed fog optics will need to be connected.
The PTF connection diagram is as follows:
- First of all, in the car interior, under the steering column, you will need to remove the protective cover. To do this, the three latches should be rotated 90 degrees.
- Having done this, under the mounting fuse block you will be able to see a self-tapping screw - you need to unscrew it, after which you will have access to dismantling the block. In any case, the anti-fog optics kit should come with installation instructions and it must contain a connection diagram. Please use this as a guide during installation.
- Next, you can move on to the torpedo. On the center console, you need to remove the plug, as well as the button for activating the rear window heating system. These components are installed near the clock.
- Next, you will need the fog light button that comes with the kit. The blue wire must be connected to the mounting block, and all other wires are connected to the heating button. This can be done using special clamps, which are also included in the kit.
- At the final stage of connection, you will need to install the relay responsible for the operation of the fog lights in the unit. When performing this task, be careful - the wires that come from the engine compartment must be connected to F18 and F17, and the yellow cable should also be connected to the same contacts. The connection procedure is described in more detail in the diagram.
Wiring diagram for fog light control buttons
Installing PTF on Kalina
Kalina is equipped with PTF in the Lux configuration (usually sold with covers for the sockets in the bumper). You will also need: a relay, wires, a PTF power button or an external lighting control unit (for Kalina luxury equipment).
We remove the bumper and remove the plugs from it. We fasten each PTF with three self-tapping screws. To extend the headlight power cable into the Kalina's interior, it is better to remove the left front wheel and the arch protection (fender liners).
We tighten the headlight power wires with connectors to the front of Kalina opposite the place where the PTF will be. We screw the minus terminals to the body (not to the crankcase protection bolts - they are screwed into plastic sockets). We install the bumper and connect the PTF.
We install the headlight switch button in one of the following ways:
- On the panel between the front seats instead of a plug near the cigarette lighter.
- On the dashboard console instead of a plug for the air conditioning button (for Kalina equipment without air conditioning).
- As part of the purchased external lighting control unit, which is installed instead of the old module without a PTF power button.
We connect one wire from the button to the blue-black wire of the ignition switch (+12 V when the ignition is turned on). The second one is carried out to the relay block (on the dashboard on the left of the Kalina steering column). In the block we insert the relay into the place K9 provided for it. We connect to its contacts:
- to “85” – wire from the button;
- “86” – “mass”;
- “31” – at +12 V;
- from “87” - to the headlight fuses (F16 and F17).
We connect the wires from Kalina's PTF on the other side of the fuses.
Prices for headlights and work
Installing headlights in the showroom (where you buy a car) will cost 2,000 - 3,000 rubles, plus the price of fog lights is 2,600 rubles, which is much more expensive than in a store. Installation of fog lights in a car service center averages from 1,500 to 2,000 rubles. You can buy headlights yourself. It is not necessary to pay money for installation, because fog lights can be installed on your own.
The price of a set of fog lights varies from 1200 to 1800 rubles. For headlights you need to purchase a connection kit - 400 rubles.
Standard PTF Priora 1 and 2: article number, price
AvtoVAZ installs fog lights on Lada Priora from Bosch and Avtosvet (Kirzhach). The difference is that Bosch is 40% larger in installation depth than fog lights from Kirzhach. Lighting equipment from BOSCH was installed in luxury versions, and from Kirzhach - in standard ones. Two options for the kit are being considered. The first set is a PTF for Priora 1 (pre-restyling), the second is for Priora 2 (restyling). The difference is the shape of the headlights and installation points. PTFs are sold complete or separately.
For Priora 1:
- PTF set of Kirzhach “Avtosvet” 21700-3743010-52. Price – about 700-800 rubles. One headlight costs about 500 rubles.
- PTF kit Bosch 21700-3743010-54. Price – about 1600-1900 rubles. One headlight costs about 900 rubles.
For Priora 2:
- PTF set Kirzhach “Avtosvet” 21700-3743010-53. Price – about 800-900 rubles. One headlight costs about 500 rubles.
- PTF kit Bosch 21700-3743010-50. Price – about 1000-1200 rubles. One headlight costs about 600 rubles.
How to adjust the light flow
In order to prepare for testing and debugging fog lights, the Priora should be placed in conditions as close as possible to real ones. You need to place a load weighing approximately 200 kilograms in the cabin, a spare tire in the trunk, and completely fill the tank with fuel.
After this, the car is installed five meters from a flat wall. The tester measures the distance from the ground to the center of the fog, and draws a horizontal line on the wall five centimeters lower. If the headlights have been adjusted correctly, the light spot will be approximately at the level of this line. You can also test and debug each of the headlights separately (to do this, you need to repeat the procedure, closing each of the headlights in turn).
Many car enthusiasts who bought a car called VAZ 2170-2172 find out very late that not all trim levels are equipped with fog lights (FTL), and then they wonder how to install them themselves. This is what this article will be devoted to. So, brief instructions for installing fog lights on a VAZ Priora.
Step one
You need to purchase a ready-made installation kit from a car store to install headlights on your car. Be careful, it must include: a wiring harness of the required length, a switch button, a relay and wires for connecting it, connectors, clamps and fuses. PTFs are usually sold together with an installation manual; the installation kit also includes a connection diagram.
Step two
Don't forget, this is very important!
To prevent a dangerous short circuit from occurring during installation of the headlights, it is necessary to disconnect the ground wire from the battery before starting work.
Step three
Carefully study the diagram for installing fog lights on a Lada Priora car. It will be given below.
Step four
Prepare all the tools. You will need:
- two types of screwdrivers: Phillips and flat;
- two keys. One for eight, the other for ten;
- knife (you will need it to cut out the standard plugs in the bumper and to strip the cable).
The installation process itself can be divided into three stages.
First stage: installing headlights in the bumper
For installation of fog lights in Lada Priora there are standard places located in the bumper and closed with plugs. First you need:
- remove the protection from the engine crankcase;
- Remove the standard headlight covers.
Install new headlights in place of the standard plugs. In this case, there is no single instruction. After installation, you need to secure them with self-tapping screws. Then connect the electrical connector to the lamp.
Then lay the wiring harness along the cable under the hood, and the harness must be secured with a clamp. This must be done so that on the right side the tourniquet is long, and on the left, on the contrary, short. After this, you need to connect the negative wires directly to the car body.
Next, we install the crankcase protection back and fasten the bumper itself in place.
Second stage: installation and connection of the PTF switch
We fix the headlight switch on the front panel of the car. This is done like this:
- open the decorative panel under the steering column. To do this, you need to turn three locks ninety degrees;
- remove the plug, which is located slightly to the left of the clock.
- you should see wires in the opened hole. The switch is connected to them. We connect short wires to wires with the same contacts. We do the same with the contacts of the glass heating button.
Third stage: connecting headlights
After you have completed all the above operations, you will need to connect the new headlights to the mounting block. This process comes down to simply installing several parts into the mounting block.
- We install the K10 relay and two fuses.
- Once these parts are installed, simply place the mounting block in place. If you did everything correctly, then after installing the battery mass you should have new headlights.
Do not forget to carefully check the quality of the insulation of connections, since most fires occur due to electrical wiring faults that are not corrected in time.
Stage four: adjusting the fog lights
The performance check and adjustment of the PTF must be carried out immediately after installing the PTF. The adjustment can be made either independently or at a service station.
PTF adjustment is carried out on a fully equipped vehicle. The gas tank must be full, a spare tire and a tool kit must be present.
The work is shown on the left headlight; on the right headlight we perform the operations in the same way.
Attention! The fog lamp is halogen. You should not touch its glass bulb with your fingers, as traces from them will lead to darkening of the lamp when heated. You can remove dirt from the flask with a clean rag soaked in alcohol.
Hi all. Today at VAZ Repair another photo report on the installation of PTF. This time we will install fog lights on the Lada Priora at home. The work is not difficult, but it requires certain knowledge and adherence to a sequence of actions.
I will not delve into the details of what fog lights (FTL) are and what use they are, anyone interested can read about it on the Internet, fortunately there are many detailed, understandable explanations. I will only say that not all trim levels had fog lights installed, so we will fix this problem ourselves. Therefore, without unnecessary preambles, I propose to proceed directly to the process.
So, to install PTF on Priora you must have:
- Set of fog lights;
- Wires, corrugation, pads, adapters, relays and buttons;
- Heat shrink, electrical tape;
- Pliers, a set of keys and screwdrivers.
Replacing Priora high beam lamps
It all starts again with removing the battery - you can’t do without it now. The high beam lamp is located a little deeper and is not easy to get to. The sequence of actions when replacing a high beam lamp is as follows:
- We disconnect the rubber cover (it is larger than the one designed to protect the low beam lamp);
- Disconnect the block with wires;
- Unclench the spring clamp and disengage it from the reflector hooks. We release the light bulb.
- We remove the lamp socket from the headlight unit.
In fact, everything is simple: they opened the lid and took out one lamp. However, such minor operations will put a lot of strain on your wrist and palm - don’t forget to warm up, otherwise the new part may treacherously slip out of your hand when you don’t expect it.
How to connect fog lights on Lada Priora?
When there is not much left in stock, you just have to disassemble everything and install the PTF, then put everything back together and enjoy the work done. Kidding :-).
- Let's start with the fact that we need to de-energize everything, to do this we remove the “-” terminal of the battery.
- Next, you need to remove the bumper; to do this, unscrew the screws that secure it one by one. The screws that need to be unscrewed are marked in the photo. After all the fasteners are unscrewed, carefully unclip the bumper from the latches and dismantle it completely.
- Next, take a screwdriver and remove the foglight plugs, which are attached with self-tapping screws.
- We prepare our fog lights and proceed to an important stage called “installation of fog lights.” We carefully place the PTFs in their regular places and secure them with the self-tapping screws that secured the plugs. Then we start laying the wiring. The wiring is routed from the inside of the bumper; it is advisable to use corrugated wire.
- The wires need to be pulled into the cabin in the GTZ area; to do this, we take out a special plug, under which the holes we need are hidden. For convenience, it is recommended to remove the frill along with the wipers, as well as the expansion tank with bracket.
- In the cabin, in order to extend and connect the fog lights, you should pull off the trim (sound insulation) and pull the wire into the cabin.
- When the wires are brought into the interior, you can start connecting. The diagram according to which it should be connected is usually included with the PTF kit, but just in case I decided to post the diagram.
- Connecting the fog lights to the button requires the removal of the central panel. When installing the PTF relay in the unit, it is important not to mix up the wires and follow the PTF connection diagram.
Installing fog lights on a Lada Priora is quite an extraordinary task and can be done by any car enthusiast. The only problem is the connection; as a rule, difficulties arise with it. However, if you follow the instructions and carefully study the connection diagram, then everything should work out. If difficulties arise during the connection, I recommend contacting an experienced electrician, he will easily help you for a minimal fee. Before final assembly, do not forget to check everything and make sure that the PTFs are working as they should.
That’s all for me, thank you for your attention and see you again at VAZ Repair! Bye!
Replacing the PTF light bulb, SE bumper — Lada Priora Hatchback, 1.6 l., 2010 on DRIVE2
Good evening, I came back from a long journey and this is what I saw, the right PTF does not work, because I use them as a DRL, I need it, let's start replacing
jack up the car, take off the hubcap and wheel
Let's take off... I'll call it a mudguard or the outer lining of the arch
here are all the screws on which it is attached, there are quite a lot of them, so it’s better to wash it so that it can be seen, I looked by touch, throwing aside clothes of dirt
We also remove the inner part; it is attached to one wall and screwed to the bumper
The bottom is also screwed to the bumper with 3 long self-tapping screws, we also remove them
put this dregs aside and continue
We remove the PTF, disconnect the power, open the lid, twist it in a circle and pull it towards us and this is what we see
We take out the light bulb, mine just fell apart, it’s also a common problem that the light bulb simply turns black and swells, you have to pull it back so that it bursts, and then shake out the fragments from it
Since I took off the wheel, and I didn’t have a spare light bulb, I had to ride to the store on this horse
I bought a couple of these bulbs
also at 55w there was a similar one before
insert, check, everything works, screw the PTF back
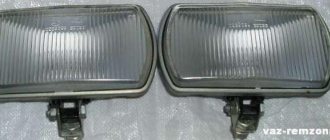
Types of PTF
As you know, Priora underwent several stages of restyling, where one of the main changes was the bumpers. With the change in bumpers, the design of the PTFs themselves also changed.
In the old bumper, the fog lights had a round appearance, but in the new one they already received a frame in the shape of a triangle, but still with the same round headlight.
At first glance, you might think that they are exactly the same, but this is a wrong assumption, they have different mounting brackets
Therefore, it is important to know which bumper the PTF will be installed on.
There are two manufacturers of fog lights for Priora - BOSH and Kirzhach. It is difficult to notice any particular difference in the luminous flux of these manufacturers, but there are differences in the mounting for installation in them. It will be difficult to replace “BOSH” with “Kirzhach”; for this you will have to change the PTF spacer in the SE bumper.
There are two options for installing a pre-restyle Priora and a post-restyle Priora into the bumper (SE bumper, Priora 2).
Articles and price of PTF for PRIORA 1 (pre-restayl until 2012):
PTF Priora 1
PTF "Kirzhach": 21700-3743010-52. The price starts from 700 and reaches 1000 rubles. For one headlight, sellers ask from 500 rubles.
PTF "BOSCH": 21700-3743010-54. The price starts from 1500 and reaches 2000 rubles. For one headlight you will have to pay from 1000 rubles.
Articles and price of PTF for PRIORA 2 (restyled after September 2012):
PTF Priora 2 (with frame)
PTF "Kirzhach": 21700-3743010-53. The price starts from 800 and reaches 1100 rubles. For one headlight, sellers ask from 600 rubles.
PTF "BOSCH": 21700-3743010-50. The price starts from 1000 and reaches 1500 rubles. For one headlight you will have to pay from 700 rubles.
It should also be noted that not all stores come with a mounting kit of wires and relays for the PTF. It is necessary to check with the sellers whether they have an installation kit. Otherwise, you need to purchase it in addition. Its cost is from 600 rubles.
Analogs
If for some reason the models from and “Kirzhach” do not suit you, then you should not be upset. Currently, the market is simply filled with a huge number of Chinese-made analogues.
Manufacturers from China have a large selection of high-quality PTFs that are not inferior to more expensive models.
One of the most popular Chinese PTF models are headlights that completely cover the cutout for the fog lamp, that is, they have the shape of a triangle.
Chinese PTF
If you are categorically not a supporter of Chinese production, there are a number of domestic manufacturers creating analogues of fog lights for the Lada Priora.
Gas discharge
Xenon allows you to make fog lights as bright and effective as possible. The service life of high-quality xenon is about three years, but xenon can be used for foglights only in accordance with strict rules, violation of which will not result in a fine, but in deprivation of rights for up to one year. So, for xenon, you can only use special headlights marked “D”, and an automatic corrector is required. Self-installation of xenon in fog lights is more complex than other types of lamps, but if installed correctly, the result will please you for several years in a row. The disadvantages of gas-discharge lamps, in addition to their high cost, include the need to replace both lamps if only one burns out.
How to do work on foreign cars
Now let’s figure out how to change the fog light on a Ford Focus 2. We will need:
- screwdriver;
- gloves.
Begin.
- First of all, unscrew the screw on top of the low beam head unit - this main illuminator needs to be removed.
- Below, to the right of the head unit, press the latch, pull the housing towards you and remove it.
- We remove the interfering wiring to the side.
- Carefully turn the lighting element towards the wing.
- Unscrew the plug and replace the lamp.
- We reassemble in reverse order.
Replacing lamps in Priora taillights
Replacing the rear light bulbs is complicated by the fact that the combination unit inside supports the operation of the parking lights and brake signal. But it all starts just as simply, when replacing the bulbs in the rear headlights of the Priors, as well as the front ones:
- Remove part of the upholstery opposite the headlights;
- Unscrew the screws that support the protective housing of the rear light. In Kalina, there were nuts in place of the screws, and unscrewing them was even more fun - they fell into a huge gap and were lost in the car body forever;
- Turn the brake light and clearance holders counterclockwise. Do not remove the socket, take it out together with the light bulb;
- It is easy to press down the lamp, turn it clockwise and remove it from the socket with a slight movement (it will almost fall out on its own);
- Carry out the operation in reverse order.
All you have to do is remember about the combination headlight - remember where each lamp was located, so that you don’t confuse anything during installation. With the rest of the light bulbs, everything is different - in addition to the ground (black wire), wires from the ECU are connected to them. Thus, the “foglights” correspond to the red wire color, the turn signal indicator – blue, the green light is assigned to the reverse lamp.
LED
A more acceptable option for most. They feature a wide range of colors, brightness and low power consumption. LED lamp
The fog lamp heats up very little due to its unique operating principle. This allows you to avoid melting of the internal parts of the headlight during prolonged operation of the PTF. They almost never cause blindness to oncoming drivers. What are the second lamps for in Skoda fog lights? The disadvantages include a higher cost, as well as the need for careful selection of the lamp itself - they are not suitable for every headlight