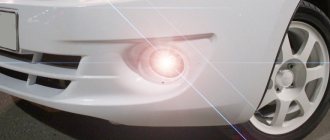
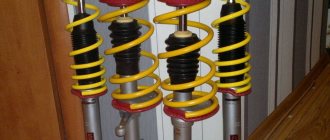
This music will last forever if I don't change the seal
Thanks to VAZ’s “innovative” side door glass seals, the road in a Lada Granta is never boring. This is especially evident in winter, when these same seals “tann”, turning into “plastic”, and the glass in them simply dangles, producing a “melodic” rattling sound on bumps.
When the windows are tightly closed, the rattling is not so strong and does not always appear. But the problem is that while driving, the windows tend to lower themselves by 0.5-1.0 cm. I don’t know how to explain this, maybe from shaking while driving. However, this does not make it any easier, because they begin to rattle again. In order not to listen to this “music”, you have to turn them up again and again. Fortunately, I have electric windows in front. There you just need to use a button, but on the rear doors there are “oars” that need to be turned.
Glove box repair
If you needed to remove it to fix a broken handle that had a broken hinge, the procedure for removing it is the same.
The box itself consists of a pair of main parts glued together. Yes, precisely glued, and not attached in a different, more reliable way.
Therefore, in order to separate them, it will not take much effort. Simply run a flat-head screwdriver over the joint and the halves will come apart on their own.
Remove marigolds Kalina
If the plastic fastener fails, the handle can be easily repaired using the same glue. The reliable Poxipol is perfect. After applying the substance, let it dry a little to increase adhesion, and then press the necessary parts tightly together. In principle, instructions for use are on each package of glue.
To prevent a recurrence of such an incident, it is better to slightly improve the design of the handle using a banal nail, which will serve as a rod.
Drill holes for the stud using a screwdriver. Select a nail of appropriate length and diameter. File it down and install it to strengthen the handle.
The glove box is assembled in the reverse order of dismantling.
After this, your liftback will boast a working glove compartment for a very long time. Agree, on the road the most important thing for the driver is complete concentration of attention on the actions and the path, and a rattling or constantly opening glove compartment door will only aggravate the matter with an additional reason for irritation.
Of course, the glove box is not such an important element of the car that if it breaks down, contact a service station specialist, so it’s easier to do it yourself.
Which hose to use and what length
As mentioned above, the windshield washer hose is used as a seal. It can be found at any auto parts store. The washer hose can be of a certain length, cut and packaged, or can be sold by the meter (by the meter is the best option). The main thing is that the sections of hose inserted into the side window seals are solid and not made up of scraps.
On the Internet you can hear a lot of advice about the length of the hose. Some say the length is 4.5 meters, for others 5 meters is enough. But when I measured the length of the hose on my Grant, it came out to 1.5 meters for the front doors and 1.4 meters for the rear. In total, four doors required 5.8 meters. How did I take the measurements? I simply took the hose and applied it to the seal into which it would be inserted. Then I measured the resulting length with a tape measure and this is what happened. Below is a photo of the hose measurement for the front door:
And here is a photo of measuring the hose for the rear door:
Why is there such a difference in size from what I learned from the videos I watched earlier? They probably have different window openings on Grant :)) (just kidding). Actually I do not know. But, as they say, you can’t argue with facts. I trust my measurements, so I had to go to the store again and buy additionally the missing meters of washer hose, since what I bought earlier was not enough. This is what it means to blindly trust unfounded advice from the Internet. Trust, but verify - golden words. Let's move on.
Entry No. 27. Sealing the side windows.
Good afternoon dear friends! 7 months of owning Granta have already passed. There are many stories on the Internet about side windows rattling, since the seal inside which the glass moves when lowered is not rigid enough and quickly loses its original elasticity. Also, in one person’s review, it was stated that this procedure is relevant for cars produced before 2014, but I hasten to disappoint you - this is not true. For many, on later cars, including mine in 2022, this problem remained, but it did not begin to appear immediately, but after the winter. As far as I understand, after the LG underwent restyling, nothing has changed, so the owners of the new Grants will also face this problem. But what can we do, all cars have problems, even BMWs (Van19, addressed to you), nothing is ideal, so we’ll solve this problem ourselves, since the great AvtoVAZ engineers can’t do it)
exploitable roofing - what is it?
There are several options to solve this problem, but I managed to resort to two. I’ll tell you why this is so in the process.
Option #1. Gluing the window seal into the cavity of the rubber gutter. For this we need:
The window seal itself is sold in any hardware store at an extremely affordable price of 50 rubles per linear meter. It is worth considering that most likely it comes double, so 2.5 meters will be quite enough.
You also need a little electrical tape to secure the seal in the corner of the door.
Well, as well as patience and, as it seemed to me, a little free time.
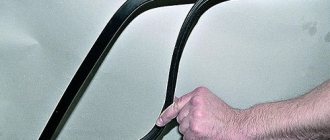
We take the seal out of the opening, pulling it completely out from the side of the body pillar and opening it.
The seal must be glued to the ribbed part. If during operation you have accumulated a lot of dirt there, then it needs to be removed.
Well, we glue the seal along the entire length of the opening. Next we assemble in reverse order. To make it easier to insert the seal into place, you can use silicone grease.
Well, now why did I have to use the second option? I have windshields glued to the doors and therefore putting the seal in place on top is an extremely hectic task. After fiddling with mats with one back door for about half an hour, I realized that this option does not suit me, let’s go another way.
Option #2. Laying the washer hose in the same place. To do this, we need a washer hose, which is also at an extremely affordable price in the store; 5 meters cost me 70 rubles.
Everything is simpler here. Without removing the door seal, we hook it to the inner part and bend it, and then we put the hose there. And so on throughout the opening.
After this is done, the door closes without rattling, only the lock itself can be heard. When driving over small bumps or rough asphalt, there is also silence. And in principle, there was a feeling that it had become quieter in the car, maybe because the windows had become denser and, at least by a fraction, there was less noise coming from the street. The glass does not roll down tightly; when it is raised to the maximum, it is fixed more tightly. I'm pleased with the result. I hope this article will help someone deal with this problem.
Source
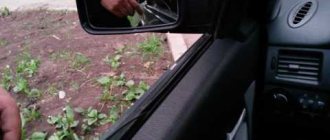
Insert the washer hose into the seal
Using the example of a rear door, let's look at the process of installing a hose into a rubber seal. The glass in the rear door does not go down completely, so you need to start installing the hose from the glass side (from left to right, if you are standing outside facing the door). So let's get started.
First, bend the inner part of the seal with a screwdriver
By pulling out the seal, you will see a free space inside where the hose will be inserted.
So that the glass does not interfere with the hose “passing” inside, it must be pressed by hand close to the outer part of the seal, as shown in the photo.
Next, bending the seal with a screwdriver, we lay the hose inside.
We lay the hose in the upper left corner of the seal, also bending it with a screwdriver.
We continue to lay the hose in the upper horizontal part of the seal.
Place the hose in the upper right corner of the seal.
We finish laying the hose. As you can see, the hose was cut exactly to size.
By analogy, we insert the hose into the side window seals on the other doors. This completes the modification of the side window seal on the Lada Granta. Now the rattling glass will not bother you. See you in new issues of the in-flight magazine!
Source
How to remove velvet covers on a Lada Granta
Replacing or installing velvet covers
How to remove the velvet cover (outer glass seal) on a Priora.
Issue 2 (Installation of new-style velvet covers on a door without a retaining step)
Glass seal for Niva Lada (velvet)
How to replace a door sliding glass Shnivy
Chevy Niva removal, installation of rear door glass
Installation (replacement) of "Velvetok" Lada Granta (Kalina 2)
Removing side windows Niva
Remove the front doors of the Lada Kalina
The first months of owning the Lada Vesta sedan revealed some shortcomings. Most of them are not very significant, but there are points that are worth paying attention to. One of the problems has become widespread when the glass gets scratched when using the window regulator on Vesta. A similar problem occurs on the Lada Granta and Kalina 2 models.
You can deal with the consequences. Contact an authorized dealer, where the damaged door glass will be replaced with new ones. To prevent such a situation from occurring in the future, some try to use ESP (window lifters) less often or monitor the cleanliness of the glass more carefully, but sand getting under the seals (velvet covers) cannot be ruled out in this way.
How to change the glove compartment latch on a Granta
The problem on the Internet is quite common, so I’ll make an introductory part. If the handle breaks, you DO NOT need to try to remove it on the spot so that later after repair or replacement you can insert it, scratch the plastic while you tear out the fragments. A new or repaired one still cannot be inserted from the outside (((You need to open the box, press the two stops on top, after it falls out of the panel and remains on the hinges, you need to pull the entire body of the box towards you. The hinges are split, while the torpedo body is solid axis. Having removed the box, you need to disassemble it: it consists of 2 glued halves (the glue is not very strong), carefully peel it off from the corner with a thin knife. The ear (axis) in the handle-lock fell off on one side. Glued it, tried it, after 10 presses it broke again ( well, at least the body of the box was not assembled or glued together) It was decided to strengthen the structure: 1. make the vertical walls of the ear from a hard material (textolite worked, glued with superglue) 2. put it on 1 steel axle (drilled a 1.5 mm hole in the center and inserted a piece old knitting needle) 3. fill the whole thing with epoxy so that it doesn’t come loose.
READ Which Battery For Lada Granta
All that remains is to assemble the structure: glue the 2 halves of the box and place them in the car.
Cut the glass seals
If you modify the glass velvets yourself, do not overdo it, otherwise the glass may rattle due to its insufficient adhesion (pressure). We recommend that you contact an authorized dealer for warranty.
Stick madeleine (anti-creaking) on the glass seals
Another way to prevent scratches on Vesta glass is to stick madeleine on the seals. We cut the strips and glue them, retreating 1-2 mm from the top of the internal seal, as shown in the photo (do not forget to clean and degrease the surface):
We modify the outer glass seal in the same way. We glue the top part flush with the factory one, and place the bottom 3 mm below the velvet on the plastic so that the glass does not lift up the madeline when lifted.
From the fall of 2022, scratches on glass are not covered by warranty (information letter No. 76-17).
Personally, I like the appearance of the car without tinting, the so-called aquarium. I wondered what could be invented for reusable use, in other words, I got tired of taking it off, it got hot and I installed it.
First thought
It was for my needs to roll up the entire car except the forehead with removable tinting, in the tinting center and we had not heard of such perversions, so it was proposed to shoot purely for the apron windows, I was not satisfied with this option, before re-tinting I can use the same film, but the rear sphere is material to throw away, the fact that the films differ in shade and there is some kind of turbidity was also a stone in the garden, plus on top of everything there is the possibility of unnecessary hesitation with law enforcement officers)
Second exit
I saw in the form of an order for frame curtains from the company LAITOVO, because as I understand it, they only make curtains for all windows, I’ll say right away that the pleasure is not cheap, it costs about 7 thousand rubles, I also couldn’t find this miracle for sale in my city, but send it to someone on the Internet I didn’t want to spend my hard-earned money without looking or touching the product, because there are a lot of scammers nowadays, and with curtains, not everything is so smooth in terms of visibility, if you put the curtain on the rear window, then you can forget about its visibility, and of course most importantly, I was afraid of the wildly collective farm look