Replacing the clutch pedal position sensor
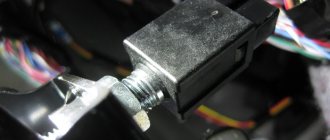
On Lada Vesta and XRAY cars, removal and installation of the sensor is performed in the same way. It is located in the area of the clutch pedal, next to the steering shaft: Procedure :
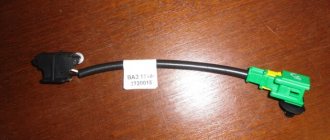
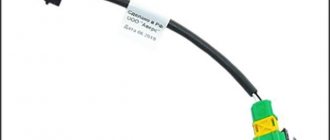
- Disconnect the block with wires (green) by pressing the latch.
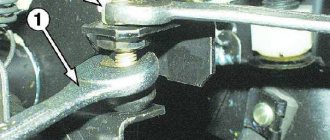
- Remove the sensor by turning it counterclockwise 90°.
Installation is carried out in the reverse order, with the brake pedal in its highest position.
Checking the clutch pedal position sensor
Vesta and XRAY got the sensor from Renault (article 253250007R). To check it, you will need a multimeter (in ohmmeter mode). Procedure :
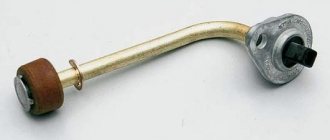
- Move the rod lock to the right position using a flat-head screwdriver.
- Connect the multimeter probes to sensor terminals No. 3 and No. 4.
- When the rod is in the free position, the circuit should be open (the resistance value approaches infinity).
- When you press the rod, the circuit should close (the resistance value is close to zero).
We replace the faulty sensor with a new one. Let us remind you that we previously talked about the brake pedal position sensor and the electronic gas pedal. Categories of products that may be of interest to you based on the article “Replacing and checking the clutch pedal position sensor on Lada Vesta and XRAY”: Products from the Dustershop77 range on the topic of the article:
| Name | Manufacturer | Price | Availability | Add to cart |
| intro iso ant-1 | Antenna adapter Intro iso ant-1 | INTRO | 500 / 350 rub. Discount: 300 rub. | 2 |
| DC307-ASAM.30587 | Silent bolt (silent lock) ASAM 30587 | ASAM | 700 / 500 rub. Discount: 350 rub. | >10 |
| OBD-BT01 | Bluetooth OBDII - adapter for diagnostics | China | 1500 / 1000 rub. Discount: 900 rub. | 2 |
| DC1167 | Large shock absorber support cup cover | Analogue | 1000 / 700 rub. Discount: 600 rub. | 8 |
| multi-vc731 | On-board computer Multitronics vc731 | Multitronics | 8500 / 7900 rub. Discount: 7600 rub. | 1 |
| DC909 | Oil filter cup puller | Analogue | 500 / 450 rub. Discount: 400 rub. | 7 |
| multi-c590 | On-board computer Multitronics C590 | Multitronics | 7500 / 6600 rub. Discount: 6200 rub. | 1 |
| DC303 | 8mm L-shaped key for Renault oil plug | RF | 200 / 100 rub. Discount: 70 rub. | >10 |
| multi-cl590 |
Replacing the clutch on Lada Vesta
This is not an easy job, no matter what type of transmission is installed. The further operation of the car will depend on the quality of the operations performed, and therefore it is better to entrust this to qualified specialists. The cost of such work is quite high and, depending on the complexity and type of transmission, can vary from 3,500 to 15,000 rubles. Of course, replacing the clutch of a Lada Vesta robot, and especially on a manual one, is quite possible. But this requires a wealth of experience and skills, and in the case of a robotic gearbox, also special software, without which it is impossible to adjust the transmission (adaptation).
Replacing the clutch on an AMT
To change it on a Vesta with a robotic transmission, you will need to completely dismantle the gearbox. The further algorithm of actions is as follows.
- If replacing the pressure plate is not included in the plans, then its position relative to the basket should be marked with paint so that there are no problems during assembly.
- Using a 8mm wrench, unscrew the bolts securing the basket to the flywheel of the power plant, remove the pressure and friction disc.
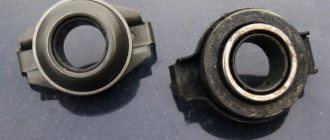
- Remove the release bearing along with the drive.
- All failed elements must be replaced, after which assembly is carried out in the reverse order of disassembly. Also, to install the basket, you will need a mandrel to center the friction disc.
Adjustment will require special equipment and knowledge. You definitely can’t do without specialists here.
Replacing the clutch on a manual transmission
Structurally, this mechanical unit is no different from an automated transmission, with the exception of some nuances. The replacement process is identical, however, in the case of a hydraulic drive, a procedure for bleeding the system from air will be required. This work is performed as follows.
- Remove the battery, its shelf, and the dust shield of the power unit.
- Unscrew the cap of the master cylinder reservoir and add brake fluid to the maximum level.
- Remove the protective plug from the fitting and put a suitable size hose on it (preferably transparent). The other end of the hose is released into a container with working fluid.
- Displace the fitting tube tip by lifting the clamp.
- Wait until air stops flowing along with the brake fluid through the tube, then release the lock and remove the hose from the fitting.
- Add fluid to the reservoir to the optimal level.
Even a beginner can identify clutch faults on a Vesta, be it a manual gearbox or a robotic one, if you follow all the instructions. Another thing is replacing the clutch. Not only a beginner, but also many experienced car enthusiasts cannot cope with this. The fact is that, in addition to the tool, you will need special equipment, as well as a lot of experience.
During the operation of the car, some owners note the appearance of pecks, jerks or twitches when switching to 1st, 2nd or 3rd gear. The cause of this problem may be the clutch pedal travel sensor, which can be adjusted with your own hands in a couple of minutes.
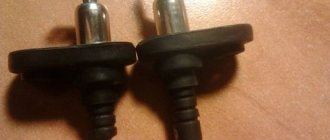
Attention! Depending on the vehicle equipment, the clutch pedal travel sensor may differ. Next we are talking about the Renault 253250007R sensor with a rectangular rod, which has risks)
How to remove the clutch sensor
:
- Disconnect the clutch pedal travel sensor connector.
- Turn the clutch pedal sensor 1/4 turn counterclockwise.
The rod may only move when adjusting size X. The clutch pedal travel sensor must be replaced if the rod is separated from the sensor or adjustment requires more than three changes to size X.
The procedure for adjusting the clutch sensor
:
Measure the X dimension of the stem protrusion
If dimension X is less than 17mm, adjust it by gently pulling the end of the rod. Dimension X must be between 17 mm (no less) and 18 mm (no more).
Clutch Sensor Installation
done in reverse order. Press the clutch pedal with your hand. Install the sensor on the pedal assembly. Lock the sensor by turning it 1/4 turn clockwise. When returning the clutch pedal to its original position, support it with your hand. Connect the connector.
Note
: The clutch pedal travel sensor is adjusted automatically depending on the pedal position. During automatic adjustment, clicks of transition through fixed positions are heard.
ps On the Lada XRAY the clutch travel sensor is not adjustable.
Let us remind you that if the clutch pedal position sensor is faulty, engine operation may be unstable (speeds fluctuate, jerks when releasing the gas), and error P0830 will appear. Before replacing the sensor, it is recommended to check it with a multimeter.
Dismantling
To remove the clutch pedal travel sensor on the Lada Vesta and X-Ray, first of all, you need to disconnect its plug.
Then turn the component a quarter turn to the left (counterclockwise).
In this case, it is permissible to move the rod, but only if dimension X is adjusted. As for the sensor, it must be changed without fail if the rod was separated from it, or if adjustment required more than 3 changes to dimension X.
Replacing the clutch on Lada Vesta
This is not an easy job, no matter what type of transmission is installed. The further operation of the car will depend on the quality of the operations performed, and therefore it is better to entrust this to qualified specialists. The cost of such work is quite high and, depending on the complexity and type of transmission, can vary from 3,500 to 15,000 rubles. Of course, replacing the clutch of a Lada Vesta robot, and especially on a manual one, is quite possible. But this requires a wealth of experience and skills, and in the case of a robotic gearbox, also special software, without which it is impossible to adjust the transmission (adaptation).
Replacing the clutch on an AMT
To change it on a Vesta with a robotic transmission, you will need to completely dismantle the gearbox. The further algorithm of actions is as follows.
- If replacing the pressure plate is not included in the plans, then its position relative to the basket should be marked with paint so that there are no problems during assembly.
- Using a 8mm wrench, unscrew the bolts securing the basket to the flywheel of the power plant, remove the pressure and friction disc.
- Remove the release bearing along with the drive.
- All failed elements must be replaced, after which assembly is carried out in the reverse order of disassembly. Also, to install the basket, you will need a mandrel to center the friction disc.
Adjustment will require special equipment and knowledge. You definitely can’t do without specialists here.
Replacing the clutch on a manual transmission
Structurally, this mechanical unit is no different from an automated transmission, with the exception of some nuances. The replacement process is identical, however, in the case of a hydraulic drive, a procedure for bleeding the system from air will be required. This work is performed as follows.
- Remove the battery, its shelf, and the dust shield of the power unit.
- Unscrew the cap of the master cylinder reservoir and add brake fluid to the maximum level.
- Remove the protective plug from the fitting and put a suitable size hose on it (preferably transparent). The other end of the hose is released into a container with working fluid.
- Displace the fitting tube tip by lifting the clamp.
- Wait until air stops flowing along with the brake fluid through the tube, then release the lock and remove the hose from the fitting.
- Add fluid to the reservoir to the optimal level.
Even a beginner can identify clutch faults on a Vesta, be it a manual gearbox or a robotic one, if you follow all the instructions. Another thing is replacing the clutch. Not only a beginner, but also many experienced car enthusiasts cannot cope with this. The fact is that, in addition to the tool, you will need special equipment, as well as a lot of experience.
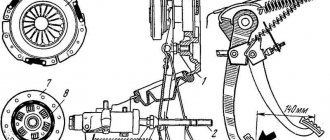
With a working engine, an impeccable gearbox, and a new chassis, the car will not go anywhere without a clutch. On the Lada Vesta this is one of the most important components. The task of a mechanical clutch is to connect the internal combustion engine and manual transmission, transmitting torque from the engine to the chassis, and also to separate them when changing gears (if you leave the gearbox input shaft rotating through the internal combustion engine, the gears will inevitably be damaged).
The Lada Vesta clutch on a manual transmission (mechanical) consists of one disc, engagement is made mechanically (dry, permanently closed type), the drive is hydraulic. The latter means that the unit is driven by fluid pressure and is adjusted manually (by foot) by the driver. In addition, the fluid system acts as a pedal booster. After all, simply pressing with your foot is not enough to set in motion the structure, which engages with the shaft while rotating several thousand revolutions. Therefore, there is no need for hydraulics on an AMT. Read the article to the end and you will learn the intricacies of this knot! Find out the problems that often happen and the clutch drive fails: the release bearing or the basket as a whole is broken. It's time to change, or adjust enough, precise adjustment is important for good operation of the unit. Replacement at the dealer at 9 TO.
Total
If it clicks when releasing or tightening the Lada Vesta clutch in the cabin, the reason may be the limit switch, pedal holder or hydraulic cylinder design. More serious knocking noises in the engine compartment - less often the dealer will refuse to find out the cause, as this may indicate a malfunction of important parts: springs, release bearings, working cylinder.
As a temporary solution to the problem of heavy knocking, drivers use the accelerator. You need to adapt to this: when the clutch is released, the driver gives more gas and the knock disappears. Typically, such actions indicate defects in the media release manual.
Lada Vesta became the new flagship of AvtoVAZ in 2015. The appearance, interior and equipment are radically different from all previous models. For the first time in many years, the new product was able to compete with the most popular foreign cars from Europe and Asia. In addition, Vesta is not inferior to them in quality and in some cases can give them an advantage.
Noise when disengaging or engaging the clutch
A noise similar to rustling, grinding, a slight hum, or howling appears when the unit is turned off. When turned on, it disappears. With almost one hundred percent probability we can say that the release bearing has worn out. Replacing it does not require removing the entire component. However, its untimely replacement leads to failure of the entire mechanism. A squelching, whistling sound when pressing the pedal is associated with wear of the main or working cylinders. There is pressure, the broken part does not hold it - the liquid breaks through further, making noise. The noise in the box disappears only when the clutch is disengaged
The second type of sound is constant, disappears only when the gear is disengaged, and is located in the area of the gearbox. The nature of the “tinkling” of Lada Vesta is a weakened connection between the three main nodes.
A worn driven circle loses its volume and begins to dangle inside the housing. Worn dampers are not able to press the circle tightly. The gearbox is not tightly connected to the engine. Replacing the clutch on a manual gearbox
The procedure is very complicated. The main difficulty is not even that the gearbox needs to be completely removed, but that during assembly it needs to be centered in weight with the flywheel. Repairs can be done with your own hands. But if you do not have the proper experience, saving is not worth it, because we are talking about direct contact with the most important “organs” of the Lada. In general, the process looks like this:
- We de-energize Vesta, remove all attachments that block access to the gearbox mounting bolts (air filter, pipes);
- To prevent the loose internal combustion engine of the Lada from falling, we will hold it with a small diamond-shaped, barrel jack;
- We unscrew the power fasteners so as not to drain the oil, dismantle the box assembly with drives;
- We loosen one by one, then unscrew the fastening elements of the engaging mechanism housing (the bolts here are strong, but small in diameter, you need a good 8mm wrench). We remove the part and find the defect;
- We install the new product, adjust the position of the driven circle inside with a special tool;
- We change the release bearing in the box housing;
- Smoothly, without tilting, the input shaft of the gearbox hits the flywheel splines;
- We check the operation of the drive.
Not all operations are described here. For example, in order to remove the gearbox with drives, it is necessary to dismantle the suspension arms and so on.
Analogs
The manufacturers themselves recommend 826818 VALEO 2180 for Vesta. Owners note that when using the model, the pedal becomes noticeably softer and the car starts easily. The note applies to the original set; fakes are often found. The spare part costs four thousand eight hundred rubles.
The original part of the Lada Vesta is not suitable for the 21129 engine in terms of power; it is designed for lower speeds, for example, such as 2112. For 106 horsepower and above, TS-00001321 would not be a bad match. Price – five thousand six hundred rubles.
How to keep AMT Lada Vesta in traffic jams
A little background:
- ESP system test Lada Vesta
- Manual mode AMT Lada Vesta
- Lada Vesta traction control test
Hello everyone! Dmitry Flegantov is with you!
As you know, I own a LADA Vesta SV Cross 2022 with a 1.8 liter engine and an AMT 2.0 robot.
There are many different rumors about the AMT robot on the new Ladas, but all these rumors became irrelevant with the release of the second version of the AMT and the robot became almost ideal. But no one has canceled the basic rules for proper operation of a car, without which the installed additional accessories of the Lada Vesta become just decoration.
Today I will tell you how to maintain the clutch of an AMT robot during daily driving around the city, especially with constant traffic jams and starts from traffic lights. Let me remind you that the AMT robotic transmission is an ordinary manual gearbox with a conventional clutch, but the clutch is released and gears are changed by automatic actuators according to the algorithms embedded in the control unit. As a result, you get two pedals, like on a classic automatic, and, accordingly, the same comfortable ride.
So, what should you do to ensure that by 70,000 km, or even earlier, your clutch does not say “quack”, but reaches the required 150,000 km? Yes, everything is simple, you just need not to tear it and not slip (this, by the way, also applies to ordinary “mechanics”). And, what does it mean in relation to a robot “not to tear” and not to “slip”, you ask, does it work automatically? And, this means that there is no need to allow sudden acceleration from a standstill and prolonged movement at a very low speed. All the operating principles that you apply to a manual transmission are absolutely relevant here. Although the robot is an automatic machine, it obeys your commands; although it minimizes the wear of elements by correcting your mistakes, it also has borderline modes, constant movement in which will lead to premature repairs. It’s like if you constantly turn the motor to the cut-off point, it seems to be designed for such loads, but these loads should be short-term, not constant!
The first thing you must learn is that you do not need to press the gas pedal sharply when the car is stationary and the clutch is disengaged, the start should be smooth, and you can accelerate when the clutch is fully engaged. I assure you that this way you will start even faster and leave the traffic behind than when you sharply press the trigger, since the clutch is engaged in a split second, but you do not force it to jerk (the robot tries to smooth out this jerk and allows short-term slippage, hence the increased wear).
The second rule, which will protect the clutch from wear when crawling in a traffic jam, is that you do not need to move at a very low speed, which is less than in the “creeping” mode (the creeping mode is implemented in AMT only with the 1.8 engine). When moving so slowly that the engine does not stall, the robot allows the clutch to slip just as accurately as a driver does in a car with a manual transmission; naturally, this causes wear and heating of the discs. Therefore, there is no need to crawl close to the vehicle in front, wait a little, increase the distance and start moving with the clutch fully engaged.
That's all! By following these simple rules, you will significantly extend the life of the clutch of your Lada Vesta SV Cross, and any other car, both equipped with a manual gearbox and a robotic transmission!
For illustration, watch the video where I show all this clearly:
I hope this was helpful!
To be continued…
Standard anti-gravel protection for Lada Vesta
Author's column by Dmitry Flegantov
Bleeding the hydraulic drive
Required tools and consumables:
- capacity 0.5 l;
- thin hose;
- bottle of brake fluid;
- slotted screwdriver.
The procedure is as follows:
- Fill the hydraulic reservoir with brake fluid to the Max mark.
- Remove the protective cap from the bleeder fitting.
- Place the hose onto the fitting. Place the second end of the hose into a jar filled 1-2 cm with brake fluid so that it is immersed in the liquid.
- Use a slotted screwdriver to pry the spring clamp of the supply tube and lift it 1 click.
- Pull the tube tip back 1 click.
- Wait until air bubbles stop coming out of the tube. To speed up the process, you can press the clutch pedal several times.
- Return the tube tip and spring clip to their original state.
- Install the engine splash guard, battery and battery shelf.
Clutch pedal position sensor VAZ
On the latest models of VAZ cars equipped with an electronic gas pedal, a clutch pedal position sensor is installed. Let's consider why it is needed, the principle of operation and possible malfunctions.
Where is the clutch sensor installed?
The clutch pedal position sensor on VAZ cars is installed directly on the clutch pedal bracket; it can be seen by looking under the steering column.
The clutch pedal position sensor is one of the elements of the engine management system with an electronic gas pedal. This sensor provides a more flexible control scheme for engine modes. It simplifies the process of starting to move, eliminates “drops” and jerks of the car when changing gears in the manual transmission, and also allows for a reduction in fuel consumption.
By providing information to the engine controller about the moment the clutch is engaged and disengaged, the clutch pedal position sensor allows it to reduce or increase engine speed at the right moment, as well as adjust the ignition timing.
The clutch pedal position sensor is an ordinary limit switch with two positions - “on” and “off”.
Its normal position is open, that is, it turns on only when the clutch pedal is pressed.
The following symptoms may indicate a malfunction of the clutch pedal position sensor:
- car "pecks" when changing gears
- a sharp increase or decrease in engine speed when the clutch is disengaged
Also, if a malfunction occurs in the clutch pedal position sensor, error 0830 “Clutch pedal sensor error” is recorded in the engine controller and the “Check Engine” light in the instrument cluster turns on.
Error 0830 is detected if the engine controller does not receive a signal from the clutch sensor:
- within 2 seconds after changing gear while driving
- after four gear changes at speeds above 10 km/h and engine speeds above 1000 rpm
The main reasons for error 0830:
- malfunction of the clutch sensor itself
- short circuit or open circuit
- Incorrect clutch pedal height
We encountered error 0830 while preparing the material “How to get there without a clutch?” We recorded video instructions on how to change gears without a clutch. After several gear changes without disengaging the clutch, the “Check Engine” light came on on the panel, which went out only after several dozen gear changes in normal mode.
Clutch sensor price
On many VAZ cars with an electronic gas pedal there is a connector for this sensor, but there is no sensor itself. It is not clear whether they forget to install it at the factory, or whether careless dealers remove it. The second option is also quite possible, since this sensor is still in great short supply. It costs an average of 350 rubles, but finding it on sale is almost impossible.
There are two types of clutch pedal position sensors for VAZ cars:
21214-3720020-02 for Lada 4×4 cars with electronic gas pedal
1118-3720015 for Kalina, Grant and Priora cars with an electronic gas pedal.
They are not interchangeable with each other.
It would seem like a simple sensor, but how much it can complicate the life of an ordinary car owner.
The widespread computerization of cars, adapting to consumer demand, non-stop pushes the best engineering minds to new discoveries. Every year, driving cars becomes more comfortable and safer - and all this thanks to all these innovations. Today we will talk about such an element as the clutch pedal sensor. There are two versions of the clutch sensor, which are not fundamentally different from each other - one is used in a robotic gearbox, the other in a manual one. What does the clutch sensor do? The answer is quite simple - the electronics send a signal to the control unit so that it, in turn, synchronizes the rotation of the engine crankshaft and the gearbox input shaft.
Messages 13
1 Topic from Andre-y 2016-09-04 12:43:27
- Andrey
- New member
- Inactive
- Messages: 3
- Thank you: 0
Topic: Vesta clutch adjustment
Hello to everyone who will come.
I’ve driven the West for 1000 km and I can’t get used to the clutch, just when I’m moving off, well, the clutch grabs at the very end, so you still have to release it very slowly and for a long time in order to start normally and not stall the engine, and keep the speed at least 1500-1700. Is it so hard for everyone to start moving and is it possible to adjust the clutch? Before this I had a Priora, even if I let go of the clutch more frequently, I still pulled away confidently, but in the West the engine stalled.
2 Reply from Fan 2016-09-04 19:07:49
- Fan
- Moderator
- Inactive
- From: Smolensk region
- Messages: 1,017
- Thank you: 204
Re: Vesta clutch adjustment
I got into the Vesta in the cabin and immediately took off and drove off. You probably don’t have enough experience; you need to feel when the engine is choke. And don’t forget that Vesta, unlike Priora, has a hydraulic clutch, not a cable.
3 Reply from Andre-y 2016-09-04 19:42:03
- Andrey
- New member
- Inactive
- Messages: 3
- Thank you: 0
Re: Vesta clutch adjustment
I got into the Vesta in the cabin and immediately took off and drove off. You probably don’t have enough experience; you need to feel when the engine is choke. And don’t forget that Vesta, unlike Priora, has a hydraulic clutch, not a cable.
I went for a test drive, and somehow I didn’t feel any grip, so I sat down and drove off. And when I bought the Westa, I started driving, and that’s where it all began. Maybe during the test drive the clutch was adjusted a little better and grabbed in the middle, but on mine it was at the very end.
4 Reply from rvs 2016-09-04 21:55:00 (2016-09-04 21:55:29 edited by rvs)
- rvs
- Participant
- Inactive
- Messages: 97
- Thank you: 31
Re: Vesta clutch adjustment
Maybe during the test drive the clutch was adjusted a little better and grabbed in the middle
How can you adjust the hydraulic clutch drive? Someone invented the know-how.
5 Reply from Andre-y 2016-09-05 18:14:41
- Andrey
- New member
- Inactive
- Messages: 3
- Thank you: 0
Re: Vesta clutch adjustment
Essentially no one answers my question. Does anyone even ride West?
6 Reply from rvs 2016-09-05 20:41:53
- rvs
- Participant
- Inactive
- Messages: 97
- Thank you: 31
Re: Vesta clutch adjustment
Nobody actually answers my question.
What answer are you expecting? The clutch is adjustable only on a cable drive. Vesta has a hydraulic drive. What can be adjusted there?
7 Reply from Klyuv 2016-09-06 09:15:23
- Beak
- Participant
- Inactive
- From: Moscow region
- Messages: 301
- Thank you: 46
Re: Vesta clutch adjustment
The clutch is adjustable only on a cable drive. Vesta has a hydraulic drive. What can be adjusted there?
Wait, what seems so strange and impossible to you? I don’t know, maybe specifically on Vesta they made the unit unregulated, but in general the free play is adjusted in the same way on hydraulically driven systems. There is no fundamental difference.
8 Reply from rvs 2016-09-06 12:44:33
- rvs
- Participant
- Inactive
- Messages: 97
- Thank you: 31
Re: Vesta clutch adjustment
but in general, free play is adjusted in the same way on hydraulically driven systems. There is no fundamental difference.
Front-wheel drive VAZs have had a backlash-free clutch for 30 years (or whatever has passed since the release of the first eight). If its drive is cable, then adjustment is made with nuts on the cable; if the drive is hydraulic, then there is no adjustment. In general, there is no need to confuse the hydraulic clutch drive on the classics, where the clutch (free play) was adjusted between the nut on the pusher and the fork.
9 Reply from Klyuv 2016-09-06 16:40:01
- Beak
- Participant
- Inactive
- From: Moscow region
- Messages: 301
- Thank you: 46
Re: Vesta clutch adjustment
It’s not just the classics that have used and still use a hydraulic drive with adjustable pedal travel. If you know for sure that this is not provided for on Vesta, then that means it is. But this is not because “it can be adjusted on a hydraulic drive.”
10 Reply from Lumi 2016-09-21 20:13:55
- Lumi
- Moderator
- Inactive
- From: St. Petersburg
- Messages: 580
- Thank you: 102
Re: Vesta clutch adjustment
you need to feel when the engine is choking.
Injection at 1.5 thousand?
I feel the problem may be in the check valve, which, when the brake is suddenly released, does not allow the brake fluid to quickly flow back.
11 Reply from antifashist 2016-09-22 12:49:33
- anti-fascist
- Moderator
- Inactive
- From: Salavat, Bashkortostan
- Messages: 708
- Thank you: 73
Re: Vesta clutch adjustment
I’ve driven the West for 1000 km and I can’t get used to the clutch, just when I’m moving off, well, the clutch grabs at the very end, so you still have to release it very slowly and for a long time in order to start normally and not stall the engine, and keep the speed at least 1500-1700. Is it so hard for everyone to start moving and is it possible to adjust the clutch? Before this I had a Priora, even if I let go of the clutch more frequently, I still pulled away confidently, but in the West the engine stalled.
What does the dealer say? Must check.
12 Reply from Sergey Kurdyukov 2018-08-06 14:05:06
- Sergey Kurdyukov
- New member
- Inactive
- Messages: 1
- Thank you: 0
Re: Vesta clutch adjustment
I drove the West for 1000 km and can’t get used to the clutch
I've already driven 16 thousand in a year and a half and I can't get used to the clutch. Before that I had Kalina, and although its clutch is stiffer, I got used to its clutch in a couple of weeks. Moreover, in Kalina I could shift in any gear without a transmission jerk. On Vesta it works normally only at 3rd and higher.
| Turn off the engine and press the clutch pedal two or three times. | There should be no jamming, creaking, knocking or any other extraneous sounds in the drive mechanism. |
| Start the engine. | If at the same time a howling sound is heard from the manual transmission, which becomes more distinct when the pedal is depressed, it means that the release bearing is badly worn and needs to be replaced. |
| With the engine running, depress the clutch pedal and engage any speed. | At the same time, there should be no creaks, knocks, or crunches. Otherwise, extraneous sounds indicate incomplete disengagement of the clutch. This usually indicates airing of the system. If there is no air, it means there is a malfunction of the master or working cylinder, or a broken diaphragm spring. |
| With the engine running, turn on the speed and smoothly release the clutch pedal. | When the car starts to move, there should be no jerking or extraneous noise. Otherwise, the cause of failure may be damage to the discs, damper, or oil getting on the discs. |
| While driving, you need to press the accelerator pedal sharply. | If the revolutions have increased, but the car has barely accelerated, it means the clutch is slipping. It is easy to understand about slipping by the characteristic burning smell from the friction linings of the disc in the cabin. The problem is solved by replacing the disks. |
How to drag
You will need: buy a set of leather braiding for the gearshift knob (price about 650 rubles), or make a pattern yourself (glue the handle with masking tape, cut it and transfer the dimensions to the leather).
- Mark the gearshift knob in the center.
- Apply glue to the handle and pieces of leather, wait 5-15 minutes.
- Place the leather on the handle, smooth it out, and wait for it to dry.
- Sew the overlays using the threads from the kit.
- On the upper part, make cuts on the skin in the form of triangular cuts. Then we wrap the skin inside and glue it.
- Reassemble and install in reverse order.
If the price of a leather braid for a gear knob costs 650 rubles, a leather gear knob costs from 850 rubles. What is better for you, buy a ready-made handle or tighten it yourself?
Frequently asked questions about adapting a robotic box
- Turn on the ignition and connect to the car using the ELM327 adapter and DDT4ALL software.
- Select in the upper left window XGA-XRAY - AT - BVR_On_CAN_x52_J53_v2.4
- In the middle window [AT] BVR_On_CAN_x52_J53_v2.4
- In the lower left After sales - Learning Procedures
- Press the button with the image of a “face”
- Carry out the learning procedure by clicking on the appropriate button.
- Turn on the ignition, but do not start the engine. Carry out training of the clutch actuator end positions. Execution time is about 5-6 seconds. (you will hear the actuator moving).
- After the operation, press the “STOP” button and turn off/on the ignition.
- We wait 5-10 seconds and start the gearbox learning procedure. We do not turn off the ignition. Execution time is about 1 minute.
- After the operation, press the “STOP” button and turn off/on the ignition.
- Start the engine and wait 15-20 seconds, then start learning the clutch touch point. Execution time 5-10 seconds.
- After the operation, press the “STOP” button and turn off the ignition. Wait for the main relay to turn off (about 4 minutes)
- We start the engine and check.
- Turn on the ignition and connect to the car using the ELM327 adapter and DDT4ALL software.
- Select in the upper left window XGA-XRAY - AT - BVR_On_CAN_x52_J53_v2.4
- In the middle window [AT] BVR_On_CAN_x52_J53_v2.4
- In the lower left After sales - Diagnostic.
- We make sure that the two selected windows have non-zero values.
- Click on the “heart” icon in the top menu, remember or write down the errors, then erase the errors.
How long does it last? The adaptation process takes about 5 minutes. During adaptation, the car adjusts the clutch, then turns off and saves the settings
How to adapt the clutch? Clutch adaptation is carried out using special equipment via the diagnostic connector. It is best to have the clutch adaptation done by a dealer rather than by a third-party service; besides, the dealer will be cheaper.
How much does a clutch adaptation cost? Under warranty, adaptation is free. In other cases, it all depends on the region. In third-party services - from 2 tr.
How to install an application on MMS
Procedure:
- Copy the installation file (with the extension cab) to the SD card.
- Insert the SD card into the MMC.
- Exit to desktop.
- Go to “My Computer” -{amp}gt; SD card.
- Start installing the application by double clicking on the cab file.
It is more convenient to install and launch applications through AppLauncher:
- Launch Total Commander
- Open the SD card and start installing the application by double clicking on the cab file.
What useful and interesting applications for the standard Lada Vesta MMC can you recommend? By the way, here is the directory of programs for WinCE.
Let us remind you that we previously talked about other applications that expand the functionality of Vesta’s multimedia system:
- AppLauncher - allows you to launch applications without going to the desktop.
- A patch that allows you to watch videos while driving.
- Altmenu - allows you to comfortably use several navigation programs at once.
- Improved CityGuide - will make the program interface more convenient, and will add data about cameras, ambushes, etc. to the maps.
- Navitel
- Yandex maps
Key words: cassette player Lada Vesta
Instructions, recommendations from experts
Often Lada Vesta owners complain about knocking and jamming when moving from first to second gear. Shocks are less common when turning on third speed. The reason for this behavior of the transmission is wear of the clutch sensor, violation of the gaps, and an increase in the free play of the pedal.
It is quite possible to adjust the unit with your own hands; there is no need to go to a workshop. The exception is the current factory warranty for the technical product.
Design and principle of operation of the crankshaft sensor
In order for the sensor to transmit a signal through a wire to the ECU microcontroller, the following principle is used:
- two flywheel teeth were deliberately omitted;
- when entire flywheel teeth rotate near the DPKV, they distort the magnetic field arising in the device coil;
- when a section of the crown with a missing tooth passes near the sensor, the interference disappears;
- the device transmits a signal about this to the computer, and the computer determines the exact position of the pistons in each cylinder.
The ECU software allows you to calculate the position of the pistons in cylinders I and IV when a signal is received and the direction of shaft rotation. This is enough to correctly generate signals to the fuel supply and ignition sensor.
This is interesting: Features and advantages of cylinder head studs
Optic
Structurally, this sensor is made of an LED and a receiver. The signal appears in the receiver when it passes through a section of the flywheel with ground teeth, since at this moment the LED beam is not blocked by the remaining intact teeth.
These simple steps do not allow you to use the device for any additional operations. If a breakdown occurs (ignition desynchronization), the DPKV is replaced along with the wire.
Hall Sensor
Working on the principle of potential difference in the cross section of metals (Hall effect), the crankshaft position sensor has the additional function of distributing ignition into the combustion chambers of the cylinders.
A fairly simple operating principle of the sensor is based on the generation of voltage due to a change in the magnetic field. Without a flywheel with two ground teeth, this device will not work.
Inductive
Unlike previous modifications, the magnetic crankshaft position sensor operates on the basis of electromagnetic induction:
- a field is constantly generated around the device;
- voltage for the signal to the microprocessor occurs only when passing through a section of the flywheel rim with missing teeth.
Shaft position monitoring is not the only option of this device; in addition, it serves as a shaft speed sensor.
Removing gearbox 21807
1. Place the car on a two-post lift, apply the parking brake, turn off the ignition, open the hood and disconnect the earth wire terminal from the battery.
2. Remove the front wheels from the car.
3. Unscrew thirteen bolts 1 of the fastening and remove the mudguard 2 of the engine (replaceable head 10, knob and extension).
Engine splash guard:
- fastening bolt;
- engine splash guard
4. Disconnect the pipes of the intake resonator 1 from the air intake and the air filter housing, unscrew the two fastening bolts and remove the resonator (replaceable head 10, knob).
Intake resonator:
- intake resonator;
- air filter pipe;
- air intake pipe
5. Unscrew the fastening clamp 1 and disconnect the upper hose 3 of the crankcase ventilation from the pipe of the cylinder head cover 7 (pliers).
Air filter with intake pipe hose assembly:
- clamp for securing the upper crankcase ventilation hose;
- intake pipe hose clamp;
- upper crankcase ventilation hose;
- intake pipe hose;
- air filter mounting bolt;
- air filter;
- cylinder head cover
6. Loosen the fastening clamp 2 and disconnect the intake pipe hose 4 from the throttle pipe (a Phillips screwdriver).
7. Unscrew bolt 5 securing the air filter and remove air filter 6 assembled with hose 4 of the intake pipe (replaceable head 10, knob).
8. Press down the buttons 2 of the cable end clamps and disconnect the ends of the shift cable 4 and gear selection cable 5 from the gear shift mechanism 6 levers.
Disconnecting the transmission control drive cables:
- cable sheath fastening clamp;
- button for securing the cable end;
- bracket for fastening gearbox control drive cables;
- gear shift cable;
- gear selection cable;
- gear shift mechanism
9. Move the clamps 1 fastening the cable sheaths in the direction indicated by the arrow, remove the cable sheaths from the fastening bracket 3 and remove the gear selection and shift cables from the work area.
10. Disconnect harness 4 of the ignition system wires from the block of harness 1 of the oxygen sensor wires.
Disconnecting the diagnostic oxygen sensor wiring harness:
- oxygen sensor wiring harness;
- oxygen sensor wiring harness mounting bracket;
- oxygen sensor wiring harness block mounting bracket;
- ignition system wiring harness
11. Disconnect the harness block 1 of the oxygen sensor wires from the mounting bracket 3, remove the oxygen sensor wiring harness from the mounting bracket 2 and remove the harness from the work area.
12. Disconnect the ignition system wiring harness connector from reverse light switch 4.
Disconnecting the bracket for securing the outlet hose from the gearbox:
- mounting bracket bolt;
- outlet hose mounting bracket;
- radiator outlet hose;
- reverse light switch
13. Unscrew bolt 1 of bracket 2 securing the outlet hose (replaceable head 13, knob).
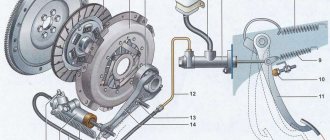
14. Unscrew the two fastening bolts 1, remove the clutch hydraulic drive cylinder 2 without disconnecting the hydraulic drive tube 3, and hang the cylinder on the service hook (replaceable head 13, ratchet wrench, service hook).
Removing the clutch hydraulic cylinder:
- bolt;
- clutch hydraulic drive cylinder;
- clutch hydraulic tube;
- bracket for fastening the hydraulic clutch cylinder;
- Transmission;
- clutch release fork
15. Unscrew three bolts 1, remove bracket 2 for fastening the hydraulic clutch cylinder, remove starter 3 and hang it on a service hook (replaceable Torx E10 head, extension, ratchet wrench, service hook).
Removing the starter:
- bolt;
- bracket for fastening the hydraulic clutch cylinder;
- starter
16. Unscrew the fastening nut 1, remove the ground terminal 2 from the stud and remove the wire from the work area (replaceable head 17, knob).
Disconnecting the ground wire from the gearbox:
17. Unscrew plug 1 and drain the oil from gearbox 3 (ring key 17, installation type 24164 “ALFA” (Italy) for collecting used oil).
Hole plugs for changing the oil in the gearbox:
- oil drain plug;
- oil filler plug;
- Transmission
Speedometer and clock on MMS screen
EasyConnected or EasyLink is a program that allows you to display the screen of an Android smartphone on an MMC (the phone must be connected to the MMC via USB).
On smartphone:
- Allow installation of third-party software: Settings {amp}gt; Security{amp}gt; Unknown sources. Allow installation of applications from unknown sources.
- Become a "developer": Settings {amp}gt; About the device {amp}gt; Build number. Click on this menu many times.
- In the “for developers” menu, enable USB debugging.
- Install the EasyConnected_V4.6.1.apk application.
Author of the photo. Just drop the folder into the MMC memory and run the exe file.
Reviews
| № | Positive |
| 1. | Semyon (www.zr.ru): mileage 70,000 km, clutch is normal. |
| 2. | Andrey (autobann.su): the pedal travel is natural, not increased. I noticed that in severe frosts the PS becomes a little tight. |
| 3. | Georgy (lada-vesta.net): there are no comments on the DS, it works as usual. |
| 4. | Stepan (otzovik.com): standard pedal travel, 68,000 km of active drive without maintenance and repairs. |
| 5. | Vladimir (www.zr.ru): positive review, no comments. |
| 6. | Alexander (autobann.su): I have a pre-installed DS with a stock from Renault Logan, I heard that the quality of the French is better than the domestic one. |
| 7. | Mikhalych (https://forumvesta.ru): all standard units and components are working properly, without any violations. |
| 8. | Vitaly (lada-vesta.net): Lada Vesta is assembled with high quality, I have no complaints. |
| 9. | Timofey (otzovik.com): in four years of operation, I replaced the sensor once, I don’t consider it a defect or defect. |
| 10. | Stanislav (www.zr.ru): I use Lada myself and recommend it to others. |
| 11. | Gennady (autobann.su): mileage 85,000 km without repairs or equipment replacement. |
| 12. | Alexey (https://forumvesta.ru): soon 100,000 km, the condition of the car is a solid “4”. Much depends on the driver, how he observes the technical inspection deadlines. |
| Negative | |
| 13. | Konstantin (www.zr.ru): the Russian sensor served for two years, after which the rod failed. Replaced it with a French one from Renault Logan. |
| 14. | Vitaly (otzovik.com): the DS is not tightly fixed, periodically it turns out of the grooves. |
| 15. | Grigory (autobann.su): after a year of using the car, the DS flew. Fortunately, it was under warranty and was replaced free of charge. |
| 16. | Kirill (lada-vesta.net): I pumped the system several times, but to no avail. |
Connecting cruise control keys
To connect the cruise control keys, follow the procedure.
Connecting the buttons on the steering wheel begins with completing the wired cruise control system with the radio wiring. Connect the wiring to the multimedia device into the blue connector. To avoid mistakes, study the wiring diagrams.
If a new radio was installed during operation, you will need an adapter for the specific type of audio system.
- switching music files;
- Instant volume mute.
Cost of steering wheel with buttons
The price for the model with buttons depends on the store. Most Lada Vesta car owners purchase products with keys in virtual stores. The order is placed for article number 8450006832. The cost ranges from 5000 to 7000. If the vehicle owner needs an airbag, the price increases by another 1000-15000. For leather covering you will have to pay another 2000-2500 rubles.
To save money, you can use an overlay with keys on a standard steering wheel. This option is more difficult to connect and difficult to find, since it is not popular.