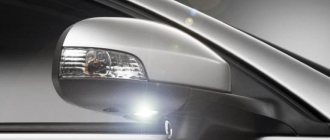
The term limit switch is nothing more than a common abbreviation for “limit switch”. In it, the contacts are closed without fixation by a movable rod - this is convenient for monitoring the position of moving elements. Limit switches of various types are installed in cars on the doors or in the trunk; they control the position of the brake pedal and handbrake lever.
Limit switches. Types and device. Operation and Application
To limit the movement of various units and mechanisms, limit switches are used. Electricians can also call them limit switches or terminals. These devices are subject to requirements for their reliability, durability and safety during operation.
Types, device and application
There are many different types of limit switches, divided by operating principle and features. Each type may include additional types. This depends on where the device is used. Let's take a closer look at the features of each type.
Mechanical
This type of limit switch is popular in production, as well as in domestic use. Switches come in the form of a button, roller, float, or lever type. A good example of the use of terminals is a house elevator. Its design contains many limit switches: in the form of a sensor for the minimum and maximum height of movement of the elevator, a signal to open doors, a rope break sensor and many others.
In an apartment, many home craftsmen install limit switches in the form of microswitches on the door so that when it opens, the lighting in the room turns on.
Push-button or wheel switch
Includes a housing containing electrical contacts, which can be either normally open or closed. A button or roller is installed behind the body. It depends on the way it functions.
Often, on the housings of limit switches there is a connection diagram with contact numbers. Let's look at the principle of operation of a limit switch using the example of a device equipped with a roller.
The moving mechanism collides with a wheel, which pushes the rod down. As a result, the contacts open, thereby de-energizing the electrical network that was connected to them. We can say that the end stops the mechanism from moving further, or connects some device or alarm.
When installing the limit switch, special precision must be observed. Otherwise, the mechanism may not reach the roller, or, on the contrary, it will go too far onto the roller, which will lead to breakdown of the limit switch mechanism.
It must be said that single end switches are practically no longer found. Basically they are made in the form of a block of contacts in one housing. In our case under consideration, it is clear that there are normally closed and normally open contacts operating in pairs. This design option is convenient and universal, since you can connect to any pair of contacts, depending on the operating scheme. No need to look for a special design.
Sometimes a switch with two pairs of contacts is needed when you need to turn off the mechanism and turn on, for example, reverse.
Microswitches
Such miniature limit switches are a unique subtype of limit switches that are used in electronics and household devices. They are small in size. In essence, these are the same limit switches, but they have their own distinctive features.
With small dimensions, the movement of the working part is very small. Therefore, precise adjustment is required during its installation. If it is impossible to adjust a microswitch with a small stroke, switches with an intermediate link (roller) are used.
This makes it possible to increase the stroke of the rod and make the necessary adjustment of the limit switch.
Non-contact limit switches
This type of limit switch has become popular in industrial production. Based on capacitive switches, various level sensors are produced in dispensers (for checking the level of liquids, bulk materials, etc.). When filling a container with liquid, a limit switch located in the container will stop its filling at a certain time.
The retail chain offers a wide selection of non-contact limit switches, so you can choose a device for any type of structure. Before purchasing, it is advisable to get advice from a specialist so as not to make a mistake in choosing a specific switch model.
Reed switches
These are a type of limit switches that respond to a magnetic field. The reed switch device consists of several pairs of contacts made of ferromagnetic material.
The action of the contacts inside the reed switch occurs when a magnet approaches it. The advantage of this design is the absence of mechanical contact. This greatly increases its service life. When installing such limit switches, special attention must be paid to the presence of a magnet, since this device will not react to any other material.
The scope of application of reed switches is very diverse. The reed switch acts as a microswitch that can be easily installed anywhere. It is connected to various alarm systems on doors. When the door is closed, the magnetic field acts on the reed switch, and the circuit remains closed. When the door is opened, the magnet moves from the reed switch, the contact opens and connects the alarm or other device.
Inductive switches
Such limit switches are also not a separate device, but act as a block of several pairs of contacts in one housing. They are mounted in different ways: with glue, bolts, nuts. Their sizes vary widely. These limit switches must be energized. They are used as movement limiters for various units and mechanisms.
The inductive type of limit switches is used in security systems, since such switches react both to the weight of the metal and to its movement. Inductive switches are used in rods as a stroke limiter and in the mechanisms of safety protective casings. Their distinctive advantage is their unpretentiousness to pollution, which is why they are used in industrial production processes.
Inductive models by their design can replace mechanical types of limit switches. They are easy to use because they do not require direct contact to operate. Its design contains an inductor that reacts to metal. Therefore, no magnet installation is required.
Optical sensors
Non-contact limit switches are equipped with optical touch sensors. Therefore, such devices are widely used in areas where special precision is needed. Optical switches are used to regulate the movement of moving parts in automatic gate opening systems. They are triggered at the end of the movement of the gate leaves, or when foreign objects appear in front of the moving leaf.
Optical limit switches operate on several principles and are divided into types. Reflective sensors emit and receive light reflected from an object located in the sensor area. When light energy is captured, a certain logical level appears at the output. The distance from the object to the sensor depends on the size of the object, surface quality, color, etc.
The receiver and emitter are located in the same housing
Reflective color returners receive and emit color reflected from a special reflector. If the beam is crossed by an object, a control signal is issued. The range of action of such a limit switch depends on the environment and its light transmission.
Through sensors have a separate receiver and light source located opposite each other. An object that enters the area of the light beam interrupts the light, thereby changing the logical output level.
Wall optical sensors consist of an infrared diode and a silicon photocell, which are located on intersecting optical axes in a dark housing made of heat-resistant plastic.
The detector reacts to radiation from an infrared diode as an object passes through its field of action.
Capacitive switches
This type of switches is used as limit switches. Capacitive sensors detect conductive and non-conductive materials that are in liquid, powder or solid form. The sensor is triggered when the material is placed next to each other at a configured distance.
Capacitive switches include the main parts:
- A generator that creates an electric field to influence an object.
- A demodulator that converts the amplitude of RF oscillations into a change in voltage.
- Trigger – provides a certain signal value, hysteresis value, and switching.
- Amplifier – increases the input signal to a certain value.
- LED indicator - displays the status of the switch position and makes it possible to control operation and settings.
- Compound – provides some protection against foreign particles and moisture.
- Housing – serves to install the switch, protects all internal elements from mechanical damage, is made of brass or plastic. Hardware parts are included with the housing
The principle of operation of capacitive limit switches is as follows. The active surface of the switch consists of 2 metal electrodes. They can be considered the plates of a capacitor. The electrodes are located in the feedback circuit of the RF generator, which is configured so that when the object is not near the active surface, it does not work.
THIS IS INTERESTING: Your question: How to return overpayment of pension contributions?
When an object appears near the active surface, an electric field arises, thereby changing the feedback capacitance. In this case, the generator produces oscillations. Their amplitude becomes greater as the object approaches the surface.
Related topics:
Source: https://electrosam.ru/glavnaja/slabotochnye-seti/oborudovanie/kontsevye-vykliuchateli/
Installation of hood lock StarLine L10
A reinforced hood lock is a mandatory item in the anti-theft protection program for Ford Focus vehicles. Many thefts were committed due to poor security of the engine compartment. And without installing a hood lock, the mechanical gearbox lock from Garant would also be useless - access to the engine compartment of the Focus allows you to quickly and easily “bypass” it.
During the installation of the lock, a special reinforced bracket was used.
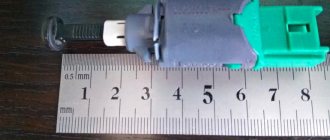
Door limit switch VAZ 2114: use, modernization and replacement
Limit switches - also known as limit switches - are electromechanical devices whose task is to open/close an electrical circuit. Although the device was originally developed for use in engineering structures, but with the increase in the number of electronics in vehicles, they began to be widely used in their control system.
So, since the 50s of the last century, almost all cars were equipped with an automatic system for turning on the light in the cabin when the front door was opened, but with the progress of progress, an increasing number of tasks began to be assigned to the limit switches used in the car, for example, the limit switches of the VAZ 2114 are located on the entrance doors and trunk.
Correct modernization of VAZ 2114 limit switches
The most common problem in cars of this series is that the driver's door switch of the VAZ 2114 wears out and then does not work, so there is no need to talk about the normal operation of sensors, alarms and even lights in the cabin.
The second most unpleasant problem that VAZ 2114 car owners may encounter is that the standard limit switches do not report that the door is not closed when it is slightly open by one click of the limit switch. Such a design flaw not only does not allow the car owner to be confident that all doors are closed, but also leaves a significant loophole for intruders.
Therefore, if you want the signal to be triggered even when the door is slightly open, you will have to slightly change its design with your own hands.
Modernization of the limit switch of the VAZ 2114
IMPORTANT! The design of the rear door limit switches on the VAZ 2114 differs from the design of the front doors; this should be taken into account when selecting materials and methods for solving the problem.
The essence of the problem is to reduce the stroke length of the limit switch to obtain the required response of the entire electrical network.
The simplest solution from available materials is the following modernization:
- We take the upholstery piston of your own car.
- We replace the standard “washer” with this piston.
- Using available means, measure the distance between the edge of the cap with the base; it should be 1 mm.
- We fix the design and check it; the light bulb in the cabin will act as a kind of quality control; it should light up after one click.
Although this method is not applicable for the rear door due to differences in design, it will help solve the problem of the front doors. Also, do not forget about fixing the piston; the ideal option would be a regular plumbing gasket of the appropriate size. On the back door, the limit switches will just have to be carefully ground off.
Replacing the limit switch with an alternative one
If a decision has been made not to sculpt the glue from scrap materials, then it is necessary to look for a worthy alternative. Let's say right away that the VAZ 2114 door limit switch can be easily replaced with a similar device with DAEWOO; we will need the General Motors device model 96235956 in the amount of 5 units.
We need to replace one limit switch with another, to do this we twist the old one and get to work:
- We start with the rear doors, where the analogs will become like family.
- We move on to the front door, where, due to the fact that our analogue is a little wider, the holes will not match, we will have to screw it in a little diagonally.
- Before doing this, it is necessary to solve the problem with the wiring running along the rack, due to the fact that our device is wider, it will not allow it to work normally. To solve this problem, a heat-shrinkable tube of the required size for the end cap is selected in advance; this will protect it from the cable.
- We assemble and check functionality.
IMPORTANT! If you couldn’t find the required tube, you can use scraps of cable duct or other dense material and fix them on the device, this is wrong, but it can help out for the first time.
Where do the door switches come from?
The general diagram of the VAZ 2114 door limit switches is shown in the diagram below:
In practice, it looks like this: a black and white wire goes to the limit switches, since they are responsible for opening the circuit, the white wire is responsible for the plus, and the black wire for the minus. So, for example, there are three wires going to the light bulb responsible for interior lighting: black and white, responsible for powering the light bulb itself, and black and white from the end switch.
As can be seen from the diagram, they are all connected in parallel, which means that the alarm system, the light bulb and the instrument panel are included in this network separately for each door.
Alarm connection
To install this device, the driver will have to become familiar with the concept of inserting wires.
Connecting an alarm system to limit switches
In order to carry out this simple operation, you do not have to disassemble the entire machine:
- Remove the sill trims and the side panel on the driver's door.
- We find there a wiring harness going to the dashboard (this is what is needed so as not to connect the alarm to each door in parallel).
- Having selected the white cable we need, we insert 1N5401 into it so that the direction of the current on the diode is directed towards the limit switches.
- We connect the 1N4001 paired with it according to the diagram shown in the picture.
- We find the handbrake wire; we need to embed 1N4001 into it so that the cathode is closer to the switch.
- We find a blue cable and solder a branch into it to the alarm unit.
- We turn on the alarm and test, and if something doesn’t work, first of all we “ring” all the solders, perhaps you soldered one of the diodes in the opposite direction.
In conclusion
Limit switches are a known problem in the VAZ line, but their repair, modification and maintenance can be done independently using the diagrams described above. It is better to entrust the installation of an alarm system to professionals, because the safety of the car is much more valuable than the saved “pennies”.
Source: https://vazremont.com/koncevik-dveri-vaz-2114
Typical breakdowns and their symptoms
If the door lock does not work on the Ford Fusion, then it is necessary to establish the cause of the malfunction. Basic moments:
- Dust, dirt or the element has not been lubricated for a long time.
- Oxidation and freezing occurred due to moisture ingress and concentrate ingress. An electrical leak may occur, or it may be caused by washing, precipitation, or sudden cold snap.
- Incorrect adjustment was made. High installation or too small stroke of this part.
- False alarm when dust or water gets into the gap between the contacts.
- Corrosion. Regular lubrication of the internal niche with an anti-corrosion agent will help prevent damage.
How to remove and repair the door switch of a Lada Granta
Car : Lada Granta. Asks : Igor M. The essence of the question : when you open any door, the light in the cabin comes on every other time, how to remove the limit switches and repair them?
I decided to change the door limit switches on the Lada Granta, since in winter there is a problem with their operation. They just don't turn on 4 times out of five. I heard that you can install limit switches on door locks, but I don’t know the design of the system itself. How to remove old switches from the thresholds, and then what to do with the empty hole in the threshold?
Operating principle of limit switches
The following two tabs change content below.
Depending on the configuration, the Lada Granta can be equipped with one limit switch (driver's door only) - Standard equipment, or 4 limit switches - Norma+ and Luxury equipment.
Indeed, many Lada Granta car owners have replaced the limit switches in the threshold with switches in the door lock. In winter, limit switches in thresholds often do not respond to door opening due to loss of elasticity of the rubber cap. Also, sometimes there are cases when the limit switches of a Lada Grant in the thresholds themselves trigger when the car turns sharply, when the door may move slightly away from the body.
Switching to limit switches in the door lock eliminates these problems, and it can be done in-house. This will require additional wiring and plugs.
Removing the old limit switches
The old limit switches in the thresholds are removed quite simply. Depending on the design, they are attached either to rubber antennae or to a self-tapping screw.
- In the first case, you just need to carefully pull them towards you, since the switches are held in place by fixing tendrils.
Limit switches with “antennae” type fastening, such limit switches are located on the driver’s doorIn the second case, you need to unscrew the end screw.
Self-tapping screw for fastening the end switches, pay attention to the gaps from the end switch to the body
- Next, you just need to pull out the connector with the wires, here is the usual “mom and dad” trick.
Difficulties may arise due to the connector becoming stuck to the plug, in which case it is necessary to use a “rust converter”. Driver's door switch
THIS IS INTERESTING: Replacing a robot with a Toyota Corolla automatic transmission
On all four doors the principle of removing the limit switches is the same. True, on Grants in the “Standard” and “Norma” trim levels, only the driver’s door limit switch is installed from the factory, while the rest have rubber plugs in the thresholds. The same plug can also be used to seal the empty hole from the left front door end switch removed from the threshold.
Only the driver's door switch is installed from the factory.
Above we wrote about the option of limit switches with a self-tapping screw; this is usually done when they want to install limit switches on all doors. In this case, three limit switches are purchased and paralleled to the driver's door to the positive wire, and the negative wire is a self-tapping screw that will be powered from the car body.
Repair of limit switches
I am inclined to believe that as soon as AvtoVAZ solves the problem with the limit switches, as soon as they start working, then the Lada can become a good car.
This problem dates back to the first Samara, where the quality of individual spare parts was very poor. Owners of nines will confirm that the limit switches there were defective, and here on the Lada Granta, the limit switches were made by the “enemy of the people”. Look what happened to them after three years of operation.
These limit switches can be repaired, but it’s easier to throw them away. It is necessary to clean the contacts on site.
Clean this contact, but given the amount of rust, the effect will not last long
Source: https://carfrance.ru/snimaem-i-remontiruem-konceviki-dverej-lada-granta/
Car alarm connection points for Ford Focus 2006-2009
At the ignition switch we take the power wires. 12 Volts - red Ignition - green/yellowStarter - gray/red ACC - yellow
We connect to the dimensions on the light switch to the orange/black (in some to orange/yellow) wire (positive polarity)
The fuel pump can be found in the right threshold - green/orange.
Stop - green/white on the “frog” brake pedal.
The central locking control and door limit switches are located on the fuse block at the bottom of the passenger's feet. (In some cars, the central locking is installed in the driver's door - green/h and blue/h). Central locking (controlled by minus) - black/orange and black/green in the orange connector. When you search, close all the doors, otherwise the locks will not close. Door switches (positive) - black (driver's), black (rear left), black (rear right) and black (front right) in the same orange connector where the tsz. Look with a voltmeter, not a probe. The probe will not show a “plus” when the door is opened (at least the light bulb one). The trunk limit switch is in the same place as all the others and is also positive - black/cr.
If there is a hood switch on the car, then you can take it in the adjacent blue connector - h/w. By the way, he is also positive.
To control the engine, it is better to take a signal from an injector (any). Right wire in the direction of travel. You can try charging - the pink wire on the generator. But it takes a long time for 12 volts to appear on this wire. Therefore, autorun often does not work correctly. In terms of noise (or voltage), it works, but when the stove is fully turned on (motor at maximum), it again does not work correctly (in the case of Sherkhans, it does not work 100% correctly).
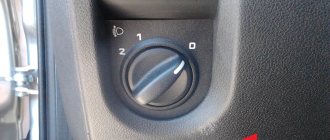
If the low beam is turned on when you turn on the ignition, then (to prevent this from happening) cut the thin side and the thin side on the headlight switch.
| Chain | Color | Location |
| + 12V | Red (thick) | In the harness to the fuse box, green large size. |
| ACC | Yellow | Egnition lock |
| IGN1 | Green/yellow | Egnition lock |
| SARTER | Grey/black | Horizontal harness behind the glove compartment (you can also block the starter there.) |
| Turns | Blue/white Blue/red | In the harness to the fuse box, green large size. |
| Handbrake (-) | Black/red | Horizontal harness behind the glove compartment. |
| Central lock (-) | Black/green | Harness for the fuse box, small orange size. |
| Black/orange | ||
| Trunk limit (+) | Black/red | |
| Left front door switch (+) | Black/yellow | |
| Left rear door switch (+) | Black/orange | |
| Right front door switch (+) | Black/blue | |
| Right rear door switch (+) | Black/green | |
| Open trunk (-) | Black/yellow | |
| Gasoline pump | Green/orange | On the right threshold. |
| Engine monitoring | Nozzle. | |
| Immo crawler StarLine BP-03. The alarm unit is conveniently located under the radio. (To remove the radio, you need special keys.) There is no point in opening the trunk with the key fob. When you open it, it still won’t open smoothly; you have to open it smoothly with your hand, but it’s heavy. Therefore, we connect all the limit switches of the doors and trunk through 5 diodes and send them to the alarm system, to the positive input of the doors. Moreover, the alarm does not have a positive trunk input. If the low beam turns on when you turn on the ignition, then to prevent this, cut the green/red thin, green/yellow thin on the sidelight switch. |
5.1. Installation of car alarm components
We install the LED indicator in the right rack
Windshield antenna
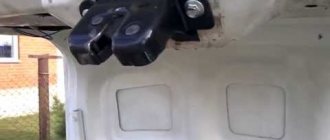
We remove the alarm unit under the dashboard. Siren and limit switch under the hood.
We mount the shock sensor above the glove compartment
5.2. Connecting circuits
All connections are made on the BCM unit (under the glove compartment).
General view of BCM
Power +12 - large green connector, red wire
Ignition (+) - large blue connector, light green/yellow wire
Starter (+) - horizontal harness behind the glove compartment, gray/black wire
Turn signals (+) - large green connector, blue and blue/orange wires
Door switches (+) - small orange connector: black/yellow, black/orange, black/blue, black/green
Connect limit switches via diodes
Please note: there are two wires black/orange and black/green, determine the ones you need!!! Trunk switch (+) - small orange connector, black/red
Trunk switch (+) - small orange connector, black/red
Central locking (-) - central locking control is connected in a small orange connector - black/orange and black/green
Valet button
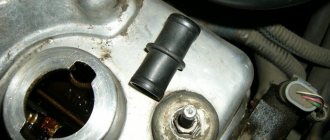
Transition from the passenger compartment to the engine compartment
Checking and replacing door limit switches on Lada cars
12 January 2022 LadaOnline 24 561
To increase safety (so that the driver does not start driving with the door open and for the alarm to work), cars are equipped with open door sensors (popularly “limit switches” or “limit switches”). Their malfunction causes the interior lighting to work incorrectly and prevents the car from being armed. Let's figure out how to check and, if necessary, replace door switches.
Replacement
To remove the limit switches, open the doors, then:
- remove the protective cover from the sensor by simply pulling it towards you.
- pry off the limit switch with a screwdriver
- remove the limit switches by snapping off the three latches
- disconnect the block with wires.
On some Lada models (for example, Lada Priora or Niva 4x4), the limit switches are attached to the body with a screw.
On the Lada XRAY the limit switch is located in the door lock and changes along with the lock.
Installation is carried out in reverse order.
Wiring check
Instructions for cars of the B0 assembly line (XRAY, Largus, Nissan Almera, Renault Duster, Sandero). Remove the limit switch and set the multimeter to voltmeter mode. We measure the voltage at the contacts of the block with the wires:
- If there is no voltage, the circuit of the interior lamp lamp or the lamp itself is faulty.
- if the voltage is significantly less than 12 V, the wire connecting the sensor to ground is probably damaged.
We set the multimeter to ohmmeter mode, connect one probe to ground (body), and the other to the terminal of the block with the black wire. The resistance should be close to zero.
If the resistance is high and tends to infinity, the connection between the wire and the body is probably damaged by corrosion or the wire is damaged (treat the connection with a product to protect electrical contacts).
If the fault cannot be resolved in this way, it is necessary to remove the interior trim from the pillar, find and fix the fault.
Checking the door switch
When the rod is recessed, the contacts are open. First of all, we check the serviceability of the sensors by opening all the car doors one by one.
Check with a multimeter. We connect a multimeter to the limit switch terminals in ohmmeter mode and check the closure of the sensor contacts (the contacts must be closed, the resistance is close to zero). We press the sensor rod and check the measurements (the contacts must be open - the resistance tends to infinity).
Let us remind you that in some cases (for example, in the cold season) limit switches may work intermittently. For Lada Vesta, Grant and Kalina 2 you can use this solution, and for Priora this.
Keywords: lada xray doors | Lada Vesta doors | Lada Largus doors | Lada Granta doors | Lada Kalina doors | Lada Priora doors | doors 4x4 | interior lighting lada xray | interior lighting for Lada Vesta | interior lighting for Lada Largus | interior lighting for Lada Granta | interior lighting for Lada Kalina | interior lighting for Lada Priora | 4x4 interior lighting | universal article
2 0
Found an error? Select it and press Ctrl+Enter..
Similar materials
- Solving problems with door limit switches on Lada Vesta, Granta and Kalina 2
- How to connect the standard alarm system to LADA
- How to remove door trims on Lada XRAY
- VAZ door switch - does not work (does not connect contacts). This is the simplest option, since you can find out if the limit switch is faulty by opening each door in turn. The light switched to the “Door” position will not light up when opening a door with a faulty button.
- The door switch on the VAZ is closed. In this case, everything is somewhat more complicated, since the light in the “Door” position, just like the open door lamp on the dashboard, will be on constantly. Here you need to disassemble each limit switch in turn and test it.
Visitors in the Guests
, cannot leave comments on this publication.
Source: https://xn--80aal0a.xn--80asehdb/do-my-self/repair/repair-lada-vesta/1821-proverka-i-zamena-koncevikov-dverey-na-avtomobilyah-lada.html
Door switches Vesta. Diagnostics
Diagnostics may be required if signs of possible limit switch malfunctions are detected. Such signs may include problems with the operation of the alarm system, erroneous readings of the door open lamp on the dashboard, or blinking interior lights. And these same signs will help you figure out which limit switch is not working. There are two options for the malfunction of these nodes:
Replacing the door switch on a Lada Vesta car
The design of the Lada Vesta limit switches is quite simple. The replacement work will not take much time, and the spare part itself is quite inexpensive. It often happens that the problem lies in the boot, which freezes in the cold - in this case, there is a solution: you can order a similar part with the catalog number “104035756”, and until the time of replacement, simply remove the old boot. The cost of such an analogue is about 70 rubles, and the quality of the part will not force you to return to this problem.
After you have purchased a Lada Vesta door switch, you need to spend half an hour replacing the part. To do this, carefully remove the old limit switch, disconnect the connector and connect the new limit switch to it, then assemble the assembly into place. Don't forget to put on the boot after connecting.
An important point - do not drop the wire into the hole in the body, otherwise it will be almost impossible to get it out. But if this happens, then make a hook out of wire and try to hook the connector with it.
Source: https://olade.ru/proverka-i-zamena-koncevikov-dverej-na-avtomobilyax-lada
Car alarm connection points for Ford Focus 2003, automatic transmission, SE package
Author Dragon
Ignition switch: +12V – red ACC – can not be connected Ignition – green/yellow Starter – gray/black
Connections on the BCM behind the glove compartment: Ground - black in the lower connector Opening the central locking (-) - black/yellow in the lower connector Closing the central locking (-) - black/red in the lower connector Left turn (+) - blue in the lower connector Right turn (+) – gray in the lower connector Trunk opening (-) – white in the upper connector Doors (put a diode in the gap of each wire, otherwise it will work when the car falls asleep): driver’s side – black/yellow, 2nd connector from the bottom, front passenger’s side – black/blue, 2- 2nd connector from the top, right rear – black/green, bottom connector, rear – black/orange, 2nd connector from the bottom Trunk – black/yellow in the driver’s sill (put a diode in the gap, otherwise it will trigger when the car falls asleep, if you don’t turn off the interior light)
Brake - on a frog
Engine control - solder to the battery lamp on the instrument panel.
PS the SL A91 injector is twisted.
What is a limit switch, where is it located, the location of limit switches on different cars
Modern cars are slightly different from older vehicles in terms of appearance and functionality. Such machines have evolved into real computers, but there are devices and parts that remain mandatory for both old and new machines. We are talking about the main parts, additional temperature and light indicators, and also limit switches. Now you can figure out what a limit switch is and where it is located in cars of different generations.
Limit switches and their purpose, where they are located in different cars
ATTENTION! A completely simple way to reduce fuel consumption has been found! Don't believe me? An auto mechanic with 15 years of experience also didn’t believe it until he tried it. And now he saves 35,000 rubles a year on gasoline! Read more"
People who had to deal with the process of independently installing an alarm on a car definitely had to deal with the word limit switch. The instructions say that certain wires must be connected to it.
This detail is present on absolutely every old or new car, on the doors and hood of the Grant, Niva, Kalina, Skoda, Logan, Chevrolet, Lanos, Octavia, Sprinter and other vehicles. The operating principle of limit switches is very simple, and the devices themselves are quite small in size, inexpensive, and very easy to connect.
They are necessary so that you can correctly open the doors, the hood, use the lighting, and for other purposes that involve the process of enabling or disabling functions.
THIS IS INTERESTING: How to remove the fuse box
End switches - what lies behind this name
When a car door or hood is opened, an alarm is installed, small parts are replaced, everyone always remembers the limit switches. For owners of Niva, Logan, Chevrolet, Lanos, Logan, Kalina or others, they look different.
The limit switches may look like ordinary switches, which are located on the door, trunk and other necessary points, or they may be hidden inside the door - this type of arrangement is used for Kalina cars, because there the limit switches are located in the door locks. This arrangement is less convenient than the external one, but is also more reliable.
Limit switches are small systems that act as switches and are practically impossible to do without.
By the word “limit switch” the car driver should understand the following:
- a microsystem that helps establish proper control of specific machine mechanisms;
- small switches whose function is to transmit a signal through wires to the main control system to produce a specific action;
- devices that operate as closing and unlocking buttons.
There are positive and negative limit switches. Negative ones are much more common and are located in cars such as Niva, Chevrolet, Lanos, Logan, Sprinter. In Volgas and Fords, BMW tour cars you can find positive limit switches. The operating principle of all these devices is the same, but the installation features, as well as the different types of alarms, differ.
Plus and minus limit switches - what is their difference
End switches of different types differ little from each other, but are divided into positive and negative. Positive limit switches can be found quite rarely, but their presence in a car can be easily determined. To search for positive limit switches in Niva, Lanos, Chevrolet, Logan, Skoda Tour and others, you will need to perform the following actions:
- take a voltmeter and connect the device to the required wire;
- open the car door and look at the device indicators;
- if the door is opened and the readings are +12 Volts, the positive limit switch is found.
Negative limit switches, reed switches or others, are present in almost all machines and there are quite a lot of them. Such a limit switch is shorted to ground when the door is opened. Limit switches of any type can be detected using a voltmeter. During installation and connection of the alarm system, this device will be extremely necessary.
You can always replace the end switch of a Niva, Grant, Kalina, Chevrolet, Octavia and other cars yourself. Limit switches can be bought at any car dealership and even on the market. The process is quite simple or connecting new end switches to the wires is done quickly.
Why connecting an alarm system to limit switches is an important process
Every car alarm, no matter what car it is installed in, is an important element that ensures the safety of the vehicle. For Niva, Grant, Kalina, Skoda, Chevrolet, Lanos, Octavia Tour, Logan and others, the connection diagram is almost the same. Many people cannot fit limit switches into the process of connecting an alarm system, but it is the connection to them that plays a very important role.
If you correctly connect the alarm wires to the limit switches, then the owner of a Niva, Kalina, Skoda, Logan, Chevrolet, Lanos, Octavia or other cars will be able to achieve the following effect:
- the alarm system will block the limit switches of the door, hood and other systems more reliably than without it;
- installing an alarm on the end switches of a Niva, Viburnum or other cars will maximally prevent unauthorized entry into the interior of the cabin;
- such a system will notify the vehicle owner that he has forgotten to open the door or trunk, or has not turned off the lights or heating system.
The limit switches of different cars have their own specific connection to the central unit. There are options when all limit switches are combined into an integral system, and there are cases that suggest that a separate wire must lead to each limit switch.
Depending on this feature, the level of complexity of connecting the alarm will depend.
If the system operates on one wire, you can simply crash into it, but when each limit switch has its own separate wire, you need to make a separate alarm connection to each of them.
How to find limit switches quickly and without any problems
Many people do not quite know where the limit switches are located in Kalina, Niva or other cars. But when you have to install an alarm, searching for them takes quite a lot of time. In order not to waste extra time on inspecting the interior of your own car, you should use the following tips:
- find the documentation for the car and look at the layout of various systems, devices, limit switches and wires that lead to them;
- look at the instructions for the alarm system - often this is where you can find the location of connection points such as limit switches;
- look for a layout diagram for a Niva, Viburnum or other vehicle models on the Internet;
- look for these points in the car interior using a voltmeter.
These methods will help the car enthusiast find absolutely all limit switches if he needs to connect an alarm system or replace these switches with new devices. The limit switches are designed to make it easier for the driver to deal with different systems of the car, and it doesn’t matter whether it’s a domestic car - Niva, Kalina or foreign models, everything will be as comfortable as possible.
Limit switches are very small in size, are installed in many places on the car, and perform specific functions. These devices are designed for comfortable access to a functional range of certain vehicle systems and simplify the process of connecting an alarm system.
Each limit switch is responsible for the operation of its zone, but they can be connected to the same wire. Connecting to different wires is no less common. Negative and positive limit switches are found in both foreign and domestic cars - the interiors of Niva, Viburnum and the external space of the car.
They are easy to buy, you can replace them yourself, and every motorist can connect additional wires to them independently.
Tired of paying fines? There is an exit! Forget about fines from cameras! An absolutely legal new product - Traffic Police Camera Jammer, hides your license plates from the cameras that are installed in all cities. More details at the link.
- Absolutely legal (Article 12.2);
- Hides from photo and video recording;
- Suitable for all cars;
- Works through the cigarette lighter connector;
- Does not cause interference to radios and cell phones.
Find out details
Source: https://alarmspec.ru/informaciya/chto-takoe-koncevik.html
Disassembling the interior
Before you begin installing the main elements of the alarm system, prepare a place for them by performing the following work:
- Remove the lower trim of the instrument panel, first dismantling the left trim.
- Then remove the part, having previously unscrewed the fastener.
- Remove the plug from the ignition switch slot and disassemble the steering shaft casing.
- Remove the right instrument panel trim.
- Unscrew the screws securing the upper shelf of the glove box and remove the lower cover of the module control unit (BCM).
- Then they unscrew the glove box fastening and remove it, gaining full access to the module control unit.
Door switch repair
What is a door switch? - This is a device that is a regular switch. As a rule, it is located at the point of contact between the car door and the body. part (button) is on the body, the counterpart is on the door. Its main task is to inform various vehicle systems about the closing or opening of a door. Light in the cabin, alarm system, “open doors” lamp on the dashboard - all these components use limit switches in their work.
In this article we will talk about such elements as Lada Vesta door limit switches. There are 6 limit switches installed on Vesta - 4 on the doors, 1 on the hood and 1 on the trunk. The door limit switch on a VAZ is not fundamentally different from the limit switches of other cars, so the diagnostic and replacement principles described in the article can also be applied to any other cars. Any diagnostic and replacement work can be done independently, without contacting a service station.
How to install an alarm?
But if your chisel is equipped with an APS-4 immobilizer and an injection engine, then the above procedure will not be enough. In addition, you will need to arm the car after the “polite illumination” of the interior lamp or alarm is extinguished, and enable the “delay arming” function (if available). All the methods described are quite acceptable for use.