Acoustics for the front doors of Lada Granta
Installing speakers in Granta doors allows you to be independent of the body type - speakers in the doors do not require an acoustic shelf. This means that you can install speakers in a sedan and a hatchback according to the same principle.
Preparatory work
Before we begin the installation itself, let's figure out how to prepare the car. For this:
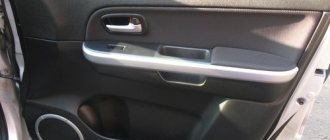
- We disassemble the door : dismantle the handle (pry up and remove the trim, unscrew 2 screws), the tip of the limit switch, two screws from the bottom of the door, overcoming the resistance of the retaining pins, pull the door card toward you and remove it from the door;
- We soundproof the door: in the warm season or in a heated garage, we cover all accessible parts of the door with vibroplast. Vibroplast StP M2 is suitable; when applying it to the door, be sure to heat it with a construction hairdryer and roll it with a pressure roller;
- If you have Spleen thermal insulation material, we cover the inside of the door card with it. This will further hide noise from the door when assembled;
- We are preparing spacers , if any are required for installing 16 cm speakers - more about them later in the text;
- We replace the factory terminals on the speaker wire in the door with normal ones (usually good terminals are included with the speakers) - to do this, we simply cut off the unnecessary connectors and attach the terminals we need to the wiring. A high-quality twist with heat shrink is enough;
- If the door panels do not have holes for speakers , we prepare them. It would be optimal to supply factory acoustic grids, which are installed on luxury versions of Granta and Datsun OnDo.
Installing speakers in Granta front doors
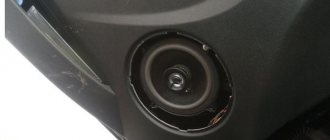
The standard acoustics in Grant are 13 cm speakers. They do not produce good sound, but they are easily installed in the factory holes for the speakers without unnecessary manipulation. The procedure for dealing with them is simple:
- connect the speaker cables, observing the polarity;
- fix with screws in regular places in the metal of the door or directly on the door card;
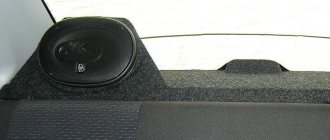
- install grids (in common parlance - grills).
An important disadvantage is that the center of the mounting hole and the place under the grill do not coincide. This means that when installed with complete grills, they will look asymmetrical and clumsy.
Standard acoustics most often do not produce a rich sound and, when installed with their own grids, look poor.
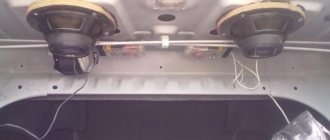
How to install 16cm speakers with spacers
In pursuit of sound, it is logical to install 16 cm speakers. This is where all the disadvantages of the AvtoVAZ design appear - the speakers either are not centered, or do not allow the window to roll down, or interfere with the glove compartment lid.
Speaker installation
Many sedans are purchased in a classic configuration, without a radio and sound system. To install these fragments, it is important to follow the step-by-step instructions:
- The casing is removed. To do this, unscrew the handle, which is held on by two bolts, disconnect the latches and pull out the panel covered with fabric. Sound insulation is removed.
- The electrical wiring is disconnected, the old speaker is removed (if equipped).
- A hole is created in the cladding for musical equipment. An iron niche has already been created for size 13 acoustics. This is where the back of the speakers is inserted. Sometimes a little filing with a jigsaw is required.
- The equipment is fastened with self-tapping screws. The wiring is being connected.
- The facing card is returned to its place and secured with clips. They often break during removal, so it is worth purchasing an additional set of clamps. At the end the handle is screwed on.
Installing speakers in Granta rear doors
The procedure for working with the rear doors is identical to the front ones. Important difference : homemade spacers are not required here. The plant produces a set of special mounts for installing 13 cm speakers in the rear doors.
Articles for ordering online:
| Speaker Mount - Rear Left | 21907901033 |
| Speaker Mount - Rear Right | 21907901032 |
| Rear left column trim | 21906202095 |
| Rear right column trim | 21906202094 |
| Trim for front left door | 21906102097 |
| Trim for front right door | 21906102096 |
Installation sequence:
- Disassemble the door;
- Cut a hole in the door card for the lining;
- Install the speaker mount on the door;
- Replace the standard audio terminals with normal ones;
- Connect the wires to the column, secure it;
- Install the trim and assemble the door.
You can replace the fastening with improvised materials, but factory production takes into account all bends.
Installing front speakers
Acoustics for Lada Granta
Before moving on to the actual algorithm for installing the front speakers (see How to choose speakers for a car radio on your own), let us remind you that this car has already been equipped with standard seats and there is no need to do anything new. But a serious problem arises when installing two-component acoustics. And yet, modernization will have to be carried out, since the diameter of the standard seats is quite limited, however, as on other car models.
Note. If, for example, we want to install high-quality 16 cm acoustics on a Lada Granta, then another intractable problem will arise. The front windows may not open all the way and will hit the speaker. You will have to make special spacers from plywood or chipboard.
Making podiums
The first thing to do is to make podiums.
DIY acoustic podium
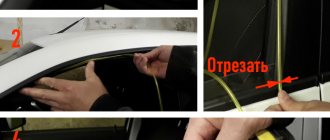
Cut out a paper stencil to fit the diameter of the speaker. Don't forget to cut out the inner circle too.
Note. For 16 cm acoustics, you should get a ring with the same diameter and a 15 cm circle cut inside it.
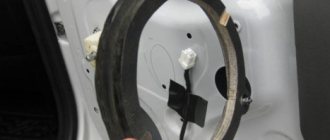
- We glue together 2 pieces of plywood, cut according to a stencil. We use PVA glue and self-tapping screws.
- We should get rings 11 mm thick. This is quite enough for most speakers, although the thickness can be increased, if necessary, later by adding additional rings.
- Now we need to install these same acoustic podiums in the door of the Lada Grant. Without removing the trim, we make markings by attaching a homemade ring to the door.
- We remove the casing.
- We take a drill and start drilling holes in the metal of the door.
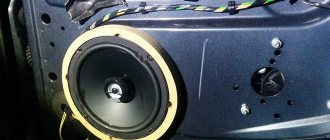
- We put up podiums and fasten them well.
Note. During this work, it is recommended to at the same time make high-quality sound insulation of the door. It will make the sound from the speakers much fuller, and music lovers will be satisfied.
- We lay wiring in the door.
- We put the trim back in place.
- We install the decorative speaker grille. You can attach it in various ways.
The work is done. As for the tweeters and subwoofer, they are installed in the cabin, on the advice of professionals who should themselves feel the direction of the sound. The homemade podiums are very good and nothing will rattle, because the speakers will not be attached to the door.
General information about music in Grant
In this section, we will consider general non-professional points about music in the Lada Granta.
Installing music
If you have a VAZ 2190 in the basic configuration (or Norma) with audio preparation, then installing music will entail the following steps:
- Removing the radio cover - on the back side there are ISO connectors for power and speaker wires. You will have to run the wires to the rear speakers yourself if you plan to install an acoustic shelf, since from the factory the wires are routed only to the doors;
- Installation of a 1- DIN radio (for 2-DIN you will have to farm, cutting out a jumper in the panel and looking for a suitable frame);
- Finding and connecting the plug of the pre-installed antenna - often the antenna wire on the roof is lost under the ceiling trim and it turns out to be easier to install the antenna separately than to find the factory cable;
- Pulling wires into the trunk to connect an amplifier, subwoofer and speakers installed in an acoustic shelf.
- To install the amplifier, you will also need a separate power cable from the engine compartment directly from the battery terminal through a fuse.
The main differences between coaxial and component acoustics
- Coaxial: a single design of speakers, where low-frequency and high-frequency are mounted on the same axis. Depending on the type of preinstalled crossover, one, two, or three-way crossovers are distinguished.
- Component: consists of a number of individual different-frequency speakers that are installed throughout the vehicle interior.
Related link:
Installing a trunk release button with your own hands on the Lada Granta Liftback
It is better to install coaxial ones on the back row of seats, component ones - in the front. The cost of coaxial speakers is a third cheaper than component ones.
Crib
Instead of a conclusion, let's summarize:
- You can plug in budget sound into the Grant for an amount of 20,000 rubles or more.
- Podiums in the front doors = impossible to open the glove compartment.
- 16 cm speakers in the front doors - cut the metal of the door or prepare spacers with the factory facing of the speakers.
- The acoustic shelf covers the ISOFIX mounts.
- Audio preparation pulls wires only in the doors.
- Article numbers for ordering speaker covers and mounts are in the “Installing speakers in rear doors” section.
Did you like the article? Write a comment or see what we have about the selection of budget cars for 200 thousand.
Reviews
| № | Positive |
| 1. | Kirill , 33 years old: the standard front speakers are quite enough for me. To add volume to the sound, I installed a couple on the rear shelf. |
| 2. | Vasily , 44 years old: The standard radio on the Lada Granta Liftback is not bad, the sound is good. There are not enough speakers in the back row. I didn’t bother, I set the speakers to “13”. |
| 3. | Vitaly , 33 years old: after purchasing the Lada Granta Liftback, I supplemented the standard audio system with only two rear speakers, that’s enough for me. |
| 4. | Gennady , 41 years old: to increase the volume of sound, he added two speakers to the rear side doors and the rear parcel shelf. The standard radio works, no problems. |
| 5. | Mikhail , 35 years old: I heard a lot of complaints about the standard system, my feedback is positive. Yes, it is not super powerful, but it is enough for the average driver. |
| 6. | Gennady , 29 years old: the standard 2-DIMM radio on the Lada Granta Liftback is quite enough for good sound. Anyone who wants a concert hall should buy it separately. |
| 7. | Vyacheslav , 38 years old: I heard that they install rear speakers on the Grant at “16”, but did not bother. I bought it on “13”, I’m happy, there are no complaints about the sound, it’s not ideal, but it’s enough for me. |
| Negative | |
| 1. | Vasily , 28 years old: I didn’t believe the negative reviews until I bought the Lada Granta Liftback. Weak and terrible. Change the speakers and radio. |
| 2. | Kirill , 33 years old: I took the car with me, it had a standard radio, I replaced it with a new one from Pioneer. It's a completely different matter. |
| 3. | Georgy , 41 years old: when buying Grants, I knew in advance about problems with acoustics. I bought coaxial speakers and a good radio. |
Related link:
Recommendations for choosing winter tires for the Lada Granta Liftback
Conclusion In general, the sound quality of the standard speakers on the Lada Granta liftback is good. Lovers of high quality and cleanliness do not like this, so they strive to replace it with expensive models.
It is necessary to start from the fact that the car is in the budget segment, which means there is no point in demanding the best. If desired, install 16 speakers on the rear side doors to enhance the sound quality.
Installing a radio
We pry the plug of the car radio socket from below and take it out. The socket contains plugs for connecting: USB, ISO, AUX, FAKRA (antenna).
To replace the standard audio system, you need to remove the trim and deflectors. To do this, you will need to disconnect the ground (disconnect the minus terminal from the battery). Next, remove the trim, prying it from below, and disconnect the block from the emergency parking button of the car. Remove the deflectors (4 screws for the T20 head).
Behind the air ducts, again unscrew the 4 screws. We drag the car radio towards us, disconnect the connectors with the wires. That's it, they took it off. Installation of an alternative radio takes place in the reverse order. Watch the wires during installation, try not to pinch them. Please note that a 1DIN radio is suitable for Lada Vesta.