March 03, 2015 Lada.Online 95 782 3
Some owners, after purchasing a LADA car, notice malfunctions in the operation of the doors. For example, the back door doesn't open well. You can cope with the problem yourself by adjusting the locks and door geometry. The defect can also be corrected under warranty from an authorized dealer.
Malfunctions that owners of LADA cars (and other car brands) encounter when the door locks are not adjusted:
- the door does not open or close;
- the door closes/opens poorly (tight);
- large gaps between the door and the body (water gets into the cabin, rattling and whistling appear at speed).
Door adjustment on all LADA cars (XRAY, Vesta, Largus, Granta, Priora, Kalina Niva 4x4) is performed in the same way. There are no fundamental differences.
Car doors do not open well
The most common manufacturer defect is that the rear and front doors on Kalina are difficult to open. The flaw occurs in used cars and those that have just come off the assembly line. The reason is incorrect or insufficient adjustment of the door handle or the door itself. In used cars, the doors become loose over time. Uneven gaps form at the joints with the housing components.
The problem can be solved with the help of a service center or fixed by yourself. The second option is more acceptable for experienced drivers, experienced auto mechanics and those who like to experiment with their car.
First of all, it is important to find out the reason why the back door on a Viburnum does not open well. An external inspection of the defect is carried out and a comparison with the original position of the part is carried out. Based on the results of the check, you can adjust the elements yourself.
In a similar way, malfunctions of the front and rear doors are eliminated, including the trunk door, if the car has a hatchback or station wagon body, but in this case there are nuances.
201-1 Repair Kalina
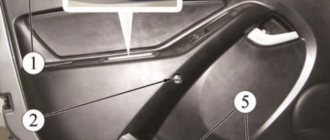
Front door lock with locking drive and outside handle
Remove the front door trim (see “Removing the front door trim”).
Using a Phillips screwdriver, unscrew the screw securing the base of the inner handle. . and remove it from the mounting pin. We bend the edge of the protective material behind the inner door panel.
Using a screwdriver, we disconnect the rod from the cylinder mechanism of the outer handle lock.
Similarly, disconnect the rod from the outer handle.
Using a 8mm socket, unscrew the bolt securing the outer handle.
Using the “8” socket, unscrew the handle securing nut.
. and remove the outer handle.
Using a Phillips screwdriver, unscrew the three screws securing the door lock. Move the red block lock up.
. and disconnect the block from the locking drive.
Use a screwdriver to press out the plastic rod clamp, turning it around its axis. . and, having disconnected the rod of the inner handle from the lock, remove the rod.
We remove the front door lock along with the locking drive and rods through the technological opening in the inner door panel. Install the front door lock in reverse order
Door adjustment process
To eliminate defects in the operation of door elements, it is necessary to find out the cause of its occurrence. In some cases, treating moving parts of the mechanism with lubricants helps. The seals between the trim and the body are subject to wear and tear, and they also require replacement periodically. If manipulation of the replaced elements is not enough, technical intervention is required. Regulation is necessary for the following factors:
- the gap in the extreme part of the structure causes the door on the Kalina car to not close tightly;
- The problem is caused by a faulty door lock.
Violation of the geometry of the structure in the doorway is the most common cause of the defect. Gaps can appear in any part of the joint with the body. Most often this happens from above and below. The adjustment in these cases is similar, but has minor differences.
Adjusting the bottom of the door
First of all, it is necessary to establish access to the inside of the lock from the outside. To do this, the glass is completely lowered. The door closes with light blows on the bottom of the casing. During the process, the size of the gap in the lower part of the structure is controlled. When the correct result is achieved, the door is carefully opened and slammed shut. If necessary, repeat the procedure. It is worth monitoring the force of impact and correcting the geometry of the doorway.
This method is used at manufacturing plants at the final stage of car production. The only difference from regulation at home is the availability of technological devices and tools.
Removing the lock and replacing the cylinder
The design of the trunk lock on the Lada Kalina consists of two parts: the cylinder where the key is inserted and the door locking mechanism itself. All this is disconnected separately and will be written about this in more detail below.
If you need to replace the larva, it is quite easy to remove it. You can do this using an 8mm socket and a flathead screwdriver. Below is shown which bolts need to be unscrewed to release this part along with the body.
Now that the bolts are unscrewed, take a plastic screwdriver and use it to pry off the plastic retainer that secures the rod to the body of the cylinder. For clarity, below is a photograph that clearly shows what needs to be done:
- Then, carefully take the larva so that its spring, which is located inside, does not jump out. If you need to replace a part, then replace it with a new one and assemble everything in the reverse order.
- If it is necessary to completely remove the entire mechanism, then you will have to do a little more work. We unscrew the door locking mechanism itself with a large Phillips screwdriver, there are only two bolts:
When everything is done, you need to pull it a little towards yourself and it can be easily removed; all that remains is to disconnect the plug with the power wires from this structure:
That's all the repairs, which will take about half an hour if you have the right tools and this manual. We install all the removed parts, which can be bought at absolutely any auto store, in the reverse order. I hope that I helped someone with this photo report using the example of my Lada Kalina station wagon.
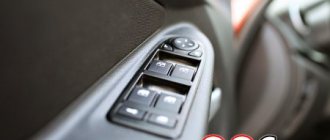
Door lock adjustment
A car lock is used to prevent the door from opening spontaneously and is a protective element of the security system. The standard Lada Kalina lock consists of two parts: mechanical and electronic. It often becomes the reason why the door handle is difficult to open; Kalina sometimes has such a defect already from production. As in the case of adjusting door gaps, there are two options for correcting the deficiency:
- Take your car to a service station and trust the professional technicians. Recommended for beginners and inexperienced car owners.
- Fix the problem yourself using available tools. Suitable for car enthusiasts with extensive driving experience and basic training.
Adjusting the lock at home is done using a Phillips screwdriver. Before starting manipulations, it is recommended to mark the original position of all elements for possible return to their original state.
To move the lock module, loosen the three screws that secure it. The bracket is now not fixed and can move in the plane. Once it is in the correct position, the screws are tightened into place. The structure is treated with lubricant and undergoes mandatory testing by opening and closing doors.
The procedure should be performed extremely carefully so as not to damage the body paint and trim elements.
If the lock is the reason that Kalina’s door does not open well, and the adjustment did not help, resort to more stringent means:
- The locking bracket is pulled out 3 - 5 mm and secured in this position. The method allows you to use this additional distance for a smoother door movement. It is important to find the optimal size for the structure to bulge from the body. If the door is extended excessively, it will make sounds on uneven sections of the road and allow dust and moisture into the interior.
- Reducing the area of the locking hook. This is usually achieved by filing the mechanism and restoring the locking system to its original state. The size of the cut area affects the ease of opening the doorway. If too much volume is removed, the door may open and close on its own. During processing, it is advisable to round off the sharp tip of the lock tooth.
Ignition switch malfunctions
Like any electronic device, the ignition switch of the Lada Kalina is subject to frequent breakdowns. Malfunctions can occur for a variety of reasons, the most common of which are the following.
Oxidation of contacts always leads to serious damage (usually due to moisture and dampness in the machine)
Burnout of contacts, which occurs due to sudden voltage surges. Voltage drops usually occur when the power unit is started, during which the temperature inside the system rises sharply, causing the insulation to simply burn out
This is why it is so important to approach the launch issue wisely.
Mechanical damage. If, when you are about to turn the key, you notice that it has become more difficult to do so than usual, it means that something happened to the lock cylinder, perhaps it was simply clogged with dirt or dust, or maybe there was a defect at the factory that came to light only now.
If the problem lies in burnout or oxidation, then when you turn the key in the lock, you will not see any reaction from the ignition system. In this case, you just need to replace the contacts without changing the entire lock; if the defect in the wires is not severe, then you can get by with cleaning the contacts.
Damage to the lock cylinder also occurs when someone tries to steal a car. In any case, the lock needs to be changed completely. But how to do it yourself?
Loose door hinges and how to fix them
Sometimes there is no need to adjust body structural elements. The problem of closing the door is caused by play in the hinges. Their role is performed by standard bolts. The hinge axes weaken due to frequent use, play occurs, the door begins to make sounds when driving, and perform vertical movements.
The defect is eliminated with a wrench. The bolts are tightened with a smooth force and, if necessary, replaced with similar fasteners of a modified design. After the hinges are aligned and the gaps disappear, the door is inserted into place, the size of the gaps on the right, left, and sides is carefully monitored.
The nuances of door straightening
Smooth dents without creases or folds have the least consequences. We can say that the car owner is lucky if the paintwork is not damaged. But such delicate damage can only be caused by relatively “soft” objects.
The dent on the door can be very large, and there is also a so-called “cracker”. In this case, rows of points are placed by welding on the back side of the door with an interval of 15-20 mm. The dots can also be placed on the front side, but then after straightening they will have to be ground off.
Creases or folds are classified as complex damage. It is impossible to straighten them by simply squeezing them out. Most likely, the door will have to be removed and worked on on the slipway. In the most difficult cases, opening the door is required. On the slipway, the geometry of the part is restored using hydraulics.
You can straighten the creases using a special device - a spotter and a reverse hammer, which is hooked onto washers specially welded to the casing. To straighten the door from the inside, you may need to cut out part of its frame, which is then welded back.
The method that involves working with a reverse hammer is traditional. But after such straightening, small bumps may remain on the surface of the door. You can get rid of them with a metal plane followed by processing with an angle grinder with a flap disc.
When a dent is formed after an impact at an angle close to a straight line, the door often moves inward a little. If the blow is strong, then it may not close at all. This is due to the pull of the hinge on the door itself. You can drown them by hitting them with a hammer through a wooden spacer.
Many experts believe that for complex dents without creases, preference should be given to straightening from the outside of the door. In this case, it is easier to control the process, which means that leveling will occur faster. To make it easier to attach the rods, use a spotter or welding washers, welded with low current, so that they can then be easily rolled up.
If the door is straightened from the back side, then the most important point in this case is to control the force of impact. To avoid cutting the door frame, some straighteners resort to the pneumatic method. It involves placing an inflatable cushion (soccer ball) opposite the dent, which, when inflated, will gently straighten the doors.
The decision to choose a straightening method is always made after examining the dent and depends on its characteristics. Sometimes a door dent can be straightened out with a regular pry bar, which is pressed against the stiffener on the reverse side. In this case, you can control the straightening by installing a large mirror opposite the door.
After straightening the door, there is no need to rush into painting. First you need to install it in place and check the gaps. They should be uniform around the perimeter. You should take similar gaps on the door on the opposite side as a sample.
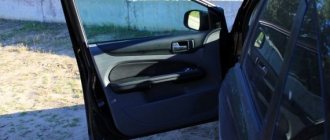
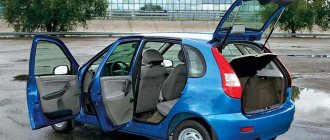
How the back door on a Lada Kalina should work correctly
When operating domestically produced cars, you have to deal with both acquired and factory defects. The rear door of the Lada Kalina is more often than other body elements exposed to physical impact during driving, includes a number of technically complex devices, and has a high percentage of defects during assembly line assembly. The main components of the normal operating process of the door:
- Correct geometry of fit of the lateral and vertical sides to the body, drain, sills of the car, equal gaps between them.
- Clear operation of the locking mechanism, installed door closer, and central locking lock.
- No extraneous sounds when moving the machine, including over rough terrain or dirt roads.
Careful car care increases its service life. Sometimes, if problems arise, it is enough to change the seal, tighten the fasteners, and lubricate the components and body parts.
Instructions for replacing the lock
Dismantling requires preliminary preparation
It is important to take care of the room in which the work will be carried out; it is better to choose a well-lit place with a comfortable temperature. A closing fragment or larva is purchased
The necessary equipment is prepared:
- screwdrivers;
- pliers;
- socket wrench 8;
- Silicone Grease;
- knife.
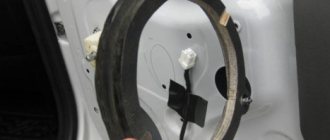
Replacing the larva in Kalina
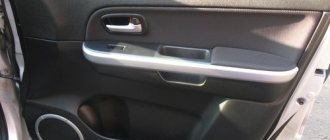
To change the element, you will have to disassemble the door card; this is the only way to get to the lock and remove the trim. To replace the cylindrical core you must:
- Unscrew the handle that is held in place by two screws.
- Remove the trim panel.
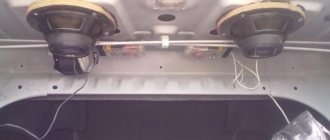
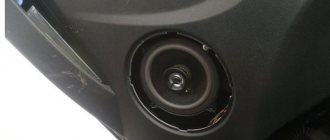
- Disconnect the speakers, disconnect the power window wires.
- Unscrew the block with the wires; to do this, press the clamps.
- Unscrew the fastening of the intermediate link arm.
- Remove the rod; to do this, turn the screwdriver around its axis.
- Pull out the end of the clamp.
- Remove the plastic cap.
- Remove the lock cylinder.
- Carry out lubrication work or install a new device.
The parts are assembled in the reverse order. If difficulties arise, it is recommended to contact a repair shop.
Source
Installation and connection of central locking depending on the modification of Kalina
The central locking is controlled by an electronic unit, from which wires go to the door actuators. A wire also goes from the block to the driver's door microphone, which is located inside the actuator. When connecting, installing or repairing the central locking system after dismantling the left door trim, you need to find the cable from the drive to the 7-pin connector.
Central lock connection
Depending on the configuration (“Norma”, “Standard”, “Lux”) under the casing you can see:
- Six wires suitable for the connector (drive and two microphones).
- Unconnected wires from the drive.
- Lack of wires that should be in the connector on pins 4/6.
If there is an alarm, then wires 2/7 must be connected to the central locking unit. If the package does not include connecting all the actuators, then you need to do this yourself by connecting the missing ones to the control unit. To do this, you can use a two-wire cable that runs from the door to the central locking control unit. The electrical circuit of one or another modification of Kalina will help with the work.
Central lock connection diagram