Changing the oil in the front axle of Niva Chevrolet
The manufacturer recommends changing the oil in the front axle gearbox every 45 thousand mileage; to change it you will need a 17 mm wrench, a 17 mm hexagon, a syringe and a container for old oil. It is best to change the oil in the Niva Chevrolet gearbox after a hot trip
Unscrew the drain plug of the front gearbox housing and drain the oil into a container, then screw the plug back
Unscrew the filler plug and fill in new transmission oil using a syringe to the level of the lower edge of the filler hole and screw in the filler plug. This completes the transmission oil change for Chevy.
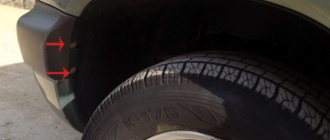
Front axle backlash
All described procedures require capital investment. Move the GP gears - you can do this with your own hands, without buying spare parts. So to speak, “make do with little blood.” But in essence, Serzhkam is right, because on the run at which such a thing appears! backlash, it is necessary to inspect the entire bridge
I partly agree. But it’s not about rearranging the GP gears, looking for the contact patch. Adjustment, no harm when approaching with head, no harm
While I was thinking which side to approach the bridge from, the wheel bearing fell apart. Tell me the tricks when replacing bearings are available or in normal mode.
As soon as I climb into the hole, I immediately inject the front universal joint. I try to turn on the front end more often... for splined work.
Differences in VAZ rear axle gearboxes
RZMs differ in the gear ratio of the main pair; in total, there are four types of gearboxes on the VAZ classic:
- 2101;
- 2102;
- 2103;
The slowest one is the RZM 2102, its drive gear has 9 teeth, and the driven gear has 40 teeth. To calculate the gear ratio, you need to divide the number of planetary gear teeth by the number of teeth on the drive shaft; for the VAZ 2102 the drive gear is equal to 4.44.
The “penny” gearbox (2101) accordingly has the number of teeth on the gears 10/43, so its IF is 4.3. The next, faster one is RZM 2103 - it has a ratio of 10/41, which means the gear ratio is 4.1. And finally, the “fastest” will be the 2106 gearbox, with the number of teeth 11/43 and an inverter frequency of 3.9, respectively.
Many VAZ 2101-07 owners strive to install the fastest gearbox, but this is not always necessary. If the car often carries cargo, that is, the car is a “workhorse”, high speed is of no use, but high-torque power will be very useful. It should be noted that RZM 2102 was not supplied as spare parts; it was installed only on station wagons.
Possible faults
The need to adjust the elements of the front axle is assessed by the presence of noise and vibrations that occur in various operating modes of the VAZ 21214. Thus, conditionally acoustic signs can be divided into two groups:
- Constantly registered.
- Fixed when braking with the help of an internal combustion engine or accelerating.
The nature of the sounds may resemble:
- howling (wear of the main pair);
- crunching, “trolleybus” hum (destruction or overtightening of the shank bearings, unscrewed drive shaft nut, axle bearings, incorrect adjustment of the gearbox gears);
- intermittent “shuffling” (differential bearing).
The difficulty of diagnosis lies in the abundance of extraneous noise produced by other components of the car.
Control and adjustment of gears
This stage is considered very important for the assembly of a spur gearbox. During the inspection, the error of the work performed is determined, and the gaps necessary for long-term operation of the device are established. These are the final stages of assembling a spur gearbox. They include 3 operations:
- Checking and adjusting the runout of gear wheels.
- Assessment of the contact patch of teeth in gear mesh.
- Setting lateral clearances in engagement.
Control of the contact spot of the gearing is carried out with paint. The teeth of the smaller diameter gear should be lubricated with a thin layer of paint, and then slowly turned 2-3 turns. The presence of a displacement of the contact spot indicates a change in the distance between the axes or an axial misalignment. The problems listed above can lead to premature equipment failure.
The parameters of the contact patch are determined by the degree of accuracy of the gearing. In terms of tooth height, it should be from 30 to 75%, and in length - from 30 to 95%. An increase in percentage means an increase in gearing accuracy. The side clearance is determined with a feeler gauge. After installation and adjustment, the mechanism must be checked for smooth operation and noise. Eliminate problems by re-adjusting or replacing defective components.
Repair
It is not necessary to buy a new unit. You can replace the oil seals or gears yourself, and then adjust the mechanism. It makes sense to repair the mechanism if most of the parts are not worn out. Otherwise, it’s worth overpaying and installing a unit that is known to work, so as not to return to repairs.
To repair and adjust the front axle gearbox you will need:
- mark;
- hammer;
- spanners for 10 and 17;
- knob with extension;
- end attachments at 10, 17,19;
- punch;
- bearing puller;
- mounting blade;
- caliper;
- pliers;
- dynamometer;
- flat probe;
- level;
- vice.
You will also need new gaskets for the covers.
How to change?
If the mechanism is seriously damaged, it makes sense to replace it with a new one. To do this you will need a new gearbox and a small set of tools:
Important: replacement or repair of the gearbox cannot be performed without a lift, inspection ditch or overpass.
Operating procedure
To install the new unit in place, you must perform the operations in reverse order.
Important: after installing the gearbox, do not forget to fill it with transmission oil. Otherwise, you will soon have to change it again with another one
Gear running-in
The final stage of assembling a spur gearbox is running in the gears. Using the procedure, contact spots are corrected, existing defects are corrected, and the contact area is increased. After running-in, the roughness of the meshing surface decreases, the noise level decreases, and the working life of the gears increases.
The running-in of surfaces in contact with the gear clutch includes grinding them with an abrasive paste. The grain size of the material is selected based on the accuracy of engagement and the hardness of the teeth. The recommended procedure for processing gearing is contained in technical documentation and instructions. General algorithm of actions during running-in:
- The teeth are coated with a thin layer of abrasive material.
- The mechanism is started for 5–10 minutes. The motor frequency is set to 20–30 rpm.
- Remove the paste from a pair of teeth and check the condition of the working surfaces. The procedure can be considered complete if there are traces of contact and there are no scuffs or other effects.
- The paste must be replaced and then the device must be started again, gradually increasing the braking torque on the output shaft.
- Every 30 minutes the mechanism is stopped, the working surfaces are checked, and the abrasive paste is changed.
- After removing the abrasive paste, you need to run-in the mechanism for 90–120 minutes. Industrial oil must be periodically applied to the teeth so that the surface becomes smooth and shiny, and the remaining abrasive material is completely removed.
If there is a multiple number of teeth in a pair, the gear tooth and the two meshing wheel teeth must be marked before the procedures. When assembling, they are brought into engagement to ensure that the previously run-in teeth match. If there is an odd number of teeth, all elements are run in, so there is no need to mark them.
Purpose of marking
Each gearbox at NIVU has a specific marking:
- 2101, 2102 (not produced);
- 2103 with gear ratio Z=4.1, which means 10 teeth on the drive gear, 41 teeth are placed on the driven gear;
- 2106 with a gear ratio Z=3.9, i.e. 11 teeth on the drive gear, 43 teeth on the driven gear.
Marking 2103 indicates that these are higher-speed gearboxes, and 2106 – more traction ones.
Gearbox for Niva
When replacing one of the units, you need to pay attention to the meaning of the gear ratios: they must be the same for the front and rear axles. If the gear ratios are different, then the wheel axles rotate at different speeds
One gearbox breaks quickly.
The markings of the front and rear components of the NIVA vehicle must match and have the same gear ratios. If units marked 2101, 2102 were previously installed, replacing it with a part with a different marking (2103, 2106), then both gearboxes must be replaced.
Changing the bearing
We prepare the bit, hammer, sealant and a special puller for the retaining rings, after that:
- Removing the wheels
- We take out the retaining ring from the bearing, to do this we take a wooden spacer and knock the bearing off the shaft with a hammer
- The wheel has an inner CV joint from which the oil seal must be removed
- We lubricate the working edge of the oil seal, and apply sealant to the outer part.
- We take a hammer and press the oil seal back into place, after which we install all the parts back.
The Chevrolet Niva front axle gearbox must be removed if repairs or replacement are necessary. In order to carry out all the necessary actions you need to have special equipment and certain skills. If the work is carried out in a garage, you may not achieve the desired results. Therefore, if you do not have experience in replacement, then it is advisable to contact specialists for a special service.
Some useful tips
- Since the engine no longer bears additional load, you can replace the standard hard cushions of the power unit with softer ones, from VAZ classics.
- When attaching the eyes to the front beam of the bridge, welding should be carried out by an experienced welder who is familiar with the technique, which allows not to “release” the metal. The beam is a load-bearing structural element of the car, and its strength should not be reduced.
- The welding areas should be cleaned of scale, then the joints should be thoroughly primed and painted.
- After untying, the RPM should not touch the engine and beam either in a static position or while the vehicle is moving.
- If you are producing a suspension lift, you should select a decoupling kit taking into account the increased angles of the CV joint and driveshaft.
- The silent blocks of the brackets of an untethered gearbox are subject to wear in the same way as the power unit cushions or suspension elements.
- The replacement of these elements should be included in your list of operations during maintenance.
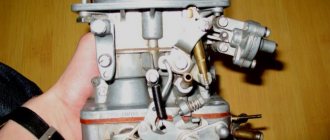
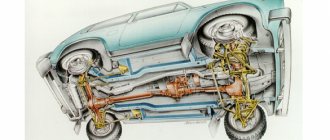
Device
The unit parts are housed in a durable metal case that protects the mechanism from damage. Gear oil is used to lubricate rotating parts.
The force of the propeller shaft, screwed to the flange on the shank of the unit, is transmitted to the drive gear. Next, through the satellites, the torque is distributed between the axle gears (left and right).
The gearbox mechanism also includes bearings, nuts, gaskets, and adjusting rings. Plugs are provided for filling oil and removing waste into the housing. The drive gear, like the axle shafts, is equipped with oil seals that prevent transmission leakage while the vehicle is moving. The figure shows the gearbox design in detail:
Preparation
The main stage is preceded by preparation, which includes: 1. Draining the oil from the RPM through the drain hole;
2. Disconnecting the driveshaft with a 13 key
3. Removing the right wheel drive.
4. Dismantling the lower ball joint on the left side.
5. Removing the suspension extension.
6. Removing the gearbox from the brackets on the right and left, using a stop.
This is followed by disassembling the gearbox, thoroughly cleaning the surfaces from dirt and grease, and troubleshooting the components.
Repair or replacement, which is better?
Car owners of VAZ classics often cannot decide what is best to do - buy a complete ready-made REM assembled or purchase individual parts and repair the gearbox. It’s really difficult to decide here - the price of a new gearbox, of course, is higher, but the owner of the car is freed from the headache of adjustment. The thing is that it’s not so easy to find a good specialist in VAZ gearboxes, and there is no guarantee that the new main pair will not hum.
If a car owner buys a new gearbox, but it hums, the part can be exchanged under warranty, but the car owner loses money on removing and installing the gearbox. If you purchase a defective main pair, the repair itself will be more expensive - you will have to pay a technician for a secondary overhaul of the gearbox.
Leverage
All SUVs actively use all their resources, including the front axle. At the same time, Niva manages to use such resources as people’s nerves. In addition to the familiar gear shift lever and handbrake, Niva boasts another lever that serves to control the transmission - downshift, return to upshift, lock and unlock the differential. At the same time, those who got behind the wheel of this car for the first time may have big problems - after engaging a lower gear, the lever does not want to return to an upshift! The secret is that return is only possible with the clutch depressed and at low speed. Some drivers neglect the instructions and remain unaware of the generally accepted method. Through trial and error, they figure out that shifting is possible when driving in reverse in a circle at extremely low speeds. And although this method works, its convenience is highly questionable.
Rear axle gearbox repair
When the rear axle overheats or noise comes from it, the gearbox needs to be repaired. It is not recommended to remove the Chevrolet gearbox yourself in the garage, because it is very difficult to determine the gap between the gears.
Removing the rear unit
If it is not possible to repair the gearbox in a workshop, then it is better to replace this entire part:
- Install the NIVU on a pit or overpass;
- Oil is drained from the rear axle;
- Disconnect the driveshaft from the drive gear flange;
- Dismantle axle shafts on a Chevrolet;
- Unscrew the bolts of the rear axle gearbox at the beam;
- Remove the rear axle gearbox.
Rear Assembly Installation
In early models of NIVA cars, the joints between the flanges and the rear axle were sealed with a gasket. Later, oil-resistant sealant was used for this. When reinstalling the gearbox, any type of seal must be restored. Follow the sequence below:
- Clean the surfaces connecting the rear axle to the assembly from residual sealant; Degrease the bolt threads, mounting holes in the beam and connectors with a special agent, solvent or gasoline;
- Treat surfaces with oil-resistant sealant;
- The threads of the gearbox bolts must be lubricated with a fixing compound;
- Install the gearbox into the Chevrolet rear axle beam and tighten evenly with the mounting bolts;
- Install the remaining dismantled parts in exactly the reverse order;
- Fill the rear axle with oil.
Sequence of work
- We purchase (make) a tying kit. When making it yourself, we drill holes in the pan in accordance with the diameter of the studs.
- We securely install the car on supports, preferably above the inspection hole.
- Drain the oil from the gearbox.
- We dismantle the CV joint drives, having first freed the steering knuckles of the wheels.
- Disconnect the front driveshaft from the flange.
- We remove the axle gearbox from under the car.
- On a flat working surface, separate the bottom tray and side covers of the RPM.
- On top of the CV joint drive covers, using elongated studs, we fasten the earring brackets. It is possible to replace the installation sequence of covers and brackets, depending on the kit you choose.
- Instead of a standard pan, we attach a reinforced one, with installed clamps for attaching the anti-roll bar to the beam. In addition to the factory gasket, we use sealant. The pallet will experience additional loads, so the tightness needs to be improved.
- We hang the RPM with the rear mount on the stabilizer beam. We center the axis of the propeller shaft and the axis of its flange in the gearbox.
- On the bridge beam we mark the fastening lugs for the brackets for the front suspension of the gearbox housing.
- We weld the eyes to the bridge beam and perform anti-corrosion treatment.
- We fix the earrings in the eyes using polyurethane or rubber silent blocks.
- We check the vertical alignment of the propeller shaft and CV joint drives.
- We attach the axle shafts and driveshaft, and secure the steering knuckles of the wheels.
- Fill the gearbox with oil according to the operating instructions.
- Without starting the engine or removing the car from its supports, check the free rotation of the wheels and the front driveshaft.
- We make a test drive, after which we re-inspect the car in the inspection pit.
Front axle of UAZ cars (Spicer)
The front axle decoupling is complete, your SUV has become much more comfortable on the highway and more reliable off-road.
Guide to replacing the front axle oil seal Niva Chevrolet
Advantages and disadvantages of the Chevrolet Niva suspension design and is it worth repairing it yourself?
Why do you need a Chevy Niva suspension lift and how to make it yourself?
Front gearbox
The need to remove this part of a NIVA car usually arises if signs of a malfunction appear and the part needs to be repaired or replaced. When disassembling, assembling or repairing a gearbox, it is necessary to use specialized equipment. Relevant skills are also required. If necessary, it is better to contact a car repair shop.
Removing the front axle
First, the NIVA is driven onto a lift or inspection pit, and the gearbox can be disassembled and dismantled. Removed:
- Stabilizer bar;
- Engine crankcase protection plate;
- Suspension cross member extensions.
Gearbox for VAZ Niva
Work continues:
- The shock absorbers are disconnected from the lower suspension arms;
- The drive gear flange is disconnected;
- The Chevrolet front driveshaft is removed;
- The suspension spring is compressed, separate the ball joint and the lower arm;
- Remove the spring;
- Disconnect the steering linkages and steering linkages.
- Remove the cap;
- Unscrew the bearing nut from the wheel hub.
On the other side of the NIVA car suspension, all operations are performed in the same sequence. Then you need to perform the following steps:
- The clamp that tightens the connection between the muffler pipe and the exhaust pipe is loosened;
- The suspension of the mufflers with pipes on the gearbox is disconnected;
- The nuts holding the exhaust pipe of the mufflers going to the exhaust manifold are unscrewed;
- Remove the pipe downwards;
- Unscrew the nuts that secure the cross members of the pillow suspension to the brackets;
- Unscrew the bolt that secures the right bracket to the engine;
- The front axle is supported, the nuts securing it are unscrewed;
- The Chevrolet engine is raised by 25-30 mm;
- The axle and front wheel drives are removed.
Gearbox Niva
Repair of the front axle assembly
Disassembly is carried out in the following sequence:
The front axle is installed and secured on a stand intended for repair work; The plug opens and the oil is drained from the Chevrolet crankcase; Unscrew the nuts securing the inner hinge housing of the bearing cover; The hinge is removed very carefully (so as not to damage the sealing gasket); Remove the retaining ring with the spring washer; Press the bearing from the inner joint housing; Remove the oil seal; The stamped cover and sealing gasket of the axle housing are removed (the bottom cover cannot be removed); The front axle gearbox is disassembled
Front Unit Installation
The installation of the bridge on the NIVU occurs in the reverse order of removal. During the installation process, the gearbox is placed in place. Bolts and nuts must be tightened to torque values. Transmission oil is poured into the front axle housing through the oil filler hole. Oil should not go over the bottom edge of the hole.
Transfer case alignment
Correct installation of the transfer case can be done in several ways. Most often in auto repair shops, repairmen use the following method:
- hang the car on a lift;
- loosen the transfer case;
- start the engine;
- engage the gear and accelerate the car according to the speedometer to the speed at which vibration occurs (often it occurs at speeds from 40 to 80 km/h);
- without using the brakes, reduce the engine speed, then turn off the ignition.
The transfer case itself is centered in place, all that remains is to tighten the fastenings of the supports.
You can also adjust the position of the RC using a wire; we do it as follows:
- loosen all four fastenings of the transfer case supports;
- fasten one end of the wire to the rubber coupling of the propeller shaft;
- we attach another piece of wire to the CV joint, bring the other ends of the wire to each other;
- rotate the shaft; if the transfer case is not centered, the ends of the wire will diverge during rotation;
- the task comes down to installing the transfer case using the selection method so that the ends of the wire practically do not diverge from each other in any position when turning the shaft.
Source
Motor scooter repair Ant
Before starting repairs, you need to buy all the necessary spare parts and tools. Of course, you first need to diagnose the device in order to understand what the real problem is.
It is also necessary to take into account a few tips on how to change certain spare parts:
- If you want to change a tube or tire, you don’t need to bead the wheel at all. It is enough just to unscrew all the bolts securing it.
- The wheel begins to spin thanks to a roller chain running through the gearbox. At the same time, the rear suspension is completely independent.
- The gearbox can be easily removed without any additional tools, because it is located in the very center of the scooter.
Repair is accompanied by the following basic actions:
- drain the oil from the engine, then remove the engine and place it on some flat surface;
- remove the cooling casings and dynastrater;
- remove the final drive sprocket;
- loosen the clutch cover from the bolts and remove it;
- remove several clutch discs;
- after this it will be possible to easily remove the basket along with the chain and sprocket, the washer and the bushing;
- to disconnect the cylinder head, you need to unscrew the four washers that secure it; if there are noticeable burrs on the cylinder mirror, then it should be sharpened;
- remove the cylinder, remove the piston pin ring using pliers;
- unscrew the crankcase tightening bolts; an impact screwdriver can help, which is very useful in such cases;
- turn the engine to the disassembled side, gently hit it with a mallet until the crankcase separates into two equal halves;
- lay the engine straight, using a mallet, carefully knock out the driveshaft;
- After this, access to the bearings and seals appears.
Lateral clearance in GP and differential bearing preload
In accordance with the instructions, the lateral clearance and preload of the bearings are adjusted using tool A.95688/R.
In its absence, a caliper of a suitable size will perform the specified role.
To ensure the required preload, fix the distance relative to the bearing caps at the beginning of tightening and at the end. The required difference between the values is 0.2 mm.
The side clearance is adjusted by bringing the driven gear closer to the drive gear until it disappears. Initially, one of the nuts is in a loose position, the other (working) is tightened. After eliminating the gap, gradually tighten the attached nut until the jaws of the caliper move apart by 0.1 mm. The backlash adjustment stops when a slight knocking sound of the teeth appears. Next, both nuts are tightened evenly to a distance of 0.2 mm. The correctness of the work is indicated by uniform play in any position of the gears.
Adjustment
It will not be possible to adjust the drive gear without a torque wrench and mandrel A.70184. You will also need:
- level;
- calipers;
- flat feelers for measuring gaps;
- adjusting rings with a pitch of 0.05 mm;
- perfectly straight metal rod.
The drive gear is adjusted as follows:
- Align the crankcase mating plane horizontally (you will need a level);
- Install a metal rod onto the bearing bed.
- Place the adjusting rings and measure the distance from the rod to the mandrel.
- Install the adjusting ring. Its thickness is calculated as the difference between the actual clearance and the deflection value indicated on the new gear.
- Install the shaft and related parts in place, secure the drive gear flange.
- Using a torque wrench, tighten the nut with a force of 12 kgf.
- Using a dynamometer, check the moment at which the drive gear shaft begins to rotate. If this value does not correspond to 7.6 to 9.5 kgf, the nut needs to be tightened.
Important: the tightening torque should not exceed 26 kgf. If it is not enough, the spacer sleeve must be replaced
Adjusting the gap between the parts of the main pair is carried out in several stages:
- Tighten the nut located on the driven gear side to completely eliminate the gap.
- Using a caliper, measure the distance between both covers.
- Tighten the second nut.
- Check the distance between the two covers. It should grow by 0.1 mm.
- By rotating the first nut, achieve a gap between the gears in the range of 0.08-0.13.
All that remains is to turn the gear while checking the clearance. If it remains unchanged, the adjustment is complete. A decrease or increase in backlash during gear rotation indicates deformation of the differential housing. You can try to trim it on a lathe, but it is better to replace it with a new one.
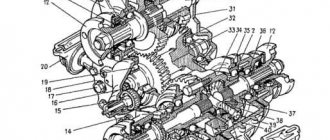
Disassembling the gearbox and replacing satellites
The satellites are additional gears installed in the differential gearbox. Their purpose is to transmit torque to the axle shafts of the rear wheels. Like any other part, pinion gears are subject to wear. After this, they will have to be changed, since this part cannot be repaired. To restore worn teeth, the car owner has neither the necessary skills nor the necessary equipment. In addition, any gear in a car undergoes a special heat treatment - carburization, which is carried out in a nitrogen atmosphere and strengthens the surface of the teeth to a certain depth, saturating this surface with carbon. An ordinary car enthusiast cannot do anything like this in his garage. Therefore, there is only one solution: purchase a repair kit for the rear axle gearbox. It costs about 1500 rubles. Here's what it includes:
- a pair of gears for axle shafts;
- a pair of satellites for the differential;
- satellite axis;
- support washer.
In addition to the repair kit for gearboxes, you will also need a set of regular open-end wrenches, a screwdriver and a hammer.
Sequence of operations
To disassemble the gearbox, it is best to use a regular bench vice. Then the work will go much faster.
- The gearbox removed from the machine is clamped in a vice in a vertical position.
- A pair of adjusting locking bolts are unscrewed from it, under which the locking plates are located.
So, an ordinary car owner is quite capable of removing the gearbox from the rear axle of the “Seven”, disassembling it and replacing its worn parts. There is nothing complicated about this. Certain difficulties may arise only at the stage of adjusting the new gearbox. But you can also deal with them by carefully reading the above recommendations.
Removal and installation of the Chevy Niva front axle gearbox
The Niva Chevrolet front axle gearbox is removed for replacement or repair. However, disassembling, adjusting and assembling the gearbox requires the use of special equipment and requires the skills of the performer. Repairing a Chevrolet gearbox in a garage almost never leads to the desired result. Therefore, if it is necessary to repair the gearbox, use the services of a specialized workshop. In order to remove the gearbox, prepare a 13, 17, 27 wrench, a 12 hexagon, a socket wrench, a chisel, a hammer, a syringe for filling transmission oil and a container for oil.
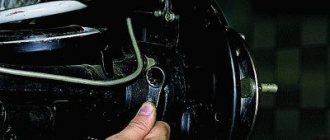
Remove the front wheels and drain the oil from the front axle gear housing. Disconnect the front driveshaft from the front axle gearbox
Unscrew the nut and remove the bolt securing the left bearing cover of the Niva Chevrolet front axle gearbox to the cross member of the front suspension. Remove the right front wheel drive and unscrew the three nuts securing the left drive inner joint bearing cover to the front axle gearbox
Turn the steering knuckle so that it pulls the drive, disconnect the gearbox from the drive and remove it. Installation of the Niva Chevrolet front axle gearbox and the removed parts is performed in the reverse order of removal, after which fill the gearbox with oil.
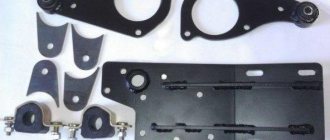
Installation of a special block
It is installed as follows:
- The axle drive housing has a cover; unscrew it with five nuts
- Remove the shaft and coupling
- We install the bridge block in place of the removed cover.
- Installing the transfer case in place
- If necessary, add transmission oil
The cost of this mechanism is around seven thousand rubles, but by installing it you will feel more confident when driving off-road, and at the same time save on gasoline when the need for all-wheel drive is not needed.
Removing and replacing the axle shaft seal of the rear axle Niva Chevrolet
Replacing the rear axle axle seal on a Chevrolet Niva
produced when there is a visible leak of transmission fluid from the axle
To do this, after parking, pay attention to the condition of the car’s drums. If there are problems with the seals, small streaks will be noticeable on the wheels.
If it is not brake fluid, then most likely the problem is in the oil seal and should be replaced. A transmission fluid leak will cause serious problems with axle components.
To carry out the work you will need a regular set of tools. The only special tool you will need is a puller for the axle shaft, but if you don’t have one, you can do without it.
Before carrying out work, ensure that the machine is as motionless as possible. To do this, wheel chocks are installed under the front wheels. First gear is engaged. The work is carried out in the following order:
- The wheel fastening becomes loose. The car is raised on a jack. The wheel is completely removed. Supports are placed under the thresholds in case of problems with the jack; ordinary blocks or several wheels folded in a stack will do;
- Before removing the brake drum, make sure the wheel is completely released. In this case, the handbrake lever must be lowered, the wheel rotates freely;
- The decorative cap is removed. To do this, disconnect it by prying up the fasteners with a screwdriver;
- The gap between the flange and the drum is moistened with penetrating lubricant (liquid wrench, WD-40);
- The brake drum is secured with two screws, they must be unscrewed. For this you will need a key “12”;
- Gently tap the drum with a hammer so you can move it relative to the axle shaft;
- In some cases, the drum can be removed quite easily. But sometimes you have to shoot him down. To do this, it is necessary to strike the rim of the drum with a hammer from the back side. Just do this through a block, otherwise you can damage the drum;
- The screws holding the axle shaft and the drum casing are unscrewed;
- The bridge rises slightly;
- The shock absorber bracket should be removed from the axle bearing plate;
- The axle shaft is removed; for this you will need a special puller. If it is not there, then you can do without it. To do this, put the wheel on the axle shaft. Screw on 3 nuts, but so that there is free space between them. We press the wheel against the axle and pull it harder towards us. After several passes, seasoned with strong words, the axle shaft should move. All that remains is to extract it;
- Now you can change the oil seal. Remove it using a screwdriver. Just pry the oil seal in a convenient place and pull it out;
- To install, the new oil seal is pressed back in, and the removed part is used as a mandrel.
Reassembly is in progress. All dismantled parts are installed in place.
Many drivers combine oil seal replacement and transmission oil change. If you decide to do the same, then it makes sense to find out what type of lubricant is used in your case. It is not recommended to mix different types of oils. This will lead to performance problems. If it is necessary to change the type of lubricant, it is recommended to first flush the system.
When removing the axle shaft, oil will begin to flow out. Therefore, it is better to drain it in advance. If you do not want to change the lubricant, then you need to take measures against its leakage. To do this, simply raise the side of the car from which you are changing the oil seal higher. This way you will avoid lubricant leakage. But, in any case, there is a risk of lubricant leakage. Be sure to add a new portion of oil after all work has been completed.
When reinstalling the brake drum, pay attention to its condition. Often there is a development along the shoulder
It should be removed using a regular file. This simple action will significantly improve braking.
In some cases, oil seal wear can be caused by a bent axle shaft. In this case, knocking noises will be heard when moving, and the oil seal will be worn out on only one side. In many cases, you can even visually determine the damage. Such a defect can only be corrected in a workshop on a special stand. If this is not possible, then you will have to buy a new part.
The rear axle on this model is quite weak. Problems with it arise quite often. That is why, replacing the rear axle axle seal on a Chevrolet Niva is familiar to almost all owners of this car. This work is not difficult. If you have even average repair skills, you will only need half an hour on one side. The most important thing is to do the work carefully
It is especially important to ensure that dirt does not get inside the bridge. Even the smallest particle of sand can cause problems with the operation of this part of the machine.
Eliminate vibration with additional fasteners
Vibration in the body is the main “disease” of the Niva; it often occurs due to improper alignment of the transfer case. Most often, vibration occurs on VAZ 21213/21214 cars, since the transfer case is mounted only on two supports on the sides of the body; on the Chevrolet Niva, the transfer case is already installed on three supports.
- driveshafts are poorly secured;
- wheels are not balanced;
- there is play in the cardan crosspieces (vibration is especially affected by play in the rear driveshaft crosspieces);
- The vibration comes from the engine itself.
Vibration when starting off on a Niva can also occur for the following reasons:
- the mounting supports of the transfer case have become loose;
- The rubber on the RK supports themselves broke.
Installing the third support of the transfer case on VAZ 21213/21214 vehicles allows you to reduce the level of vibration of the transfer case; with this support it is easier to center the transfer case. The part can be purchased at auto stores or made yourself. The finished product comes with three long studs (for model 2121); to install the third support on this machine, you will need to unscrew the short studs from the transfer case housing and install new studs from the kit. We carry out repairs as follows:
- dismantle the front passenger seat in the cabin;
- remove the floor tunnel lining;
- in the cabin we move aside the carpet covering the body amplifier (in front of the handbrake lever);
- remove the transfer case (alternatively, you can simply hang it up, but removing the third support makes it easier to install);
- We attach the bracket of the new support to the body of the RC;
- we install the transfer case in place, center it in the optimal position, and fasten the side supports;
- we combine the third support with the body, drill two holes in the bottom;
- Using washers, bolts and nuts (from the kit) we attach the support to the bottom of the body.
Also interesting: Design and repair of Niva Chevrolet cooling system fans
In order to install the subframe, the transfer case must be removed. It is more convenient to carry out such work in a pit; we carry out repairs as follows:
- leave the car in neutral gear;
- disconnect the propeller shaft from the transfer case, it is advisable to mark the driveshaft flange and the drive shaft so that during installation, align the driveshaft according to the marks - this way, the occurrence of unnecessary vibrations is eliminated;
- dismantle the muffler mounting bracket;
- remove the gearbox traverse;
- jack up the transfer case, remove the side fastenings of the transfer case;
- We treat the places where the subframe fits to the body with Movil;
- place the subframe on the gearbox studs;
- we mark the attachment points of the subframe on the side members, drill holes, attach bolts to the body;
- we tighten all fastenings, except for the transfer case supports themselves;
- we perform alignment of the steering wheel;
- Finally tighten the transfer case supports.
It should be noted that installing an additional support or subframe on the steering wheel does not always lead to the desired effect; in some cases, vibration only increases.
Tags: rear axle
Comments 9
universal joints and a smore shank then
Does the play appear when you release the clutch more sharply from the rear axle? Do you hear a blow? And when the clutch is softer, is everything good?
this is possible
very vague description of the problem. There are several places in the bridge where a gap may appear. Most often the spacer sleeve becomes loose. There are several reasons for this: defects, incorrect adjustments, and even the driver’s driving style. If the bushing is manufactured in violation of the technology, then it does not work with elastic deformation (spring-loading), but with simple deformation, which does not create the necessary tightening force for the nut, the bushing simply bends. If the cardan has wear on the crosspiece and vibration, then this vibration is transmitted to the flange, and it unscrews the shank nut, the bushing is not clamped between the ends of the bearings and rotates freely, wearing out its ends against the ends of the bearings. This bushing becomes unusable. tightening the nut will no longer help, but will harm the gearbox. If you move back abruptly (with axle box), or tow, moving backward (catching the cable to the front hooks), this accelerates the wear of the bushing. Often the gearbox hums just after such loads, the reason for this is deformation of the bushing and relaxation of the tension of the shank. The main pair may wear out. there will also be backlash. It happens that the splines on the axle shafts grind. there will also be backlash. you need to hang the wheels, disconnect the cardan and, by rocking the wheels or the shank flange, feel and listen for where there is play.
Not long ago, the rubber band on my jet rod burst and the bridge began to wobble. I removed and replaced the rubber bands, it will cost 100 rubles! Check all the rods with the installation tool!