Modern models of cars from the domestic concern VAZ are very popular among car enthusiasts. And the point is not only in their relatively low price, but also in decent technical characteristics and high maintainability.
Despite the appropriate characteristics, cars still have some weak points that vehicle owners have to work out on their own. One of these weak points is the car’s stove. In general, with high-quality assembly, the heating system works satisfactorily. However, there are significant shortcomings in the vehicle heating system, which provoke owners to improve and modernize it.
In this article we will look at how to cope with the problem when the VAZ-2110 stove blows poorly into the driver’s feet, which causes significant inconvenience for him.
VAZ 2110 - the stove does not blow at your feet
The “tens” stove is a very special device with its own character and disposition. And her mood and desires do not always coincide with the driver’s requirements. We didn’t come up with this, it’s enough to drive a 10 for a few cold months to form your own opinion. But those who have their hands in the right place will not put up with her character, but will begin to adapt her to normal work. We will also try to find out the main flaws in the design and figure out how to get the heater into working condition.
VAZ 2110 stove device
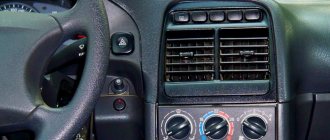
The car heater must not only heat, but also ventilate. If you do not turn on the fan, the air enters the car naturally - through the ventilation slot under the windshield and passes through the channels in the cabin. The ventilation and heater deflectors are equipped with check valves so that heat does not escape from the machine, and fresh air can freely flow into the cabin.
Unlike Zhiguli cars of classical design, the “tens” system does not have a tap. The temperature in the cabin is adjusted using a damper that limits the flow of air. Antifreeze is constantly in the system, which forces many owners to make changes to the design early on and install an additional tap that would prevent the antifreeze from heating in the summer. The certified adjustment accuracy (±2°C) does not correspond to reality, which is why many people install taps so as not to get burned on the hot elements of the heating system in the summer. The downside of the tap is that it can oxidize.
In the cold season, the heat from the heating radiator flows mainly onto the windshield, and part of it flows under the feet of the driver and front passenger. The design of the car does not provide for heating the rear passengers. Only a deflector is installed at floor level, which in principle should supply heat to the rear of the cabin. The reason why in 2110 it is not supplied to the feet of the rear passengers is that there is not enough volume and temperature of warm air. The system is simply not designed for such productivity.
Refinement of the air duct system of the VAZ furnace, dismantling the standard installation
If you have a little time and desire, modifications to the VAZ 2110 stove can be done much more thoroughly, namely:
- sealing the cracks in the front panel of the torpedo air ducts;
- modernization of the car stove damper;
- modernization of the heating system for the rear seats and driver's feet, installation of corrugated heating ducts.
All this will certainly result in the desired result and significant heat transfer from the stove, but first you need to remove the dashboard along with the dashboard and heater air ducts, for which you need to:
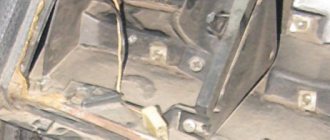
- 1. Remove the floor tunnel lining cover and the interior heating air ducts of the VAZ 2110, and then the body itself, screwed with self-tapping screws to the bottom of your car;
- 2. To remove the instrument panel, you will first need to dismantle the glove box by unscrewing it from its hinges and turning off the glove box light;
- 3. Through the formed niche, unscrew the mounting bolts of the instrument panel;
- 4. Having unscrewed all the fastening screws of the panel in its upper and lower parts, as well as on the controller bracket, we can finally remove the instrument panel from the mounting studs;
- 5. In order to remove the panel from the car interior, you will need to disconnect the electrical connectors for connecting the devices.
Repair
Problems with instability of car heating are most often noted in the event of failure of the automatic temperature control system. The system is checked sequentially, starting with the temperature sensor. It should change the resistance depending on the temperature in the cabin within the following limits - at a temperature of +22°C the sensor should show a resistance of 20 Ohms, at +16°C - 25 Ohms. If the measurement results do not coincide with the nominal values, the sensor must be replaced.
In automatic mode, heating may not work due to the fault of the controller. Its data is also measured using a multimeter. If, when the ignition is turned on and when the temperature adjustment knob is rotated, the voltage on the long terminal changes 10-12 seconds after the mode change, the controller is in working condition. If it does not respond to rotating the knob, the controller must be replaced.
Furnace electronic control unit
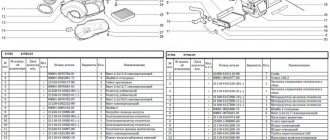
The electronic control unit includes:
- Controller handle. This device makes it possible to set the temperature in the cabin, which is produced by the stove unit. The controller handle sets the air temperature, which corresponds to that outside, and is turned on by turning the handle (up to 30 degrees Celsius). This part is usually called the ACS controller.
- The temperature sensor controls the activation of the heater when the air temperature in the cabin decreases by 2 degrees against the set one. The sensor has a microfan, and when the control knob is located in position A, a micromotor in the stove block turns on, after which the damper begins to operate, which ensures proper heating. Therefore, before repairing the heating system, you need to check the operation of this sensor. It is located near the heating lamp on the ceiling. Since its repair is not provided, if it breaks, this device must be replaced immediately.
Stove fan.
Typical faults
The heater may not respond to changes in the position of the regulator. In this case, you need to check the contacts in the relay block. The block itself is located on the right under the hood, and the heater relay is indicated by the corresponding pictogram. If the load on the controller is too high, the control wires may burn out. To do this, simply remove the controller and conduct a visual assessment of the contacts. The resistor through which the heater motor is connected may also fail. You can only get to it from under the hood.
Occasionally, low levels of antifreeze in the reservoir can negatively impact performance. If the coolant level is too low, air may enter the radiator. There it creates an air lock, preventing the heater radiator from warming up completely. If the radiator is not warming up well, you can pay attention to the thermostat. It may not open completely, thereby limiting the entry of antifreeze into the heater radiator.
Airlock
An ordinary plug in the form of an air mass may form in the cooling system. The reason for this may be:
- loose connections in pipes. Loosely tightened clamps will quickly make themselves known;
- after replacing antifreeze, air often appears in the system;
- The cylinder head gasket is broken.
The problem under consideration can be solved in several ways (the option with a broken cylinder head gasket is not taken into account).
To remove air from the system, do the following:
Place the car on a hill so that the engine is at a higher level (front facing up). Unscrew the cap of the expansion tank. Fill it with antifreeze/antifreeze to the maximum. Start the engine and let it warm up to operating temperature
Increase the rpm to 3,000. Using caution, squeeze the lower radiator hose with your hand. Don't get burned
At this moment, the expansion tank cap should be open. As air leaves the system, the antifreeze will “fall through.” Add liquid to the reservoir regularly. As soon as the bubbles stop floating when you press the nozzle, hot air will flow into the cabin.
To summarize, we note that in the article we examined the main malfunctions of the VAZ-2110 heating system. You learned the sequence in which to conduct tests to identify potential problems with recommendations for solving them.
If you are in doubt about repairing the car yourself, then the best solution would be to contact a car service center, where specialists will quickly carry out repairs with an excellent level of quality.
Poor heating of the lower zone and side windows
The windows sweat and your feet get cold. Simple symptoms, but restoration of heating may take a long time, since in this case there may be several reasons:
- The electromechanical part of the heater does not work.
- Heat leaks from air ducts.
- The intake air duct is clogged.
- Incorrect operation of the control damper.
If everything is in order with the electrics and mechanics of the heater, most likely the problem is the correct distribution of heat throughout the interior space. Many carry out serious modifications to the deflectors and sealing casings, seal all connections with polyurethane foam, and extend the air duct for the rear row of seats. Sometimes this gives results. But most often the culprit is the damper, which is assembled poorly from the factory and directs half of the warm air into the space of the front panel instead of the air duct. To eliminate the malfunction, the damper is sealed, the factory seal is removed and a new one is installed, which would ensure a tight fit of the damper to the body.
Step-by-step instruction.
Replacing the old-style VAZ 2110 heater radiator.
1. Drain some of the coolant in the system into a container prepared in advance. This can be done through the expansion tank (about 1 liter will come out) or through the drain hole in the engine block (about 4 liters will come out).
2. Remove the wind pad seal, and then the pad itself (jabot): first unscrew the screw securing it under the main brake cylinder, then the 4 upper clamps of its right side, then disconnect the 2 clamps holding hoses and wires, including and the negative wire of the fan coming from the body, as well as the positive terminal, well, and as a last step, unscrew the 2 screws securing the left part of the frill, but so that the latter only moves, but does not come off.
3. Remove the windshield trim by unscrewing the 2 nuts and 5 screws.
4. Disconnect the terminal of the antifreeze level sensor in the system and remove the outlet hose from the expansion tank.
5. Disconnect the windshield washer hose. Unscrew the 4 screws in front of you and remove the windshield wipers, windshield trim, clamps (partially) of the heater housing, fan.
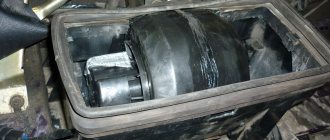
6. Unscrew the screws securing the cabin filter and the front part of the fan (be sure to remember the location of the four longest ones). Remove the latter along with the fan.
9. Remove the cabin filter housing, the fan (its rear part), the coolant supply, outlet and return hoses.
10. Using a little force, remove the leaking radiator. Install a new one in its place, and then return all the removed parts to the right places, only in the reverse order
In this case, pay special attention to the correct installation of the plastic housing of the stove fan - the pedal must fit into the desired groove, and also to the fact that after assembly you should not have any “extra” bolts left, since if you do not ensure a tight fit of all heating components system, your stove simply won’t work (heat)
Video (old sample).
Replacement of a new VAZ 2110 heater radiator.
1. Unscrew 1 screw in the middle of the lower end of the windshield, 2 nuts above the intake manifold and 1 nut in the left corner, near the air filter.
2. Remove the rear window washer reservoir (if equipped) and the air filter by first unscrewing the 4 screws holding the plastic cover that presses it to the heater.
3. Look through the air supply hose (it lies in the letter “G”), find a large self-tapping screw and 2 smaller screws connecting the 2 parts (the new type of heaters have just that many) of the heating radiator, and unscrew them.
4. Move the right part of the heater as far as possible to the right, and do the following with the left one: holding the left part in your left hand and the right part in your right, turn the latter slightly away from you and up. Draw the entire right side first, and then the rest.
5. Remove the right side. Remove the steam exhaust hose through the free space on the right side of the soundproofing panel.
6. Remove the iron brackets holding the 2 sides of the right side of the radiator together. Once you have access to the damper, also replace it with a new one.
7. Install everything in reverse order.
Video (new sample).
Three ways to remove a brake drum.
How to check the mass air flow sensor?
Adjusting the clutch of a VAZ 2110.
How to remove the steering wheel on a VAZ 2114?
VAZ-2110: the heater does not blow into the foot area
Probably, many owners of VAZ "ten" during the operation of their car had to deal with various kinds of problems associated with the operation of the stove, for example, the lack of supply of warm air to the leg area.
However, one very important point should be noted here. Generally speaking, the design solution in this case can be called quite successful. The stove in VAZs of the “tenth” family provides good heating of the interior, even if there is bitter frost outside. However, two conditions must be met: high-quality assembly and the absence of defects in components.
Design features of the VAZ-2110 stove and possible causes of problems in its operation
If any problems arise in the operation of the car, then in order to eliminate them, you must first identify the source of the problem.
In other words, first of all you need to find the cause of the breakdown. If we talk about the stove, then first let’s look at the features of its design. In the “tenth” family, the heater not only heats the interior of the car, but also ventilates it. The principle of operation in this case is quite simple. If you do not turn on the heater fan, cold air will flow into the cabin. In this case, the deflectors are equipped with check valves. They do not interfere with the flow of fresh air, and at the same time do not allow warm air to escape. The stove of the “tenth” family, unlike the “classics”, does not have a tap. The temperature here can be adjusted thanks to a damper that limits the air supply. The design provides for the constant presence of antifreeze in the stove, and because of this, many car owners are forced to make their own changes to the idea of VAZ engineers. We are talking about installing an additional tap that prevents heating during the warm season. That is, drivers have to independently eliminate design flaws. However, this option also has its disadvantages:
- first, you need to spend your time;
- secondly, the faucet can oxidize.
If we talk about why the foot area does not heat well, then, first of all, you should pay attention to the “herringbone” - this is what motorists call the plastic block that is responsible for the distribution of warm air.
At the same time, before you begin inspecting and troubleshooting this particular unit, make sure that the stove itself is working properly. After this, repair work can begin.
First, you should dismantle and disassemble the torpedo, and then get to the blower pipes. By the way, at this stage it is possible to solve another problem along the way, eliminating the “soreness” of many cars of the “tenth” family. We are talking about insufficiently good blowing of the side windows. In this case, you can either replace the corrugated hose with a new one, or seal all the cracks on the panel. It is best, of course, to use both options. That is, in addition to installing a new hose, also seal the panel. A product called “Anti-creak” is very suitable for gluing cracks.
Having completed this work, you can begin to eliminate deficiencies in the stove damper. The problem here is most often the following. During the assembly process, the damper is not pressed very securely against the stove body. As a result, some of the heat is simply lost on the way to the “consumer”. It just stays in the dashboard, meaning the heater doesn’t heat up as it should.
In particular, it may not blow into the leg area at all. To fix this problem, you should remove the standard seal, and before doing this, completely dismantle the damper. After this, we treat the valve and all the cracks with modelin. With this simple operation you will “force” the warm air to move along the right path. In addition, the standard sponge should be replaced with bitoplast-10 - it is best to stick it in several layers.
If everything is done correctly, then the normal supply of heat to the area where the legs are located should be restored. It is worth paying attention to one more point. Heat loss can occur as heated air moves towards the glass from the driver's seat. In this case, the problem can be solved with the help of ordinary polyurethane foam. A nice addition in this case will also be the elimination of panel creaking.
In order to eliminate the problem with insufficient warm air blowing into the driver's and front passenger's footwells, it is also recommended to carry out simple work to modernize the air ducts. In cars of the “tenth” family, heat is distributed throughout the cabin using a block, which, as a rule, has a fairly large gap. It can be sealed, for example, using a corrugated tube. After this simple operation, you should immediately feel positive changes - the stove will heat and blow much more intensely than before.
How relevant and necessary is it to modernize the heater?
VAZ 2110 stove modernization
A short list of possible negative consequences of a VAZ factory stove:
- low degree of operating efficiency, the heater seems to be functioning, however, the effect is hardly noticeable;
- moisture regularly accumulates on the windshield;
- traces of estrus, etc., visible to the naked eye.
Note. Before you move directly to upgrading the heater, you should first make sure that it is functioning properly. If during the inspection even small functional defects are discovered, they will need to be eliminated without fail before starting the upgrade.
To modernize the furnace, you first need to:
- remove the stove block;
- after which, it must be disassembled into individual components.
All functional elements of the furnace are connected to each other using bolts.
Upgrading the ventilation function of the furnace
VAZ 2110 stove modernization
You can improve side ventilation in two different ways:
- to create full blowing of the side windows, use corrugations with their appropriate gasket;
- insulate the side windows themselves directly, creating an absolute degree of insulation by eliminating all existing cracks.
In practice, the use of corrugations is a very relative concept, since their effect will only be noticeable to the feet of passengers. Corrugations are not suitable for creating proper ventilation, as they will provide virtually no real effect. In most cases, after installing the corrugations, the ventilation properties of the heater become worse even than before their use. In particular, especially rare cases, sometimes the ventilation properties after installing the corrugations may not be affected and remain at the same functional level.
Note. Based on the above, installing corrugations is not recommended.
If possible, sealing all the cracks seems to be a much more practical and effective solution. Gaps that need to be closed as a priority:
- first it is necessary to eliminate the cracks in the lower and upper panels;
- then bolt mounting holes; for this purpose, you can use modelin sealing agent.
Causes of poor foot airflow
Heater malfunction
Air through the cabin filter is taken from the street by the rotating blades of the electric heater motor. Through a damper system, air is distributed through air ducts and supplied into the cabin through deflectors and non-adjustable grilles.
Air, like any gaseous medium, tends to follow the path of least resistance. Therefore, it is logical that the air flows first come out of the central and side deflectors. The feet of the driver and passengers are blown last. Structurally, the air ducts to the central deflector and the upper side airflow points have a larger cross-section, and it is much easier for air to pass through them.
Initially, you need to make sure that nothing interferes with the intake of air from the atmosphere. After all, if the air is supplied in insufficient volume, then it will not be enough to supply all airflow points with the intensity that was calculated at the design stage of the car.
Check the condition of the cabin filter. To do this, remove the wipers and frill. The cabin filter is located on the right side of the vehicle under the windshield. It is covered with a plastic casing, which is secured with four self-tapping screws. Unscrew the screws and remove the cabin filter. We start the engine, warm it up to operating temperature and check the operation of the stove. If the situation has improved, change the cabin filter and close the issue.
The second common cause is a clogged heater core. In this case, the heating of the interior will be weak, because warm air does not come out of all the deflectors well, and not just into the legs. But the fact is that when driving for a long time, your feet begin to freeze first, so it seems that the problem is in this part of the airflow.
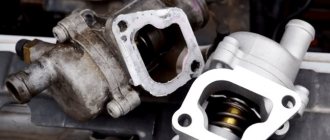
Refinement of the thermostat and its connection diagram
The previously discussed modernization of the VAZ 2110 stove by replacing a 5-hole thermostat with a 6-hole thermostat is not least related to the diameters of the bypass channels of the devices that regulate the flow of Antifreeze between the small cooling circuit and the radiator of the heating system.
The standard size of the bypass channel on a 6-hole thermostat is 11 mm, and on a 5-hole thermostat the hole is measured with a diameter of 16 mm. Regardless of what type of thermostat you have installed, you can always further adjust the flow of coolant. Thus, the interior of the VAZ 2110 will warm up better at idle engine speed.
It is recommended to use an aluminum pad to set the bypass diameter in the range from 4 to 6 mm. It is worth understanding that in this way we slightly increase the engine warm-up time. But the cabin will become really warmer.
When reinstalling the thermostat, swap the connections of the pipes coming from the expansion tank and coming from the radiator of your car's heater. Now there is no longer any need to cover the radiator with cardboard in winter; the VAZ 2110 heating system will work perfectly in any weather.