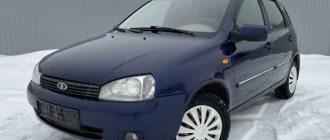
Modern Lada model
A car is not only a means of transportation, but also a complex mechanism. Each vehicle has its own strengths and weaknesses. In order to understand how reliable it is, it is necessary first of all to analyze each of the machine components.
Lada Priora is considered a fairly “hardy”, stable car, but it also has its weak points. The owner of a car of this brand must be aware of them so that, if necessary, they can repair the Priora on their own. Moreover, the troubleshooting instructions are not the most complicated.
Do-it-yourself VAZ (Lada) Priora repair
To ensure that the repair and operation of the Lada Priora does not cause any special problems, it is enough to reinforce your knowledge in time.
Factory instructions are a practical thing and will certainly have the desired effect. However, all of them are inferior to video tutorials and photo reports of the etlib.ru portal in terms of clarity and the number of nuances taken into account. This section of the site contains information materials that will allow you to diagnose and eliminate almost any Lada Priora malfunction.
By demonstrating the process, they will help even a novice driver quickly understand the operation algorithm
It is with these manuals for the Lada Priora that you can carry out repairs yourself without the intervention of car service workers, which means unnecessary expenses.
But it’s not even a matter of saving; studying repair procedures will allow you to understand the structure of your car and spend time doing an interesting activity. It’s worth starting your study with the most popular instructions.
These include replacing Priora valves 16 valves, replacing the timing belt and many others. In order to fix a problem in the cooling system, it may be useful to replace the heater radiator or replace the thermostat.
You cannot do without instructions in the case when it is necessary to replace the generator on a Priora or simply replace the generator belt.
By studying repair procedures on the website etlib.ru, you don’t have to worry that intervention without professional training will lead to negative consequences. All content is based on the experience of other motorists or certified mechanics.
History of the VAZ Priora car
Lada Priora sales began in 2007. The first models were in the sedan body. A year later, modifications in the hatchback body appeared in stores, followed by station wagons and coupes (produced in small series).
The popularity of the car puzzled the manufacturer so much that, in parallel with the production of standard models, active work was carried out to create a convertible version.
Over the entire period of its existence, Lada Priora gradually offered customers various engine options from 1.6 liters to 1.8 liters. At the same time, power varied from 81 hp. and up to 120 hp. The first changes to the car occurred in 2011.
They affected the rear bumper, steering wheel, functions and, of course, touched the configuration, adding another engine to the list of possible ones.
In 2013, the car model underwent more serious changes. Restyling affected not only the appearance of the car, thanks to it the safety of the car as a whole has improved , the comfort of the interior has increased, the quality of the chassis has improved, sound insulation has increased and much more.
2014 brought Priora a new robotic gearbox, which was available in the AMT version of the car.
Despite information from various sources about the car being discontinued at the end of 2015, it still does not leave the production line and is a popular vehicle both in Russia and abroad.
More details
Source: https://etlib.ru/auto/vaz-60/cat-priora-1143
Choose your new LADA car
Granta liftback Granta sedan Vesta sedan Vesta Cross
1 — the cost of maintenance is indicated taking into account the use of LADA engine oil. For detailed information about mandatory maintenance operations, the cost of spare parts and materials for your car, please contact the official dealers of AVTOVAZ JSC. — the total cost of maintenance (MOT) indicated in this calculator is recommended by AVTOVAZ JSC as the maximum retail price and may differ from the actual prices of official LADA dealers. LADA dealers can set the offer price less than the recommended maximum retail price. The indicated prices do not cover cases of using materials other than those specified by AVTOVAZ JSC for maintenance, as well as performing work in addition to the routine ones. — the information on the maximum recommended retail prices for maintenance in this section is for reference only and under no circumstances constitutes a public offer as defined by the provisions of Article 437 of the Civil Code of the Russian Federation. JSC AVTOVAZ reserves the right to make changes to the maintenance schedule, as well as to change the composition of spare parts and materials without prior notice. — the information in this section is intended exclusively for non-commercial purposes (personal, informational, research and other not related to business activities). Visitors to the website www.lada.ru do not have the right to use information for commercial purposes, including the right to reproduce, modify, distribute or publish information in part or in full without obtaining the prior written consent of AVTOVAZ JSC.
Due to changes in the structure of AVTOVAZ JSC and the company’s standards, the production of documentation for the maintenance and repair of LADA vehicles in printed form using a printing method has been discontinued since 2013, incl. collections of technological instructions, labor intensity of work, catalogs of parts and assembly units, etc. The sale of documentation to third parties has also been stopped. Over the past period, the documentation has been constantly updated in connection with changes in the design of vehicles, and based on the results of experimental work, many labor intensity standards have been revised. Currently, up-to-date documentation is available only to enterprises of the dealer network and partners of AVTOVAZ JSC by providing authorized access to the specialized Internet portal of AVTOVAZ JSC under separate agreements.
Do-it-yourself tuning and repair of priors
The popular Russian car Lada Priora is available in 4 body types: sedan (VAZ-2170), station wagon (VAZ-2171), hatchback (VAZ-2172), coupe (VAZ-2173) and in several trim levels, which undoubtedly makes this car convenient for different people.
Lada Priora replaced the popular and beloved Lada of the 10th family and was created for our Russian roads and our harsh climate.
Safety, efficiency, ease of maintenance, suitability for our fuel - the designers took care of all this.
Lada Priora is equipped with 8-valve (81 hp) and 16-valve (98 hp) engines, with a declared service life of 200,000 km. The new engines have a lightweight connecting rod and piston group, which increases engine power by 10%.
A number of trim levels are equipped with tuning options as standard: air conditioning with climate control, light and rain sensor, parking sensors, heated front seats, electric windows on all doors, electric and heated mirrors.
The body of the Lada Priora has been strengthened to improve passive safety, and the torsional rigidity of the body has also increased. The Priora is equipped with airbags: in the “Norma” configuration – a driver’s airbag, in the “Lux” configuration – driver and front passenger airbags.
The “Lux” version is also equipped with seat belt pretensioners, an ABS system and a parking radar. According to the Lada Priora promotional website, when impacted at a speed of 5 km/h, only the bumper is damaged, without affecting the other structural elements of the body.
The environmental friendliness of the car complies with Euro-3 standards for the Russian market and Euro-4 for the EU market.
To date, a large number of various improvements and bug fixes for the Lada Priora have already been implemented, and we have collected them. The main focus of the site is on topics such as do-it-yourself repair and tuning of priors, and on the topic of styling - both interior styling and exterior styling.
Here you will find a high-quality selection of photographs and photo reports, materials on modifications, repairs, styling and tuning, as well as many useful tips on car maintenance and operation. You will find real answers to many questions that arise during operation, information on the modification and repair of various components.
All materials related to modifications, repairs and tuning are presented “in pictures” for ease of perception and clarity.
Would you like to share your achievements? Write to us!
Many of us have made some modifications, and we undoubtedly want our work to be appreciated by other owners of the Lada Priora car. You can send us a photo report of the work done with a detailed description, we will publish your work, and it will be appreciated!
Source: https://www.Tune-Priora.ru/remont/
Removing a generator on a Priora for replacement or repair
In this material, we will consider in detail how you can remove the generator on Priors of various modifications, using various techniques. How the unit is repaired is a topic for another material. You can read about choosing a new generator to replace the standard one here. If you are looking for an answer to the question of directly performing dismantling according to instructions, then it is presented below.
Interesting! Alternator malfunctions on Priora are a popular topic, as evidenced by the large number of video instructions from car owners. However, most of these instructions are only superficial, and you often have to watch other videos to find the answer to your question. The material discusses in detail all stages of removing the generator, regardless of the chosen method.
First, let's see what instructions Avto-VAZ offers for removing the generator on a Priora. Below is a picture with a detailed description and photo.
The photo below shows that it can also be removed not only from below, but also through the engine compartment.
This manual is intended for Priora cars in a budget modification (without air conditioning and power steering). Dismantling the unit in such Prior modifications is not difficult. By following the instructions, you can implement the process quickly and correctly.
Now let's look at the instructions from Avto-VAZ for removing the generator on a Priora with air conditioning.
Experience shows that the instructions from the factory are not at all sufficient to be able to remove the generator on a Priora. That is why we will consider in detail the dismantling process for VAZ-2170 cars with and without air conditioning.
Do-it-yourself Lada Priora repair - general tips and guidance
In order to assess the reliability of a vehicle, you should first analyze all its components.
In general, the Lada Priora is considered a fairly reliable car, but there are also a number of “chronic diseases”.
Drivers should be aware of what obstacles may arise during the operation of the car - such awareness will save money on visiting a car service center and performing repairs themselves.
The most common engine problems
The most common malfunction that requires repairs is a breakdown of the timing belt support bearing. Often the water pump also fails. Such malfunctions are eliminated fairly quickly, although such repairs cannot be called cheap.
Indeed, in most cases, support bearings are not sold separately, but you have to purchase the entire timing belt set. According to the regulations, the timing belt must be replaced every 120 thousand kilometers.
The problem is that failure of the pump or support bearing can lead to a broken belt - accordingly, it will need to be replaced sooner.
When may car repairs be required?
Thus, the transmission is highly reliable - this is noted both by the manufacturer and by repairmen, who practically do not encounter malfunctions of this unit.
Rarely, but still, repairs to the Lada Priora may be related to the suspension and control system. Thus, the rack support may need to be replaced. The cause of failure of support bearings is their contamination. Front strut bearings especially often break.
Apparently, this unit is not sealed sufficiently and, as a result, can easily become dirty. It is not difficult to diagnose such a problem yourself - try turning the steering wheel all the way and you will hear characteristic clicks.
The front hubs can also hardly be called reliable - they can quickly become deformed if they fall into a hole.
You will also need to repair the Lada Priora yourself in the following cases:
- failure of ball joints. As a rule, such a malfunction occurs with a mileage of more than one hundred thousand kilometers,
- To prevent brake system malfunctions, it is necessary to regularly clean the rear drums,
- As for the heating system, the main faults here are related to the stove. Thus, jamming of the dampers or breakdown of micromotor gearboxes may occur,
- The cabin filter consists of many parts, which leads to an increase in the complexity of its replacement,
- with high mileage of the car, difficulties also arise when it is necessary to replace the rear bearings,
- When the car's mileage reaches 180-200 thousand kilometers, shock absorbers and suspension springs may fail. However, this can happen earlier if the car is not operated in accordance with the requirements.
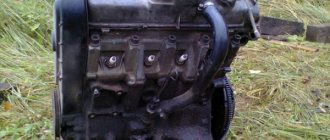
Do-it-yourself Priora engine repair | Automobile magazine pol-z.ru
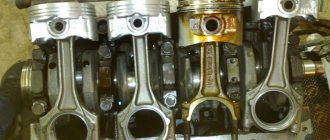
Overhaul of the Lada Priora engine includes the stages of disassembly, search and replacement of worn parts and subsequent assembly.
Usually, during the repair of a Priora engine, the pistons are replaced; in some cases, additional boring of the cylinders is required. A fairly common reason for major repairs is engine overheating.
The motor may overheat due to a faulty cooling system, leaking gasket, malfunctioning thermostat, etc. In mild cases, simply replacing the gasket may be sufficient. But sometimes engine overheating may require serious repairs that you cannot handle on your own.
What tools will you need?
In the process of disassembling and assembling the engine you will need:
- Mounting blade
- Screwdriver
- A set of keys
- Piston installation device
- Soft hammer
- Torque wrench
Sequencing
Disassembling the engine is not difficult, so we will omit its description and present here only the operations for repair and subsequent assembly of the engine:
- Get rid of carbon deposits accumulated in the cylinder block. Remove carbon deposits from the oil grooves in the cylinder beds.
- Insert the bearing shells, following the marks you made when disassembling the motor. Make sure that the locking tendrils of the inserts fit into the bed poses.
- After this, lubricate the liners with oil.
- Place the crankshaft in the cylinder block and lubricate the half rings with oil. Make sure that the half rings are installed so that their grooves are directed towards the crankshaft cheeks
- Install a half-ring made of an alloy of steel and aluminum (it is white) on the front side of the central bed.
- On the other side of the bed, install a semi-ring made of metal ceramics (it has a yellowish color).
- Rotate the installed half-rings so that their ends are flush with the ends of the cylinder bed.
- Install the liners into the main bearing caps. Again, be guided by the marks that were made during disassembly of the engine. Make sure that the locking lugs fit into the groove and lubricate the liners.
- Install the covers in accordance with the cylinder numbers marked on them.
- Lubricate the ends and threads of the bolts that will secure the covers with engine oil.
- Tighten the third cover bolts. Do the same with the bolts of the second, fourth, first and fifth covers (in that order).
- After tightening the bolts, check the ease of movement of the crankshaft. Turn it several times.
- Install and secure the oil pump and rear oil seal holder
- Install the connecting rod into the piston and insert the piston pin. Don't forget to lubricate both the pin and the connecting rod with oil.
- Install retaining rings on both sides of the pin. Make sure that they are located in the grooves of the piston.
- After this, install the oil scraper ring and piston rings on the piston. To do this, it is better to use a special tool called a “puller.”
- Make sure the rings rotate easily in the grooves.
- Carefully wipe the crankpins and cylinder bores.
- Insert the liner into the connecting rod, making sure that its antenna fits exactly into the groove of the connecting rod. Lubricate the piston and liner. Install a mandrel on the piston to compress the rings and lower the connecting rod into the cylinder.
- Press the mandrel against the block. Using the handle of a hammer, push the plunger.
- Then install the lower connecting rod head onto the crankshaft journal.
- Insert the liner into the connecting rod cap and install it, making sure that the markings on the lower end of the connecting rod and on the cap are located on the same side.
- Tighten the cover bolts. Install the remaining pistons in the same way.
- Secure the oil pan
- Install the locking plate and flywheel after lubricating the mounting bolts with anaerobic locking agent.
- Apply a thin layer of grease to the cylinder block and place the crankcase gasket on top.
- Install and secure the oil pan.
Source: https://pol-z.ru/remont-dvigatelya-priora-svoimi-rukami/
Replacing the Lada Priora steering wheel (VAZ Priora)
- Place the steering wheel on the shaft in a level position, with the splines partially matching.
- We tighten the steering wheel with a nut a few millimeters.
- We remove the steering wheel from the steering shaft and cut off the burrs using a needle file.
- We put the steering wheel on the shaft again and repeat the procedure from step 2. So until the steering wheel sits completely.
xn—2111-43da1a8c.xn—p1ai
- over your safety. The worst option is if you buy a steering wheel that is made of hard material and is not capable of deformation.
- above the price. A branded steering wheel is usually manufactured at the factory, under the careful supervision of specialists. This kind of enterprise sometimes specializes exclusively in “steering wheels”, so attention, effort, knowledge and resources are aimed only at making a steering wheel, which, once picked up, cannot be let go. The price of a high-quality steering wheel cannot be lower than a standard factory one.
- over passing a technical inspection. You will not pass MOT if you have an alternative steering wheel installed and do not have a certificate confirming that this steering wheel complies with GOST.
xn—2111-43da1a8c.xn—p1ai
How to remove the steering wheel on a Priora? Step-by-step instruction
- 24 mm socket wrench;
- pipe 30-40 cm long (for support);
- 5 mm hex wrench;
- screwdriver (flat blade).
- 1. Disconnecting the wire from the negative terminal of the battery;
- 2. Installation of the steering wheel, the position of which will fully correspond to the movement of the car strictly in the forward direction;
- 3. First, unscrew the 2 fastening screws, while turning the airbag itself. To do this, use a screwdriver to disconnect the wire block;
- 4. We remove the latch and remove the wiring block, which is located on the airbag;
- 5. The next step is to use a screwdriver to press out the clamp of the wire block that goes to the sound signal;
- 6. With a special 24 mm key. loosen the steering wheel nut;
- 7. Then, grasping the steering wheel with our hands, with sharp movements, swaying in different directions, we pull the steering wheel toward ourselves;
- 8. Having torn the steering wheel from its place, unscrew the nut 24 to the end and remove it;
- 9. Under no circumstances should you press hard on the moving part of the slip ring.
How to repair a bumper
Often replacement can be avoided and damaged plastic can be repaired. Here, of course, you cannot do without the help of an experienced craftsman, but if you wish, you can do it yourself.
There are two very reliable ways to solder a bumper on a Priora:
- Metal grid.
- Welding using a hair dryer and a plastic rod.
The first method has been used before. To do this, you need to have a powerful soldering iron - from 80 watts and above and a metal mesh, which is used, for example, to protect audio speakers.
The parts to be fastened must be cleaned at the site of the future seam, and then the mesh must be cut off and applied to the joint on the back side of the bumper.
Heat the mesh with a soldering iron and it will “fall” into the melted plastic. All that remains is to move it to the side to tighten the mesh with liquid plastic and move the soldering iron away.
This makes a fairly strong connection. However, finding a suitable mesh is often difficult, and the connection is not durable. The best method is using a hair dryer and a rod.
Procedure:
- The bumper must be removed from the car and the soldering area must be processed using a grinding machine.
- The connection point is secured with clamps. And it is cleaned with a Dremel - you need to create a groove.
- Using a special nozzle, heat the plastic rod and move it along the joint, creating a seam. Treat the front of the bumper as well.
- The seams must be smoothed using a sanding machine.
- After this, the repair area is leveled, primed and painted.
Not every bumper can be repaired. It is impossible to solder a crack in the areas of the bumper's power component. For example, on the ribs, which strengthen the structure.
Unfortunately, such a bumper will have to be thrown away or used for spare parts in the future.
Priora do-it-yourself car repair
Like all domestic cars, Lada Priora has its drawbacks. During the release of the model, a list of the most frequent breakdowns and weak points of this machine was formed. For Lada Priora, repairs of engine spare parts and electrical equipment are common occurrences. There are also problems with the suspension struts and interior plastic.
In case of serious breakdowns that are beyond your competence, you need to undergo diagnostics at a service station. But if you are sure that you are able to identify a certain, not too serious breakdown, you can cope on your own. Repairing the Priora on your own will help you follow the operating and repair instructions for the VAZ 2170.
When a driver undergoes Priora maintenance, service station workers often discover faults in the engine systems. The most common causes of engine failure are as follows.
- Problems with the timing belt.
- Failure of fuel pump parts.
- Crankshaft position sensor failure.
Signs: loss of power, engine stability. The repair manual prescribes how to replace the timing belt, repair the fuel pump, and replace the crankshaft position sensor. Car repairs are performed with the ignition off.
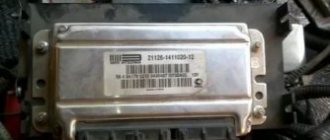
First you need to remove the right engine protective shield, release the latch that holds the engine control system wiring harness block. Then you should disconnect the crankshaft position sensor from this block. The sensor is dismantled using a 10mm wrench. Unscrew the mounting bolt.
You need to check not only the sensor itself, but also its entire circuit. We do not turn on the ignition, the crankshaft is motionless. We connect one multimeter probe to the terminal of the block harness, the other to ground. The voltage on the tester should be approximately 2.5 V.
We repeat the procedure with the other terminal of the harness.
If the voltage is normal, you need to check the circuit for an open or short circuit: the section between harness pin 1 and controller pin 34, as well as the wire that connects harness pin 2 and controller pin 15.
If the voltage and circuit are OK, the controller may have failed. We test the sensor itself using a multimeter. Normal operation of the sensor occurs with a resistance of 550–570 Ohms.
And in AC mode, when the steel rod is brought to the end of the sensor, a voltage surge should occur. Then the sensor is normal.
If none of the conditions are met, replace the sensor and install it back on the oil pump cover.
Caring for the timing belt involves replacing it after 200 thousand kilometers. Checking is recommended every 45,000 km. After all, a broken belt, “licking” of teeth, the presence of folds, cracks, and fiber breaks lead to a violation of the phases of the camshaft and crankshaft.
Consequences: jamming of pistons, valves, connecting rods. The presence of oil on the belt is also unacceptable. If such breakdowns are detected, we replace the timing belt. Repair and maintenance of the belt is carried out in accordance with the instruction manual.
The main thing you need to know: before removing the belt, you need to set the shafts to the TDC (top dead center) position of the piston.
To check the pressure in the fuel rail, which depends on the fuel pump and filter, you will need a pressure gauge. You need to insert it instead of the spool, which is located under the fuel rail fitting. With the ignition on, take readings from the pressure gauge. The value should be between 3.6–4 bar.
We check the serviceability of the fuel pump by ear. If the pump makes unusual sounds or the pressure is not as specified, the parts must be replaced. The replacement process is described in the operating and repair instructions.
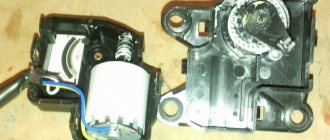
Electrical equipment often suffers from breakdowns:
- electric power steering;
- wiper drive;
- headlight lamps.
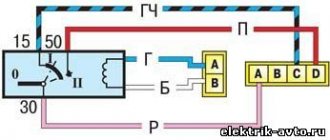
At the first stages of Lada Priora sales, problems arose with a new function - electric power steering. This was a trial step for AvtoVAZ, and it is logical that there were some disruptions. Jerks were observed when the steering wheel rotated, as well as jamming and stiff movement.
The electrical diagram provided in the owner's manual helps to trace the steering drive circuit and identify faults. Sometimes the problem was solved by simply cleaning the contacts and strengthening the wiring.
But often the breakdowns were much more serious, and only the service station workers could solve them.
Over time, the plant developed optimal assembly technology. Therefore, problems with the amplifier occur much less frequently. If the drive performance deteriorates, open the “Electrical equipment” section of the VAZ operating manual. We check the entire drive circuit for continuity and short circuit, and also clean the contacts.
On already “middle-aged” Priors, problems with the ignition coil can be traced. Also, over time, malfunctions in the operation of the windshield wiper drive occur, and headlight bulbs burn out. You can repair these parts yourself, following the instructions in the manual.
The standard battery on the Priora is not entirely successful. There are often complaints that the battery lasts for a year or a year and a half. Normal service life is up to three years. The battery on the Lada is a non-separable type, so you only have to replace it.
The front and rear suspension of the Lada Priora is equipped with hydraulic shock absorbers. The hydraulic fluid of the struts often begins to leak. In addition, other failures are possible.
Often, after a certain mileage, the plastic used in interior trim begins to rattle, knock, and creak. In this case, there can be only one repair - soundproofing the Lada's interior. In this case, four main materials are used: vibration insulation, noise absorber, sound reflector, squeak suppressor.
Malfunctions in the suspension and interior
The front and rear suspension of the Lada Priora is equipped with hydraulic shock absorbers. The hydraulic fluid of the struts often begins to leak. In addition, other failures are possible.
| Problems | Your actions |
| A common problem with the Lada is a leak in the hydraulic cylinders of the strut shock absorber. | In this case, the stand may need to be replaced. The instructions describe how to remove the stand. You need to disconnect it from the fastenings under the hood, and on the other hand, disconnect the fastenings of the steering tip and steering cam. We remove the strut from the spring with a special puller and replace it with a new one. |
| A separate problem: the CV joint (angular velocity control joint) crunches. | This kind of malfunction happens even on new Priors. Drivers often note that external visibility does not help identify a defect. In this case, you should contact a service station. |
| The remaining problem areas of the Lada suspension are: wheel bearing, anti-roll bar. | You can replace them yourself. Detailed instructions are described in section 7 “Chassis”. See the subsections “Replacing stabilizer parts”, “Replacing the bearing”. |
Often, after a certain mileage, the plastic used in interior trim begins to rattle, knock, and creak. In this case, there can be only one repair - soundproofing the Lada's interior. In this case, four main materials are used: vibration insulation, noise absorber, sound reflector, squeak suppressor.
How to replace the Priora timing belt and instructions for action
One of the latest developments by VAZ engineers of the last decade is the 21126 engine, which became the main power unit on the VAZ-2170.
Here, cylinder honing and new pistons were used, which contributed to an increase in power.
However, a banal break in the gas distribution mechanism drive will damage the components of even such a technologically advanced unit. Therefore, it is better to check and change this component of the system in advance.
When is it necessary to replace the timing belt on a Priora car?
If we take into account the factory maintenance regulations, then he recommends rotating the rubber-mechanical product after 200,000 km . But, as practice shows, motorists prefer to change this part earlier - some at 60,000, and some at 100,000 km. It is believed that during urban travel the element wears out faster.
In any case, the condition of the element must be monitored every 45 thousand km . The first signs that a timing belt replacement is already necessary on a Lada Priora are the following factors:
- extraneous noise during engine operation;
- discoloration of exhaust gases;
- problems when starting the engine;
- extraneous vibrations.
Low mileage does not always guarantee trouble-free operation of the car. Quite often in reviews from car enthusiasts you can come across a situation where the belt drive wears out ahead of schedule due to oil and dirt getting on it. These components enter through seals and cracks in the casing, so it is important to eliminate the causes of leaks and inspect the part.
It is important to understand that replacing the Priora timing belt must be done in a timely manner; in no case should the matter be delayed until it breaks. Otherwise, the cost of repairs may unpleasantly surprise the owner. This is largely due to the absence of recesses for the valves on the pistons, so a break in the part leads to their direct contact, after which the latter usually bend.
Problems with the strength of the belt drive at high speeds generally lead to catastrophic consequences, including breakage of the pistons and even deformation of the connecting rods. In order not to expose themselves to risk, experienced motorists are advised to periodically monitor the condition of the rubber transmission, as well as the degree of its tension.
How is a belt drive checked on a VAZ 2170?
The part is a rubber product with teeth located on its inner part. The outer rim shows:
- the type of motor for which the car part is intended;
- number indicating the number of teeth – 137;
- marking indicating the width of the product - 22 mm.
This data will be useful to the owner who does not yet know which belt to buy for the VAZ 2170. All that remains is to prepare the necessary tool for checking:
- inbus key (hexagon) to “5”;
- key to “10”;
- jack.
The drive status check is performed on a cold motor and consists of the following steps:
- Using a hexagon, unscrew the five bolts securing the front upper cover of the timing gear drive and remove it.
- Inspect the part and determine whether the Lada Priora needs to replace the timing belt . To do this, engage fifth gear, lift the right front wheel and rotate it clockwise. The product must be free of cracks, peelings and undercuts exposing the cord threads. If defects are found, the part must be replaced.
- Inspect the condition of the tension roller - there should be no damage to it.
- Check the belt tension by pressing a force of 10 kg on the belt between the camshaft gears and measuring its deflection - it should be no more than 5-7 mm . You can also carry out control by the position of mark 1 on the outer race of the self-tensioning roller, which ideally should be opposite the protrusion 2 . Deviations are permissible within 3-4 mm - they are adjustable, but exceeding these values means the need to replace the belt drive and rollers.
How to replace the timing belt on a Lada Priora on your own?
The process includes not only the rotation of the rubber transmission, but also the rollers - tension and support - change along with it. Repair kits are usually sold at auto dealerships. To work you will need the following tools:
- head at “17”;
- keys to “15”, “13”, “10”, “8”;
- inbus key (hexagon) to “5”;
- a special key for adjusting the roller or pliers for removing the locking ring.
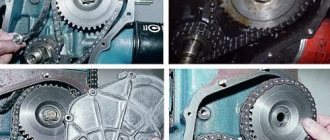
Next, the process of changing the drive occurs in the following order:
- Unscrew 5 bolts with a hexagon on the upper plastic casing of the gas distribution mechanism and 2 on the lower one, remove them.
- Using the socket at “17”, turn the crankshaft clockwise and align both camshafts at TDC on the compression stroke of the first cylinder according to the marks. This moment is determined by aligning marks 1 on the camshaft pulleys with marks 2, which are located on the rear cover.
- Remove the rubber plug in the clutch housing and check the position of the crankshaft: the marks on the flywheel and the slot on the upper housing cover must match.
- Before replacing the timing belt on a Priora car , you need to remove the auxiliary drive pulley. To do this, the assistant must engage 5th gear and press the brake, and the car owner, using the “17” socket with a knob, unscrew the pulley mounting bolt and remove it.
- For the convenience of subsequent assembly, before dismantling the rubber part, experienced car enthusiasts recommend fixing the camshaft pulleys with a simple wooden wedge, which should be driven between them.
- Using a “15” wrench, loosen the tension roller bolt and remove the belt from the shafts. Next, remove the tension and support rollers.
- Apply fixing sealant to the threads of the bolts of the new rollers. Tighten the support roller to a torque of 35-41 Nm , but do not completely tighten the tension roller. Check the position of the crankshaft using the mark on the oil pump cover.
- Place the toothed rubber drive onto the crankshaft pulley. Pull both branches and put the front part on the support roller, and the back part on the pump pulley and place it behind the tension roller. If a wooden wedge was used, it must be removed.