On all cars of the Tenth Family, the power lines for the lights contain many elements. There are lamp health relays, switches and fuses. Therefore, if the brake lights on a VAZ-2112 do not light up, you need to check the entire chain.
But the reason may look simple: sometimes the lamps do not turn on because the socket does not contact ground. Circuits are easy to analyze, but finding the cause of a breakdown is difficult. Let's look into the details.
If the lamps do not light, it is simply replaced.
Standard version of the brake light operating diagram
Power is supplied to fuse F17 from the battery, then the current goes to limit switch contact 11, and then, if the limit switch is closed, a circuit is formed with the filament of lamps 7. But note: part of the circuit is relay K1, more precisely, its contacts 5 and 4.
If the brake lights do not light up, on the VAZ-2112, as on all Tens, check one fuse. It is called F17 and is located in the mounting block to the left of the driver.
It is important to know: voltage is always present at one of the fuse terminals. Check it out!
Fault localization
Understanding the operating principle allows you to determine exactly why the brake lights may not light up:
- The fuse has blown. In the diagram, the fuses are marked with the letter F (from English - Fuse) and the serial number of the seat in the fuse block, for example, F3;
- poor contact at connectors;
- the light bulbs have burned out, but since the lights are connected in parallel, the likelihood that 2 lamps will burn out at once is extremely low;
- poor contact on the negative terminal of the lights. In this case, problems may begin not only with the feet, but also with the lighting of the remaining lamps in the lanterns;
- Damage to the negative track in the lamp board. From the total mass directly to the brake light lamp, the minus goes along a special path on the board. The path may collapse from water or mechanical impact;
- malfunction of the brake light switch, the so-called frog;
- broken wiring, oxidation of contacts.
A few words about the “serviceability relay”
The lamp health relay is called K1, and it is the largest in the mounting block. If you remove this relay, then when you press the pedal you can dial the voltage at terminal 5 (but not 4). Look at the diagram again, and it will become clear what we are talking about.
The largest relay in the block. All relay contacts are numbered. Check the voltage at the block terminals:
- – “mass” potential;
- – voltage “+12”, but only after turning on the ignition;
- – “+12” by pressing the pedal;
- – the terminal rings like a ground tap.
If the potential “0” is not generated at terminal “4,” it means that the lamp filaments are burnt out or there is a break in the wiring. Now consider something else: the ground potential has been detected, but the lamps do not light. This is where suspicions of a short circuit arise.
Why don't my tail lights work when my headlights are on?
The taillights and headlights have separate connections. This way, one set of headlights will still work, while the other set may have some problems and not work. Tail lights can go off for several reasons, and they are almost similar to the reasons why brake lights don't work while tail lights work.
Causes of rear light failure:
- Burnt out light bulbs;
- The fuse has blown;
- Damaged wiring.
If you still can't determine the problem with your brake lights or taillights not working, or you're not sure what to do, take it to a professional auto repair shop. Do not attempt to fix anything, be it major or minor repairs, if you have little knowledge of the vehicle.
REMEMBER: You can always contact our car service center, where your favorite car will be happy to receive professional technical assistance. You can also make an appointment with us for a scheduled technical inspection! Please familiarize yourself with our car repair and diagnostic services.
How to and how not to check potential
Let’s agree right away that we only work with a voltmeter. Voltage “+12” is caused by connecting one probe to ground. The presence of potential “zero” is checked differently: any of the probes is connected to a terminal with positive voltage, and then the second probe is connected to the wire being tested.
Consider the error: one probe is connected to ground, the second to the terminal being tested, and vol. Here they conclude that there is a “mass” potential, but this is wrong! If the contact with ground is broken, the device will also show “0”. That is, the number “0” does not contain information.
Troubleshooting
Below are examples of how to fix basic problems and how to easily find them.
Fuse
This is the most frequently damaged element in brake light failures, and also the most easily repaired. To eliminate the breakdown, you just need to replace the fuse on the mounting block.
The fuse responsible for the operation of the VAZ 2114 brake lights is located on the fuse block under number F3 and has a fuse-link current of 10A.
To make sure that the fuse has blown, you need to turn on the interior lighting. If the brake light fuse is faulty, the light in the car interior will not light up because This fuse F3 is responsible for lighting the interior and the on-board computer.
Below is a diagram of the VAZ 2114 fuse box.
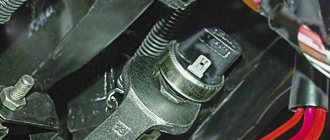
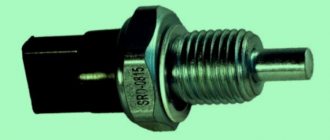
Brake pedal sensor
The brake pedal switch is responsible for turning on the brake lights when you press the brake pedal. This sensor is located on the pedal assembly of the car and is a kind of limit switch. When you press the brake pedal, the contacts on the sensors close the power supply circuit of the brake lights and light up their lamps, signaling that the car is braking.
Quite often, the spring that pushes the contacts to close on this sensor breaks, thus the sensor does not close the contacts when the brake pedal is pressed and the brake lights do not light up.
Replacement is carried out using a set of keys.
Lamp burnout
Often, the culprit of brake light malfunction is burnt-out lamps, but it should be noted that the likelihood of two lamps burning out at the same time is very small. Most often, when a brake light bulb burns out, one light fails.
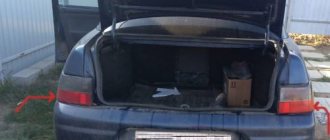
The lamps are replaced from the luggage compartment of the car.
The type of lamp installed in the rear brake light of the VAZ 2144 is P21W – 12V.
Cartridge oxidation
Over time, due to moisture, the contact on the socket into which the light bulb is inserted can oxidize and the contact between the socket and the light bulb will disappear, which will make it impossible for electric current to pass to the lamp, thereby making it impossible to light it.
This problem can be eliminated by cleaning the contact using sandpaper and the lamp contact.
Connector oxidation
Just as with oxidation of the cartridge, due to exposure to moisture, the contacts on the connector oxidize, thereby blocking the path of electric current to the lamp. With such a breakdown, most often the entire lamp suffers and not only the brake light stops lighting, but also the turn signal, clearance signal, and reverse signal.
The problem is eliminated by cleaning the contact with sandpaper and treating with alcohol.
Damage to the board
This problem is less common, but it causes damage to the flashlight. The board is a plate of conductors to which a connector is connected. Conductors are tracks that quite often fray or break, which leads to an open circuit and, consequently, to failure of the lantern.
Solving this problem is quite problematic; it is necessary to solder the soldering iron tracks. Most often, when such a breakdown occurs, the flashlight is completely replaced.
Broken wire
A broken power cord is the most common problem. Most often, a break occurs in the luggage compartment of a car due to loading and unloading of various cargoes that can break this wire.
The most difficult thing in this problem is to find the break point. It is necessary to carefully inspect the places where the wires are laid in the luggage compartment.
We hope our article was useful to you.
Wiring test on non-working brake lights
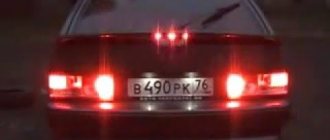
Let's look at the basic diagram: the brake lights and the reversing lamps have a common ground pin. If contact with this pin is broken, the reverse lamps will not turn on. Well, brake lights too.
On the left side there is a connector through which the wiring goes to the fifth door. The connector has black and red wires. Check the voltages on them. Most often the ground on the black wire does not ring. But maybe the connector itself needs to be cleaned.
Usually, if the ground breaks, another pin is used - the one that is connected to the glass heating coil. If the “plus” does not come to the red wire, we check the “frog”. It's simple here:
- Disconnect the connector with two wires from the limit switch;
- Using 17mm wrenches, loosen the two nuts: holding the lower nut, rotate the upper one;
- The end switch is removed as an assembly and checked with an ohmmeter.
By the way, one of the connector terminals receives a voltage of “12 Volts”. Check it!
If all the steps do not lead to results, there is only one thing left: contact a qualified electrician. We wish you success.
Light bulbs
Burnt out light bulbs are the most common reason for signals and headlights not working. Remove the screws and lenses (you can access through the trunk or check your vehicle's repair manual for the exact location). Click on the bulbs and turn them counterclockwise to remove them.
Light bulbs need to be replaced if they become dark or the filaments are broken. Choose new light bulbs of the same type and wattage. In most European cars, the same bulb does the job of the rear light and the brake light. This light bulb has double filaments, which allows them to work independently of each other.
Removing and replacing rear lights
The procedure for replacing rear lights is as follows:
- First you need to turn off the ignition, open the hood and disconnect the terminals from the battery.
- Then open the trunk of the car and remove the protective cover on the headlight, disconnect the mount and disconnect the wiring connector from the contacts on the board. Be careful not to damage them.
- Using a size 8 socket wrench, you need to unscrew the four nuts that secure the taillight. Having done this, under the nuts of the studs you will be able to see the tips of the ground cable.
- Next, you need to carefully remove the taillight from its seat. To change the diffuser, it must be removed from the optics body.
- The procedure for installing and assembling optical elements is performed in reverse order.
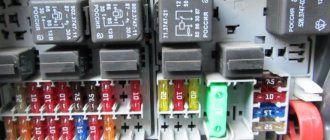
Fuse box VAZ-2107
The VAZ-2107 fuse box is located in the engine compartment, to the right of the engine (if you look in the direction of travel of the car). It contains the main fuses and relays. To check whether any of them have burned out, you need to open the hood and the plastic cover of the block, on which the names of the fuses and their nominal values should be indicated.
R1 - relay for turning on the heated rear window . If the heating does not work, check this relay, as well as fuse F5, replace the burnt or faulty ones. If the relay and fuse are working, check the contacts for connecting the wires to the heating strips on the rear window (on the side closer to the side doors)
R2 - headlight high beam relay . Works in conjunction with fuses F12 and F13. If only one headlight does not shine on high beams, most likely the problem is in the lamp, which is time to be replaced or in fuse F12 or F13 (right/left headlight, respectively)
R3 - headlight low beam relay . Works in conjunction with fuses F16 and F17. If the low beam does not work in both headlights, it is most likely the problem with this relay. First of all, replace it with a working one. If it doesn’t help, both lamps could have burned out (this happens) or their fuses.
1 — connector for the relay for turning on the headlight cleaners and washers . If your car does not have these devices, then the presence of a relay is not necessary.
We recommend: Valve desiccant - how to make a special tool with your own hands?
2 — connector for the horn relay . In the figure, a jumper is installed so that the sound signal works without this relay.
3 — connector for the cooling system fan motor relay . In the figure, a jumper is installed so that the fan operates without this relay. Be careful with this connector. Failure to contact the jumper in the absence of a relay can cause the fan to fail, and this can lead to overheating of the coolant and, accordingly, the engine. When the first signs of overheating appear (according to the temperature sensor and boiling of the liquid), turn off the engine as soon as possible.
4 — tweezers for replacing fuses 5 — spare fuses 6 — tweezers for replacing relays
Try to always have spare fuses of different ratings, so that if they blow out on the road, you don’t have to look for the nearest car shop.