Methods for troubleshooting
Troubleshooting is not a complicated process and even novice car enthusiasts can do it (the author of the video is Avtoelektika VC).
Using a multimeter, you need to test the wiring. Damaged or torn sections should be replaced intact or soldered. If there are traces of oxidation processes on the contacts, they need to be cleaned.
If the LEDs burn out, they need to be replaced in pairs. If the breaker fails, it must be replaced with a new one, as it cannot be repaired. Before replacing, turn off the vehicle's power by removing the negative terminal from the battery. Then disconnect the power wires from the breaker. Next, you need to loosen the lock nut and unscrew the main nut securing the switch to the bracket.
Replacing the brake light switch
Before installation, the new frog should be checked for functionality. This can be done using an ohmmeter. We connect the device to the device and measure the resistance. When the contact is closed, the resistance should be zero. If you press the rod, the contacts should open; the resistance in this case tends to infinity.
Replacing a stop repeater with your own hands
If repairing the repeater is not practical, it should be replaced.
The replacement process consists of the following steps:
- Using a wrench, unscrew the fastenings of the rear part of the stop and remove it.
- Then we connect the positive wire of the lighting fixture to the terminal where the brake light frog is located. To do this, you need to run the wire into the luggage compartment, unscrew the trim on the right side, and connect it to the desired terminal. The disadvantage may be a bolt in the luggage compartment.
- Heat shrink should be applied to the wiring. To prevent the wires from dangling, they need to be secured with insulating tape.
- The final step is to check the device for functionality.
Photo gallery
If a repeater with incandescent lamps is installed on the car, then when connecting a device with LEDs according to the above diagram, the lamp control will not work correctly due to different loads. In this case, you should insert the positive wire into the light bulb control unit and connect it to terminal 54H.
As a brake light, a strip with LEDs can be glued to the upper part along the entire length of the rear window. It needs to be connected to a standard device, and it will work in the same way. It is important to maintain polarity. To make the tape less conspicuous, it can be painted black. Attach the tape using double-sided tape. We check for functionality.
The brake lights on the VAZ-2112 do not light up or work, why?
On all cars of the Tenth Family, the power lines for the lights contain many elements. There are lamp health relays, switches and fuses. Therefore, if the brake lights on a VAZ-2112 do not light up, you need to check the entire chain. But the reason may look simple: sometimes the lamps do not turn on because the socket does not contact ground. Circuits are easy to analyze, but finding the cause of a breakdown is difficult. Let's look into the details.
If one of the lamps does not light, it is simply replaced. See the example in the video - you need a P21W base.
Standard version of the brake light operating diagram
Power is supplied to fuse F17 from the battery, then the current goes to limit switch contact 11, and then, if the limit switch is closed, a circuit is formed with the filament of lamps 7
But pay attention: part of the circuit is relay K1, more precisely, its pins 5 and 4
Basic network diagram
If the brake lights do not light up, on the VAZ-2112, as on all Tens, check one fuse. It is called F17 and is located in the mounting block to the left of the driver.
Main mounting block
It is important to know: voltage is always present at one of the fuse terminals. Check it out!
A few words about the “serviceability relay”
The lamp health relay is called K1, and it is the largest in the mounting block. If you remove this relay, then when you press the pedal you can dial the voltage at terminal 5 (but not 4). Look at the diagram again, and it will become clear what we are talking about.
The largest relay in the block
All relay contacts are numbered. Check the voltage at the block terminals:
- 6 – “mass” potential;
- 2 – voltage “+12”, but only after turning on the ignition;
- 5 – “+12” by pressing the pedal;
- 4 – terminal rings as a ground tap.
If the potential “0” is not generated at terminal “4,” it means that the lamp filaments are burnt out or there is a break in the wiring. Now consider something else: the ground potential has been detected, but the lamps do not light. This is where suspicions of a short circuit arise.
We turn on the brake lights forcibly
Relay K1 is successfully replaced with a pad with jumpers. In Fig. 1 just shows its diagram. If there is no such platform, you can temporarily close contacts 4-5. First, check everything mentioned above.
How to and how not to check the “0 Volt” potential
Let’s agree right away that we only work with a voltmeter. Voltage “+12” is caused by connecting one probe to ground. The presence of potential “zero” is checked differently: any of the probes is connected to a terminal with positive voltage, and then the second probe is connected to the wire being tested.
How to connect a voltmeter
Consider the error: one probe is connected to ground, the second to the terminal being tested, and vol. Here they conclude that there is a “mass” potential, but this is wrong! If the contact with ground is broken, the device will also show “0”. That is, the number “0” does not contain information.
Wiring test for non-working brake lights (ground test)
Let's look at the basic diagram: the brake lights and the reversing lamps have a common ground pin. If contact with this pin is broken, the reverse lamps will not turn on. Well, brake lights too.
Connector for connecting “internal” lights
On the left side there is a connector through which the wiring goes to the fifth door. The connector has black and red wires. Check the voltages on them. Most often the ground on the black wire does not ring. But maybe the connector itself needs to be cleaned.
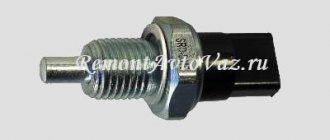
If the “plus” does not come to the red wire, we check the “frog”. It's simple here:
- Disconnect the connector with two wires from the limit switch;
- Using 17mm wrenches, loosen the two nuts: holding the lower nut, rotate the upper one; Removing the frog brake
- The end switch is removed as an assembly and checked with an ohmmeter.
By the way, one of the connector terminals receives a voltage of “12 Volts”. Check it!
carfrance.ru
Removing and installing rear lights on a VAZ 2110-2112
I think there is no need to explain once again that the rear lights are located in blocks, one of which is located in the wing, and the second in the trunk lid, so we will consider the removal procedure separately.
Removing the parking light and turn signal
So, first of all, open the trunk lid and open the “window” with Velcro in the place shown in the picture below:
As you can see, there is one nut that needs to be unscrewed. After this, you need to unscrew the self-tapping screw from the side with a screwdriver, with which the casing is attached. It is enough to do this in one place, as shown in the photo below:
And we move it back slightly to gain access to the remaining nuts securing the rear lights.
Now you can start unscrewing the two nuts that secure the lamp:
And then from the back side, you can carefully, without making excessive efforts, pull the lantern so that it comes out:
Since at first we did not disconnect the block with wires, we can do this now:
At this point we can consider half the work done. Now let's move on.
Removing the reverse light and brake light
First, with the trunk open, remove the power plug from the board, as is clearly demonstrated below:
Now all that remains is to unscrew the two nuts, which are clearly visible in the picture below:
And also, as was done in the previous description, we take out the flashlight from the back side. The central pad may be slightly in the way, but you don’t have to remove it if you act carefully:
If necessary, we replace it, and installation proceeds in the reverse order. What can we say about the cost: at the moment, a set of rear lights for a VAZ 2110-2112 is about 2000 rubles, but all this can be bought separately in blocks, that is, two right and two left blocks.
On all cars of the Tenth Family, the power lines for the lights contain many elements. There are lamp health relays, switches and fuses. Therefore, if the brake lights on a VAZ-2112 do not light up, you need to check the entire chain. But the reason may look simple: sometimes the lamps do not turn on because the socket does not contact ground. Circuits are easy to analyze, but finding the cause of a breakdown is difficult. Let's look into the details.
If one of the lamps does not light, it is simply replaced. See the example in the video - you need a P21W base.
How to remove the mounting block - all steps in one video
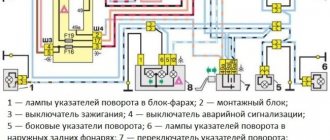
Left: If the turn signals work properly but the hazard warning lights do not turn on, the cause is usually a faulty hazard warning light switch. If you press the switch firmly several times, most often it will start working normally. If this does not happen, then remove the switch (2), squeezing its locking tabs and removing it from the groove, check the contacts of the pin connection (1). Right: When installing the brake light switch (2), it must be pressed against the pedal support (3) so that the switch pin also presses the switch when the pedal (4) is released. For perfect operation, the pin block (1) must be correctly connected.
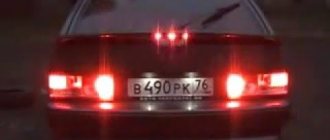
Brake lights should be checked as often as possible in the interests of safety.
- The garage wall behind your car should give off a red glow when you press the brake pedal.
- When driving, check using your rear view to see if the light from your brake lights is reflected in the headlight reflectors or on the paintwork of the car behind you.
When you press the brake pedal with your foot, the spring in the brake light switch (it is mounted in the brake pedal suspension holder) presses on the control pin. At the same time, the contacts in the switch and the electrical circuit to the brake lights are closed. If the brake pedal is released, the pedal pin presses the control pin to its original position and the brake signal goes off.
Checking the brake light switch
If both brake lights do not light, check as follows to see if the brake light switch is the cause.
Replacing the brake light switch
Wiring test for non-working brake lights (ground test)
Let's look at the basic diagram: the brake lights and the reversing lamps have a common ground pin. If contact with this pin is broken, the reverse lamps will not turn on. Well, brake lights too.
On the left side there is a connector through which the wiring goes to the fifth door. The connector has black and red wires. Check the voltages on them. Most often the ground on the black wire does not ring. But maybe the connector itself needs to be cleaned.
Usually, if the ground breaks, another pin is used - the one that is connected to the glass heating coil.
If the “plus” does not come to the red wire, we check the “frog”. It's simple here:
- Disconnect the connector with two wires from the limit switch;
- Using 17mm wrenches, loosen the two nuts: holding the lower nut, rotate the upper one;
- The end switch is removed as an assembly and checked with an ohmmeter.
By the way, one of the connector terminals receives a voltage of “12 Volts”. Check it!
If all the steps do not lead to results, there is only one thing left: contact a qualified electrician. We wish you success.
Additional Tips
Before each trip, especially over long distances, you should check the functionality of all lighting equipment, including brake lights. In order to reduce the likelihood of breakdowns along the way, you need to periodically check the condition of the sockets and bases of the rear light bulbs, and periodically clean them of oxides and dirt.
In case a breakdown does occur, you should always have an additional set of light bulbs and 10 amp fuses in your car, as well as a multimeter to check them.
Source
VAZ 2114 (2113) stops do not work
There are few reasons why the brake lights of a VAZ 2114, 2113 car do not work. Let's list them all and try to figure out this problem ourselves.
The brake light bulb in the rear light is burnt out.
Most often, only one lamp burns out, but sometimes two lamps burn out.
In this case, you will have to replace the lamp with a new one or a known good one. The brake light uses a P21W lamp. Similar lamps for the turn signal, reverse light, and fog light are in the same rear light. They can be used to check the brake light by replacing it.
The contacts in the stop lamp socket have oxidized
In this case, a “break” occurs in the electrical circuit of the lamp. Most often, in this case, one brake light will not work, while the other will be on.
To restore contact, you need to turn the light bulb in the socket several times, or remove it and clean the oxidized contacts with fine-grained sandpaper.
The wiring block for the rear light is faulty (chip)
Either it is not securely fastened, or the contacts have oxidized. In any case, there will be an open circuit in the electrical circuit.
It is necessary to remove and put the block on the terminals of the rear light board several times to restore oxidized or unreliable contact. Subsequently, you can clean the pins on the board and the wire tips in the connecting block.
The fuse in the mounting block has blown
If the fuse is blown, both brake lamps in the taillights will not light.
The electrical circuit for turning on the brake lights of the VAZ 2114 (2113) is protected by fuse F3 (7.5A) in the fuse and relay mounting block. Check the integrity of the fuse. If faulty, replace with a new one. If the fuse is blown again, you should look for a short circuit in the circuit. According to the connection diagram shown below.
The track in the rear light board has crumbled
As a result, the electrical circuit will be broken (“open”), and the brake light lamp will not light up.
It is necessary to remove the rear light board where the brake light is not illuminated and inspect it for damage to the tracks. If you cannot visually detect the location of the damage, you should “ring” the tracks with a multimeter or test lamp. Wiring is soldered to the damaged track and the board continues to function. For details, see the article “Checking the rear light board.”
The rear light ground is missing
In this case, one or two lights may not work. The negative wire of the lamp of each of the rear lights comes out of its connecting block of wires (chips) and is attached to the body next to it. Over time, this connection oxidizes and the contact disappears (the circuit opens).
It is necessary to unscrew the nut securing the tip of the negative wire to the body. Clean the pin and tip. After which the contact will be restored and the stop will light up.
Brake light switch faulty
If it malfunctions, both brake lights will not light up. The switch is located under the brake pedal and, after pressing it, closes the contacts of the electric stop circuit.
We remove two wires from it - white-red and pink-red, and connect them together with a piece of wire. The brake lights are on fire - we change the sensor, no, then we check the electrical circuit. In addition, we check the adjustment of the free play of the brake pedal, since the position of the switch may be broken, it does not work completely and the contacts do not close.
“Open” in the electrical circuit of the stop lamps
The cause of the “break” may be insecurely fastened wire harness chips, oxidation of the contacts in them, breaking of the circuit wires or their damage as a result of repairs.
Using a multimeter in voltmeter mode, you can check the presence of voltage in various parts of the electrical circuit and determine the damaged area. The best way to do this is to use a diagram.
First of all, we check the presence of voltage at the tip of the red wire in the rear light blocks to understand the malfunction in the lights or circuit. Then we check for voltage at the tip of the white-red wire of the brake light switch under the brake pedal.
Notes and additions
Before carrying out a detailed diagnosis of a malfunction of the VAZ 2114, 2113 stops, it is necessary to visually inspect the accessible sections of the brake light switching circuit and its elements, and also remember whether any repairs have been carried out on the car, since often the solution to the problem is on the surface.
TWOKARBURATORS VK -More information on the topic in our VKontakte group
Common problems with brake lights
There may be several reasons:
- blown fuse;
- faulty sensor;
- frayed or broken power cord.
The most common cause is a blown fuse responsible for protecting the signal light circuit. This fuse is located on a block built to the left of the steering column. This capacitor can withstand a current of 7.5 amperes, as evidenced by the inscription on it. It is located in the bottom row, fourth from the right edge.
If after replacing this circuit element the problem has not been resolved, other possible causes of failure should be considered.
The next troubleshooting point is to check the brake light sensor. To do this, you need to check whether voltage is entering and exiting the sensor. In this case, you need to use a control lamp. If the lamp does not light up when connected in front of the sensor, then the problem may be in the wires going to the sensor. If the lamp works before the sensor, but not after, then the problem lies in this part. You can also simply disconnect the input and output of the sensor and close it “directly” using a copper wire; if after these manipulations the lights in the brake lights light up, then the reason is precisely in the sensor. The sensor cannot be repaired, and the only way out is to replace this part with a new one.
We turn on the brake lights forcibly
Relay K1 is successfully replaced with a pad with jumpers. In Fig. 1 just shows its diagram. If there is no such platform, you can temporarily close contacts 4-5. First, check everything mentioned above.
Have an observer watch what happens to the lamps. Press the pedal with one touch and release it. If the lamps do not turn on, check that the fuse is working properly. It's burned out, which means you're looking for a short circuit.
How to and how not to check the “0 Volt” potential
Let’s agree right away that we only work with a voltmeter. Voltage “+12” is caused by connecting one probe to ground. The presence of potential “zero” is checked differently: any of the probes is connected to a terminal with positive voltage, and then the second probe is connected to the wire being tested.
Consider the error: one probe is connected to ground, the second to the terminal being tested, and vol. Here they conclude that there is a “mass” potential, but this is wrong! If the contact with ground is broken, the device will also show “0”. That is, the number “0” does not contain information.
Malfunction of the lights themselves
If during the check from the fuse box to the limit switch no problems are found, then you should move on. Now you should test the wiring from the second limit switch connector to the stop connectors with a tester. If it is working, then you need to check the board. The printed circuit board on which the taillights are mounted is not ideal, and is one of the biggest problems of all VAZ cars.
Its tracks often burn out or peel off, causing the lights to stop working. This problem can be solved in two ways - either re-solder the tracks (which can be done with a regular soldering iron, although not in road conditions) or replace the board with a new one (most motorists choose the second option).
Tail lights of VAZ 2114
Another reason why the VAZ 2114 brake lights do not work may be oxidation of the lamp sockets. In order to eliminate this problem, it is enough to clean all contacts from oxides that have appeared on them.
This is best done in one of the following ways:
- small grit sandpaper;
- WD-40 solution;
- kerosene;
- purified gasoline (“galosh”).
You should absolutely not use gasoline or other solvents to clean contacts.
Light bulb in the foot of a VAZ 2114
The last option for faulty stops is the light bulbs themselves. It makes no sense to give any detailed advice here - you just need to replace the burnt out light bulbs with new ones.
By following all the tips listed above, the car enthusiast gets the opportunity to check the entire electrical circuit of the brake lights, starting from the fuse box and ending with the bulbs in the lamps. Thanks to this, the guarantee that the fault will be accurately detected and eliminated is 100%.
Fuse blown
No. 6 for mounting block 17.3722, F3 for 2114.
If it burns out, replace it with a new one. Subsequently, it will be necessary to find out the reason for the blown fuse, perhaps a small short circuit somewhere.
Fuse No. 6 for brake lights (stops) VAZ 2108, 2109, 21099 with mounting block 17.3722
The brake lights on the VAZ-2112 do not light up or work, why?
On all cars of the Tenth Family, the power lines for the lights contain many elements. There are lamp health relays, switches and fuses. Therefore, if the brake lights on a VAZ-2112 do not light up, you need to check the entire chain. But the reason may look simple: sometimes the lamps do not turn on because the socket does not contact ground. Circuits are easy to analyze, but finding the cause of a breakdown is difficult. Let's look into the details.
If one of the lamps does not light, it is simply replaced. See the example in the video - you need a P21W base.
Standard version of the brake light operating diagram
Power is supplied to fuse F17 from the battery, then the current goes to limit switch contact 11, and then, if the limit switch is closed, a circuit is formed with the filament of lamps 7
But pay attention: part of the circuit is relay K1, more precisely, its pins 5 and 4
Basic network diagram
If the brake lights do not light up, on the VAZ-2112, as on all Tens, check one fuse. It is called F17 and is located in the mounting block to the left of the driver.
Main mounting block
It is important to know: voltage is always present at one of the fuse terminals. Check it out!
A few words about the “serviceability relay”
The lamp health relay is called K1, and it is the largest in the mounting block. If you remove this relay, then when you press the pedal you can dial the voltage at terminal 5 (but not 4). Look at the diagram again, and it will become clear what we are talking about.
The largest relay in the block
All relay contacts are numbered. Check the voltage at the block terminals:
- 6 – “mass” potential;
- 2 – voltage “+12”, but only after turning on the ignition;
- 5 – “+12” by pressing the pedal;
- 4 – terminal rings as a ground tap.
If the potential “0” is not generated at terminal “4,” it means that the lamp filaments are burnt out or there is a break in the wiring. Now consider something else: the ground potential has been detected, but the lamps do not light. This is where suspicions of a short circuit arise.
We turn on the brake lights forcibly
Relay K1 is successfully replaced with a pad with jumpers. In Fig. 1 just shows its diagram. If there is no such platform, you can temporarily close contacts 4-5. First, check everything mentioned above.
How to and how not to check the “0 Volt” potential
Let’s agree right away that we only work with a voltmeter. Voltage “+12” is caused by connecting one probe to ground. The presence of potential “zero” is checked differently: any of the probes is connected to a terminal with positive voltage, and then the second probe is connected to the wire being tested.
How to connect a voltmeter
Consider the error: one probe is connected to ground, the second to the terminal being tested, and vol. Here they conclude that there is a “mass” potential, but this is wrong! If the contact with ground is broken, the device will also show “0”. That is, the number “0” does not contain information.
Wiring test for non-working brake lights (ground test)
Let's look at the basic diagram: the brake lights and the reversing lamps have a common ground pin. If contact with this pin is broken, the reverse lamps will not turn on. Well, brake lights too.
Connector for connecting “internal” lights
On the left side there is a connector through which the wiring goes to the fifth door. The connector has black and red wires. Check the voltages on them. Most often the ground on the black wire does not ring. But maybe the connector itself needs to be cleaned.
If the “plus” does not come to the red wire, we check the “frog”. It's simple here:
- Disconnect the connector with two wires from the limit switch;
- Using 17mm wrenches, loosen the two nuts: holding the lower nut, rotate the upper one;
Removing the frog brake
The end switch is removed as an assembly and checked with an ohmmeter.
By the way, one of the connector terminals receives a voltage of “12 Volts”. Check it!
Lamp replacement procedure
If not a VAZ 2112, then the light bulb may have burned out and needs to be replaced.
The replacement process consists of the following steps:
- Disconnect the negative terminal on the battery. Replacing high and low beam lamps is the same, the only difference is the holes in which they are installed.
- To access the element to be replaced, you need to remove the rubber plug.
- Next, you should disconnect the wire block from the light bulb.
- Then you need to find the retainer that holds the springs and carefully remove it from the grooves.
- Now you can remove the light bulb from the socket.
- The next step is to insert a new light bulb.
- We assemble in the reverse order of removal.
- To replace, you need to remove the casing by unscrewing 4 bolts. The lamp is unscrewed by grasping the socket and turning it counterclockwise until it stops.
- Next, we insert a new light element and reassemble it.
Photo gallery “Replacing light bulbs on tenth models”
1. Remove the rubber plug.
Lower the latch down.
3. Remove the element from the socket.
After installing the lamps, you need to check their functionality.
Fault localization
Understanding the operating principle allows you to determine exactly why the brake lights may not light up:
- The fuse has blown. In the diagram, the fuses are marked with the letter F (from English - Fuse) and the serial number of the seat in the fuse block, for example, F3;
- poor contact at connectors;
- the light bulbs have burned out, but since the lights are connected in parallel, the likelihood that 2 lamps will burn out at once is extremely low;
- poor contact on the negative terminal of the lights. In this case, problems may begin not only with the feet, but also with the lighting of the remaining lamps in the lanterns;
- Damage to the negative track in the lamp board. From the total mass directly to the brake light lamp, the minus goes along a special path on the board. The path may collapse from water or mechanical impact;
- malfunction of the brake light switch, the so-called frog;
- broken wiring, oxidation of contacts.
Troubleshooting algorithm
To detect a fault in the electrical network, you will need a multimeter or a tester, which you can make yourself
Previously, we told you how to use a multimeter, so we won’t focus on that.
The sequence of searching for the cause of the breakdown:
- Check the fuse for the brake light circuit. The location diagram of the fuse links can be found in the repair and operating manual for your car; often the symbol of the protected circuits is located on the back of the cover covering the fuse mounting block. If the installed fuse of the required rating immediately blows, there is a short circuit (short circuit) in the circuit. Please note that the fuse can protect not only the feet, but also other circuits. Installing a fuse with an increased rating is fraught with the risk of a car fire;
- If oxidation is detected on the terminals, clean the contacts mechanically or use an aerosol contact cleaner.
- Having turned on the ignition first and holding the brake pedal depressed, check whether there is power on the positive wire that goes from the limit switch to the rear light connector. If there is power, there is a malfunction in the lights themselves;
- check whether the positive signal is coming from the mounting block to the limit switch. If + comes, but when you press the brake pedal it does not appear on the second terminal of the limit switch, then the problem is in the “frog”;
- If there is no + at the limit switch terminal, examine the circuit up to the mounting block. If the wire is intact and securely fastened in the connectors, then the problem is in the mounting block.
How to troubleshoot?
The most common reasons that the brake light on the VAZ 2114 does not work are the following factors:
- Fuse failure.
- Broken wires in one of the sections of the circuit.
- Limit switch faulty.
- Bulbs burn out.
- Oxidation of contacts in lamp sockets.
- Damage to the contact board.
The most common and at the same time the most easily removable of the above reasons is a blown fuse. To identify such a malfunction, you need to examine the fuse box. A 10-amp fuse F3 is responsible for the brake lights, which also protects the ignition switch, computer and interior lighting.
Malfunctions in the operation of the latter may also indicate a malfunction of the stop fuse (and in this case, troubleshooting should begin with the block). If it turns out that the fuse has blown, then you should replace it with a new, similar one.
A new fuse installed in place of a failed one must be designed for exactly the same maximum current. If it is less, the fuses will blow more often, and if it is more, the protected device itself may burn out.
The problem may also be in the fuse block itself - sometimes the tracks on its printed circuit boards burn out or the contact legs oxidize. In order to check its serviceability, it is enough to measure the voltage at the contacts of the newly installed fuse.