Clutch - removal / installation
The spare part numbers are indicated here (8 cells) and here (16 cells)
The work on the K4M and K7M engines to replace the clutch is no different.
To work, you will need a mandrel to center the clutch driven disc.
The mandrel from VAZ cars will fit. (Original - Emb. 1518 or Emb. 1780, or 67.7823-9702 L)
Place the vehicle on a two-post lift, apply the parking brake, turn off the ignition, open the hood and disconnect the earth cable from the battery.
.
Note: When replacing the clutch, you do not have to completely remove the gearbox, but only move it away from the engine to the required distance. This work is shown here.
If present, install the flywheel retainer (flywheel retainer Mot. 582-01) to the engine cylinder block.
If not, then use a screwdriver or a spatula to keep the flywheel from turning and...
. Unscrew the six bolts 1, Figure 3-1, securing the clutch pressure plate to the flywheel and remove the pressure plate 2 and the driven clutch discs (13-mm head, extension).
Loosen the bolts evenly: each bolt one turn of the wrench, moving from bolt to bolt along the diameter.
Remove the clutch pressure and driven discs from the flywheel, holding the driven disc.
Checking the clutch driven discs
Driven clutch discs for vehicles with K4M and K7M engines have different damper spring stiffnesses. To distinguish the clutch driven discs, marks are applied to the damper springs with paint, Figure 3-2.
Differences between clutch driven discs:
| Options | Engine K4M | Engine K7M |
| Outer diameter of the driven disk, mm | 200 | 200 |
| Driven disk thickness, mm | 7,5 | 7,6 |
| Number of splines | 26 | 26 |
| Spring Mark Color (Figure 3-2) | 1 - gray; 2 - green; 3 - blue-lilac | grey |
Inspect the driven clutch disc.
Figure 3-2 — Clutch driven disc marks on a car with a K4M engine: 1 — gray; 2 - green; 3 - blue-lilac
If there are cracks, dents, broken damper springs and cracks or delamination of the friction linings, the disc must be replaced.
Preparing for installation
Check the surface of the engine flywheel in contact with the clutch driven disc. There should be no scratches or signs of tarnish on the surface of the flywheel.
Check that the engine crankshaft main bearing is not seized.
Check the tightness of the engine and gearbox seals and replace if necessary.
Check the free movement of the clutch driven disc along the input shaft.
Check for signs of wear on the clutch engagement bearing guide sleeve and the clutch engagement fork.
Clean and wash the flywheel surface in contact with the clutch driven disc, the splines of the gearbox input shaft and the splines in the driven disc hub (white spirit)
Before installation, check the ease of movement of the driven disk along the splines of the gearbox input shaft, apply refractory grease to the splines of the driven disk hub.
Install the driven disk so that the protruding part of the disk hub (shown by the arrow) is directed towards the clutch housing diaphragm spring.
Install the clutch assembly onto the flywheel without tightening bolts 1, Figure 3-1, securing the pressure plate.
Install mandrel 1 into the driven disc hub, Figure 3-4, and center the clutch driven disc relative to the flywheel.
Alternately tighten the bolts 1, Figure 3-1, securing the clutch pressure plate crosswise:
Clutch bolt tightening sequence
Tightening torque of the clutch pressure plate mounting bolts 20 N.m (2.0 kgf.m)
Remove the flywheel retainer (if equipped).
Install the gearbox
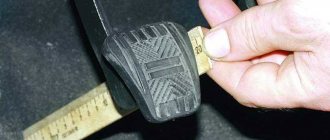
After installing the gearbox, check the amount of travel of the clutch release fork (for cars with a cable drive) and the absence of air in the clutch hydraulic drive (for cars with a hydraulic drive).
If necessary, adjust the travel of the clutch release fork (for vehicles with a cable drive) or remove air from the hydraulic clutch system (for vehicles with a hydraulic drive (JR5))
Video
Source
Clutch device of Lada Largus and diagnosis of mechanism faults
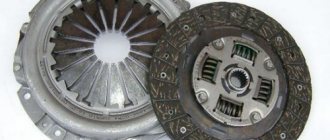
The clutch (friction clutch) is the mechanism that makes the car move and facilitates gear shifting with a manual transmission. Using this device, torque is transferred from the engine to the gearbox. The clutch can be single, double or multi-disc.
The Largus is equipped with a “dry” single-plate clutch with a diaphragm pressure spring. The device consists of a driven friction disk, a casing in which the pressure disk is located, a spring and a mechanism for releasing the clutch with the drive. The 8-valve engine is equipped with a cable drive with a JH3 gearbox, while the 16-valve engine is equipped with a hydraulic drive with a JR5 gearbox.
Replacing the clutch basket (pressure plate)
- preliminary determination of the need to change the basket
- using professional tools specially designed for this purpose
- compliance with the sequence of events
This part of the mechanism is important, since it is where all the clutch parts are located. So that the unit can operate without violating the principle of operation, the pressure plate should be changed only by a qualified technician and where they have real practice in changing the clutch basket.
It is common practice in car service centers to replace the basket assembly. This type of work is considered the most acceptable and high-quality, since it becomes possible to change the casing. Accordingly, the result will be of higher quality.
Basic malfunctions and methods for their elimination
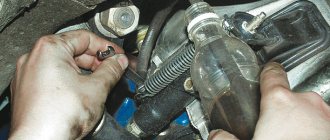
The most obvious reason for the failure of the Lada Largus clutch is oil contamination. If this happens, the clutch cannot be replaced until the leak is fixed. There can be two sources of leakage: engine or gearbox. Oil can leak out of the engine due to a worn oil seal behind the flywheel. Changing it is quite difficult due to the labor-intensive dismantling process.
If lubricant gets in from the gearbox, the culprit is a worn oil seal located on the front of the gearbox. To replace the unit, you will need to drain the oil from the gearbox and separate the final drive housing from the gearbox housing. The process is labor-intensive, but necessary. To remove the oil seal, you will also need to remove the flywheel.
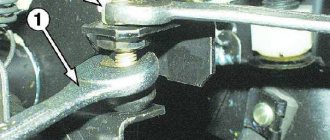
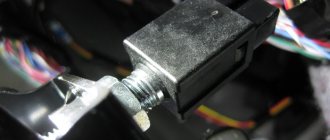
Before proceeding with the removal and disassembly of the clutch, it is necessary to check the reliability of the fixing elements that attract the assembly to the Largus frame and engine. If the fasteners are loose or the rubber bushings are worn out, when pressing the pedal the driver will feel shaking and jerking when moving away.
To describe characteristic clutch problems, special terms are used, for example, seizing. This is a situation when strong vibrations are felt during operation of the mechanism, and when you try to move, sharp jerks begin. When the clutch is driven, the disc is not pressed away from the flywheel, that is, the friction clutch does not disengage, and it is impossible to engage the gear.
If the clutch begins to squeal when shifting gears or starting off, this indicates wear on the release bearing. Wear can occur both under natural conditions after long-term use, and as a result of the actions of the driver himself. This is especially typical for cases when the car is parked with the engine running and the gear is turned off (in a traffic jam, not at traffic lights).
Slipping
The engine crank spins the flywheel faster than it transmits rotation to the pressure plate. It is not difficult to determine the malfunction, since when the speed increases, the car cannot accelerate. This is especially noticeable on steep slopes when moving up and under heavy load. To make sure of this, the car is placed on a level surface. The parking brake is applied as high as possible, after which you need to start the engine. Now you should depress the clutch, engage fifth gear, raise the speed slightly and press the brake pedal firmly while releasing the clutch. After such manipulations, if the clutch is working properly, the engine should stall. If this does not happen, it means the friction clutch is slipping. Testing is best done on a warm engine.
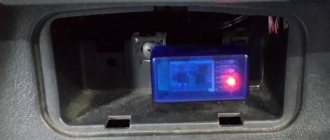
Bleeding the clutch of Lada Largus
Bleeding is only relevant for the hydraulic drive on the JR5 gearbox. This must be done if air has entered the hydraulic system and an air lock has formed. Signs of a problem: the clutch begins to “drive”, and when the pedal is fully pressed, the friction clutch does not disengage completely. When you engage any gear, a characteristic grinding sound of gears is heard, and the lever becomes difficult to control.
To bleed the clutch, you must first replace the brake fluid and restore the sealing of the brake and clutch systems. Without this, the pedal will simply fail. To work, you will need a flat-head screwdriver, new brake fluid, a suitable container and a hose that matches the diameter of the fitting. The pumping process is as follows:
- Check the brake fluid level in the reservoir and top up to the maximum level if necessary.
- Remove the protective cap from the clutch slave cylinder fitting and put on a suitable hose (for example, from a dropper). The second end must be lowered into a container to drain the brake fluid.
- Next you will need an assistant. Its task is to press the clutch pedal at least 10 times at intervals of several seconds.
- Use an 8 mm wrench to loosen the fitting, use a screwdriver to pry up the spring clamp and lift it until it clicks. The tip from the cylinder pipe is displaced by 1 cm.
- The assistant depresses the clutch and holds the pedal, at which time the liquid from the cylinder flows through the hose into the container.
- After the liquid stops flowing, the fitting is tightened, the tip of the cylinder pipe is pushed back and secured with a spring retainer.
- After this, the pedal can be released and the operation repeated after 5-10 seconds.
You need to pump until only liquid begins to flow out of the hose - there should be no air bubbles in it. After completing the procedure, place the protective cap on the fitting.
As you pump, you need to monitor the amount of liquid in the tank. A drop in its level below the minimum level is not allowed, since air will enter the system again and all actions will become meaningless. Brake fluid should be added periodically.
Hydraulic Clutch Actuator - Bleeding
— the clutch pedal is in the middle or depressed position;
- Difficulty shifting gears.
Possible consequences of contamination entering the hydraulic clutch system
The hydraulic clutch drive is very sensitive to contamination. The entry of contaminants into the system can lead to the following consequences:
— inability to change gears;
— damage or complete failure of the hydraulic clutch;
— leaks from the hydraulic clutch drive.
To remove air from the hydraulic clutch drive, use the following equipment:
— installation for removing air from the hydraulic drive system through a brake fluid reservoir type OMA 883 f. "OMA" (Italy);
— a syringe for removing air through a fitting located on the clutch slave cylinder.
Hydraulic Clutch Bleeding Procedures
If parts of the hydraulic clutch are removed
Perform air removal operations using a device for removing air through the brake fluid reservoir or using a new syringe through the air removal fitting located on the clutch slave cylinder (brake fluid according to the current “Codifier of basic and auxiliary materials used in vehicle maintenance and repair” LADA" K 3100.25100.00018).
If the clutch hydraulic parts are not removed
Perform air bleeding operations with a syringe only by injecting brake fluid through the air bleeding fitting on the clutch slave cylinder.
Place the vehicle on a two-post lift, apply the parking brake and turn off the ignition.
Remove the engine crankcase protection (see here)
Bleeding procedure if there are no hydraulic drive parts removed
Bleeding using a hydraulic drive system bleeder
Secure the clutch pedal in the up position using a strap attached to the steering wheel to ensure hydraulic integrity during the bleeding operation.
Connect the installation for removing air from the hydraulic drive system to the brake fluid reservoir (installation for removing air from the hydraulic drive system type OMA 883 f. "OMA", Italy).
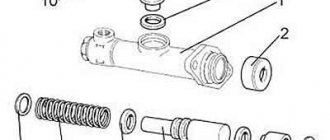
Remove plug 1, Figure 8-1, from the air bleeder fitting on clutch slave cylinder 4.
Connect the transparent tube to the air removal fitting, lowering the other end into an empty vessel located above the air removal fitting (transparent process tube, process vessel).
Press the lock 2 and pull out the pipeline 3 one click to open the air bleed hole.
1 — plug of the fitting for removing air; 2 — clamp; 3 - pipeline connecting the main and slave cylinders of the clutch drive; 4 — clutch slave cylinder; 5 - gearbox
Open the system between the bleeder unit and the brake fluid reservoir.
Wait until the brake fluid flows out without bubbles.
Relieve pressure in the clutch hydraulic drive by turning off the air bleeder.
Press the lock and install the pipeline into the working cylinder until it clicks.
Disconnect the transparent tube from the air bleed fitting and install the plug on the fitting.
Disconnect the bleeder unit.
Add brake fluid to the master cylinder reservoir and bring the level to normal. The brake fluid level should be between the “MAX” and “MIN” marks on the master cylinder reservoir.
Press the clutch pedal twenty times quickly.
Check the functionality of the clutch. If necessary, repeat the air removal operation.
Removing air using a syringe
Secure the clutch pedal in the up position using a strap attached to the steering wheel to ensure hydraulic integrity during the bleeding operation.
Remove the plug from fitting 1, Figure 8-1, to remove air from clutch slave cylinder 4.
Attach a transparent tube to the air removal fitting so that it takes the same height position as the tank (technological tube).
Press the lock 2 and pull out the pipeline 3 one click to open the air bleed hole.
Pour brake fluid into the master cylinder reservoir until it flows out of the clutch hydraulic bleeder nipple.
Replacing the friction clutch
Repairing the Larugsa clutch, like any other car, does not make sense; all worn parts must be replaced. To work, you will need a standard set of tools, amplifiers, a hammer and a new set of spare parts. First, the car must be placed on a lift or its front part raised on jacks above the inspection hole. The front wheels and engine protection are removed. After unscrewing the screws, you need to remove the left shield under the bumper. This will give you access to the shield fasteners in the wheel arch, which must also be removed.
ESPRA
| Number | 7703101548 |
| Name | Bolt M7x100 |
| Quantity per "Quantity" | 1 |
| Subgroup | 7703 |
| Part serial number | 101 |
| Additionally | Not interchangeable with a part previously released under the same number |
Bolt M7x100
Serial number: 7703101548 Quantity per model: 1
Source
Reviews about replacing the friction clutch yourself
Largus owners who changed the clutch themselves note the following:
- It is difficult to do the work yourself; it is better not to try without the skills, conditions, tools and knowledge.
- You can't do it without helpers. But even in this case, it may take all day to replace.
- As long as the clutch works and does not cause concern, there is no point in changing it.
Judging by the reviews, it is better to entrust clutch replacement to specialists, especially since the price of the issue is not so high. Conscientious craftsmen provide a guarantee for their work and bear financial responsibility for it. If you replace it yourself, all actions are performed at your own peril and risk.
Source
Order a clutch for a Lada with delivery in Moscow or the Moscow region
When placing an order to the specialists of our online store, you will also be able to choose a delivery method convenient for you. The courier will deliver the spare part to the address you specified. You can pay for the goods on the spot upon receipt. The goods can also be delivered to the office of the transport company. If you wish to pick up the part yourself, pick-up is available.
Payment for the purchase is carried out in cash or by bank transfer, depending on your wishes. When ordering spare parts from us, you do not waste time on long searches and communication with sellers at car markets. The site has implemented an order form “Buy in one click” for the most efficient processing.