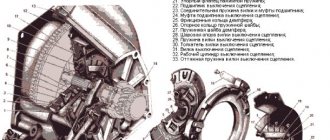
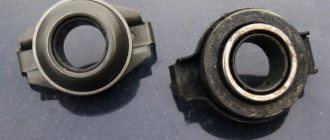
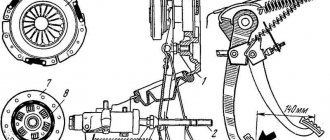
On cars with a manual transmission, the most common type is a dry single-plate clutch. On cars of the VAZ family, just such a clutch is used - consisting of a driven and driven disk, a release bearing, and a drive.
Structurally, the clutch elements are almost the same, but the drives on VAZs can be of several types - on cars belonging to the “Classic” family (VAZ-2101 - VAZ-2107) a hydraulic drive is used, and starting with the VAZ-2108 model they began to install a cable drive.
And if the cable drive is structurally very simple - there is only a cable connecting the clutch pedal in the cabin with the fork, which acts on the release bearing, then with a hydraulic drive everything is somewhat more complicated.
Tooling of the workplace
Don’t know how to properly bleed the clutch on a VAZ 2106 with your own hands? Fortunately, there is a way out! To do this, you just need to use a practical guide, taking into account some recommendations. Naturally, to perform this operation you will need to have the necessary set of plumbing tools, hollow clean containers, an auxiliary hose, rags
If it is necessary to bleed the clutch hydraulic drive after replacing the used brake fluid with a new one, then, alas, it is impossible to do without cleaning the main fluid drain fitting. Therefore, you will definitely need a special brush with a steel working surface in the form of wire.
Management
Important! If you bleed the hydraulic clutch drive after changing the fluid, you first need to clean the drain fitting of the main clutch cylinder from dirt and dust.
This is done using a brush that uses steel wire instead of bristles.
The stand shows the principle of bleeding the clutch.
Everything you need for the operation
Work on pumping the clutch on a VAZ 2106 must be carried out on an overpass or pit. You will also need the help of a partner.
The tools we need are:
- brake fluid;
- rubber hose;
- capacity;
- key to 8.
The best option for VAZ 2106 is Neva M
When is it necessary to bleed the clutch?
As noted above, the clutch bleeding procedure is necessary when the hydraulic system is depressurized, which is most often caused by repair or diagnostic work. At the same time, air can also enter the hydraulic system over time when the machine is used if the connections of the clutch mechanism units have not been tightened properly. In addition, cracks in the pipeline or other malfunctions can cause air to enter the clutch.
There are several symptoms that indicate that the clutch needs to be pumped:
- The car jerks when driving;
- The clutch pedal “beats”;
- The required result is not achieved when squeezing the clutch, only after one and a half or double squeeze.
Driving a car with a faulty clutch is extremely dangerous, both for the driver and for the units. You can bleed the clutch without contacting a service center by following the instructions below.
labavto.com
After carrying out service and repair work on the clutch units on a VAZ 2106 or after adding fluid to the hydraulic drive, air often appears in it. It is unacceptable. Therefore, it is necessary to take immediate action to remove it.
The pumping job is not difficult and after carefully reading these instructions, you will be able to handle it yourself. Air, as a rule, enters the hydraulic system after any work due to depressurization, or after changing the fluid used in it. Therefore, before moving directly to pumping, it is necessary to eliminate the causes, otherwise pumping will be in vain. Due to defects in this system, other more dangerous breakdowns in the transmission system may occur.
Car VAZ 2106
Tuned sports clutch
In motor sports, which is a kind of testing ground for the development and implementation of innovations in vehicle components and mechanisms, an increased load is applied to the special clutch. After all, this unit is operated when rotating at an angular speed of 6-10 thousand rpm and at the maximum power values of the power unit. The standard clutch cannot withstand such force, so install a basket with an increased value of the clamping force from 30 to 100 percent.
At the same time, the impact on the drive pedal increases, which creates some problems in the speed of gearbox shifting. Therefore, components such as Kevlar alloy, ceramics or polymer carbon are used as friction linings for the drive type disc. Each type of such friction compounds has its own advantages and disadvantages.
Ceramics does not heat up and withstands large impacts, but it requires the creation of high clamping force and has a reduced friction force. Carbon has high resistance to the mating surface, low material density and high heat resistance. Kevlar alloy has increased wear resistance, heat resistance and at the same time has a reduced friction index. The disadvantage is that it takes a long time to cool down after heating. For a driven type disk, it is advisable to use a springless damper that can withstand increased loads.
Due to the fact that the VAZ 2106 is equipped with a clutch, which has hydraulics in its design, from time to time it is necessary to carry out not only routine maintenance and repairs, but also bleeding of the clutch hydraulic drive. This is due to the fact that air may enter the system during operation. The air, of course, depressurizes the entire system, which leads to adverse consequences, be it an accident or even an accident.
Among other things, air can enter the system during repair work, after replacing brake fluid, etc. That is why it is imperative to take measures to eliminate defects. After all, defects in this system that are not eliminated can contribute to the breakdown of interfaces, components and parts of the transmission.
Necessary tool
Then you can proceed directly to the pumping process. To do this you will need:
- Open-end wrench or socket wrench 8;
- Container for draining (with a small amount of liquid);
- New fluid;
- Silicone transparent tube;
- Rags.
This is all the required equipment.
An interesting fact is that with identically used drives on different “Classic” models, the bleeding process is different, so methods for pumping a hydraulic drive on VAZ-2106 and VAZ-2107 vehicles will be described below.
How to bleed the clutch correctly bleed the clutch correctly
The need to pump the clutch among motorists does not arise so often, so it can even be called rare. But this is not a reason to ignore this procedure altogether, therefore in this article we will talk about the features of bleeding the clutch.
What you should know
Device diagram
Despite the fact that this problem is not encountered so often, no particular difficulties arise. It’s enough just to stick to one algorithm.
Preparing for work
How it works
You should know that the cause of this problem is air getting into the clutch system. Because of this, some malfunctions appear, and the system itself stops working correctly. In this case, you just need to know how to properly bleed the clutch to remove air.
Let's first get acquainted with the pumping algorithm.
- We prepare the system for operation;
Connects the rubber hose to the fitting;
Press the clutch and drain the fluid until all the air comes out.
To put it briefly, everything is exactly like this. There are no particular difficulties in the work, but if something happens, you should simply act according to the circumstances. In fact, the operation of removing air from the hydraulic system of a vehicle control mechanism only sounds complicated. But in reality everything is quite clear and simple.
What tools will be needed to complete the task? What must be observed? This is quite important, because the result directly depends on it. After all, it’s always unpleasant when in the process you suddenly discover the absence of the necessary tool
- A regular set of tools that can be found in any garage or car trunk;
How to bleed the clutch on a VAZ 2101-VAZ 2107
Always remember that you need to bleed the clutch together in a car, because it’s difficult to do this without the help of an outsider, but there is still a way out, so if you are going to bleed the clutch alone, then first read the entire article to at least visually understand how it’s done , and then run the video clip located at the very end of the article, and this video shows a visual process of bleeding the clutch, performed by just one person!
And it’s best to do all the work in a pit, because it’s much simpler and more convenient, but if it’s not there, then you can do the work without it, it’ll just be a little problematic!
1) At the very beginning of the operation, pour new brake fluid into the clutch reservoir, and then close the reservoir with a plug.
The liquid must be filled strictly to the very top edge! (For more information on how to fill the brake fluid into the reservoir, and why you need to fill the brake fluid at all, see the article entitled: “Replacing clutch fluid on a VAZ”)
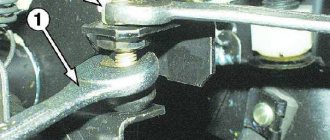
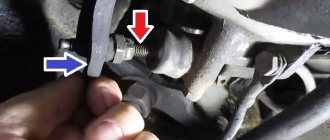
2) Next, take a small hose in your hands and put one end of it on the fitting of the working cylinder.
3) Then ask an assistant to sit in the car and press the clutch pedal about 5 times, for the last time let him leave the pedal fully depressed.
Ask an assistant to press the clutch pedal sharply and at intervals of 3 seconds!
4) Meanwhile, while the assistant holds the pedal down, prepare an empty container into which you will drain the brake fluid with bubbles, and then lower the other end of the hose into this container.
5) Then loosen the fitting with a wrench and at this time brake fluid with bubbles will begin to drain into the container you are holding.
As you already understood and this was already mentioned earlier, bubbles are air that should never be present in the brake fluid, otherwise the system will begin to malfunction, in general, we continue!
6) Now wait until the clutch reservoir containing the brake fluid is almost completely empty and then immediately tighten the bleeder fitting tightly, and let the assistant take his foot off the pedal.
Be sure to pay attention to the words: “It will not empty almost completely,” so you don’t have to wait until all the fluid comes out of the reservoir; in no case should it fall less than 15 mm, otherwise you will be bleeding the clutch for a very long time and most likely the system it won’t even be pumped if you do this, because when the fluid is completely emptied from the tank, during this time air begins to enter the system, and therefore the clutch hydraulic drive will depressurize again, which will lead to constant pumping!
7) Now, as you already understand, when the level reaches almost to the very bottom, then stop the bleeding operation by screwing in the bleeder fitting and the assistant removing his foot from the pedal, and then again add liquid to the tank and repeat the entire bleeding operation again.
Do this operation again and again until liquid begins to flow into the container without bubbles!
Symptoms and causes of malfunction
There are not so many symptoms of air in the clutch hydraulic drive - difficult gear shifting, crunching of gear teeth when shifting, especially when engaging reverse gear, weakening of the effort to depress the clutch pedal.
Often the cause of airing is a drop in the working fluid level below the minimum value; in this case, air enters the main cylinder through the fitting.
It is possible that liquid began to leak from the system due to loose connections of the pipelines, or their damage; a leak may appear from under the cylinder sealing rings due to wear.
There may even be an option when the hole in the tank lid is clogged. This hole is needed to equalize the pressure in the tank.
And if it becomes clogged inside the system, a vacuum occurs during operation, causing air to penetrate through the sealing rings.
Well, of course, after repair work related to the clutch and its drive, the system will be aired.
To restore the drive's functionality and remove air bubbles, the system should be bled.
This operation is in many ways similar to bleeding the brake system. But before starting work, the cause of airing should be identified.
Therefore, before starting work, you should carefully inspect all drive elements for leaks. If any are found, they must first be eliminated.
Bleeding the hydraulic clutch of a VAZ 2106
If the question arises of how to bleed the clutch of a VAZ 2106, you should prepare the necessary plumbing tools and auxiliary material in the form of a container with brake fluid, an auxiliary hose and a reservoir for filling the drained waste.
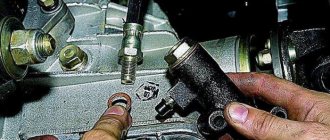
If the hydraulic clutch of a VAZ 2106 is pumped after replacing the brake fluid, then it is first necessary to clean the drain fitting of the main clutch cylinder (clutch master cylinder) from dirt and dust deposits. This work is carried out using a special brush with a working surface made of steel wire.
To gain solid knowledge of how to bleed the clutch, you need to follow the following algorithms:
We put the pre-stored rubber hose onto the fitting outlet, which has been treated and cleaned of dirt and dust deposits. This connecting element must be pulled onto the fitting with some force. We direct the other outlet of the hose to the tank to receive used brake fluid. To carry out the operation of bleeding the clutch, the help of another person is required, who will help carry out subsequent actions while inside the vehicle. The assistant must depress the pedal of the device 5-6 times, and the time interval between pumping should be 3-4 seconds. If, after pressing the pedal device, the product does not restore its original position, then it should be returned to the starting position. After recessing, the clutch pedal is held in the recessed position by an assistant in the cabin. At the same time, a car enthusiast working on a hydraulic drive must slightly unscrew the fitting to drain the working fluid using a wrench. At this time, the “brake fluid” with air bubbles begins to come out. After the leak from the rubber hose has stopped, tighten the drain fitting and give the command to your partner in the cabin to release the pedal so that it assumes a free position. We repeat the previous technological cycle with unscrewing and tightening the fitting element. A logical continuation of these actions should be a gradual “hardening” of the clutch pedal, i.e. it should acquire elasticity. The frequency of these sequential operations must be repeated 3 to 5 times or until the end of the release of air bubbles from the rubber hose directed into the reservoir for draining the used brake fluid
In this case, it is important to control the volume of brake fluid in the standard clutch reservoir. The brake fluid level must not be allowed to decrease less than 10 mm from the lower edge of the hydraulic drive reservoir! After creating a vacuum in the clutch hydraulic drive, it is necessary to tighten the fitting device completely and remove the hose from the rubber base
The other end of the hose must be kept in a tank with a “brake seal”, because it contains used liquid, after which it is necessary to drain this liquid. Add working fluid to the standard tank to the specified amount and tighten the tank cap with a little force. We wipe off excess leaked fluid with a dry rag and test the clutch hydraulic drive unit for possible leaks. Next, we try the operation of the hydraulic drive with the engine turned on and then switching on the speeds. During normal operation the vehicle can be driven.
An important addition: while the hydraulic clutch of the VAZ 2106 is being pumped, one should not forget about adding brake fluid to the standard reservoir in order to prevent air masses from entering the hydraulics.
Algorithm for carrying out the clutch bleeding operation on a VAZ 2106
The first thing you need to do is put a rubber hose of the appropriate diameter onto the fitting inlet. Before performing this operation, it is recommended to clean the inlet from dust and dirt deposits. The second end of the hose is directed into the tank to receive brake fluid (used). It should be remembered that the connecting hose must be placed on the fitting with some tension.
Unfortunately, it is impossible to do without outside help when bleeding the hydraulic clutch. Why is it this way? The answer lies on the surface! Help will be required during subsequent operations directly inside the vehicle. Your partner will have to depress the clutch pedal about five times. In this case, the interval between pumping should not be less than 3...5 seconds. If the pedal does not return to its original position, it should be returned to this position independently.
After the clutch pedal is recessed once again, the one who works with the hydraulic drive must unscrew the drain fitting using an open-end wrench. However, remember that the fitting should not be completely unscrewed. This operation is necessary to ensure that the air leaves the system (when unscrewing the fitting, the user will hear the movement of air masses coming out of the hose). Immediately after the leak stops and the air leaves the hydraulic system, the assistant will need to give the command to release the pedal so that it returns to its original position. At that time, the person working with the hydraulic system must tighten the fitting. Professionals working in service centers note that the clutch pedal should acquire elasticity with each operation of unscrewing and tightening the fitting. As soon as the force becomes required, you can stop performing the operation.
How to bleed the clutch on a Mercedes Sprinter
1). We lift the car from the front and place its front part on stands.
2). Remove the lower engine protection.
3). Fill the brake fluid into the reservoir to about.
4). We remove the dust caps from the fittings to remove air from the working cylinder and on the front caliper of the disc wheel brake mechanism.
Carefully loosen the fittings to remove air. We put a hose on the fitting, which is located on the front disc brake caliper
5). We fill the hose with brake fluid, and therefore the fitting on the caliper must be carefully opened. An assistant slowly depresses the clutch pedal and holds it pressed. Close the air bleeder and lower the brake pedal. We repeat the operation until the hose is completely filled with brake fluid.