A car engine cannot operate without coolant, which prevents the power unit from overheating. On absolutely any passenger car, and accordingly on the Russian Lada Priora, after a certain mileage, the antifreeze needs to be replaced. Let's say right away that this can be done independently, without contacting a car service, the most important thing is to know how to drain the antifreeze correctly and as expected, as well as how many liters of antifreeze to fill. We will talk about this and other nuances of replacement in this material.
Timing for coolant replacement
In VAZ Priora cars with a 16-valve engine manufactured in 2011 and other years of production, the frequency of antifreeze changes is 75 thousand kilometers. Then the working fluid begins to lose its properties. In addition, the refrigerant that is poured during production is changed every five years, if during this time the car has not traveled 75 thousand km. But this applies to the initial replacement of the fluid that is filled in from the factory. If you use regular antifreeze, then its service life is shorter and is about 30-40 thousand kilometers.
The need to change the working fluid can be determined by the following “symptoms”:
- the antifreeze has become dirtier, black, and traces of deposits have appeared in it;
- a refrigerant leak has occurred, as a result of which more liquid will need to be added to the system, and if you do not know what kind of antifreeze was added, then it will have to be changed;
- the presence of deposits and dirt in the expansion tank, this indicates that the substance has lost its properties;
- foam formation in the reservoir under the hood;
- the stove began to work worse in the winter season;
- the engine began to boil.
What to choose: antifreeze or antifreeze
Both antifreeze and antifreeze are coolants. At the same time, antifreeze is the international name denoting coolants for cooling systems of internal combustion engines.
Antifreeze is also an analogue of antifreeze; it was developed back in Soviet times. It is noteworthy that the name TOSOL is not patented. As a result, today antifreeze manufacturers are actively producing products called TOSOL. Such a liquid today has nothing in common with the old Soviet development and is still the same antifreeze. It turns out that this is antifreeze, only domestically produced.
At the same time, TOSOL is traditionally used in domestic cars; it is poured at the factory during the manufacture of new cars. However, if you need to switch from it to antifreeze, no problems arise.
The main thing is to avoid mixing different types of coolants, and also to use products in the cooling system whose properties meet the tolerances of the car manufacturer itself.
How to change it correctly?
Next, we will look at how to correctly replace the working fluid of the cooling system in a Lada Priora car with an electronic pedal or with air conditioning. You can change the refrigerant at a service station, but this task is quite simple and anyone can handle it on their own. For the best effect, it is necessary to flush the cooling system, we will discuss this below.
Preparation
Before you begin the process, prepare the following:
- fresh refrigerant in the required volume;
- seal for the drain cover if the old one is worn out;
- set of wrenches;
- clean rags;
- container for collecting used antifreeze.
The Lada Priora Repair and Maintenance channel provided a video that demonstrated the procedure for draining the working fluid from the cooling system.
Step-by-step instruction
How to replace antifreeze on a Priora:
- Drive the car into a garage with a pit; you will need a flat surface to perform the work. Wait until the engine cools down; the entire process is carried out cold.
- There should not be high pressure in the cooling system. To reset it, open the hood and unscrew the expansion tank cap. If the engine is hot, coolant may spray out of the hole, so use a rag when opening it.
- Dismantle the plastic protection of the power unit. To remove it you need to unscrew two fasteners on the sides. It is not necessary to dismantle the clamps, but removing them will make the task more convenient.
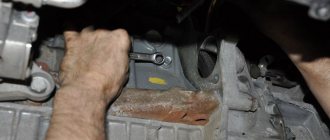
- If your car is equipped with a transmission with control cables, then it is necessary to dismantle the starter device. To do this, disconnect the negative terminal from the car battery. Press the fastening of the connector with the wiring and disconnect the plug from the output of the traction relay. Remove the protective cap from the nut securing the tip of the wire connected to the positive terminal of the battery. Using a 13mm wrench, unscrew the nut and remove the cable tip from the contact screw on the traction relay. Then use the same tool to unscrew the screws and dismantle the starter device. If the car's transmission is controlled by traction, then there is no need to dismantle the starter.
- Find the drain plug; it is located directly on the cylinder block. You need to place an old bucket or basin under it, into which the used refrigerant will be drained. Unscrew the cap and wait until the liquid comes out of the system. Also unscrew the protective valve under the radiator device; some of the substance will also flow out of it. When the draining is complete, you need to tighten both plugs. Don't forget to check the condition of the seal on the drain cap. If it is worn out or there are traces of defects, the ring must be replaced.
- Assess the condition of the refrigerant drained from the refrigeration system. If there are traces of deposits, wear products, or the liquid as a whole is very cloudy and viscous, it is recommended to flush all components. To do this, pour about 7.8 liters of distilled water into the system through the expansion tank. You can add vinegar or citric acid to it to remove dirt. The use of special cleaning agents is allowed. After filling, the engine starts, you can perform a test drive. Then the procedure for draining the refrigerant from the power unit is repeated. If the liquid is still dirty, then the washing is repeated until it comes out clear.
- Assess the condition of all pipes and lines of the cooling system. If there is damage or signs of leaks, the hoses must be replaced.
- The next step is to pour new refrigerant into the system. To prevent an air lock from appearing in the lines and eliminate air entering the system, it is recommended to slightly loosen the clamp of the pipe connected to the throttle assembly. The hose is then disconnected.
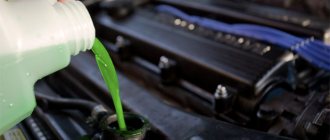
- The cooling system is filled with fresh antifreeze through the filler neck in the expansion tank. New refrigerant is poured in until it comes out of the pipe disconnected from the throttle. When this happens, the line is connected into place and the clamp is securely tightened. Then the refrigerant is added to the system to the required level.
- All previously dismantled components are reassembled in reverse order.
- The engine starts and the journey is carried out. Now you need to once again make sure that the fluid level is correct. Make sure there is no leakage from the drain hole.
Remove the cover on the expansion tank Unscrew the drain valve on the radiator cooling device of the engine Remove the starter from the car by disconnecting all fasteners
Filling new antifreeze into the VAZ 2170
To eliminate air and prevent the formation of an air lock in the cooling system, first you need to slightly loosen the throttle body hose clamp and disconnect it. New coolant is poured into the reservoir until it begins to flow from the hose removed from the throttle body. Once this happens, install the hose in place and tighten the clamp. Then you need to add antifreeze to the factory standard so that the top layer is halfway between the Min and Max marks.
Adding antifreeze to a Priora
If after replacing the fluid the system does not work correctly, it means there is an air lock that needs to be removed.
To remove the air lock yourself, loosen the clamp again and remove the hose from the throttle assembly. Open the tank lid, cover it with clean gauze or a bandage, then blow out the system until liquid appears from the hose, install the hose back and tighten the fastener securely. All actions must be carried out on a cooled engine. The method, which involves eliminating the air lock by disconnecting the hose from the throttle assembly, is not recommended due to the high pressure in the system on a warm engine.
We recommend: We repair and modernize the rear lights of VAZ 2107 cars
Scheme of the VAZ-21126 Lada Priora engine cooling system
1 — heater radiator; 2 — coolant drain hose from the heater radiator; 3 — coolant supply hose to the heater radiator; 4 — coolant pump hose; 5 — expansion tank hose; 6 — steam removal hose of the heater radiator*; 7 — expansion tank cap; 8 — expansion tank; 9— thermostat; 10 — coolant drain hose from the engine radiator; 11 — hose for supplying fluid to the throttle assembly; 12 — steam exhaust hose of the engine radiator; 13 — hose for supplying fluid to the engine radiator; 14 — engine radiator; 15 — radiator drain plug*; 16 — electric engine radiator fan; 17 — coolant pump; 18 — supply pipe of the coolant pump; 19 — coolant drain hose from the throttle body. *Not available on vehicles with air conditioning. The cooling system consists of two so-called circulation circles: 1. The small circle does not include the engine radiator, and the liquid washes only the cylinder block and cylinder head, and also flows through the throttle body channel and the heater radiator. 2. When moving in a large circle, the coolant passes through the engine radiator, where it is cooled by the incoming air flow. The thermostat controls the direction of fluid flow in the engine cooling system. The design of the Priora cooling system has 16 injector valves, the diagram is as follows: Location of elements of the Lada Priora VAZ 2170 engine cooling system: 1 - expansion tank; 2 — heater hoses; 3 - thermostat; 4 — coolant temperature indicator sensor (not visible in the photo, located under the thermostat); 5 — coolant temperature sensor; 6 — radiator hoses; 7 — radiator drain plug; 8 — drain plug of the cylinder block; 9 — heating hoses for the throttle assembly. Engine cooling system Lada Priora VAZ 2170: 1 - expansion tank; 2 — expansion tank plug; 3 — radiator outlet hose; 4 — radiator of the engine cooling system; 5 — engine control system coolant temperature sensor; 6 — radiator supply hose; 7 — thermostat; 8 — coolant temperature indicator sensor; 9 — thermostat gasket; 10 — cylinder head; 11 — water pump gasket; 12 — water pump; 13 — laying of the supply pipe; 14 — supply pipe of the water pump; 15 — filling hose; 16 - hose from the thermostat to the water pump supply tube. Radiator with electric fan and expansion tank Lada Priora VAZ 2170: 1 - expansion tank; 2 — steam removal hose of the heater radiator; 3 — steam removal hose of the radiator of the cooling system; 4 - radiator; 5 - drain plug; 6 — sealing ring of the drain plug; 7 — radiator support cushion; 8 — electric fan casing; 9 - elastic bushing; 10 — spacer sleeve; 11 — washer; 12 — spring washer; 13 - nut; 14 - bolt; 15 — electric fan; 16 — expansion tank plug.
List of necessary materials and preparation for work
First of all, you need to purchase supplies and prepare the car.
Materials and tools for replacing fluid:
- antifreeze - 8 liters, you can also purchase coolant concentrate and dilute it with distilled water yourself;
- key “13”;
- crosshead screwdriver.
How to drain antifreeze on a Priora? The following instructions must be followed:
- remove the engine crankcase protection;
- unscrew the expansion tank cap;
- After making sure that the engine has cooled down, place a bucket under the engine and use the “13” key to unscrew the drain plug.
After all the antifreeze has run out of the engine, screw the plug back on. Now you need to drain the liquid from the radiator; to do this, remove the cap on the radiator.
Attention! When the engine is not cooled down, the cooling system is under pressure; it is not advisable to remove the plug, as you can get burned. Substituting a bucket, unscrew the drain plug on the radiator and wait until all the antifreeze comes out.
What does the Priora cooling system consist of?
Expansion tank. Coolant is poured into the system through the expansion tank. It is made of translucent plastic, which allows you to visually monitor the liquid level. To do this, the marks “MAX” and “MIN” are marked on the wall of the tank. In the upper part of the tank there are two pipes for connecting the steam removal hoses of the radiator of the cooling system and the heater, in the lower part there is a pipe for connecting the inlet hose of the cooling system. Coolant pump (pump) - circulates coolant. It is bladed, centrifugal type, driven from the crankshaft pulley by a timing belt. It consists of a housing, a bearing assembly with a seal, an impeller and a toothed pulley. There is a control hole in the pump housing to detect fluid leakage when the pump seal fails. The pump should be replaced as an assembly. Jamming of the pump pulley due to failure of its bearing assembly or due to freezing of highly diluted coolant will lead to breakage of the timing belt and, as a result, to expensive engine repairs. Thermostat. Two thermostat valves - main and bypass - redistribute fluid flows in the cooling system. You will find the thermostat opening and closing temperatures below. The radiator consists of two vertical plastic tanks (the left one with a baffle) and two horizontal rows of round aluminum tubes passing through the cooling plates. The bases of the tubes are connected to the tanks through rubber gaskets. The liquid is supplied through the upper pipe and discharged through the lower. Above the inlet pipe there is a thin pipe for the steam removal hose. There is a drain plug at the bottom of the right tank. A plastic casing with an electric fan is attached to the radiator. The heater radiator is built into the engine cooling system and is designed to heat the passenger compartment by circulating hot coolant through it. The fan maintains the thermal operating mode of the engine and is switched on via a relay based on a signal from the engine control system controller. To monitor the coolant temperature, a temperature gauge sensor is screwed into the engine cylinder head in the instrument cluster. The cooling temperature sensor reads temperature data and transmits it to the electronic control unit, which adjusts the temperature. It is installed on the thermostat. A faulty element may cause the motor to overheat because the electric fan will not turn on. The cooling water jacket is located inside the cylinder block and cylinder head. It ensures the removal of heat from these elements, which heat up during operation. So, with the help of a water pump and pipes, the liquid moves into the radiator, where cooling actually occurs, and then returns to absorb new heat. >
Device and features
The cooling system of the Priora internal combustion engine has a standard set of main components:
- radiator;
- thermostat;
- electric fan;
- water pump;
- heater;
- engine jacket;
- connecting hoses;
- expansion tank.
By circulating through the large and small circuits, the coolant prevents the engine from overheating, maintaining the desired temperature. Structurally, the cooling system of the Priora is simple and no different from other internal combustion engines with an injector, with the exception of small parts.
Radiator and forced cooling fan
They mainly serve to bring the working fluid to the optimal temperature for the functioning of the engine (the operating temperature of the Priora engine with 16 valves is 90–95 degrees). The predecessor of the Priora VAZ 2110 often installed a cooler made of copper alloys, but due to cheaper prices, designers switched to aluminum analogues.
How much antifreeze is in the Priora cooling system in liters?
A Priora's car, or rather its cooling system, holds from six to seven liters of coolant, different displacements, it turns out, with or without a device such as a pre-heater.
My advice is to buy a ten-liter canister of coolant, be it antifreeze or antifreeze, not only so that there is enough, but so that there is a spare supply.
In the cold season, in winter, at sub-zero ambient temperatures, the level of coolant in any car decreases slightly, but when the engine is warm, everything falls into place - this is actually due to the physical properties of the coolant.
Check the level before each trip, on a cold engine, because if you warm up the engine, the level will rise slightly, so pay attention to the expansion tank marks and add antifreeze as needed.
Unforeseen breakdowns may also arise along the way and you should have a supply of coolant as well.
Replacing the cooling fluid is a responsible task. Before starting the procedure, you should study the operating rules in detail so as not to get burned. Antifreeze for Priora is poured at certain intervals, observing the standards. It is recommended to replace it every sixty thousand kilometers. Some people prefer to do this once every two years.
How to change antifreeze on a Priora with and without air conditioning
In order to replace it with Priora, prepare the following:
- about 8 liters of coolant;
- free capacity of about 10 liters;
- crosshead screwdriver;
- key to 13.
Before draining antifreeze on a Priora, wait until the engine and coolant have cooled down: there is a very high risk of burns. Carry out the work in the following order:
- Drive the car into the pit, stop it and remove the negative terminal from the battery.
- Remove the engine crankcase protection and the expansion tank cap.
- Place a large container under the engine, crawl down and unscrew the drain plug using a 13mm wrench.
- When the liquid - antifreeze - flows out, screw the drain plug back in, move the container under the radiator and unscrew its plug.
- When it pours out, tighten the cap. At this stage, the throttle assembly heating hose is disconnected.
- Again fill above the MIN mark and below the MAX mark. Place the throttle body heating hose in place, tighten the clamp and check the steam outlet pipe for leaks.
How many liters of antifreeze are in Priora?
It is believed that cooling liquid must be poured into a Priora 16 with a valve system every five years. It is designed to reduce the engine temperature while driving to avoid overheating.
It is worth replacing on time. If this is not done, antifreeze decomposition products will be deposited on the metal parts of the engine. They are incompatible with the operation of the structure. The device runs the risk of wearing out in a short period of time. It is also possible that the cooling fluid may overheat. The consequences of this can be unpleasant:
- reduction in engine power;
- reduction in equipment service life;
- high fuel consumption.
This is possible due to the formation of corrosion in the engine, as well as the narrowing of the tubes through which the fuel passes. Due to the fact that the engine constantly operates at elevated temperatures, the channels are deformed. Fuel and lubricating oil liquids are mixed. This leads to system wear and failure.
Bubbles may form in the container containing the coolant. In winter, cracks may form in the tank, which will require a complete replacement of the motor and other damaged parts.
Untimely replacement of antifreeze leads to many unpleasant consequences. Check periodically. If, when opening the lid, you notice an uncharacteristic color or consistency of the liquid, it is recommended to replace it immediately.
Replacing antifreeze on Lada Priora and cleaning the cooling system
Coolant (antifreeze), designed to lower the temperature of an engine that heats up during operation, needs to be replaced, like any other operating fluid. In a Lada Priora car, it indicates the need to replace antifreeze every 75,000 kilometers or once every five years (whichever happens first).
You should replace the coolant in a timely manner - otherwise you risk the fact that the additives added to the antifreeze may wear out and fall out as deposits that settle on the metal elements of the engine and the cooling path. They are aggressive towards the parts described above, accelerating their wear. In addition, in this case, there is a possibility of encountering overheating of the coolant, which entails a loss of power, increased fuel consumption and a reduction in engine life by 2-3 times. This occurs due to the formation of corrosion on the internal surfaces of the engine, narrowing of the radiator channels (and, therefore, a decrease in the coolant circulation rate). And continuous operation of the engine in overheating mode leads to deformation of the cylinder oil scraper rings, which entails mixing of exhaust gases and oil.
In addition, cavitation erosion (bubbles in the coolant) and the formation of silicate sediment are possible. In winter, a worn-out cooling system can contribute to the formation of cracks in the expansion tank.
As you can see, untimely replacement of antifreeze leads to serious wear of both the entire cooling system and engine elements. Therefore, you should periodically monitor the coolant level and check it. If you unscrew the reservoir cap and see that the antifreeze has faded, lost color or become cloudy brownish, you should replace it as soon as possible.
A more or less decent auto repair shop will charge you at least 800 rubles for replacing antifreeze. (prices from an official dealer are even higher). Not all services clean the cooling system; on average, the cost of this procedure ranges from 1,300 to 2,500 rubles. You can save a lot of money by replacing and cleaning it yourself. This will not require extra effort, and you will gain good experience.
Also, do not forget to purchase a new antifreeze canister (about 1,200 rubles for a 5-liter canister) and an expansion tank cap (its price is around 100 rubles).
The following equipment and materials will be required:
- Actually, antifreeze (8 liters)
- Screwdriver (preferably Phillips)
- Wide funnel attached to hose
- Distilled water (15 liters)
- Bottle brush
- Key diameter 13 mm.
- Citric acid or similar cleanser (2 sachets)
- Expansion tank cap
- Bucket or other container (volume of at least 8 liters), preferably 2 pcs.
We collect everything you need nearby so that it is at hand:
Next, you need to put the car in the pit, then open the hood. The antifreeze will cool down for some time, so you should wait a little:
After this, it is necessary to remove the engine crankcase protection. Without performing this procedure, it is possible to remove spent coolant from the radiator cavity, but not from the BC.
First, place a container for old antifreeze under the drain hole.
Important: there is no need to unscrew the cap of the expansion tank, otherwise antifreeze will violently begin to pour out around the sides.
Unscrew the bolt plug of the drain hole on the BC, drain the waste liquid into a container:
If, after unscrewing the drain cap, antifreeze does not flow out, then a plug of dirt has formed near the drain hole, which can simply be loosened with a screwdriver.
Then you need to unscrew the cap of the expansion tank (this is necessary to equalize the pressure). Then you will need to drain the antifreeze from the radiator. To avoid accidentally hitting the generator, you can wrap it in a plastic bag or wrap it in a rag.
We find the valve, which is located at the bottom of the radiator, on the right, in front of the radiator. We place an empty container under this valve.
The valve should be unscrewed carefully, as the pressure of the coolant can be strong:
The more antifreeze is poured out, the more the valve should be unscrewed. Attention: there is a rubber seal on the valve, it is important not to lose it.
As soon as antifreeze stops flowing from both drain holes, you will need to screw the drain plug on the cylinder block and tighten the radiator valve.
It is necessary to pay attention to the color of the waste liquid. If it is not very cloudy, the cooling system can be cleaned using only distilled water. If there are various floating substances, etc., in the coolant, you will need to add citric acid (1 sachet) to distilled water.
Before you begin cleaning the cooling system, you will need to remove any air pockets in the circuit.
To do this, you will need to remove the hose from the heating fitting of the throttle assembly:
Only after this can you pour water diluted with acid into the removed pipe using a pre-prepared hose with a funnel. As soon as water begins to flow from the removed pipe, stop adding coolant. Do not close the expansion tank cap yet.
Then you will need to insert the hose into the fitting and start the engine (with the neck of the expansion tank open - this is required to better clean the circuit from air pockets). Wait 5-10 minutes, then turn off the engine. After this, you will need to drain the water using the method described above.
If the used cleaning fluid does not contain suspended matter or other substances, you can begin cleaning the expansion tank. If any sediment or impurities are clearly visible in the liquid, repeat the cleaning procedure with distilled water and acid again.
Don't forget to put the drain plug back in place:
Thanks for subscribing!
Using the vehicle’s operating and maintenance instructions, remove the coolant reservoir and inspect it for damage:
If no cracks are found, the tank should be washed and thoroughly cleaned with a brush.
If the tank is cracked, it must be replaced with a new one:
In accordance with the instructions, we install a new tank instead of the old one, and then fill the antifreeze to about halfway (between the MIN and MAX marks):
After this, you will need to screw on the new expansion tank cap, then start the engine and let it run for 5-10 minutes. If during this time no smudges or leaks are clearly detected under the hood, most likely all of the above operations were performed correctly.
However, to be more sure, you can do the following.
You will need to wrap paper napkins around the connections described above (pipes, etc.):
Then you need to drive the car for some time, and the next day you will need to check the condition of the napkins. If no leaks or smudges are detected overnight, it means that everything was done correctly and the procedure for replacing antifreeze and cleaning the cooling system in a Lada Priora car can be considered complete.
When should you replace?
The frequency of fluid replacement in Priora models that were released after 2011 is approximately seventy-five thousand kilometers. After this period, antifreeze loses its functional properties. This is only true for the product provided by the original manufacturer. If you use Antifreeze, it will last half as long.
The need to replace the coolant can be determined by the following symptoms:
- the appearance of dirt, uncharacteristic marks, lumps of thickened liquid;
- antifreeze has begun to leak out - it can be replenished, but if you do not know the exact brand, it is recommended to replace it;
- there are deposits and dirty traces in the container, which indicates the need for an urgent replacement of the fluid, which has lost its performance properties;
- under the hood foam appears in the reservoir intended for storing fluid;
- reduction in the quality of operation of the air heating stove;
- The motor heats up at a high speed.
Is it possible to mix antifreeze?
Please note that antifreeze and antifreeze cannot be mixed under any circumstances - these are different types of coolant. Otherwise, the mixing “scheme” may resemble the blood transfusion scheme:
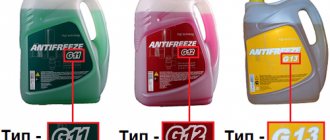
- G11 can be mixed with analogues G11, G12+, G12++, G Cannot be mixed with G12.
- G12 can be mixed with G11, G12+. Cannot be mixed with G11, G12++, G
- G13, G12++ and G12+ can be combined, mixing one type with another.
The type of coolant is written on the packaging - this is the letter G with a two-digit number and pluses, or TL - this is how antifreeze is designated.
How to choose a coolant?
Answering the question of what antifreeze to use in Priora, the manufacturer did not provide a large assortment to its users. It is best to use the Felix-40 cooler. You can use other brands, but this is not recommended. The engine system may wear out in a shorter period of time. As a result, you will have to contact the service for global repairs and replacement of parts.
To find out what kind of antifreeze your car uses, look under the hood. There should be a barrel with a sticker next to the fuel compartment.
If you are using antifreeze from another manufacturer, it is recommended to study its characteristics. It must meet international quality standards.
How to check the fluid level and how much will be enough?
To determine how many liters of coolant are needed to fill the tank, carefully read the vehicle's owner's manual. You will need approximately 7.8 liters. Some car owners prefer to fill a little less - 6 liters.
You can check the antifreeze level in the tank even on a cold engine. To do this, lift the hood lid. You will see a tank. There are two marks on it with a maximum and a minimum value. The fluid level must be within these marks.
If there are no recognition symbols on the tank itself, look for them nearby. There should be a scale that indicates how much antifreeze is in the tank on a Priora with 16 valves. For the engine to operate properly, the level of cooling fluid must remain stable.
Is it possible to store antifreeze in a plastic bottle?
According to technical regulations, antifreeze must be kept in a factory canister or bottle
.
... Only with PVC, no components of antifreeze enter into a chemical reaction. storage
temperature at which it will not lose its quality is 15 degrees above zero.
Interesting materials:
How to turn on Wi-Fi on a MacBook? How to enable Wi-Fi on a Lenovo Ideapad 330 laptop? How to turn on Wi-Fi on your smartphone? How to enable Wi-Fi on a laptop? How to enable Wi-Fi on an ASUS laptop? How to turn on the Ariston hob? How to enable WhatsApp on a computer? How to enable WhatsApp on a laptop? How to enable WhatsApp on a computer? How to enable VBA in Excel?
Preparatory stage
Before you start, you should do the following:
- choose and buy a suitable cooler;
- stock up on a new cover mount in case the old one is damaged;
- take the wrench;
- find a container where you will send the waste liquid;
- buy rags.
Algorithm of actions
To replace antifreeze in Priora, follow the instructions:
- Send the car to a garage with plenty of free space to work on. Cool down the engine. All actions must be performed on a cold engine system.
- Get rid of high blood pressure. Open the cap of the reservoir containing the antifreeze. If the engine is hot, fluid may splash out. Use a cloth and gloves for protection.
- Remove the protection that is installed on the propulsion system. Unscrew the bolts on the mount. The latches do not need to be removed. They will not interfere with the process.
- If a transmission with cables is installed, it must be removed. To do this, disconnect power from the battery. Remove the protective coating with a wrench.
- Now you need to drain the entire volume of liquid. To do this, unscrew the fixing cap. Place a container below where the waste material will be drained. Wait until all the refrigerant has left the tank. Assess the condition of the latch. If signs of wear are noticeable, replacement is recommended.
- If there are any cloudy traces in the coolant, it is recommended to flush all the channels in the car. To do this, add purified water. Add citric acid or vinegar to remove any remaining dirt. Flush the system until the water runs clear. Only after this can you fill the coolant into the tank.
- Assess the condition of the hoses. If they are worn out, replace them.
- Using a hose, pour new fluid into the container. Avoid high internal pressure.
- Refrigerant is added until the tank is filled to the optimum level.
- All disassembled parts are reassembled in reverse order.
- Start the engine and take it for a test drive. After this, check if all systems are normal.
Coolant selection
The manufacturer decided that the best way to cool the power unit is with red Felix-40 antifreeze. Cool Stream Standard 40 refrigerant can also be used. You can find out in more detail what is in your car by looking at the sticker on the expansion tank in the engine compartment.
In accordance with the official guidelines, any brand of liquid can be used. The main thing is that you need to pour in those refrigerants that meet the standards of antifreeze poured during production.
Why is liquid leaking out?
If there is a constant decrease in the level of antifreeze in the tank, then there is a leak somewhere. Every detail must be examined to quickly identify and repair damage.
What happens if it is too late to replace?
Coolant loses its properties over time. Every year the cooling system will work worse and worse. If you do not change antifreeze on time, you risk the following:
- The engine will heat up faster. If it constantly operates at elevated temperatures, the system risks breaking down quickly.
- The liquid will freeze in the tank. As a result, you will not be able to start your car in winter.
- Blood pressure may increase. Because of this, antifreeze will begin to leak.
Antifreeze related problems
The first thing that causes the owner of a Priora to worry is the moment when the antifreeze runs out. Most often, a leak occurs due to mechanical damage to the cooling system elements. The worst option is an overheating of the engine with a burnt cylinder head gasket, because after this the coolant joins the oil “causing a commotion” in the engine itself.
If antifreeze is constantly leaking on a Priora car, there may be several reasons for this:
- the radiator is damaged (replacement will help, in some cases - only repair);
- the antifreeze expansion tank is damaged (replace the tank);
- the pipes are damaged (tighten new clamps, if that doesn’t help, change the pipes and hoses);
- the water pump is worn out (replace the pump);
- leak between the head and the cylinder block (tightening the bolts will help).
Malfunctions may be short-term:
- For the first time, the coolant level has dropped (below the minimum mark; try adding fluid). If it starts to leak “regularly”, the system will have to be checked for leaks.
- “weak” antifreeze circulation (replacing the water pump or just the pump).
- Scale on the walls of the radiator, pipes, cooling jacket (flush the entire system, fill in completely new coolant).
Cost of liquid
The liquid costs about one hundred and fifty rubles per liter. To completely fill the tank, you will need to spend nine hundred rubles. When washing, you should buy purified water in advance.
Replacing coolant on a Priora
Coolant plays an important role and thanks to it, the engine temperature fluctuates in the same range and does not rise higher, we would like to immediately note the fact that the coolant temperature and the engine temperature are completely two different things, so do not get confused, for example, the fluid temperature is always displayed on the dashboard (There is a corresponding indicator), but the engine temperature is not shown anywhere and while the fluid temperature is, for example, 90 degrees (the most normal range), then the engine temperature (depending on where) can be 130, 170 and even 200 degrees, so never confuse these two parameters and replace the coolant with a new one in time, because over time it loses all its properties and the temperature can increase significantly, which ultimately affects the life of the car engine.
To replace this fluid, you will need to stock up on: A set of wrenches and other various wrenches, also screwdrivers, you will need a container of at least 10 liters and a clean, unnecessary rag to wipe off the liquid if it gets on you or the car engine!
When should you change the coolant?
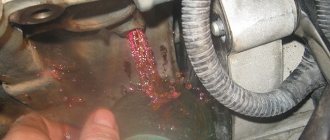
If you follow the factory, then every 5 years or after 75 thousand kilometers you need to change the fluid, but this should only be done if you fill in the fluid that is recommended by the factory, in fact, all fluids are different and if you For example, if you fill your car with antifreeze, then it will no longer need to be changed after 75 thousand kilometers, but somewhere after 40 thousand kilometers or after 2 years from the moment the fluid was filled, so don’t look too closely at the factory’s recommendations, in general, each liquid has its own norm, some will not last even one year, and some will last even five years, and here you need to pay attention to those factors that reveal when the liquid has deteriorated and become unusable, the very first factor is if the liquid has started become covered with a reddish tint (This indicates that you filled in an aggressive liquid or it is already very old; such liquid will cause engine parts to rust and will eventually become unusable) or if the new liquid is poured immediately changed its color (Any coolant has its own color, and if it quickly changed to the color of water, for example, then a cheap dye was added to this coolant and there is no need to even talk about the authenticity of the liquid itself; it must be immediately replaced with a new one), therefore, watch for these signs and if they manifest themselves, then do not hesitate and immediately change the fluid to a new one, because it runs on almost all engine parts (Such as the crankshaft, camshaft, etc.) and if they begin to become rusty, then this will not lead to anything good and you will soon go to the auto store for new parts.
When and what liquid to pour?
As you can see from the table, AvtoVAZ recommends filling in several types of oils and liquids. So let's figure out what liquid to fill and when.
Engine lubrication system
It is recommended to fill the Lada Priora engine with several types of automotive oils according to the SAE (American Association of Engineers) classification. In order to determine what kind of oil to pour into the engine, it is necessary to rely on the air temperature at which the car will be operated. The table below shows the temperature and oil used at a certain temperature.
Oil table depending on air temperature
| Outdoor temperature | SAE oil classification |
| -25 to +35℃ | 5W-40 |
| -25 to +20℃ | 5W-30 |
| -20 to +35℃ | 10W-40 |
| -20 to +30℃ | 10W-30 |
| -15 to +45℃ | 15W-40 |
Based on this table, it is necessary to select the required oil in the Lada Priora according to the degree of viscosity. The manufacturer recommends changing the engine oil no later than 15 thousand km, but it is better to change it at 10 thousand km.
Gear box
The choice of oil for the Lada Priora gearbox is based in the same way as the choice of engine oil on the ambient temperature in which the car will be operated.
Below is a table of transmission oil depending on air temperature.
Table of dependence of transmission oil on air temperature
| Outdoor temperature | SAE oil classification |
| From -26 to +45℃ | 80W-85 |
| -40 to +40℃ | 75W-90 |
AvtoVAZ recommends changing the oil in the gearbox no later than 75 thousand km, but in practice it is better to change the oil after 50 thousand km.
Engine cooling system
The manufacturer recommends adding antifreeze or antifreeze to the engine cooling system. The volume of Priora coolant is 7.9 liters. It should be noted that antifreeze is filled at the Priora plant. Under no circumstances should you ever use water as a coolant, since when the air temperature drops, the cylinder head may defrost with dire consequences and costly repairs.
Fuel tank
The Priora's fuel tank capacity is 43 liters, which is quite enough for an engine capacity of 1.6 liters. AvtoVAZ recommends using only high-octane gasoline, namely AI-95. It should be noted that on a full tank the Priora can travel from 400 to 600 km, depending on driving style.
Hydraulic Brake System
Priora is equipped with a system with hydraulic brakes and ABS. The volume of Priora brake fluid is 1 liter. DOT-4 brake fluid. It is recommended to replace brake fluid every 2-3 years, as brake fluid tends to age.
Windshield washer reservoir
The Lada Priora washer reservoir contains 2.2 liters of special liquid for cleaning the windshield from dirt. It is necessary to use a special liquid that does not freeze down to -40 degrees. During summer time, filling with ordinary water is allowed.
We hope our article was useful to you.
How to replace coolant on a VAZ 2170-VAZ 2172?
1) At the beginning of the operation, drive the car into the inspection pit and wait until it has completely cooled down, because you need to replace the coolant on a cold engine, since when it is hot the liquid heats up to very high temperatures of about 90 degrees and if you drain such liquid you will get burned and therefore you need to wait until the engine has completely cooled down and only then proceed with the replacement.
2) As soon as you have waited until your engine has cooled down, proceed to the replacement itself, to do this, unscrew the cap on the expansion tank and then remove it (Indicated by the red arrow), thereby you will remove the pressure in the system and when you unscrew the drain plugs, the liquid will flow out not slowly, as usually happens if the plug is not unscrewed, but quickly.
Replacing coolant on Lada Priora
replacing antifreeze fluid
for Lada
Priora
- cheap, free delivery...
We fill the VAZ Lada Priora with antifreeze after installing the heating! Pour antifreeze Lada Priora.
After replacing the leaking radiator and installing an electric internal engine heater...
3) When the plug is unscrewed and removed, climb under the bottom of the car and unscrew all the bolts and nuts that secure the engine mudguard to the car, instead of the mudguard you may also have a crankcase protection installed, if so, remove it (On how to remove the protection , read the article: “Protecting the crankcase on a car”), you can, in principle, not remove it, but then the liquid will get on the mudguard or on the protection and thereby stain it, and in this case it will be inconvenient to drain the coolant.
4) Now take a wrench in your hands and look for the drain plug of the cooling jacket at the very bottom of the engine on the cylinder block (see photo 1) and unscrew it completely, replacing the container in advance because when the plug is unscrewed from the hole, some of the coolant will flow out , by the way, when it drains, wipe off with a rag all traces of liquid from the cylinder block that got on it, perform exactly the same operation with the plug on the cooling radiator, it has exactly the same plug, but it can be unscrewed by hand (see photo 2), so in advance Place a container under it and also unscrew the plug to drain all the liquid from the car radiator.
After draining the liquid, screw all the plugs back, namely the radiator plug and the engine cooling jacket plug, there is also a rubber ring on the radiator plug, so be careful not to lose it, and if it is deformed (torn, cracked), then replace it with a new one, one more thing, when all the liquid is drained, do not pour it out where living beings walk (Animals, that is, people as well), because the liquid is, firstly, very toxic and secondly, if it gets into a living being, death occurs, so be careful and better throw it away in a closed container far away from all living things!
1. After all the draining operations have been completed, proceed to pouring the liquid, to do this, first disconnect the coolant drain hose (Indicated by the red arrow, just do not confuse it with other hoses) from the fitting (Indicated by the blue arrow) of the throttle assembly and then immediately start pouring coolant into the expansion tank (This is the tank from which you unscrewed and removed the cap at the very beginning) and look at the MAX mark (marked on the tank) and on the hose, and when liquid starts flowing out of the hose, put it back in place immediately and secure its fastenings with a clamp, thanks to this you will rid the cooling system of air and the heater and the engine itself will heat up normally, but if air gets into the system, then consider that instead of liquid in the pipes there will be just air that will not cool the engine at all it won’t, and therefore it will get very hot near you.
2. When the hose is connected, continue to pour liquid into the tank to the level (to the MAX mark or rather), as soon as it is filled, close the cap and get into the car and start the engine, wait until the car warms up to operating temperature (until the fan turns on), if your fan is faulty, then just follow the indicator to see the operating temperature of the engine (for the Priora it is around 90-95 degrees), then turn off the car and wait until the engine becomes cold (Be sure to wait), as soon as it has cooled down, check the fluid level in the car's tank and, if necessary, bring it to normal.
When the engine is warm, turn the heater on full and feel with your hand what kind of air is coming out of it, if it’s cold, it means you have an air lock and you changed the fluid incorrectly, by the way, because of this air lock, your fan may not turn on when this happens you need to read about how to remove an air lock from the system in the article: “Removing an air lock in the cooling system of a VAZ”, by the way, even if everything is fine in your cooling system and the stove heats up normally too, this does not mean that there is no plug, it’s just that the stove can heat normally, but not as well as it previously did, so all the thick pipes of the cooling system (They can be seen in the diagram below, they are indicated by numbers: 4, 10, 13 and 18) are manually removed after you pour in the liquid and squeeze out, thereby removing all the air from the engine cooling system and the heater will work well and the car will practically not overheat (This is taking into account that your cooling system is working properly)!
For more detailed instructions on how to replace fluid in the cooling system of a car, see the video located just below, this video shows another car, so take it only approximately, and don’t do everything as they say and be sure to study the article, it applies specifically to 16 valves Prioram.
How to remove an air lock on a Priora
On a car, malfunctions occur in the cooling system, and an air lock may form. To remove air from the system, you need to use its hoses. This is done in one of two ways. In each case, you need to wait until the power plant has completely cooled down, and only then begin to troubleshoot the problem.
I Option:
It is best to wear thick gloves before work to avoid burns. Warm up the engine a little and be sure to turn off the car. Remove the tube and clamp from the heating when antifreeze flows. Put everything back in its rightful place and tighten the clamp again. Air will escape under the resulting pressure.
II Option:
A device such as the throttle assembly clamp needs to be loosened, then the tube must be removed from the heating. Next, open the lid of the special expansion tank of the cooling system located in the engine compartment, cover the neck with a clean rag and blow through it properly. You will see air coming out. You need to tighten the cap when the coolant appears directly.